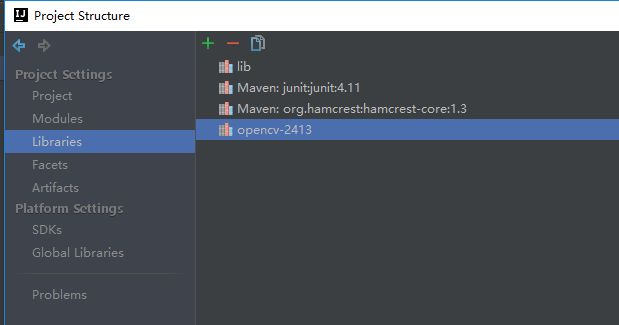
首先当然是需要安装opencv了,我用的是opencv2.4.13。下载完之后就可以直接安装了,安装过程也很简单,直接下一步下一步就好,我就不上图了。
接下来在opencv下找到jar包,比如我直接安装在c盘,我的jar包在C:\opencv\build\java中。
然后将jar包拷贝到lib目录中,并且在idea中配置
接着在opencv的路径下找到lbpcascade_frontalface.xml。比如我的就是C:\opencv\sources\data\lbpcascades。然后将其拷贝到src目录下。
这样该有的环境就已经搭建好了,就可以开始写代码了。
直接上代码
    public static void main(String[] args) {
        // Load the native library.
        System.loadLibrary(Core.NATIVE_LIBRARY_NAME);
        String url ="G:\\web\\uploadPicture\\src\\main\\resources\\assets\\4.jpg";
        new DetectFaceDemo().go(url,"G:\\1.jpg");
    }
    public void go(String srcFileName,String newPath) {

        Mat image = null;
        CascadeClassifier faceDetector = null;
        String xmlfilePath = DetectFaceDemo.class.getClassLoader().getResource("lbpcascade_frontalface.xml").getPath().substring(1);
        try {
            faceDetector = new CascadeClassifier(xmlfilePath);
            image = Highgui.imread(srcFileName);
        }catch (Exception e){
            e.printStackTrace();
        }
        // Detect faces in the image.
        // MatOfRect is a special container class for Rect.
        MatOfRect faceDetections = new MatOfRect();
        faceDetector.detectMultiScale(image, faceDetections);

        System.out.println(String.format("Detected %s faces", faceDetections.toArray().length));

        // Draw a bounding box around each face.
        for (Rect rect : faceDetections.toArray()) {
            Core.rectangle(image, new Point(rect.x, rect.y), new Point(rect.x + rect.width, rect.y + rect.height), new Scalar(0, 255, 0));
        }

//         Save the visualized detection.
        System.out.println(String.format("Writing %s", newPath));
        Highgui.imwrite(newPath, image);
    }
这样你就可以直接运行呢,但是会报错。
这时你可以打开edit,如图
修改vm option -Djava.library.path=C:\opencv\build\java\x64
接着再运行就可以了。
如果要部署到服务器上的话opencv的jar包一定要放在lib下,我之前在lib下新建了个文件夹吧jar包放在里面,一直报classnotfound的异常。
然后在tomcat的vm options中添加路径即可
但是这样有个致命的问题,他必须是一个文件路径,opencv没有提供对于流处理的封装,这不符合java的思想,也不满足项目的需求,尤其是现在许多的图片都是base64位的流。所以这又需要用stormcv这个jar包了了,再次感谢Apache。
这样我们就可以把识别的函数改为。
public void run(String imgStr) {
    BASE64Decoder decoder = new BASE64Decoder();
    Mat image = null;
    CascadeClassifier faceDetector = null;
    String xmlfilePath = DetectFaceDemo.class.getClassLoader().getResource("lbpcascade_frontalface.xml").getPath().substring(1);
    try {
        faceDetector = new CascadeClassifier(xmlfilePath);
        byte[] b = decoder.decodeBuffer(imgStr); //将base64位流解码为二进制文件
        image = ImageUtils.bytes2Mat(b);      //将二进制文件转化为mat
    }catch (Exception e){
        e.printStackTrace();
    }
    // Detect faces in the image.
    // MatOfRect is a special container class for Rect.
    MatOfRect faceDetections = new MatOfRect();
    faceDetector.detectMultiScale(image, faceDetections);
    System.out.println(String.format("Detected %s faces", faceDetections.toArray().length));
}
好了,大功告成


