spring cloud组件之ribbon+自定义IRule+fegin
相关阅读:
SpringBoot2.X快速构建和配置
微服务入门 spring cloud环境搭建
spring cloud组件之 eureka搭建、集群、心跳
经过前面几篇的学习我们已经学会了spring cloud的服务注册,服务管理,但是我们如何从Eureka 服务配置中心获取相应的服务,今天我们就学习下相关知识
1.ribbon是什么?
Spring Cloud Ribbon是基于Netflix Ribbon实现的一套客户端负载均衡的工具。
简单的说,Ribbon是Netflix发布的开源项目,主要功能是提供客户端的软件负载均衡算法,将Netflix的中间层服务连接在一起。Ribbon客户端组件提供一系列完善的配置项如连接超时,重试等。简单的说,就是在配置文件中列出Load Balancer(简称LB)后面所有的机器,Ribbon会自动的帮助你基于某种规则(如简单轮询,随机连接等)去连接这些机器。我们也很容易使用Ribbon实现自定义的负载均衡算法。
客户端负载均衡?? 服务端负载均衡??
我们用一张图来描述一下这两者的区别

这篇文章里面不会去解释nginx,如果不知道是什么的话,可以看看下面几个关于nginx的文档
Windows下Nginx的启动、停止、重启等命令
Linux下nginx的安装以及环境配置
nginx+tomcat 实现负载均衡部署
接着回来看看这张图
服务端的负载均衡是一个url先经过一个代理服务器(这里是nginx),然后通过这个代理服务器通过算法(轮询,随机,权重等等…)反向代理你的服务,l来完成负载均衡
而客户端的负载均衡则是一个请求在客户端的时候已经声明了要调用哪个服务,然后通过具体的负载均衡算法来完成负载均衡
2.如何使用:
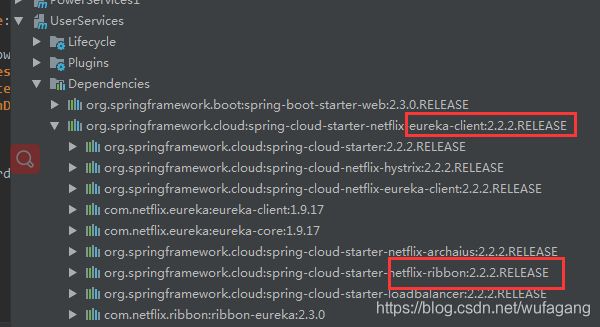
首先,我们还是要引入依赖,但是,eureka已经把ribbon集成到他的依赖里面去了,所以这里不需要再引用ribbon的依赖,如图:
要使用ribbon,只需要一个注解:
@Bean
@LoadBalanced
public RestTemplate restTemplate(){
    RestTemplate restTemplate = new RestTemplate();
    return restTemplate;
}
在RestTemplate上面加入@LoadBalanced注解,这样子就已经有了负载均衡, 怎么来证明?
我们这里现在启动了eureka集群(3个eureka) 和Power集群(2个power) 和一个服务调用者(User)

但是我们的User仅仅只需要调用服务,不需要注册服务信息,所以需要改一下配置文件:
配置什么意思就不做过多解释了,上面讲eureka的时候有讲到过
server:
  port: 8080
eureka:
  client:
    serviceUrl:
        defaultZone: http://localhost:3000/eureka,http://localhost:3001/eureka,http://localhost:3002/eureka  #eureka服务端提供的注册地址 参考服务端配置的这个路径
  instance:
    instance-id: user-1 #此实例注册到eureka服务端的唯一的实例ID
    prefer-ip-address: true #是否显示IP地址
    leaseRenewalIntervalInSeconds: 1 #eureka客户需要多长时间发送心跳给eureka服务器,表明它仍然活着,默认为30 秒 (与下面配置的单位都是秒)
    leaseExpirationDurationInSeconds: 3 #Eureka服务器在接收到实例的最后一次发出的心跳后,需要等待多久才可以将此实例删除,默认为90秒

spring:
  application:
    name: client-user #此实例注册到eureka服务端的name
然后启动起来的页面是这样子的
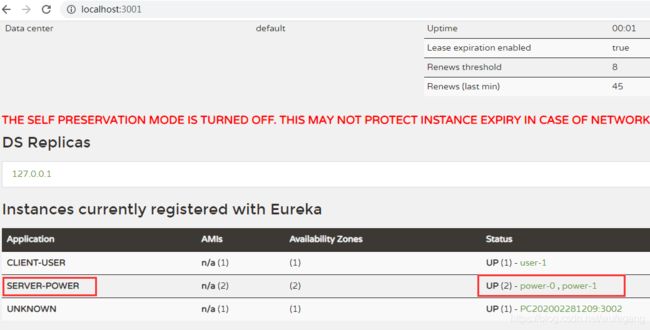
我们能看见 微服务名:SERVER-POWER 下面有2个微服务(power-0,power-1),现在我们来通过微服务名调用这个服务
这是我们的user项目的调用代码 :
controller代码修改
@RestController
public class UserController {

    @Autowired
    private RestTemplate restTemplate;
    private static final String POWER_URL="http://SERVER-POWER";

    @RequestMapping("/getUser.do")
    public R getUser(){
        return R.success().set("user","zhangsan");
    }

    @RequestMapping("/getPower.do")
    public R getPower(){
        return R.success("操作成功",restTemplate.getForObject(POWER_URL+"/getPower.do",Object.class));
    }

//    @RequestMapping("/getPower.do")
//    public R getPower(){
//        return R.success("操作成功",restTemplate.getForObject("http://localhost:8081/getPower.do",Object.class));
//    }

}
由原来的ip访问修改成Servername访问的方式,这就是为什么同一个服务的servername是一样的原因
我们来看看效果:


刷新会看到返回的data里面的值变化power和power1,默认负载均衡的策略是轮询
这里可能有点抽象,需要你们自己去写才能体会到,但是我们已经完成了负载均衡, 他默认的负载均衡是轮询策略,也就是一人一次,下一节我们来讲一下他还有哪些策略。
3.核心组件:IRule
IRule是什么? 它是Ribbon对于负载均衡策略实现的接口, 怎么理解这句话? 说白了就是你实现这个接口,就能自定义负载均衡策略, 自定义我们待会儿来讲, 我们先来看看他有哪些默认的实现
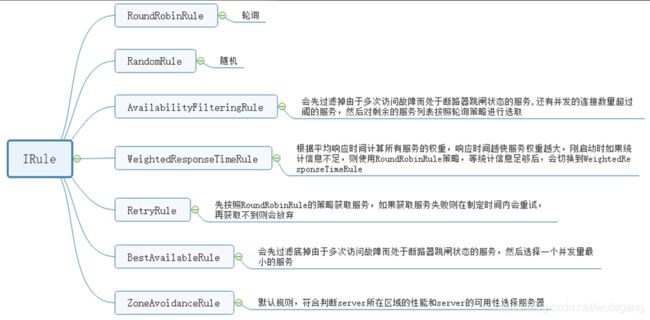
这里是ribbon负载均衡默认的实现, 由于是笔记的关系,这里不好测试,只能你们自己去测试一下了, 具体怎么使用呢?
看代码:
 @Bean
    public IRule iRule(){
        return  new RandomRule();
    }
在Spring 的配置类里面把对应的实现作为一个Bean返回出去就行了。
3.1 轮询的原理

3.2 RoundRobinRule源码
4.自定义负载均衡策略
我们刚刚讲过,只要实现了IRule就可以完成自定义负载均衡,至于具体怎么来,我们先看看他默认的实现
//
// Source code recreated from a .class file by IntelliJ IDEA
// (powered by Fernflower decompiler)
//

package com.netflix.loadbalancer;

import com.netflix.client.config.IClientConfig;
import edu.umd.cs.findbugs.annotations.SuppressWarnings;
import java.util.List;
import java.util.concurrent.ThreadLocalRandom;

public class RandomRule extends AbstractLoadBalancerRule {
    public RandomRule() {
    }

    @SuppressWarnings({"RCN_REDUNDANT_NULLCHECK_OF_NULL_VALUE"})
    public Server choose(ILoadBalancer lb, Object key) {
        if (lb == null) {
            return null;
        } else {
            Server server = null;

            while(server == null) {
                if (Thread.interrupted()) {
                    return null;
                }

                List<Server> upList = lb.getReachableServers();
                List<Server> allList = lb.getAllServers();
                int serverCount = allList.size();
                if (serverCount == 0) {
                    return null;
                }

                int index = this.chooseRandomInt(serverCount);
                server = (Server)upList.get(index);
                if (server == null) {
                    Thread.yield();
                } else {
                    if (server.isAlive()) {
                        return server;
                    }

                    server = null;
                    Thread.yield();
                }
            }

            return server;
        }
    }

    protected int chooseRandomInt(int serverCount) {
        return ThreadLocalRandom.current().nextInt(serverCount);
    }

    public Server choose(Object key) {
        return this.choose(this.getLoadBalancer(), key);
    }

    public void initWithNiwsConfig(IClientConfig clientConfig) {
    }
}
我们来看看这个类AbstractLoadBalancerRule
public abstract class AbstractLoadBalancerRule implements IRule, IClientConfigAware {

    private ILoadBalancer lb;

    @Override
    public void setLoadBalancer(ILoadBalancer lb){
        this.lb = lb;
    }

    @Override
    public ILoadBalancer getLoadBalancer(){
        return lb;
    }
}
这里我们能发现,还是我们上面所说过的 实现了IRule就能够自定义负载均衡即使是他默认的策略也实现了IRule
我们可以直接把代码copy过来改动一点:
package com.hrp.MyRule;

import com.netflix.client.config.IClientConfig;
import com.netflix.loadbalancer.AbstractLoadBalancerRule;
import com.netflix.loadbalancer.ILoadBalancer;
import com.netflix.loadbalancer.Server;

import java.util.List;
import java.util.Random;
import java.util.concurrent.ThreadLocalRandom;

/**
 * MySpringCloud
 *
 * @Title: com.hrp.MyRule
 * @Date: 2020/5/23 18:52
 * @Author: wfg
 * @Description:原来是纯随机策略 我们现在改为。
 * 如果一个下标已经被随机到了2次了,第三次还是同样的下标的话,那就再随机一次
 * @Version:
 */
public class MyRule extends AbstractLoadBalancerRule {

    private Random rand;
    private int lastIndex = -1;
    private int nowIndex = -1;
    private int skipIndex = -1;
    public MyRule() {
        rand = new Random();
    }


    @SuppressWarnings({"RCN_REDUNDANT_NULLCHECK_OF_NULL_VALUE"})
    public Server choose(ILoadBalancer lb, Object key) {
        if (lb == null) {
            return null;
        } else {
            Server server = null;

            while(server == null) {
                if (Thread.interrupted()) {
                    return null;
                }

                List<Server> upList = lb.getReachableServers();
                List<Server> allList = lb.getAllServers();
                int serverCount = allList.size();
                if (serverCount == 0) {
                    return null;
                }

                int index = this.chooseRandomInt(serverCount);


                System.out.println("当前下标为:"+index);
                if (skipIndex>=0&&index == skipIndex) {
                    System.out.println("跳过");
                    index = rand.nextInt(serverCount);
                    System.out.println("跳过后的下标:"+index);
                }
                skipIndex=-1;

                nowIndex = index;
                if (nowIndex == lastIndex) {
                    System.out.println("下一次需要跳过的下标"+nowIndex);
                    skipIndex = nowIndex;
                }
                lastIndex = nowIndex;


                server = (Server)upList.get(index);
                if (server == null) {
                    Thread.yield();
                } else {
                    if (server.isAlive()) {
                        return server;
                    }

                    server = null;
                    Thread.yield();
                }
            }

            return server;
        }
    }

    protected int chooseRandomInt(int serverCount) {
        return ThreadLocalRandom.current().nextInt(serverCount);
    }

    @Override
    public Server choose(Object key) {
        return this.choose(this.getLoadBalancer(), key);
    }

    @Override
    public void initWithNiwsConfig(IClientConfig clientConfig) {
    }
}
这里我们就把自己写的Rule给new出来交给spring 就好了
@Bean
    public IRule iRule(){
        //return  new RandomRule();
        return new MyRule();
    }
具体测试的话就不测试了, 那个效果放在笔记上不太明显,可以自己把代码copy过去测试一下
4.1 不通的服务使用不同的负载均衡策略
我们有很多服务,比如现在userclient要调用powerserver和orderserver但是这2个的负载均衡策略我想使用不同的策略,毕竟每个服务的速度,服务环境等等不同
The CustomConfiguration class must be a @Configuration class, but take care that it is not in a @ComponentScan for the main application context. Otherwise, it is shared by all the @RibbonClients. If you use @ComponentScan (or @SpringBootApplication), you need to take steps to avoid it being included (for instance, you can put it in a separate, non-overlapping package or specify the packages to scan explicitly in the @ComponentScan).
这是官网的一句话,大概的意思是: 这个自定义的配置类必须有@Configuration 注解,但是不能在主程序的上下文中,也就是说@ComponentScan不能扫码到,否则所有@RibbonClients将共享,如果你使用了@ComponentScan or @SpringBootApplication ,则需要采取步骤来避免包含它(例如,可以将它放在一个单独的、不重叠的包中,或者在@ComponentScan中指定要显式扫描的包)
第一步: 在com包外面创建配置类
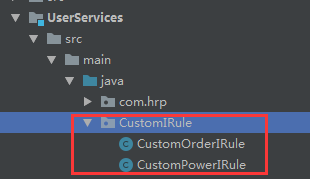
@Configuration
public class CustomOrderIRule {

    @Bean
    public IRule iRule(){
        return new MyRule();
    }
}
@Configuration
public class CustomPowerIRule {

    @Bean
    public IRule iRule(){
        return new RandomRule();
    }
}
第二步: 客户端启动添加注解

@RibbonClients({
        @RibbonClient(name="SERVER-ORDER",configuration = CustomOrderIRule.class),
        @RibbonClient(name="SERVER-POWER",configuration = CustomPowerIRule.class)
})
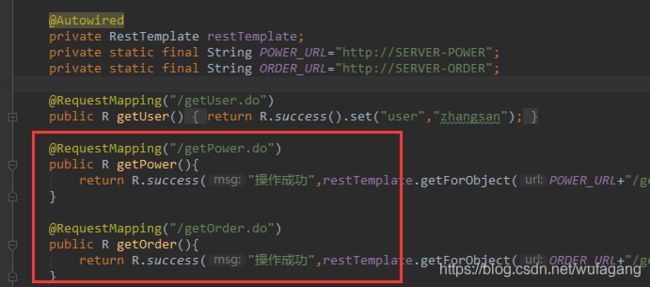
controller里面添加这2个方法,浏览器访问getPower.do和getOrder.do 自己测试是使用不同的策略
5.feign负载均衡
private static final String POWER_URL=“http://SERVER-POWER”;
private static final String ORDER_URL=“http://SERVER-ORDER”;
从上面的代码中我们也可以看出来,虽然RestTemplate已经封装了http请求,但是我们每次调用接口前我们还需要先写url,并且我们的服务会在不同的地方多次调用,感觉还是不够方便,feign就是为了让我们的RestTemplat更简便…
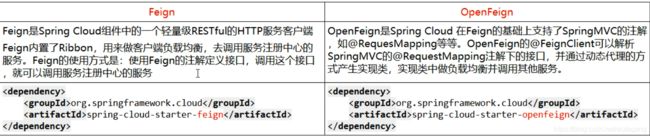
5.1 feign是什么
Feign是一个声明式WebService客户端。使用Feign能让编写Web Service客户端更加简单, 它的使用方法是定义一个接口,然后在上面添加注解,同时也支持JAX-RS标准的注解。Feign也支持可拔插式的编码器和解码器。Spring Cloud对Feign进行了封装,使其支持了Spring MVC标准注解和HttpMessageConverters。Feign可以与Eureka和Ribbon组合使用以支持负载均衡。
官网链接:https://github.com/spring-cloud/spring-cloud-openfeign
5.2 feign 能干什么
Feign旨在使编写Java Http客户端变得更容易。 前面在使用Ribbon+RestTemplate时,利用RestTemplate对http请求的封装处理,形成了一套模版化的调用方法。但是在实际开发中,由于对服务依赖的调用可能不止一处,往往一个接口会被多处调用,所以通常都会针对每个微服务自行封装一些客户端类来包装这些依赖服务的调用。所以,Feign在此基础上做了进一步封装,由他来帮助我们定义和实现依赖服务接口的定义。在Feign的实现下,我们只需创建一个接口并使用注解的方式来配置它(以前是Dao接口上面标注Mapper注解,现在是一个微服务接口上面标注一个Feign注解即可),即可完成对服务提供方的接口绑定,简化了使用Spring cloud Ribbon时,自动封装服务调用客户端的开发量。
feign和OpenFeign的区别
5.3 如何使用?
第一步:在客户端(User)引入依赖:
<dependency>
    <groupId>org.springframework.cloud</groupId>
    <artifactId>spring-cloud-starter-openfeign</artifactId>
</dependency>
第二步: 在启动类上面加上注解:@EnableFeignClients
第三步: 然后编写一个service接口加上@FeignClient()注解 参数就是你的微服务名字
package com.hrp.service;

import org.springframework.cloud.openfeign.FeignClient;
import org.springframework.web.bind.annotation.RequestMapping;

/**
 * MySpringCloud
 *
 * @Title: com.hrp.service
 * @Date: 2020/5/24 6:31
 * @Author: wfg
 * @Description:
 * @Version:
 */
@FeignClient(name = "SERVER-POWER")
public interface PowerServiceClinet {

    @RequestMapping("/getPower.do")
    public Object getPower();
}
下面是调用代码:

这里拿了RestTemplate做对比 可以看看2者区别
Feign集成了Ribbon
利用Ribbon维护了服务列表信息,并且融合了Ribbon的负载均衡配置,也就是说之前自定义的负载均衡也有效,这里需要你们自己跑一遍理解一下。而与Ribbon不同的是,通过feign只需要定义服务绑定接口且以声明式的方法,优雅而简单的实现了服务调用