Android >> 27. Android Studio 9-Patch 图片制作以及带气泡对话框的制作
9-Patch 图片制作
在AS 中右击图片,然后选择create 9-Patch file ,然后在图片当中,左边界和上边界是当图片伸展时所延申的部分,右边界和下边界是其中内容所填充的部分。
对于聊天中的气泡对话框,当然就需要使用9-Patch 文件了,我在这里也提供两个免抠素材:
绿色的:
↓
![]()
↑
这里还有一个白色的(右击,选择保存图片):
↓
![]()
↑
带气泡的对话框
添加依赖
既然是对话框,我们就可能用到RecyclerView,使用RecyclerView 就要添加依赖,具体方法见:
Android >> 26. RecyclerView(一)
编辑对话框主页面
对话框除了各自的信息之外,当然最基本还要有文字输入框以及一个发送按钮:
<LinearLayout
    xmlns:android="http://schemas.android.com/apk/res/android"
    xmlns:tools="http://schemas.android.com/tools"
    android:layout_width="match_parent"
    android:layout_height="match_parent"
    tools:context=".Chatting_View"
    android:background="@color/colorLittleGray"
    android:orientation="vertical">

    <androidx.recyclerview.widget.RecyclerView
        android:id="@+id/msg_chatting_recycler_view"
        android:layout_width="match_parent"
        android:layout_height="wrap_content"
        android:layout_weight="1">
    androidx.recyclerview.widget.RecyclerView>

    <LinearLayout
        android:layout_width="match_parent"
        android:layout_height="wrap_content">

        <EditText
            android:id="@+id/input_text"
            android:layout_width="0dp"
            android:layout_height="wrap_content"
            android:layout_weight="1"
            android:hint="Type something here"
            android:maxLines="2"
            tools:ignore="Suspicious0dp" />
        <Button
            android:id="@+id/send_button"
            android:layout_width="wrap_content"
            android:layout_height="wrap_content"
            android:text="Send"/>
    LinearLayout>
LinearLayout>
我们放置了一个RecyclerView,然后在其下面放置一个文本输入框和一个发送按钮。
编辑RecyclerView 子项
有了对话框的整体布局之后,当然就要编辑一下每个RecyclerView 的消息子项
<LinearLayout
    xmlns:android="http://schemas.android.com/apk/res/android"
    xmlns:tools="http://schemas.android.com/tools"
    android:orientation="vertical"
    android:layout_width="match_parent"
    android:layout_height="wrap_content"
    android:padding="10dp">

    <LinearLayout
        android:id="@+id/left_layout"
        android:layout_width="wrap_content"
        android:layout_height="wrap_content"
        android:layout_gravity="left"
        android:background="@drawable/left_white_msg"
        tools:ignore="RtlHardcoded">

        <TextView
            android:id="@+id/left_msg"
            android:layout_width="wrap_content"
            android:layout_height="wrap_content"
            android:gravity="center"
            android:layout_margin="10dp"
            android:textColor="#000"/>
    LinearLayout>

    <LinearLayout
        android:id="@+id/right_layout"
        android:layout_width="wrap_content"
        android:layout_height="wrap_content"
        android:layout_gravity="right"
        android:background="@drawable/right_green_msg"
        tools:ignore="RtlHardcoded">

        <TextView
            android:id="@+id/right_msg"
            android:layout_width="wrap_content"
            android:layout_height="wrap_content"
            android:gravity="center"
            android:layout_margin="10dp"
            android:textColor="#000"/>
    LinearLayout>
LinearLayout>
(在这里,为了美观,将接收和发送的消息分别设置为左对齐和右对齐)
为了方便之后的消息类型判断以及显示,我们将一个接收消息框和一个发送消息框作为一个子项体,在后续我们可以通过判断消息是接收进来的还是发送出去的从而选择显示哪个消息(setVisibility(View.VISIBLE)),而将另一个消息的控件设置为setVisibility(View.GONE)
定义消息实体类
现在有了对话框的整体布局和每个Item 子项的布局之后,我们就要开始对Item 子项的性质进行设置了。
在Activity 中定义一个消息的类:
public class Msg{
    public static final int TYPE_RECEIVED = 0;
    public static final int TYPE_SENT = 1;
    private String content;
    private int type;

    public Msg(String content, int type){
        this.content = content;
        this.type = type;
    }

    public String getContent(){
        return content;
    }

    public int getType(){
        return type;
    }
}
Msg 类中只有两个字段,content 表示消息的内容,type 表示消息的类型(TYPE_RECEIVED 或TYPE_SENT)
创建适配器类
用了RecyclerView,当然就还需要使用适配器了。
同样在Activity 的java 文件中
public static class MsgAdapter extends RecyclerView.Adapter<MsgAdapter.ViewHolder>{
    private List<Msg> mMsglist;

    static class ViewHolder extends RecyclerView.ViewHolder{
        LinearLayout leftLayout;
        LinearLayout rightLayout;
        TextView leftMsg;
        TextView rightMsg;

        public ViewHolder(View view){
            super(view);
            leftLayout = view.findViewById(R.id.left_layout);
            rightLayout = view.findViewById(R.id.right_layout);
            leftMsg = view.findViewById(R.id.left_msg);
            rightMsg = view.findViewById(R.id.right_msg);
        }
    }

    public MsgAdapter(List<Msg> msgList){
        mMsglist = msgList;
    }

    @NonNull
    @Override
    public ViewHolder onCreateViewHolder(@NonNull ViewGroup parent, int viewType) {
        View view = LayoutInflater.from(parent.getContext()).inflate
                (R.layout.msg_item, parent, false);
        return new ViewHolder(view);
    }

    @Override
    public void onBindViewHolder(@NonNull ViewHolder holder, int position) {
        Msg msg = mMsglist.get(position);
        /* 若收到消息,显示左边的消息布局,将右边的消息布局去除 */
        if(msg.getType() == Msg.TYPE_RECEIVED){
            holder.leftLayout.setVisibility(View.VISIBLE);
            holder.rightLayout.setVisibility(View.GONE);
            holder.leftMsg.setText(msg.getContent());
        }
        /* 若发送消息,则显示右边的消息布局,将左边的消息布局去除 */
        else if(msg.getType() == Msg.TYPE_SENT){
            holder.leftLayout.setVisibility(View.GONE);
            holder.rightLayout.setVisibility(View.VISIBLE);
            holder.rightMsg.setText(msg.getContent());
        }
    }

    @Override
    public int getItemCount() {
        return mMsglist.size();
    }
}
使用RecyclerView
现在有了适配器了,可以使用这个RecyclerView 了
先声明
private List<Msg> msgList = new ArrayList<>();
private EditText inputText;
private Button send;
private RecyclerView msgRecyclerView;
private MsgAdapter adapter;
最后在Activity 的onCreate() 方法中进行调用
@Override
protected void onCreate(Bundle savedInstanceState) {
super.onCreate(savedInstanceState);
setContentView(R.layout.activity_chatting__view);
initMsgs();
inputText = findViewById(R.id.input_text);
send = findViewById(R.id.send_button);
msgRecyclerView = findViewById(R.id.msg_chatting_recycler_view);
LinearLayoutManager layoutManager = new LinearLayoutManager(this);
msgRecyclerView.setLayoutManager(layoutManager);
adapter = new MsgAdapter(msgList);
msgRecyclerView.setAdapter(adapter);
send.setOnClickListener(new View.OnClickListener() {
@Override
public void onClick(View view) {
String content = inputText.getText().toString();
if(!content.isEmpty()){
Msg msg = new Msg(content, Msg.TYPE_SENT);
msgList.add(msg);
adapter.notifyItemInserted(msgList.size() - 1);
msgRecyclerView.scrollToPosition(msgList.size() - 1);
inputText.setText("");
}
}
});
}
private void initMsgs(){
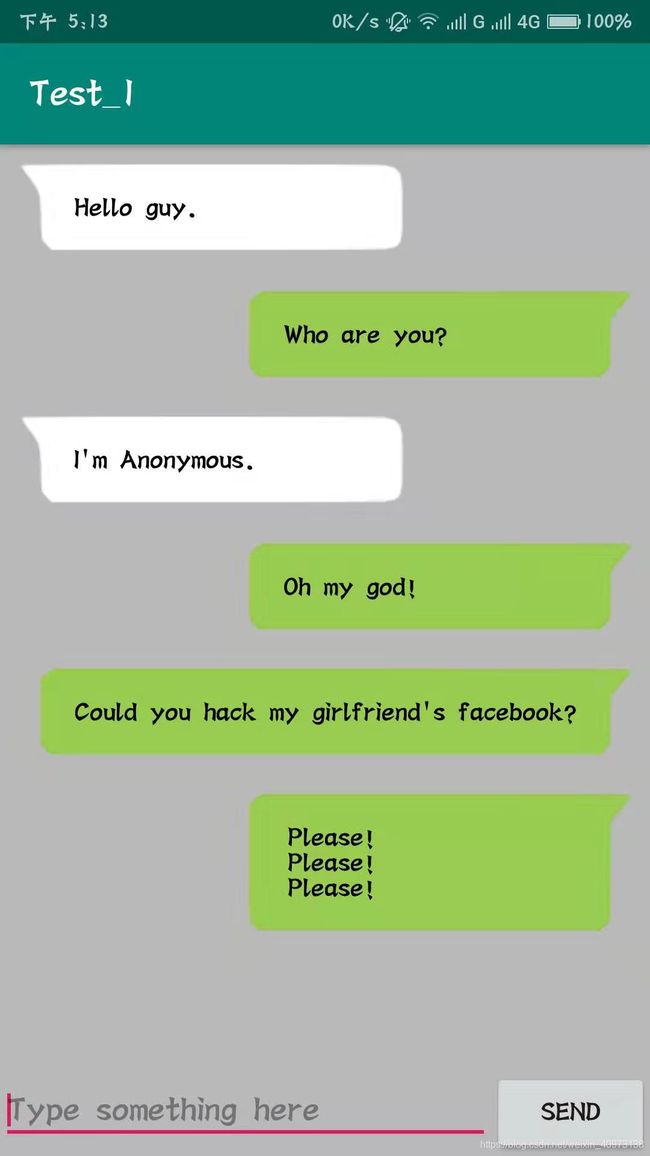
Msg msg1 = new Msg("Hello guy.", Msg.TYPE_RECEIVED);
msgList.add(msg1);
Msg msg2 = new Msg("Who are you?", Msg.TYPE_SENT);
msgList.add(msg2);
Msg msg3 = new Msg("I'm Anonymous.", Msg.TYPE_RECEIVED);
msgList.add(msg3);
}
我们先在initMsgs() 方法中初始化了几条信息用于显示。
然后配置RecyclerView,添加点击事件。在点击事件中,我们为要发送出去的信息创建一个Msg 对象,然后添加进msgList 列表当中。之后调用适配器的notifyItemInserted() 方法用于通知列表有新的数据插入,这样新增的消息才能够在RecyclerView 中显示。接着调用RecyclerView 的scrollToPosition() 方法将显示的数据滚动到最后一行。最后将文本输入框清空。