Springboot整合SpringSecurity 04-启用登出logout功能
Springboot整合SpringSecurity 04-启用登出logout功能
前面Springboot整合SpringSecurity 02-使用自定义登陆页面我们讲过了SpringSecurity的登陆功能。
本系列的按顺序写的,如果对于某些代码不清楚,请看下前面的几篇文章。
Springboot整合SpringSecurity 01-使用入门
Springboot整合SpringSecurity 02-使用自定义登陆页面
Springboot整合SpringSecurity 03-访问权限控制
Springboot整合SpringSecurity 04-启用登出logout功能
Springboot整合SpringSecurity 05-使用JDBC实现认证和授权
Springboot整合SpringSecurity 06-登陆扩展之自定义登陆验证逻辑
Springboot整合SpringSecurity 07-方法访问权限控制
本章我们继续讲解如何实现登出功能。
1.提供一个登出界面
我们在templates目录下面新建一个logout.html
注意: 这里我们的/logout是使用form表单post提交的。
在SpringSecurity的官方文档里面讲了:
The URL that triggers log out to occur (default is /logout).
If CSRF protection is enabled (default), then the request must also be a POST
当csrf保护是开启的状态的时候,我们的登出请求必须是POST。
2.创建一个跳转到登出页面的接口
package com.demo.spring.security.controller;

import org.springframework.stereotype.Controller;
import org.springframework.ui.Model;
import org.springframework.web.bind.annotation.GetMapping;
import org.springframework.web.bind.annotation.RequestParam;
import org.springframework.web.bind.annotation.ResponseBody;

/**
 * @author flw
 */
@Controller
public class HelloController {

    @GetMapping("hello")
    public String hello() {
        return "hello";
    }

    @GetMapping("login")
    public String login(@RequestParam(required = false) String error,
                        @RequestParam(required = false) String logout,
                        Model model) {
        if (error != null) {
            model.addAttribute("error", "error");
        }
        if (logout != null) {
            model.addAttribute("logout", "logout");
        }
        return "login";
    }

    @GetMapping("/common/hello")
    @ResponseBody
    public String common() {
        return "common";
    }

    @GetMapping("/user/hello")
    @ResponseBody
    public String user() {
        return "user";
    }

    @GetMapping("/admin/hello")
    @ResponseBody
    public String admin() {
        return "admin";
    }

    @GetMapping("logout")
    public String logout() {
        return "logout";
    }
}
3.配置WebSecurityConfig
@EnableWebSecurity
public class WebSecurityConfig extends WebSecurityConfigurerAdapter  {

    @Bean
    @Override
    public UserDetailsService userDetailsService() {
        InMemoryUserDetailsManager manager = new InMemoryUserDetailsManager();
        manager.createUser(User.withDefaultPasswordEncoder().username("user")
                .password("user").roles("USER").build());
        manager.createUser(User.withDefaultPasswordEncoder().username("admin")
                .password("admin").roles("ADMIN").build());
        manager.createUser(User.withDefaultPasswordEncoder().username("dba")
                .password("dba").roles("DBA","USER").build());
        return manager;
    }

    @Override
    protected void configure(HttpSecurity http) throws Exception {
        http
                .authorizeRequests()
                .antMatchers("/static/**", "/common/**", "/login/**").permitAll()
                .antMatchers("/admin/**").hasRole("ADMIN")
                .antMatchers("/user/**").access("hasRole('USER') and hasRole('DBA')")
                .anyRequest().authenticated()
                .and()
                .formLogin()
                .loginPage("/login")
                .successHandler(new MyAuthenticationSuccessHandler())
                .permitAll()
                .and()
                .logout()
//                .logoutUrl("/my/logout")
//                .logoutSuccessUrl("/my/index")
//                .logoutSuccessHandler(null)
                .invalidateHttpSession(true)
//                .addLogoutHandler(null)
                .deleteCookies("testCookie", "testCookie2");
    }
}
logout(): 开启logout功能,在使用WebSecurityConfigurerAdapter的时候默认开启。
logoutUrl("/my/logout"): 指定登出页面的处理地址。默认/logout
logoutSuccessUrl("/my/index"): 指定登出成功跳转页面。默认/login?logout。这里我们使用默认配置
logoutSuccessHandler(null): 指定登出成功后的处理handler,指定了这个的话,上面的logoutSuccessUrl()就失效了。
invalidateHttpSession(true): 指定是否在登出的时候使session失效,默认为true。
addLogoutHandler(null): 指定登出的处理handler。
deleteCookies(“testCookie”, “testCookie2”): 删除指定的cookie。
同时为了测试删除cookie,我在上面登陆的配置里面添加了一个successHandler(new MyAuthenticationSuccessHandler())。指定了这个的话和登出的成功handler一样,配置的successUrl就失效了。
MyAuthenticationSuccessHandler配置如下:
/**
 * @author flw
 */
public class MyAuthenticationSuccessHandler implements AuthenticationSuccessHandler {

    private RequestCache requestCache = new HttpSessionRequestCache();
    private RedirectStrategy redirectStrategy = new DefaultRedirectStrategy();

    public void onAuthenticationSuccess(HttpServletRequest request,
                                        HttpServletResponse response,
                                        Authentication authentication) throws IOException, ServletException {
       // 因为deleteCookies时候指定的path是这样的。所以这里我们的cookie也要加这个path,
        // 否则会删除失败
        String cookiePath = request.getContextPath() + "/";
        Cookie cookie = new Cookie("testCookie", "cookie");
        cookie.setMaxAge(60);
        cookie.setPath(cookiePath);
        Cookie cookie2 = new Cookie("testCookie2", "cookie2");
        cookie2.setMaxAge(60);
        cookie2.setPath(cookiePath);
        response.addCookie(cookie);
        response.addCookie(cookie2);
        SavedRequest savedRequest = requestCache.getRequest(request, response);
        // 当直接进入的登陆页面,跳转到hello.html。
        if (savedRequest == null) {
            redirectStrategy.sendRedirect(request, response, "/hello");
            return;
        }

        String targetUrl = savedRequest.getRedirectUrl();
        // 当访问其他路径被拦截到登陆页面,跳转到当时的页面。
        redirectStrategy.sendRedirect(request, response, targetUrl);
    }

}
因为使用了自己的SuccessHandler,默认的跳转就失效了,所以上面我们配置了跳转逻辑。具体我们会在后面的章节讲解。
4.开启项目
现在我们可以开始测试项目了。
首先,我们访问前面配置的不需要权限的接口
http://localhost:10022/security/common/hello
结果如下:

可以看到,这时候没有我们的测试testCookie。
然后我们直接访问/login登陆页面进行登陆
http://localhost:10022/security/login
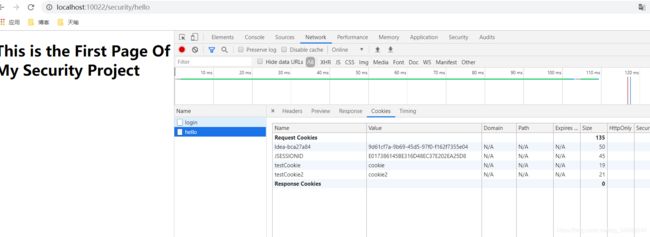
可以因为我们没有从其他页面被拦截到登陆页面,所以登陆成功后跳转到MyAuthenticationSuccessHandler指定的默认/hello页面去了。

可以看到请求里面已经携带了我们的测试cookie。
然后我们访问登出页面进行登出
http://localhost:10022/security/logout
