Springboot+Mybatis+MySql整合多数据源及其使用
Springboot+Mybatis+MySql整合多数据源及其使用
- 新手前来报道
- 创建Springboot项目
- 创建maven项目
- 修改POM文件、导入项目所需maven依赖
- 新建application.yml配置多数据源
- 新建Springboot主启动类
- 配置多数据源
- 新建数据库db1和db2
- 表对应的实体类
- 数据源枚举类
- 线程参数配置类
- 数据源动态切换类
- 数据源配置类
- 当前数据源注解
- 数据源注解截面AOP
- 数据库数据查询Dao
- 写个Controller简单测试一下
- 浏览器访问接口测试一下
- 怎么用
- 注解上场
- 示例代码
新手前来报道
毕业工作两年了,通过CSDN学到了不少知识,成长了不少,决定通过写博客的方式分享自己所学的知识,让其更加体系化。如有错误或有值得提升的地方,还请各位大佬多多指教。
创建Springboot项目
通过IDEA的快捷方式可以轻松创建一个新的Springboot项目,我们就不过多讨论这种方式了好吧。此处我们通过maven来进行Springboot新项目的创建。
创建maven项目
话不多说,直接上IDEA步骤
第一步:

第二步:
选择Maven,点击Next

第三步:
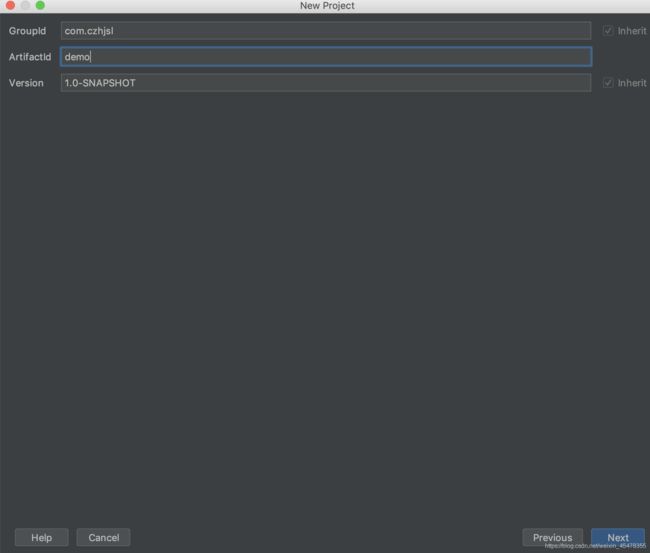
填写项目GroupId、ArtifactId,点击Next

第三步:
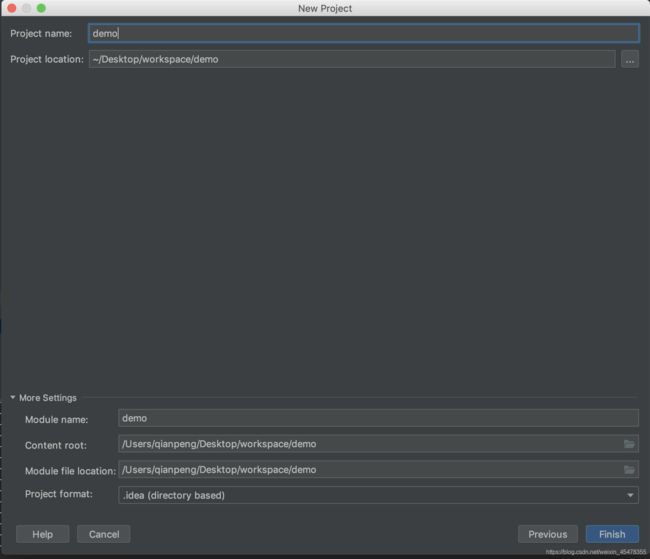
调整项目路径后点击finish

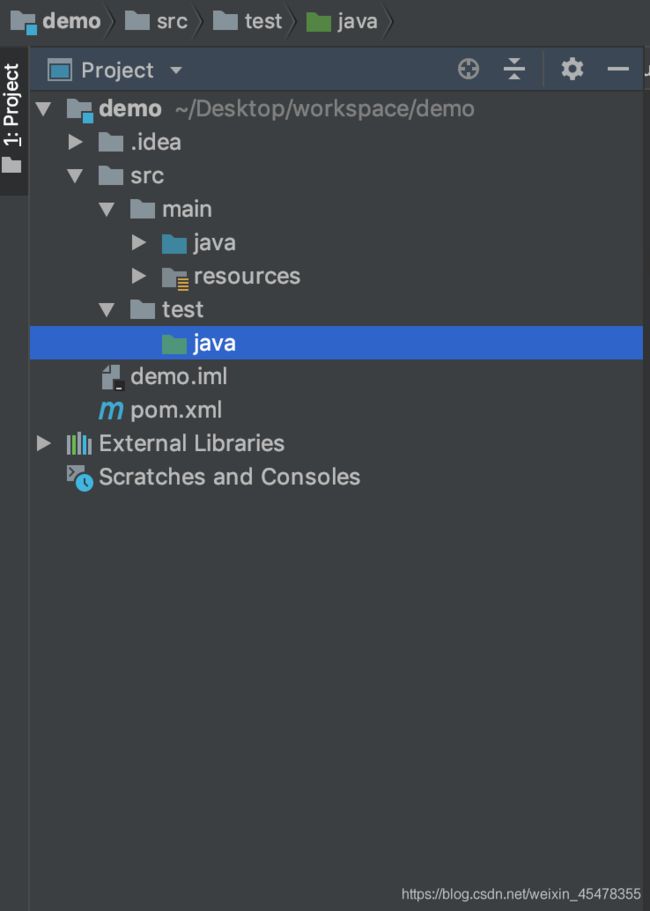
结果:
不出意外,应该生成如下项目结构,下一级无任何文件。我这边是已经写好所有代码的目录结构,所以会显示还有下一级。至此,maven项目创建成功。

修改POM文件、导入项目所需maven依赖
<project xmlns="http://maven.apache.org/POM/4.0.0"
         xmlns:xsi="http://www.w3.org/2001/XMLSchema-instance"
         xsi:schemaLocation="http://maven.apache.org/POM/4.0.0 http://maven.apache.org/xsd/maven-4.0.0.xsd">
    <modelVersion>4.0.0modelVersion>

    <groupId>com.czhjslgroupId>
    <artifactId>demoartifactId>
    <version>1.0-SNAPSHOTversion>
    <name>demoname>
    <description>Demo project for Spring Bootdescription>

    <parent>
        <groupId>org.springframework.bootgroupId>
        <artifactId>spring-boot-starter-parentartifactId>
        <version>2.1.11.RELEASEversion>
        <relativePath/>
    parent>

    <properties>
        <skipTests>trueskipTests>
        <java.version>1.8java.version>
        <log4j.version>1.2.17log4j.version>
        <fastjson.version>1.2.58fastjson.version>
        <druid.version>1.1.10druid.version>
        <mybatis.version>1.3.2mybatis.version>
    properties>

    <dependencies>
        <dependency>
            <groupId>org.springframework.bootgroupId>
            <artifactId>spring-boot-starter-webartifactId>
        dependency>
        <dependency>
            <groupId>org.springframework.bootgroupId>
            <artifactId>spring-boot-starter-jdbcartifactId>
        dependency>
        <dependency>
            <groupId>mysqlgroupId>
            <artifactId>mysql-connector-javaartifactId>
            <scope>runtimescope>
        dependency>
        <dependency>
            <groupId>org.mybatis.spring.bootgroupId>
            <artifactId>mybatis-spring-boot-starterartifactId>
            <version>${mybatis.version}version>
        dependency>
        <dependency>
            <groupId>org.springframework.bootgroupId>
            <artifactId>spring-boot-starter-aopartifactId>
        dependency>
        <dependency>
            <groupId>com.alibabagroupId>
            <artifactId>druid-spring-boot-starterartifactId>
            <version>${druid.version}version>
        dependency>
        <dependency>
            <groupId>org.springframework.bootgroupId>
            <artifactId>spring-boot-devtoolsartifactId>
            <scope>runtimescope>
            <optional>trueoptional>
        dependency>
        <dependency>
            <groupId>org.projectlombokgroupId>
            <artifactId>lombokartifactId>
            <optional>trueoptional>
        dependency>
        <dependency>
            <groupId>log4jgroupId>
            <artifactId>log4jartifactId>
            <version>${log4j.version}version>
        dependency>
        <dependency>
            <groupId>org.springframework.bootgroupId>
            <artifactId>spring-boot-starter-actuatorartifactId>
        dependency>
        <dependency>
            <groupId>org.springframework.bootgroupId>
            <artifactId>spring-boot-starter-testartifactId>
            <scope>testscope>
        dependency>
    dependencies>
    <build>
        <finalName>${project.artifactId}finalName>
        <plugins>
            <plugin>
                <groupId>org.springframework.bootgroupId>
                <artifactId>spring-boot-maven-pluginartifactId>
                <configuration>
                    <fork>truefork>
                configuration>
            plugin>
        plugins>
    build>
project>
新建application.yml配置多数据源
src/main/resources/application.yml
server:
  port: 8080
spring:
  datasource:
    #数据源1
    db1:
      driver-class-name: com.mysql.cj.jdbc.Driver
      url: jdbc:mysql://192.168.0.104:3306/db1?useUnicode=true&characterEncoding=utf-8&useSSL=false
      username: root
      password: mysqlpassword
      type: com.alibaba.druid.pool.DruidDataSource
    #数据源2
    db2:
      driver-class-name: com.mysql.cj.jdbc.Driver
      url: jdbc:mysql://192.168.0.104:3306/db2?useUnicode=true&characterEncoding=utf-8&useSSL=false
      username: root
      password: mysqlpassword
      type: com.alibaba.druid.pool.DruidDataSource
logging:
  level:
    root: info
新建Springboot主启动类
src/main/java/com/czhjsl/DemoSpringbootApplication.java
@SpringBootApplication
public class DemoSpringbootApplication {
    public static void main(String[] args) {
        SpringApplication.run(DemoSpringbootApplication.class, args);
    }
}
至此,通过maven方式创建Springboot项目完成
配置多数据源
新建数据库db1和db2
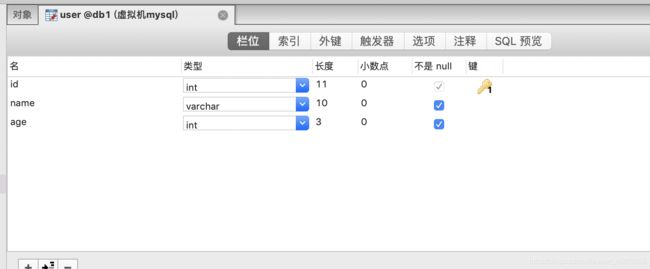
在mysql数据库新建两个数据库,作为不同的数据源,并在两个数据库中新建相同的user表,作为测试多数据源使用。表结构如下:

为了测试效果,插入了两条ID相同的数据


表对应的实体类
@Data
public class UserEntity implements Serializable {

    private static final long serialVersionUID = 2735011165270709366L;

    private int id;

    private String name;

    private int age;
}
数据源枚举类
定义一个枚举类来表示不同数据源
public enum DataSourceType {
    DB1,
    DB2
}
线程参数配置类
定义一个工具类来设置当前线程的数据源枚举值
public class DataSourceContextHolder {
    // 存放当前线程使用的数据源类型
    private static final ThreadLocal<DataSourceType> contextHolder = new ThreadLocal<>();

    // 设置数据源
    public static void setDataSource(DataSourceType type){
        contextHolder.set(type);
    }

    // 获取数据源
    public static DataSourceType getDataSource(){
        return contextHolder.get();
    }

    // 清除数据源
    public static void clearDataSource(){
        contextHolder.remove();
    }
}
数据源动态切换类
public class MyRoutingDataSource extends AbstractRoutingDataSource {
    @Override
    protected Object determineCurrentLookupKey() {
        return DataSourceContextHolder.getDataSource();
    }
}
数据源配置类
@Configuration
@MapperScan(basePackages = "com.czhjsl.dao")
public class DataSourceConfig {
    //数据库db1数据源
    @Bean(name = "dataSource1")
    @Primary
    @ConfigurationProperties("spring.datasource.db1")
    public DruidDataSource dataSource1 () {
        return DruidDataSourceBuilder.create().build();
    }

    //数据库db2数据源
    @Bean(name = "dataSource2")
    @ConfigurationProperties("spring.datasource.db2")
    public DruidDataSource dataSource2 () {
        return DruidDataSourceBuilder.create().build();
    }

    //将两个数据源添加至动态数据源配置类中
    @Bean(name = "myRoutingDataSource")
    public MyRoutingDataSource myRoutingDataSource (@Qualifier("dataSource1") DruidDataSource dataSource1,
                                                @Qualifier("dataSource2") DruidDataSource dataSource2) {
        Map<Object, Object> map = new HashMap<>();
        map.put(DataSourceType.DB1, dataSource1);
        map.put(DataSourceType.DB2, dataSource2);
        MyRoutingDataSource myRoutingDataSource = new MyRoutingDataSource();
        myRoutingDataSource.setTargetDataSources(map);
        myRoutingDataSource.setDefaultTargetDataSource(dataSource1);
        return myRoutingDataSource;
    }
    //数据源session
    @Bean(name = "sqlSessionFactory")
    public SqlSessionFactory sqlSessionFactory (@Qualifier("dataSource1") DruidDataSource dataSource1,
                                                @Qualifier("dataSource2") DruidDataSource dataSource2) throws Exception {
        SqlSessionFactoryBean factoryBean = new SqlSessionFactoryBean();
        factoryBean.setDataSource(myRoutingDataSource(dataSource1,dataSource2));
        // 设置mapper.xml的位置路径
        Resource[] resources = new PathMatchingResourcePatternResolver().getResources("classpath:mapper/*/*.xml");
        factoryBean.setMapperLocations(resources);
        return factoryBean.getObject();
    }

    //数据源事物配置
    @Bean
    public PlatformTransactionManager transactionManager (@Qualifier("myRoutingDataSource")MyRoutingDataSource myRoutingDataSource){
        return new DataSourceTransactionManager(myRoutingDataSource);
    }
}
当前数据源注解
@Target({ElementType.METHOD,ElementType.TYPE})
@Retention(RetentionPolicy.RUNTIME)
public @interface MyDataSource {
    DataSourceType value() default DataSourceType.DB1;
}
数据源注解截面AOP
@Aspect
@Component
public class DataSourceAspect {
    @Before("@annotation(ds)")
    public void beforeDataSource(MyDataSource ds) {
        DataSourceType value = ds.value();
        DataSourceContextHolder.setDataSource(value);
    }
    @After("@annotation(ds)")
    public void afterDataSource(MyDataSource ds){
        DataSourceContextHolder.clearDataSource();
    }
}
数据库数据查询Dao
注解方式实现(目的:查询db1中user数据)
@Mapper
@Repository
public interface User1Dao {

    @Select("select * from user where id=#{id}")
    UserEntity queryUserById (@Param("id") int id);

}
Mapper文件方式实现(目的:查询db2中user数据)
@Mapper
@Repository
public interface User2Dao {

    @Select("select * from user where id=#{id}")
    UserEntity queryUserById (@Param("id") int id);

}
<mapper namespace="com.czhjsl.dao.User2Dao">
    <select id="queryUserById" parameterType="int" resultType="com.czhjsl.entity.UserEntity">
        select * from user where id = #{id}
    select>
mapper>
写个Controller简单测试一下
为了简单测试一下是否能查询到两个数据源里的数据,直接在controller里注入dao接口,根据参数切换不同dao查询不同数据库
@Controller
@RequestMapping("user")
public class UserController {

    @Autowired
    private User1Dao user1Dao;
    @Autowired
    private User2Dao user2Dao;

    @RequestMapping("get")
    @ResponseBody
    public UserEntity getUser(int id, int DB){
        if (DB == 1)
            return user1Dao.queryUserById(id);
        else if (DB == 2)
            return user2Dao.queryUserById(id);
        else return null;
    }
}
浏览器访问接口测试一下
http://localhost:8080/user/get?id=1&DB=1

http://localhost:8080/user/get?id=1&DB=2

可以看到,并没有达到预期的效果。
怎么用
注解上场
之前写了这么多配置类,最后注解该找个地方给他安排一下了。
在Dao接口的方法上添加表明当前数据源的注解@MyDataSource
@Mapper
@Repository
public interface User1Dao {

    @MyDataSource(value = DataSourceType.DB1)
    @Select("select * from user where id=#{id}")
    UserEntity queryUserById (@Param("id") int id);

}
Mapper文件方式实现(目的:查询db2中user数据)
@Mapper
@Repository
public interface User2Dao {

    @MyDataSource(value = DataSourceType.DB2)
    @Select("select * from user where id=#{id}")
    UserEntity queryUserById (@Param("id") int id);

}
重启之后再通过链接访问接口
http://localhost:8080/user/get?id=1&DB=1
http://localhost:8080/user/get?id=1&DB=2
http://localhost:8080/user/get?id=1&DB=1


当当当当,大功告成!
示例代码
链接: 示例代码.