Nexus3.16简单配置及在ideal中的使用
接上篇的Centos7上Nexus私服搭建(maven本地中央仓库的简单安装运行)
一.设置自启动
参考:https://help.sonatype.com/repomanager3/installation/run-as-a-service
1.新建用户nexus
2.修改bin/nexus.rc为如下
run_as_user="nexus"
3.在路径下/etc/systemd/system/新建文件nexus.service内容如下:
[Unit]
Description=nexus service
After=network.target

[Service]
Type=forking
LimitNOFILE=65536
ExecStart=/home/nexus/soft/nexus/nexus-3.16.1-02/bin/nexus start
ExecStop=/home/nexus/soft/nexus/nexus-3.16.1-02/bin/nexus stop
User=nexus
Restart=on-abort

[Install]
WantedBy=multi-user.target
4.激活服务
sudo systemctl daemon-reload
sudo systemctl enable nexus.service
sudo systemctl start nexus.service
5.报错
期间遇到启动不能成功的问题,通过将自启动脚本中的start改为run,然后去路径/home/nexus/soft/nexus/sonatype-work/nexus3/log下查看日志,发现提示有些文件夹报权限问题,赋权给当前用户即可.
二.基本配置
1.端口设置
所在文件/home/nexus/soft/nexus/sonatype-work/nexus3/etc/nexus.properties/如下:
2.运行环境配置
所在文件/home/nexus/soft/nexus/nexus-3.16.1-02/bin/nexus.vmoptions
三.ideal中配置本地中央仓库
基本概念:本地仓库 本地中央仓库 镜像
1.配置setting文件
为ideal单独配置一个工作空间
在工作空间下新建setting文件主要修改点如下:
①.指定本地仓库地址
D:\ideaworkspace\MyMavenProject\maven-repository ②.配置用户上传依赖到中央仓库时使用的验证信息,一个用于release版的发布,一个用于snapshot版的发布
        nexus
	admin
	admin123


        snapshots
	admin
	admin123
③.配置镜像地址用于下载依赖包,一个release版的地址,一个snapshot版的地址(如果下一步的仓库地址直接指向本地中央仓库此处可不设置)
        nexus
	central
	http://192.168.25.101:8888/repository/maven-public/


        snapshots
        maven-snapshots
        http://192.168.25.101:8888/repository/maven-snapshots/
上面两个地址分别与nexus服务器上的仓库对应如下:
④.仓库地址配置
    central-repository


            central
            central
            http://192.168.25.101:8888/repository/maven-central/
            default

                true


                true
激活上面的配置
central-repository
2.配置项目中pom.xml文件
添加distributionManagement节点,用于发布当前工程到本地中央仓库,一个用于snapshot版,一个用于release版
        snapshots
        Nexus Snapshot
        http://192.168.25.101:8888/repository/maven-snapshots/


        nexus
        Nexus Sites
        http://192.168.25.101:8888/repository/maven-releases/
注意:
①.当前项目版本的设置,
如果带有SNAPSHOT则为快照版,会发布到上面snapshotRepository指定的仓库
默认为RELEASEb版,会发布到上面repository指定的仓库
②.发布到仓库需要验证,会根据此处id的值在setting中查找对应server节点声明的用户名和密码
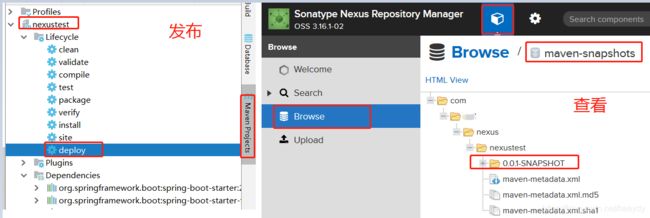
3.ideal中发布:执行deploy脚本即可发布到远程仓库
附件:
本文中涉及到的setting和pom.xml文件


