使用ES6的class语法写一个面向对象的简易轮播图插件
实现原理和思路
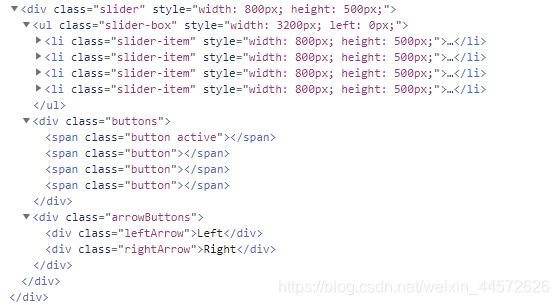
- 将一个轮播图分为三大部分slider(轮播展示区),slider-box(存储轮播图片的ul)slider-item(ul中得到每一个li,一个li存储一张图片)。
- 切换原理是通过修改slider-box的left实现切换,通过transition属性实现动画效果
最终效果
实现过程
一、CSS部分
这里是html结构,可以按照这个结构来编写css样式

css代码:
body,html{
  margin: 0;
  padding: 0;
}
ul,li{
  list-style: none;
  margin: 0;
  padding: 0;
}
.slider{
  overflow: hidden;
  position: relative;
}
.slider-box{
  position: absolute;
  left: 0;

}
.slider img{
  width: 100%;
  height: 100%;
}

.slider-box{
  display: flex;
  transition: 0.3s;
}
.slider .buttons{
  position: absolute;
  display: flex;
  bottom: 10px;
}

.slider .buttons .button{
  cursor:pointer;
  display: block;
  width: 15px;
  height: 15px;
  background: rgba(0, 0, 0, 0.671);
  margin-left: 10px;
}

.slider .buttons .active{
  background: rgba(201, 0, 0, 0.671);
}

.arrowButtons{
  width: 100%;
  color: white;
  font-size: 1.5em;
  font-weight: bolder;
  position: absolute;
  display: flex;
  top: calc(50% - 40px);
  justify-content: space-between;
}

.leftArrow, .rightArrow{
  border-radius: 50px;
  width: 80px;
  height: 80px;
  text-align: center;
  line-height: 80px;
  background: rgba(0, 0, 0, 0.5);
  cursor: pointer;
}
二、JavaScript部分
- 第一步编写构造函数
class Slider{
	constructor(settings) {
    const { width, height, showButtons, el, imgs, autoPlay, showArrowButtons } = settings;
    // 配置
    this.el = el; //需要生成轮播图的位置
    this.width = width || 600;	//轮播图的尺寸
    this.height = height || 400;
    this.showButtons =  showButtons!==undefined?showButtons:true;	//是否显示底部小按钮
    this.imgs = imgs;	// 轮播图片的地址

    this.currentIndex = 0; // 当前图片的索引
    this.autoPlay = autoPlay!==undefined?autoPlay:true; // 是否自动轮播
    this.showArrowButtons = showArrowButtons!==undefined?showArrowButtons:true; // 是否显示左右箭头
    // 储存dom元素
    this.buttons = [];	// 小按钮
    this.slider = null;	// 轮播展示区域
    this.sliderBox = null;	// 轮播ul
    this.arrowButtonBox = null	// 左右箭头的父级
    this.nextButton = null;	// 右箭头
    this.preButton = null	// 左箭头
    //初始化计时器
    this.timer = null;	// 控制自动轮播的定时器
  }

	......
}
- 初始化
init()
class Slider{
	...
	// 初始化dom元素
  init() {
    this.initSlider();
    this.initSliderBox();
    if (this.showButtons) {
      this.initButtons();
    }
    if (this.autoPlay) {
      this.startAutoPlay();
    }
    if(this.showArrowButtons){
      this.initArrowButtons()
    }
  }

  // 初始化轮播图展示区域
  initSlider() {
    let slider = document.createElement("div");
    slider.className = "slider";
    slider.style.width = this.width + "px";
    slider.style.height = this.height + "px";
    let box = document.querySelector(this.el);
    box.appendChild(slider);
    this.slider = slider;
  }

  // 初始化轮播ul
  initSliderBox() {
    let sliderBox = document.createElement("ul");
    sliderBox.className = "slider-box";
    sliderBox.style.width = this.width * this.imgs.length + "px";
    this.imgs.forEach((path) => {
      let li = document.createElement("li");
      li.className = "slider-item";
      li.style.width = this.width + "px";
      li.style.height = this.height + "px";
      let a = document.createElement("a");
      let img = document.createElement("img");
      img.setAttribute("src", path);
      a.appendChild(img);
      li.appendChild(a);
      sliderBox.appendChild(li);
    });
    this.sliderBox = sliderBox;
    this.slider.appendChild(sliderBox);
  }

  // 初始化小按钮
  initButtons() {
    if (!this.showButtons) return;
    let buttonBox = document.createElement("div");
    buttonBox.className = "buttons";
    this.imgs.forEach((img, i) => {
      let button = document.createElement("span");
      button.className = "button";
      if (i === 0) {
        button.className += " active";
      }
      buttonBox.appendChild(button);
      this.buttons.push(button);
    });
    this.slider.appendChild(buttonBox);
  }

  // 初始化箭头按钮
  initArrowButtons(){
    let arrowButtonBox = document.createElement('div')
    arrowButtonBox.className = 'arrowButtons'
    arrowButtonBox.style.width = this.width
    this.arrowButtonBox = arrowButtonBox
    let leftArrow = document.createElement('div')
    leftArrow.className = 'leftArrow'
    leftArrow.innerText = 'Left'
    this.preButton = leftArrow
    let rightArrow  = document.createElement('div')
    rightArrow.className = 'rightArrow'
    rightArrow.innerText = 'Right'
    this.nextButton = rightArrow
    arrowButtonBox.appendChild(leftArrow)
    arrowButtonBox.appendChild(rightArrow)
    this.slider.appendChild(arrowButtonBox)
  }
}
- 编写轮播代码
class Slider(){
  switchTo() {
    this.setActiveButton();
    this.sliderBox.style.left = -(this.currentIndex * this.width) + "px";
  }

  // 设置动态按钮
  setActiveButton() {
    this.buttons.forEach((b, i) => {
      if (i === this.currentIndex) {
        b.className += " active";
      } else {
        b.className = "button";
      }
    });
  }

   // 开启自动轮播
   startAutoPlay() {
    this.timer = setInterval(() => {
      if (this.currentIndex === this.imgs.length - 1) {
        this.currentIndex = 0;
      } else {
        this.currentIndex++;
      }
      this.switchTo(this.currentIndex);
    }, 2000);
  }
}
- 绑定事件
class Slider(){
  ...
	  // 监听按钮事件
  addButtonsListeners() {
    this.buttons.forEach((b, i) => {
      b.addEventListener("click", () => {
        this.currentIndex = i;
        this.switchTo();
      });
    });
  }
  // 监听slider事件
  addAutoPlayListeners() {
    this.slider.addEventListener('mouseover',()=>{
      clearInterval(this.timer)
      this.timer = null
    })
    this.slider.addEventListener('mouseout',()=>{
      this.startAutoPlay()
    })
  }
  // 箭头按钮监听函数
  addArrowButtonsListener(){
    this.nextButton.addEventListener('click', ()=>{
      this.currentIndex++
      if(this.currentIndex>this.imgs.length-1){
        this.currentIndex=0
      }
      this.switchTo()
    })
    this.preButton.addEventListener('click', ()=>{
      this.currentIndex--
      if(this.currentIndex<0){
        this.currentIndex=this.imgs.length-1
      }
      this.switchTo()
    })
    this.slider.addEventListener('mouseover',()=>{
      this.arrowButtonBox.style.display = 'flex'
    })
    this.slider.addEventListener('mouseout',()=>{
      this.arrowButtonBox.style.display = 'none'
    })
  }
}
- 在
init()函数中补充监听事件
  // 初始化
  init() {
    this.initSlider();
    this.initSliderBox();
    if (this.showButtons) {
      this.initButtons();
      this.addButtonsListeners(); // 底部小按钮相关事件
    }
    if (this.autoPlay) {
      this.startAutoPlay();
      this.addAutoPlayListeners() // 轮播相关事件
    }
    if(this.showArrowButtons){
      this.initArrowButtons()
      this.addArrowButtonsListener() // 箭头函数相关事件
    }
  }
三、使用轮播图插件
<head>
  <link rel="stylesheet" href="slider.css">
head>
<body>
  <div id="slider">div>
  <script src="slider.js">script>
  <script>
    let slider = new Slider({
      el: '#slider',
      width:800,
      height:500,
      showButtons: true,
      autoPlay: true,
      showArrowButtons: true
      imgs: [
        './images/1.jpg',
        './images/2.jpg',
        './images/3.jpg',
        './images/4.jpg'
      ]
    })
    slider.init()
  script>
body>
总结
今天在复习ES6中Class语法的时候,想要通过一个小案例来巩固一下知识,于是就有了这篇博客,无他,只是为了锻炼一下自己的编码能力。
实际上直接通过正常的面向过程配合html,css写一个轮播图效果并不难,相比于这篇博客所记录的可能还要简单许多。
