上文说的 要用现实现象来模拟解释 初始化 Direct3D11的过程, 呃... 暂时想不出了, 呵呵.
一般初始化 Direct3D11的过程, 分为四步:
bool Dx11DemoBase::Initialize( HINSTANCE hInstance, HWND hwnd)
{
    //store members
// steop 1. Description of driver types and feature level
    D3D_DRIVER_TYPE driverTypes[] = {
        D3D_DRIVER_TYPE_HARDWARE,
        D3D_DRIVER_TYPE_WARP,
        D3D_DRIVER_TYPE_SOFTWARE
    };
    unsigned int totalDriverTypes = ARRAYSIZE( driverTypes);

    D3D_FEATURE_LEVEL featureLevels[] = {
        D3D_FEATURE_LEVEL_11_0,
        D3D_FEATURE_LEVEL_10_1,
        D3D_FEATURE_LEVEL_10_0
    };
    unsigned int toalFeatureLevels = ARRAYSIZE( featureLevels);
// step 2. create swap-chain, device and context
    bool result = false;
    result = CreateDeviceAndSwapChain( totalDriverTypes, driverTypes, toalFeatureLevels, featureLevels);
    assert( result == true);
// step 3. set render target view
    result = SetRenderTargetView();
    assert( result == true);
// step 4. set viewport
result = SetViewport();
    assert( result == true);
  return LoadContent();
}
开始接触Direct3D时, 觉得很烦, 需要很多的初始化对象, 还不是最终直接需要的东西, 如 step 1 中定义的一些 的结构数据; 对这种初始化创建方式的不熟悉, 应该是我自己 接触的代码量还是相当匮乏, 了解的编程编码方式不了解; 还好 前段时间在进行 linux的网络库开发时, 用到了 pthread_mtex_t 锁, 创建方式如:
//声明并定义 mutex结构体
pthread_mutex_t  mutex;

//声明定义 mutex使用的 属性设置 结构体 attr
pthread_mutexattr_t attr;
attr.xxx = yyy;
attr.... = ...;

//使用 属性结构体attr 初始化 mutex
pthread_mutex_init( &mutex, &attr);
创建线程也有类似的方式:
//声明 线程tid
pthread_t    tid;

//声明 线程属性
pthread_attr_t    attr;
//接着是 该属性的设置
pthread_attr_init(&attr);
pthread_attr_setdetachstate(&attr,PTHREAD_CREATE_DETACHED);

//最后使用 属性结构体 attr 创建线程:
pthread_create(&tid, &attr, callback_func, NULL);
这种使用属性结构体来初始化/或创建 最终目的对象的方式 也可转换到 directx11 编程中; 如 swap-chain( 只不过这里不适用 attr类的 标记单词, 而使用 Desc后缀):
// step 2. create swap-chain(其实不仅仅是 swap-chain 啦, 还包括 device, context等, 这里是为了说明 attr/desc - creation的 编码方式)
bool Dx11DemoBase::CreateDeviceAndSwapChain( unsigned int totalDriverTypes, D3D_DRIVER_TYPE driverTypes[], unsigned int totalFeatureLevels, D3D_FEATURE_LEVEL featureLevels[])
{
    RECT dimensions;
    GetClientRect( hwnd_, &dimensions );
    unsigned int width = dimensions.right - dimensions.left;
    unsigned int height = dimensions.bottom - dimensions.top;

    //第一步声明并定义 swap-chain 描述:
    DXGI_SWAP_CHAIN_DESC swapChainDesc;
    ZeroMemory( &swapChainDesc, sizeof( swapChainDesc));
    swapChainDesc.BufferCount = 1;
    swapChainDesc.BufferDesc.Width = width;
    swapChainDesc.BufferDesc.Height = height;
    swapChainDesc.BufferDesc.Format = DXGI_FORMAT_R8G8B8A8_UNORM;
    swapChainDesc.BufferDesc.RefreshRate.Numerator = 60;
    swapChainDesc.BufferDesc.RefreshRate.Denominator = 1;
    swapChainDesc.BufferUsage = DXGI_USAGE_RENDER_TARGET_OUTPUT;
    swapChainDesc.OutputWindow = hwnd_;
    swapChainDesc.Windowed = true;
    swapChainDesc.SampleDesc.Count = 1;
    swapChainDesc.SampleDesc.Quality = 0;

    //第二步才是 创建 swap-chain, 不过
    unsigned int creationFlags = 0;
#ifdef _DEBUG
    creationFlags |= D3D11_CREATE_DEVICE_DEBUG;
#endif
    HRESULT result;
    unsigned int driver = 0;
    for( driver = 0; driver < totalDriverTypes; ++ driver)
    {
        //匹配当前的 driver 和 feature-level
        result = D3D11CreateDeviceAndSwapChain(
            0,
            driverTypes[ driver],
            0,
            creationFlags,
            featureLevels,
            totalFeatureLevels,
            D3D11_SDK_VERSION,
            &swapChainDesc, //就是这里啦
            &swapChain_,    //主体讨论的对象
            &d3dDevice_,    //同时被创建了
            &featureLevel_, //同时被创建了
            &d3dContext_    //同时被创建了
        );

        if( SUCCEEDED( result))
        {
            driverType_ = driverTypes[ driver];
            break;
        }
    }

    if( FAILED( result))
    {
        DXTRACE_MSG( "Failed to create the Direct3D device!");
        return false;
    }

    return true;
}
step 1. 进行 driver , feature-level 的确定;

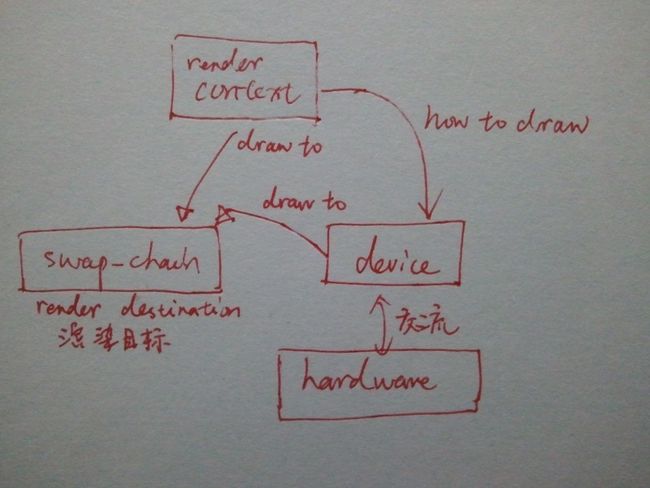
step 2. 产生 device, context 和 swap-chain . 这三者的关系( 通过书本的解释)如下图:
Direct3D device   : 与硬件设备通信
Direct3D context   : 告诉 Direct3D device 如何进行 draw
swap-chain      : Direct3D device 和 Direct3D context 绘制的 目的地
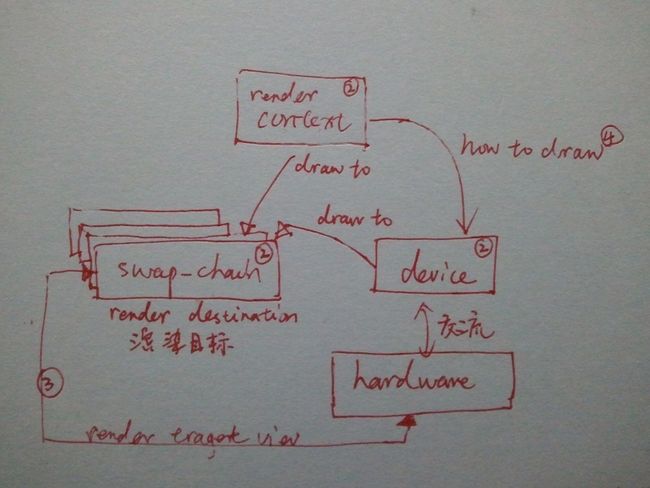
step 3. Set render target view
其实 第3步 还是没有超出上图的 描述, 这一步主要是针对 swap-chain 和 device 的设置( 按照我刚开始学习directx11 而言), 因为 swap-chain分为 多层, 需要设置一层为 候补层 backBufferTarget, 而 其中一层 用来实际直接渲染 , that are the primary and secondary rendering buffers of a swapchain. 如下图:
// step 4. set viewport
最后的 step 4. 也没有超出上述范围, 不下图所示的 ④ 标记, 用以设置 "how to draw", 主要是坐标 /大小:
整个新的 Dx11DemoBase 基类为:
#ifndef _DEMO_BASE_H_ #define _DEMO_BASE_H_ #include#include #include class Dx11DemoBase{ public: Dx11DemoBase(); virtual ~Dx11DemoBase(); bool Initialize( HINSTANCE hInstance, HWND hwnd); void Shutdown(); virtual bool LoadContent(); virtual void UnloadContent(); protected: HINSTANCE hInstance_; HWND hwnd_; D3D_DRIVER_TYPE driverType_; D3D_FEATURE_LEVEL featureLevel_; ID3D11Device *d3dDevice_; ID3D11DeviceContext *d3dContext_; IDXGISwapChain *swapChain_; ID3D11RenderTargetView *backBufferTarget_; unsigned int width_ ; unsigned int height_ ; private: bool CreateDeviceAndSwapChain( unsigned int totalDriverTypes, D3D_DRIVER_TYPE driverTypes[], unsigned int totalFeatureLevels, D3D_FEATURE_LEVEL featureLevels[]); bool SetRenderTargetView(); bool SetViewport(); }; #endif
最新文件: Dx11DemoBase.tar
这篇写到这里, 发现跟原文叙述的过程也差不多, 但通过自己的一层层刨释, 即使是仅仅 抄写代码, 但考虑到 本随笔还是可能会被其他 观客 看到, 不能马虎, 不能行文前后矛盾, 一深入思考, 反而提升了自己对 DirectX11 的认识.


