【小家Spring】Spring MVC执行流程 FrameworkServlet、DispatcherServlet源码分析(processRequest、doDispatch)
每篇一句
岁月是一张长长的考题,没人会比你交卷
相关阅读
【小家Spring】Spring IOC容器启动流程 AbstractApplicationContext#refresh()方法源码分析(一)
【小家Spring】Spring IOC容器启动流程 AbstractApplicationContext#refresh()方法源码分析(二)
【小家Spring】AbstractBeanFactory#getBean()、doGetBean完成Bean的初始化、实例化,以及BeanPostProcessor后置处理器源码级详细分析
【小家Spring】AbstractAutowireCapableBeanFactory#populateBean实现Bean的依赖注入(属性赋值)和initializeBean对Bean的初始化
【小家Spring】Spring解析@Configuration注解的处理器:ConfigurationClassPostProcessor(ConfigurationClassParser)
【小家Spring】细说Spring IOC容器的自动装配(@Autowired),以及Spring4.0新特性之【泛型依赖注入】的源码级解析
前言
本篇博文会更偏向于应用、更加宏观一些。
但是,本人还是建议,在了解Spring MVC的执行流程之前,先参阅这两篇博文:
【小家Spring】Spring容器(含父子容器)的启动过程源码级别分析(含web.xml启动以及全注解驱动,和ContextLoader源码分析)
【小家Spring】Spring MVC初始化(容器启动)时,Spring MVC九大组件初始化详解(Spring MVC的运行机制)
这样会有助于你更好的了解本文的一个流程,毕竟既会宏观的从步骤上去讲解,也会稍微微观(注意是稍微)的从源码角度去分析一下子
备注:如果你已经是高手,已经对Spring的容器管理比较了解了,请自行忽略~
Spring MVC的执行流程似乎是一个面必问的话题,面试官能通过一个问题,探底出你掌握此部分只是的深度甚至广度,此篇博文,不容忽视啊,哈哈~
问题剖细了,可以是:一个请求url是怎么样找到Handler进行处理的?拦截器为何preHandler顺序执行,postHandler就倒序执行呢?Spring MVC是怎么样去优雅的处理异常的?…、
请求处理流程
了解之前,我们先宏观看看,一个请求达到Spring MVC,它的一个处理流程。
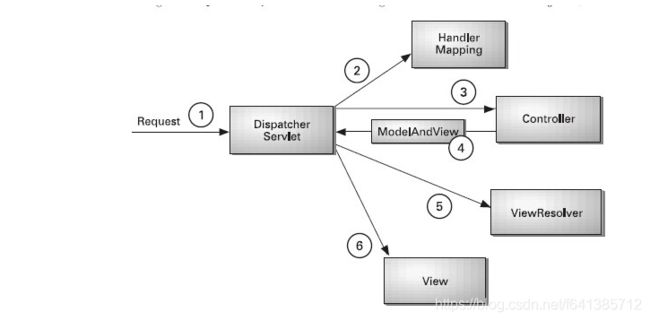
这里我首先贴上一张非常权威的流程图,也是Spring in Action这本书里提供的,springmvc的核心组件和请求处理流程

描述:
- DispatcherServlet是springmvc中的前端控制器(front controller),负责接收request并将request转发给对应的处理组件
- HanlerMapping是springmvc中完成url到controller映射的组件.DispatcherServlet接收request,然后从HandlerMapping查找处理request的controller
- Cntroller处理request,并返回ModelAndView对象,Controller是springmvc中负责处理request的组件(类似于struts2中的Action),ModelAndView是封装结果视图的组件
- ④ ⑤ ⑥:视图解析器解析ModelAndView对象并返回对应的视图给客户端
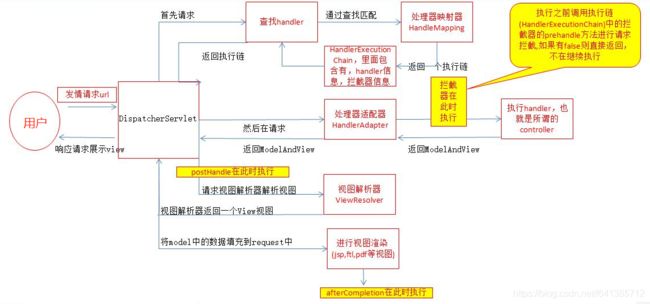
我个人认为,这本书里说的还是稍微抽象了点,有核心,但是缺失了一些较为细节的处理步骤。那么下面,我也贴出一副更加具象的图片,供以参考:

描述:
- 用户发送的所有请求(包括上传附件等任何请求),统一先交给
DispatcherServlet - 然后
DispatcherServlet调用合适的HandlerMapping,从而找到一个Handler(Controller中的方法以及拦截器),然后封装成HandlerExecutionChain返回给控制器DispatcherServlet - 调用处理器适配器
HandlerAdapter去执行handler(注意:执行之前需要先请求执行链中的拦截器的preHandle方法进行拦截,返回true就继续执行,返回false就不继续执行了) - 处理器执行完后,返回给控制器
DispatcherServlet一个ModelAndView(里面放有视图信息,模型数据信息)。 然后就执行postHandle方法 - 控制器调用视图解析器解析视图,根据逻辑名(xxxx/xxxx/xxxx.jsp)解析成真正的视图view(jsp,ftl等),然后返给控制器一个
View - 控制器开始渲染视图(视图渲染器可以是第三方或自己实现),然后将模型数据填充到request中。
DispatcherServlet响应用户请求,展示jsp等视图信息
备注:这里面还会设计到数据绑定、序列化、返序列化、异常处理等一些内容,那就是更加细节的东西了,那就以后专题再讲解。毕竟这一块对使用者来说还是非常的透明的。。。
DispatcherServlet执行流程的源码分析

我们从调用栈了可以很直接的看到调用关系。
我发的请求为:http://localhost:8080/demowar_war/controller/hello GET请求。
FrameworkServlet复写了service方法如下:
	/**
	 * Override the parent class implementation in order to intercept PATCH requests.
	 * 官方doc说得很清楚,复写是为了支持到PATCH请求(PATCH方法是新引入的,是对PUT方法的补充,用来对已知资源进行局部更新,目前使用得非常少,但SpringMVC也给与了支持)
	 * 备注:源生的servlet并不支持PATCH请求
	 */
	@Override
	protected void service(HttpServletRequest request, HttpServletResponse response)
			throws ServletException, IOException {

		HttpMethod httpMethod = HttpMethod.resolve(request.getMethod());
		if (httpMethod == HttpMethod.PATCH || httpMethod == null) {
			processRequest(request, response);
		}
		else {
			super.service(request, response);
		}
	}
因为我们是get请求,所以我们重点只需要看看子类复写的doGet方法即可。但是猛的发现,FrameworkServlet复写所有的doGet/doPost等等都交给了processRequest(request, response);方法。
doOptions稍微有点特殊,它处理一些是否允许跨域的问题,TRACE请求:主要用于测试或诊断,可忽略
FrameworkServlet#processRequest方法解析
该方法作为FrameworkServlet的实现,其实它也是提供了一些模版实现,最终会开口给子类的 模版设计模式,在Spring源码中大量存在。此处我们关注点在于:FrameworkServlet为我们做了哪些事情(相对来说比较复杂点)~
阅读前博文参考:
【小家Spring】Spring MVC之RequestContextHolder和LocaleContextHolder的使用详解以及使用误区
	protected final void processRequest(HttpServletRequest request, HttpServletResponse response)
			throws ServletException, IOException {

		long startTime = System.currentTimeMillis();
		// 记录抛出的异常~~~(若有的话)
		Throwable failureCause = null;

		//拿到之前的LocaleContext上下文(因为可能在Filter里已经设置过了)
		LocaleContext previousLocaleContext = LocaleContextHolder.getLocaleContext();
		// 以当前的request创建一个Local的上下文,后面会继续处理
		LocaleContext localeContext = buildLocaleContext(request);

		RequestAttributes previousAttributes = RequestContextHolder.getRequestAttributes();
		// 这里面build逻辑注意:previousAttributes若为null,或者就是ServletRequestAttributes类型,那就new ServletRequestAttributes(request, response);
		// 若不为null,就保持之前的绑定结果,不再做重复绑定了(尊重原创)
		ServletRequestAttributes requestAttributes = buildRequestAttributes(request, response, previousAttributes);

		// 拿到异步管理器。这里是首次获取,会new WebAsyncManager(),然后放到request的attr里面
		WebAsyncManager asyncManager = WebAsyncUtils.getAsyncManager(request);
		//这里需要注意:给异步上下文恒定注册了RequestBindingInterceptor这个拦截器(作用:绑定当前的request、response、local等)
		asyncManager.registerCallableInterceptor(FrameworkServlet.class.getName(), new RequestBindingInterceptor());

		//这句话很明显,就是吧request和Local上下文、RequestContext绑定
		initContextHolders(request, localeContext, requestAttributes);

		try {
			//模版设计模式:由子类DispatcherServlet去实现实际逻辑
			doService(request, response);
		} catch (ServletException | IOException ex) {
			failureCause = ex;
			throw ex;
		} catch (Throwable ex) {
			failureCause = ex;
			throw new NestedServletException("Request processing failed", ex);
		} finally { //这个时候已经全部处理完成,视图已经渲染了
			//doService()方法完成后,重置上下文,也就是解绑
			resetContextHolders(request, previousLocaleContext, previousAttributes);
			if (requestAttributes != null) {
				requestAttributes.requestCompleted();
			}

			//关键:不管执行成功与否,都会发布一个事件,说我处理了这个请求(有需要监听的,就可以监听这个事件了,每次请求都会有)
			publishRequestHandledEvent(request, response, startTime, failureCause);
		}
	}
publishRequestHandledEvent()发布请求处理完后的事件源码
	private void publishRequestHandledEvent(HttpServletRequest request, HttpServletResponse response,
			long startTime, @Nullable Throwable failureCause) {
		//当publishEvents设置为true和 webApplicationContext 不为空就会处理这个事件的发布
		if (this.publishEvents && this.webApplicationContext != null) {
			// 计算出处理该请求花费的时间
			long processingTime = System.currentTimeMillis() - startTime;
			this.webApplicationContext.publishEvent(
					//ServletRequestHandledEvent这个事件:目前来说只有这里会发布
					new ServletRequestHandledEvent(this,
							request.getRequestURI(), request.getRemoteAddr(),
							request.getMethod(), getServletConfig().getServletName(),
							WebUtils.getSessionId(request), getUsernameForRequest(request),
							processingTime, failureCause, response.getStatus()));
		}
	}
下面我们来写个监听器,专门来监听这个事件:
/**
 * 专门监听ServletRequestHandledEvent时间的监听器
 *
 * @author fangshixiang
 * @description //
 * @date 2019/2/28 12:10
 */
@Slf4j
@Component
public class ServletReqestHandledEventListener implements ApplicationListener<ServletRequestHandledEvent> {

    @Override
    public void onApplicationEvent(ServletRequestHandledEvent event) {
        //url=[/demowar_war/controller/hello]; client=[127.0.0.1]; method=[GET]; servlet=[dispatcher]; session=[null]; user=[null]; time=[143ms]; status=[OK]
        log.info(event.getDescription());
        log.info("返回状态码为:" + event.getStatusCode()); //返回状态码为:200
        log.info("异常信息为:" + event.getFailureCause()); //异常信息为:null
        log.info("处理请求耗时为:" + event.getProcessingTimeMillis()); //处理请求耗时为:143
        log.info("事件源为:" + event.getSource()); //事件源为:org.springframework.web.servlet.DispatcherServlet@3e7fadbb
    }
}
DispatcherServlet#doService方法解析
	@Override
	protected void doService(HttpServletRequest request, HttpServletResponse response) throws Exception {

		// 如果该请求是include的请求(请求包含) 那么就把request域中的数据保存一份快照版本
		// 等doDispatch结束之后,会把这个快照版本的数据覆盖到新的request里面去
		Map<String, Object> attributesSnapshot = null;
		if (WebUtils.isIncludeRequest(request)) {
			attributesSnapshot = new HashMap<>();
			Enumeration<?> attrNames = request.getAttributeNames();
			while (attrNames.hasMoreElements()) {
				String attrName = (String) attrNames.nextElement();
				if (this.cleanupAfterInclude || attrName.startsWith(DEFAULT_STRATEGIES_PREFIX)) {
					attributesSnapshot.put(attrName, request.getAttribute(attrName));
				}
			}
		}

		// Make framework objects available to handlers and view objects.
		// 说得很清楚,把一些常用对象放进请求域  方便Handler里面可以随意获取
		request.setAttribute(WEB_APPLICATION_CONTEXT_ATTRIBUTE, getWebApplicationContext()); //这个是web子容器哦
		request.setAttribute(LOCALE_RESOLVER_ATTRIBUTE, this.localeResolver);
		request.setAttribute(THEME_RESOLVER_ATTRIBUTE, this.themeResolver);
		request.setAttribute(THEME_SOURCE_ATTRIBUTE, getThemeSource());

		// 如果是重定向,放置得更多一些~~~~
		if (this.flashMapManager != null) {
			FlashMap inputFlashMap = this.flashMapManager.retrieveAndUpdate(request, response);
			if (inputFlashMap != null) {
				request.setAttribute(INPUT_FLASH_MAP_ATTRIBUTE, Collections.unmodifiableMap(inputFlashMap));
			}
			request.setAttribute(OUTPUT_FLASH_MAP_ATTRIBUTE, new FlashMap());
			request.setAttribute(FLASH_MAP_MANAGER_ATTRIBUTE, this.flashMapManager);
		}

		try {
			// DispatcherServlet最重要的方法,交给他去分发请求你、找到handler处理等等
			doDispatch(request, response);
		} finally {
			if (!WebAsyncUtils.getAsyncManager(request).isConcurrentHandlingStarted()) {
				// Restore the original attribute snapshot, in case of an include.
				//如果是include请求  会上上面的数据快照,重新放置到request里面去
				if (attributesSnapshot != null) {
					restoreAttributesAfterInclude(request, attributesSnapshot);
				}
			}
		}
	}
DispatcherServlet#doDispatch方法解析
首先根据请求的路径找到HandlerMethod(带有Method反射属性,也就是对应Controller中的方法),
然后匹配路径对应的拦截器,有了HandlerMethod和拦截器构造个HandlerExecutionChain对象。HandlerExecutionChain对象的获取是通过HandlerMapping接口提供的方法中得到。
有了HandlerExecutionChain之后,通过HandlerAdapter对象进行处理得到ModelAndView对象,HandlerMethod内部handle的时候,使用各种HandlerMethodArgumentResolver实现类处理HandlerMethod的参数(非常重要),使用各种HandlerMethodReturnValueHandler实现类处理返回值。 最终返回值被处理成ModelAndView对象,这期间发生的异常会被HandlerExceptionResolver接口实现类进行处理。
	protected void doDispatch(HttpServletRequest request, HttpServletResponse response) throws Exception {
		// 此处用processedRequest  需要注意的是:若是处理上传,processedRequest 将和request不再指向同一对象
		HttpServletRequest processedRequest = request;
		// 异常链处理器
		HandlerExecutionChain mappedHandler = null;
		boolean multipartRequestParsed = false;

		WebAsyncManager asyncManager = WebAsyncUtils.getAsyncManager(request);

		try {
			ModelAndView mv = null;
			Exception dispatchException = null;

			try {
				//checkMultipart 这个方法很重要,判断是否是上传需求。且看下面的具体分析:::
				//如果请求是POST请求,并且请求头中的Context-Type是以multipart/开头的就认为是文件上传的请求
				processedRequest = checkMultipart(request);
				// 标记一下:是否是文件上传的request了
				multipartRequestParsed = (processedRequest != request);

				// 找到一个处理器,如果没有找到对应的处理类的话,这里通常会返回404,如果throwExceptionIfNoHandlerFound属性值为true的情况下会抛出异常
				mappedHandler = getHandler(processedRequest);
				if (mappedHandler == null) {
					noHandlerFound(processedRequest, response);
					return;
				}

				// 根据实际的handler去找到一个合适的HandlerAdapter,方法详细逻辑同getHandler,因此不再解释
				HandlerAdapter ha = getHandlerAdapter(mappedHandler.getHandler());

				// 如果是GET请求,如果内容没有变化的话,则直接返回
				String method = request.getMethod();
				boolean isGet = "GET".equals(method);
				if (isGet || "HEAD".equals(method)) {
					long lastModified = ha.getLastModified(request, mappedHandler.getHandler());
					if (logger.isDebugEnabled()) {
						logger.debug("Last-Modified value for [" + getRequestUri(request) + "] is: " + lastModified);
					}
					if (new ServletWebRequest(request, response).checkNotModified(lastModified) && isGet) {
						return;
					}
				}

				// 这段代码很有意思:执行处理器连里的拦截器们,具体参阅下面详细:
				if (!mappedHandler.applyPreHandle(processedRequest, response)) {
					return;
				}

				// 真正执行我们自己书写的controller方法的逻辑。返回一个ModelAndView
				// 这也是一个很复杂的过程(序列化、数据绑定等等),需要后面专题讲解
				mv = ha.handle(processedRequest, response, mappedHandler.getHandler());

				// 如果异步启动了,这里就先直接返回了,也就不会再执行拦截器PostHandle之类的
				if (asyncManager.isConcurrentHandlingStarted()) {
					return;
				}

				//意思是:如果我们没有设置viewName,就采用默认的。否则采用我们自己的
				applyDefaultViewName(processedRequest, mv);
				// 执行所有的拦截器的postHandle方法,并且把mv给他
				// 这里有一个小细节:这个时候拦截器是【倒序】执行的
				mappedHandler.applyPostHandle(processedRequest, response, mv);
			} catch (Exception ex) { // 这两个catcher什么都不做,只是把异常记录下来
				dispatchException = ex;
			} catch (Throwable err) {
				dispatchException = new NestedServletException("Handler dispatch failed", err);
			}

			//这个方法很重要,顾名思义,他是来处理结果的,渲染视图、处理异常等等的  下面详细分解
			processDispatchResult(processedRequest, response, mappedHandler, mv, dispatchException);
		}
		catch (Exception ex) {
			triggerAfterCompletion(processedRequest, response, mappedHandler, ex);
		}
		catch (Throwable err) {
			triggerAfterCompletion(processedRequest, response, mappedHandler,
					new NestedServletException("Handler processing failed", err));
		}
		finally {
			if (asyncManager.isConcurrentHandlingStarted()) {
				// Instead of postHandle and afterCompletion
				if (mappedHandler != null) {
					mappedHandler.applyAfterConcurrentHandlingStarted(processedRequest, response);
				}
			}
			else {
				// Clean up any resources used by a multipart request.
				if (multipartRequestParsed) {
					cleanupMultipart(processedRequest);
				}
			}
		}
	}
checkMultipart
multipartResolver 在上篇博文初始化的时候讲过了,值是有可能为null的哦(如果你没有配置对应的Bean的话)
    protected HttpServletRequest checkMultipart(HttpServletRequest request) throws MultipartException {
   		// 配置了multipartResolver,并且是文件上传的请求  才会继续往下走
        if (this.multipartResolver != null && this.multipartResolver.isMultipart(request)) {
        	// 如果该请求已经是MultipartHttpServletRequest 那就输出一个日志走人
            if (WebUtils.getNativeRequest(request, MultipartHttpServletRequest.class) != null) {
                logger.debug("日志。。。");
            } else if (hasMultipartException(request) ) { // 判断是否有MultipartException 一般没有
                logger.debug("Multipart resolution failed for current request before - " +
                        "skipping re-resolution for undisturbed error rendering");
            } else {
                try {
                	// 这里特别注意,不管是哪种multipartResolver的实现,内部都是new了一个新的MultipartHttpServletRequest的实现类,所以不再指向原来的request了,所以一定要注意
                    return this.multipartResolver.resolveMultipart(request);
                } catch (MultipartException ex) {
                    if (request.getAttribute(WebUtils.ERROR_EXCEPTION_ATTRIBUTE) != null) {
                        logger.debug("Multipart resolution failed for error dispatch", ex);
                        // Keep processing error dispatch with regular request handle below
                    } else {
                        throw ex;
                    }
                }
            }
        }
        // If not returned before: return original request.
        // 如果前面没有返回,就原样返回,相当于啥都不做
        return request;
    }
这里需要注意的是:org.springframework.web.multipart.support.MultipartFilter,如果在web.xml中配置这个过滤器的话,则会在过滤器中提前判断是不是文件上传的请求,并将请求转换为MultipartHttpServletRequest类型。这个过滤器中默认使用的MultipartResolver为StandardServletMultipartResolver。
在CommonsMultipartResolver中有一个属性叫resolveLazily
private boolean resolveLazily = false;
这个属性值代表是不是延迟解析文件上传,默认为false。最终返回的是一个DefaultMultipartHttpServletRequest的类。这里有一个重要的方法是:parseRequest,这个方法干的事是解析文件上传请求。它的底层是commons-fileupload那一套,不同的是Spring在获取FileItem之后,又进行了一下封装,封装为便于Spring框架整合。tHandler**
	@Nullable
	protected HandlerExecutionChain getHandler(HttpServletRequest request) throws Exception {
		if (this.handlerMappings != null) {
			// 会把配置的所有的HandlerMapping 都拿出来查找,只要找到一个就返回
			for (HandlerMapping hm : this.handlerMappings) {
				if (logger.isTraceEnabled()) {
					logger.trace(
							"Testing handler map [" + hm + "] in DispatcherServlet with name '" + getServletName() + "'");
				}
				HandlerExecutionChain handler = hm.getHandler(request);
				if (handler != null) {
					return handler;
				}
			}
		}
		return null;
	}
SpringMVC默认加载三个请求处理映射类:RequestMappingHandlerMapping、SimpleUrlHandlerMapping、和BeanNameUrlHandlerMapping。
这三个类有一个共同的父类:AbstractHandlerMapping。在上面代码中hm.getHandler(request)这个getHandler方法在AbstractHandlerMapping中,它的子类都没有重写这个方法。因此我们含有必要去AbstractHandlerMapping这个类中看一下这个方法:
	@Override
	@Nullable
	public final HandlerExecutionChain getHandler(HttpServletRequest request) throws Exception {
		// 这个是留给子类去重写实现的:查找handler处理器的~ 比如根据URL去查找匹配等等
		// 备注:获取hadnler的过程,非常的复杂,这个必须后面单独的专题再说吧
		Object handler = getHandlerInternal(request);
		if (handler == null) {
			handler = getDefaultHandler();
		}
		if (handler == null) {
			return null;
		}

		// Bean name or resolved handler?
		if (handler instanceof String) {
			String handlerName = (String) handler;
			handler = obtainApplicationContext().getBean(handlerName);
		}

		//构建出一个处理器链   注意:和handler绑定了,并且内部还去拿到了所有的拦截器,然后添加到处理器连里面去   getHandlerExecutionChain() 方法自己去看,可以看明白
		HandlerExecutionChain executionChain = getHandlerExecutionChain(handler, request);
		//是不是cors请求,cors是跨域请求
		if (CorsUtils.isCorsRequest(request)) {
			CorsConfiguration globalConfig = this.globalCorsConfigSource.getCorsConfiguration(request);
			CorsConfiguration handlerConfig = getCorsConfiguration(handler, request);
			CorsConfiguration config = (globalConfig != null ? globalConfig.combine(handlerConfig) : handlerConfig);
			executionChain = getCorsHandlerExecutionChain(request, executionChain, config);
		}
		return executionChain;
	}
HandlerExecutionChain#applyPreHandle
	boolean applyPreHandle(HttpServletRequest request, HttpServletResponse response) throws Exception {
		HandlerInterceptor[] interceptors = getInterceptors();
		if (!ObjectUtils.isEmpty(interceptors)) {
			for (int i = 0; i < interceptors.length; i++) {
				HandlerInterceptor interceptor = interceptors[i];

				// 注意:如果是拦截器返回了false,就立马触发所有拦截器的AfterCompletion 方法。并且马上return false
				if (!interceptor.preHandle(request, response, this.handler)) {
					triggerAfterCompletion(request, response, null);
					return false;
				}
				this.interceptorIndex = i;
			}
		}
		return true;
	}
processDispatchResult
	private void processDispatchResult(HttpServletRequest request, HttpServletResponse response,
			@Nullable HandlerExecutionChain mappedHandler, @Nullable ModelAndView mv,
			@Nullable Exception exception) throws Exception {

		boolean errorView = false;

		//如果有异常,就进入异常处理逻辑,返回到异常页面
		if (exception != null) {
			// 含有异常页面视图的异常
			if (exception instanceof ModelAndViewDefiningException) {
				logger.debug("ModelAndViewDefiningException encountered", exception);
				mv = ((ModelAndViewDefiningException) exception).getModelAndView();
			} else {
				Object handler = (mappedHandler != null ? mappedHandler.getHandler() : null);
				//1、会执行所有的我们的自己配置(或者默认配置)了的HandlerExceptionResolver处理器
				//2、上面需要注意了,但凡处理方法返回的不是null,有mv的返回。那后面的处理器就不会再进行处理了。具有短路的效果,一定要注意  是通过null来判断的
				//3、处理完成后,得到error的视图mv,最后会设置一个viewName,然后返回出去
				mv = processHandlerException(request, response, handler, exception);
				errorView = (mv != null);
			}
		}

		// 若视图不为空,不为null,就开始执行render()方法,开始渲染视图了
		if (mv != null && !mv.wasCleared()) {
			render(mv, request, response);
			// 如果有错误视图,这里清除掉所有的请求域里的所有的错误属性
			if (errorView) {
				WebUtils.clearErrorRequestAttributes(request);
			}
		}

		//处理异步=========我们发现,它不执行后面的AfterCompletion方法了,注意一下即可
		if (WebAsyncUtils.getAsyncManager(request).isConcurrentHandlingStarted()) {
			// Concurrent handling started during a forward
			return;
		}

		// 执行拦截器的AfterCompletion 方法
		if (mappedHandler != null) {
			mappedHandler.triggerAfterCompletion(request, response, null);
		}
	}
至此,只剩一个视图渲染的方法:render()
	protected void render(ModelAndView mv, HttpServletRequest request, HttpServletResponse response) throws Exception {
		// 通过localeResolver吧local解析出来,放到response里面去
		Locale locale = (this.localeResolver != null ? this.localeResolver.resolveLocale(request) : request.getLocale());
		response.setLocale(locale);

		//==================视图:关键中的关键==================
		View view;
		String viewName = mv.getViewName();

		// 如果已经有viewName了(绝大多数情况)
		if (viewName != null) {
			// 视图解析器  根据String类型的名字,解析出来一个视图(视图解析器有多个)
			// 还是那个原理:只要有一个返回了不为null的,后面的就不会再解析了
			view = resolveViewName(viewName, mv.getModelInternal(), locale, request);
			// 如果解析不出来视图,那就抛出异常,说不能解析该视图
			if (view == null) {
				throw new ServletException("Could not resolve view with name '" + mv.getViewName() +
						"' in servlet with name '" + getServletName() + "'");
			}
		} else { //没有视图名称,但是必须有视图内容,否则抛出异常
			view = mv.getView();
			if (view == null) {
				throw new ServletException("ModelAndView [" + mv + "] neither contains a view name nor a " +
						"View object in servlet with name '" + getServletName() + "'");
			}
		}

		try {
			//设置响应马 status
			if (mv.getStatus() != null) {
				response.setStatus(mv.getStatus().value());
			}
			// 根据model里的数据,正式渲染(关于此部分逻辑,后续再说,也比较复杂)
			view.render(mv.getModelInternal(), request, response);
		} catch (Exception ex) {
			throw ex;
		}
	}
至此,整个Spring MVC处理请求的一个过程算是结束了
总结
本文从FrameworkServlet、DispatcherServlet源码处去跟踪比较具象的去描述了Spring MVC的一个执行过程。从中我们可以深刻感受到,Spring在考虑这些问题的时候还是非常全面的。
还能感受它里面使用得丝滑般的设计模式:门面模式、模版模式等等~~
Spring MVC作为现在Java Web开发中实际的规范,大多数时候我们只需要着眼关注我们自己书写的Controller本身了,但是如果我们想做一些优雅处理:全局异常处理、数据绑定处理、序列化反序列化定制化处理等等,理解这些工作流程,现在就如有神助了
关注A哥
| Author | A哥(YourBatman) |
|---|---|
| 个人站点 | www.yourbatman.cn |
| [email protected] | |
| 微 信 | fsx641385712 |
活跃平台 |
|
| 公众号 | BAT的乌托邦(ID:BAT-utopia) |
| 知识星球 | BAT的乌托邦 |
| 每日文章推荐 | 每日文章推荐 |