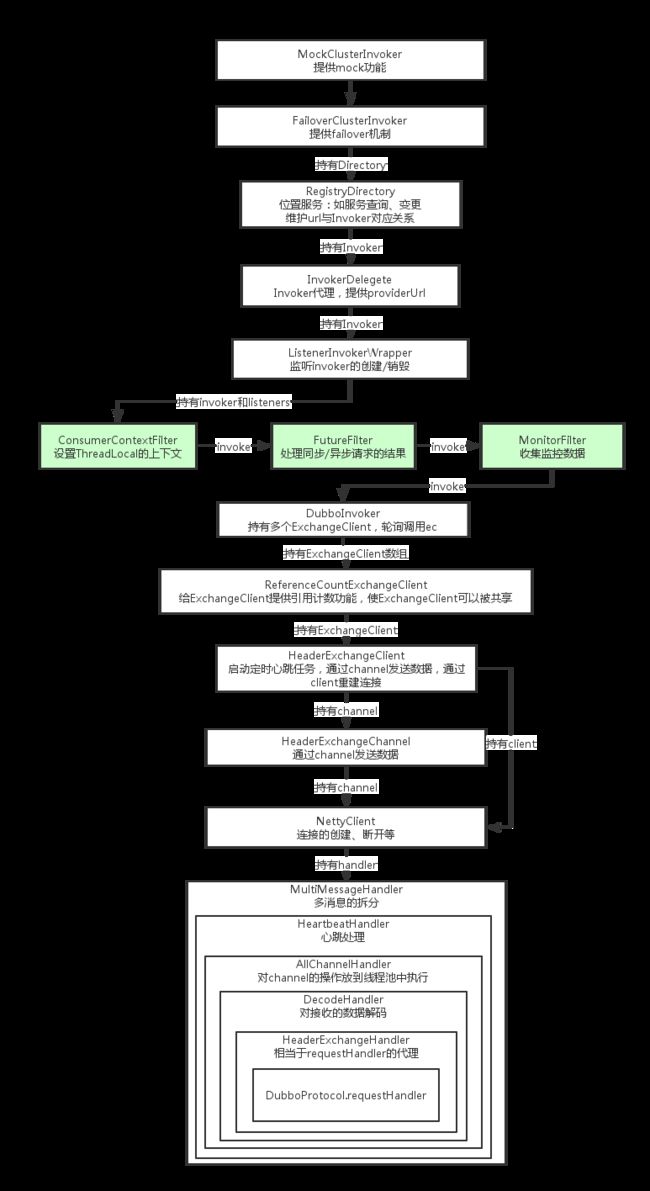
从前面一篇创建注册中心的流程当中,我们知道在从注册中心获取到provider的连接信息后,会通过连接创建Invoker。代码见com.alibaba.dubbo.registry.integration.RegistryDirectory的toInvokers方法:
// protocol实现为com.alibaba.dubbo.rpc.Protocol$Adpative,
//   之前已经讲过,这是dubbo在运行时动态创建的一个类;
// serviceType为服务类的class, 如demo中的com.alibaba.dubbo.demo.DemoService;
// providerUrl为服务提供方注册的连接;
// url为providerUrl与消费方参数的合并
invoker = new InvokerDelegete(protocol.refer(serviceType, url), url, providerUrl);
此处url的protocol为dubbo,因此protocol.refer最终会调用com.alibaba.dubbo.rpc.protocol.dubbo.DubboProtocol.refer,同时Protocol存在两个wrapper类,分别为:
com.alibaba.dubbo.rpc.protocol.ProtocolListenerWrapper、
com.alibaba.dubbo.rpc.protocol.ProtocolFilterWrapper。在dubbo中存在wrapper类的类会被wrapper实例包装后返回,因此在protocol.refer方法调用的时候,会先经过wrapper类。由于这里的复杂性,我们先不讲wrapper类里的refer实现,直接跳到DubboProtocol.refer。
url的demo如下:
dubbo://30.33.47.127:20880/com.alibaba.dubbo.demo.DemoService?anyhost=true&application=demo-consumer&check=false&....DubboProtocol的refer代码如下:
    public  Invoker refer(Class serviceType, URL url) throws RpcException {
        // 创建一个DubboInvoker
        DubboInvoker invoker = new DubboInvoker(serviceType, url, getClients(url), invokers);
        // 将invoker加入到invokers这个Set中
        invokers.add(invoker);
        return invoker;
    }

    // 创建连接Client,该Client主要负责建立连接,发送数据等
    private ExchangeClient[] getClients(URL url){
        //是否共享连接
        boolean service_share_connect = false;
        int connections = url.getParameter(Constants.CONNECTIONS_KEY, 0);
        // 如果connections不配置,则共享连接,否则每服务每连接,
        // 共享连接的意思是对于同一个ip+port的所有服务只创建一个连接,
        // 如果是非共享连接则每个服务+(ip+port)创建一个连接
        if (connections == 0){
            service_share_connect = true;
            connections = 1;
        }

        ExchangeClient[] clients = new ExchangeClient[connections];
        for (int i = 0; i < clients.length; i++) {
            if (service_share_connect){
                clients[i] = getSharedClient(url);
            } else {
                clients[i] = initClient(url);
            }
        }
        return clients;
    }

    /**
     *获取共享连接
     */
    private ExchangeClient getSharedClient(URL url){
        // 以address(ip:port)为key进行缓存
        String key = url.getAddress();
        ReferenceCountExchangeClient client = referenceClientMap.get(key);
        if ( client != null ){
            // 如果连接存在了则引用数加1,引用数表示有多少个服务使用了此client,
            // 当某个client调用close()时,引用数减一,
            // 如果引用数大于0,表示还有服务在使用此连接, 不会真正关闭client
            // 如果引用数为0,表示没有服务在用此连接,此时连接彻底关闭
            if ( !client.isClosed()){
                client.incrementAndGetCount();
                return client;
            } else {
//                logger.warn(new IllegalStateException("client is closed,but stay in clientmap .client :"+ client));
                referenceClientMap.remove(key);
            }
        }
        // 调用initClient来初始化Client
        ExchangeClient exchagneclient = initClient(url);
        // 使用ReferenceCountExchangeClient进行包装
        client = new ReferenceCountExchangeClient(exchagneclient, ghostClientMap);
        referenceClientMap.put(key, client);
        ghostClientMap.remove(key);
        return client;
    }

    /**
     * 创建新连接.
     */
    private ExchangeClient initClient(URL url) {
        // 获取client参数的值,为空则获取server参数的值,默认为netty
        String str = url.getParameter(Constants.CLIENT_KEY, url.getParameter(Constants.SERVER_KEY, Constants.DEFAULT_REMOTING_CLIENT));

        String version = url.getParameter(Constants.DUBBO_VERSION_KEY);
        // 如果是1.0.x版本,需要兼容
        boolean compatible = (version != null && version.startsWith("1.0."));
        // 加入codec参数,默认为dubbo,即DubboCodec
        url = url.addParameter(Constants.CODEC_KEY, Version.isCompatibleVersion() && compatible ? COMPATIBLE_CODEC_NAME : DubboCodec.NAME);
        //默认开启心跳,默认每60s发送一次心跳包
        url = url.addParameterIfAbsent(Constants.HEARTBEAT_KEY, String.valueOf(Constants.DEFAULT_HEARTBEAT));

        // BIO存在严重性能问题,暂时不允许使用
        if (str != null && str.length() > 0 && ! ExtensionLoader.getExtensionLoader(Transporter.class).hasExtension(str)) {
            throw new RpcException("Unsupported client type: " + str + "," +
                    " supported client type is " + StringUtils.join(ExtensionLoader.getExtensionLoader(Transporter.class).getSupportedExtensions(), " "));
        }

        ExchangeClient client ;
        try {
            //设置连接应该是lazy的
            if (url.getParameter(Constants.LAZY_CONNECT_KEY, false)){
                client = new LazyConnectExchangeClient(url ,requestHandler);
            } else {
                client = Exchangers.connect(url ,requestHandler);
            }
        } catch (RemotingException e) {
            throw new RpcException("Fail to create remoting client for service(" + url
                    + "): " + e.getMessage(), e);
        }
        return client;
    }
可以看到client创建由com.alibaba.dubbo.remoting.exchange.Exchanges处理,其代码如下:
    public static ExchangeClient connect(URL url, ExchangeHandler handler) throws RemotingException {
        if (url == null) {
            throw new IllegalArgumentException("url == null");
        }
        if (handler == null) {
            throw new IllegalArgumentException("handler == null");
        }
        url = url.addParameterIfAbsent(Constants.CODEC_KEY, "exchange");
        // 默认通过HeaderExchanger.connect创建
        return getExchanger(url).connect(url, handler);
    }

    public static Exchanger getExchanger(URL url) {
        // 默认type为header,因此默认的Exchanger为com.alibaba.dubbo.remoting.exchange.support.header.HeaderExchanger
        String type = url.getParameter(Constants.EXCHANGER_KEY, Constants.DEFAULT_EXCHANGER);
        return getExchanger(type);
    }

    public static Exchanger getExchanger(String type) {
        return ExtensionLoader.getExtensionLoader(Exchanger.class).getExtension(type);
    }
HeaderExchanger的connect代码如下:
    public ExchangeClient connect(URL url, ExchangeHandler handler) throws RemotingException {
        return new HeaderExchangeClient(Transporters.connect(url, new DecodeHandler(new HeaderExchangeHandler(handler))));
    }
这里简单介绍下这些类的作用:
HeaderExchangeHandler: ExchangeHandler的代理,HeaderExchangeHandler将数据封装后调用ExchangeHandler的连接/断开/发送请求/接收返回数据/捕获异常等方法;
DecodeHandler: 也是一个代理,在HeaderExchangeHandler的功能之上加入了解码功能;
Transporters.connect默认得到的是NettyTransporter:创建NettyClient, 该client是真正的发起通讯的类;
NettyClient在初始化的时候会做一些比较重要的事情,我们先看下:
    public NettyClient(final URL url, final ChannelHandler handler) throws RemotingException {
        super(url, wrapChannelHandler(url, handler));
    }

    protected static ChannelHandler wrapChannelHandler(URL url, ChannelHandler handler){
        // 设置threadName, 设置默认的threadpool类型,
        //
        url = ExecutorUtil.setThreadName(url, CLIENT_THREAD_POOL_NAME);
        url = url.addParameterIfAbsent(Constants.THREADPOOL_KEY, Constants.DEFAULT_CLIENT_THREADPOOL);
        // 对handler再次进行包装
        return ChannelHandlers.wrap(handler, url);
    }
我们知道前面得到的包装对象DecodeHandler,而ChannelHandlers.wrap对该Handler再次进行包装:
    protected ChannelHandler wrapInternal(ChannelHandler handler, URL url) {
        return new MultiMessageHandler(new HeartbeatHandler(ExtensionLoader.getExtensionLoader(Dispatcher.class)
                                        .getAdaptiveExtension().dispatch(handler, url)));
    }
这些包装类在之前handler的基础上加入的功能:
dispatch生成的对象AllChannelHandler:加入线程池,所有方法都异步的调用;
HeartbeatHeandler: 心跳包的发送和接收到心跳包后的处理;
MultiMessageHandler:如果接收到的消息为MultiMessage,则将其拆分为单个Message给后面的Handler处理;
在看看NettyClient在构造方法中还做了哪些操作:
    // 调用了父类com.alibaba.dubbo.remoting.transport.AbstractClient的构造方法
    public AbstractClient(URL url, ChannelHandler handler) throws RemotingException {
        ...省略部分代码...
        try {
            //
            doOpen();
        } catch (Throwable t) {
            close();
            throw new RemotingException(url.toInetSocketAddress(), null,
                                        "Failed to start " + getClass().getSimpleName() + " " + NetUtils.getLocalAddress()
                                        + " connect to the server " + getRemoteAddress() + ", cause: " + t.getMessage(), t);
        }
        try {
            // connect.
            connect();
            if (logger.isInfoEnabled()) {
                logger.info("Start " + getClass().getSimpleName() + " " + NetUtils.getLocalAddress() + " connect to the server " + getRemoteAddress());
            }
        } catch (RemotingException t) {
            if (url.getParameter(Constants.CHECK_KEY, true)) {
                close();
                throw t;
            } else {
                // 如果check为false,则连接失败时Invoker依然可以创建
                logger.warn("Failed to start " + getClass().getSimpleName() + " " + NetUtils.getLocalAddress()
                             + " connect to the server " + getRemoteAddress() + " (check == false, ignore and retry later!), cause: " + t.getMessage(), t);
            }
        } catch (Throwable t){
            close();
            throw new RemotingException(url.toInetSocketAddress(), null,
                    "Failed to start " + getClass().getSimpleName() + " " + NetUtils.getLocalAddress()
                    + " connect to the server " + getRemoteAddress() + ", cause: " + t.getMessage(), t);
        }

        ...省略部分代码...
    }
可以看到在构造方法处已经开始创建连接,netty如何创建连接此处不再详细介绍,可以看看之前的netty介绍。需要注意的时连接失败的时候,如果check参数为false则Invoker依然可以创建,否则在初始化阶段会报异常。
回过头来看看HeaderExchangeClient,改类创建了一个发送心跳包的定时任务:
    public HeaderExchangeClient(Client client){
        if (client == null) {
            throw new IllegalArgumentException("client == null");
        }
        this.client = client;
        this.channel = new HeaderExchangeChannel(client);
        String dubbo = client.getUrl().getParameter(Constants.DUBBO_VERSION_KEY);
        // 默认为60秒发一次心跳包,如果连续3个心跳包无响应则表示连接断开
       this.heartbeat = client.getUrl().getParameter( Constants.HEARTBEAT_KEY, dubbo != null && dubbo.startsWith("1.0.") ? Constants.DEFAULT_HEARTBEAT : 0 );
        this.heartbeatTimeout = client.getUrl().getParameter( Constants.HEARTBEAT_TIMEOUT_KEY, heartbeat * 3 );
        if ( heartbeatTimeout < heartbeat * 2 ) {
            throw new IllegalStateException( "heartbeatTimeout < heartbeatInterval * 2" );
        }
        startHeatbeatTimer();
    }

    private void startHeatbeatTimer() {
        stopHeartbeatTimer();
        if ( heartbeat > 0 ) {
            heatbeatTimer = scheduled.scheduleWithFixedDelay(
                    new HeartBeatTask( new HeartBeatTask.ChannelProvider() {
                        public Collection getChannels() {
                            return Collections.singletonList( HeaderExchangeClient.this );
                        }
                    }, heartbeat, heartbeatTimeout),
                    heartbeat, heartbeat, TimeUnit.MILLISECONDS );
        }
    }
我们知道,在socket通讯时,数据发送方和接收方必须建立连接,而建立的连接是否可用,为了探测连接是否可用,可以通过发送简单的通讯包并看是否收到回包的方式,这就是心跳。如果没有心跳包,则很有可能连接的一方已经断开或者中间线路故障,双方都不知道这种情况。 因此心跳包很有必要引入。心跳包的实现比较简单,这里简单介绍下,不再贴具体代码:通过拦截(代理)所有的发送/接收数据的方法,记录下最后一次read(接收数据)、write(发送数据)的时间,如果都大于心跳的时间阈值(如上面的60s)则发送一条数据给对方,该数据的格式不重要,只要有心跳的标识(即对方可以解析出这是一个心跳包)即可,对方接收到数据以后也会返回一个应答的包,如果发送方接收到回包,则最后一次read时间将会被充值为当前时间,表示连接未断开。如果发送方一直未收到回包,则指定时间(如上面的60s)后再次发送心跳包。如果多次(如上面的3次)发送均未收到回包(心跳超时),则判断连接已经断开。此时根据应用的需求断开连接或者重新连接。在dubbo中,如果心跳超时则进行重连。
除了心跳以外,我们可以看到HeaderExchangeChannel对client再次进行了封装,它的作用是将要发送的实际数据封装成com.alibaba.dubbo.remoting.exchange.Request对象。
最终获得的HeaderExchangeChannel被封装到HeaderExchangeClient中,传入到DubboInvoker,最终DubboProtocol.refer返回了DubboInvoker。但流程还未结束,还记得我们一开头提起的wrapper类吧。下面来看看这两个类还做了哪些操作。
DubboProtocol.refer执行后,进入到ProtocolFilterWrapper,其refer代码如下:
    public  Invoker refer(Class type, URL url) throws RpcException {
        if (Constants.REGISTRY_PROTOCOL.equals(url.getProtocol())) {
            return protocol.refer(type, url);
        }
        // protocol为dubbo时执行到这里
        return buildInvokerChain(protocol.refer(type, url), Constants.REFERENCE_FILTER_KEY, Constants.CONSUMER);
    }

    private static  Invoker buildInvokerChain(final Invoker invoker, String key, String group) {
        // 初始的last为刚刚创建的DubboInvoker
        Invoker last = invoker;
        // 加载group为consumer的Filter,加载到的Filter依次为:
        // com.alibaba.dubbo.rpc.filter.ConsumerContextFilter
        // com.alibaba.dubbo.rpc.protocol.dubbo.filter.FutureFilter
        // com.alibaba.dubbo.monitor.support.MonitorFilter
        List filters = ExtensionLoader.getExtensionLoader(Filter.class).getActivateExtension(invoker.getUrl(), key, group);
        if (filters.size() > 0) {
            // filter从最后一个开始依次封装,最终形成一个链,调用顺序为filters的顺序
            for (int i = filters.size() - 1; i >= 0; i --) {
                final Filter filter = filters.get(i);
                final Invoker next = last;
                last = new Invoker() {

                    public Class getInterface() {
                        return invoker.getInterface();
                    }

                    public URL getUrl() {
                        return invoker.getUrl();
                    }

                    public boolean isAvailable() {
                        return invoker.isAvailable();
                    }

                    public Result invoke(Invocation invocation) throws RpcException {
                        return filter.invoke(next, invocation);
                    }

                    public void destroy() {
                        invoker.destroy();
                    }

                    @Override
                    public String toString() {
                        return invoker.toString();
                    }
                };
            }
        }
        return last;
    }
再看看ProtocolListenerWrapper:
    public  Invoker refer(Class type, URL url) throws RpcException {
        if (Constants.REGISTRY_PROTOCOL.equals(url.getProtocol())) {
            return protocol.refer(type, url);
        }
        return new ListenerInvokerWrapper(protocol.refer(type, url),
                Collections.unmodifiableList(
                        ExtensionLoader.getExtensionLoader(InvokerListener.class)
                        .getActivateExtension(url, Constants.INVOKER_LISTENER_KEY)));
    }

    // ListenerInvokerWrapper构造方法
    public ListenerInvokerWrapper(Invoker invoker, List listeners){
        if (invoker == null) {
            throw new IllegalArgumentException("invoker == null");
        }
        this.invoker = invoker;
        this.listeners = listeners;
        if (listeners != null && listeners.size() > 0) {
            for (InvokerListener listener : listeners) {
                if (listener != null) {
                    try {
                        // 直接触发referred方法
                        listener.referred(invoker);
                    } catch (Throwable t) {
                        logger.error(t.getMessage(), t);
                    }
                }
            }
        }
    }
listener在consumer初始化和destroy时生效,不影响正常的执行,默认情况下listeners为空。
到这里InvokerDelegete的生成基本上完成了,结合第一篇consumer的介绍,我们可以得到下图(后续我们再讲讲各个类的具体实现):
