死磕spring源码:4.spring的AOP是如何实现的
死磕源码:4.spring的AOP是如何实现的
- 一. 前言
- 二.什么叫做AOP?
- 三.spring的AOP的应用
- 四.spring的AOP的实现机制
- 1.解析aop:aspectj-autoproxy标签
- (1)自定义命名空间【aop】处理器-AopNamespaceHandler
- (2)自定义标签【aspectj-autoproxy】解析器-AspectJAutoProxyBeanDefinitionParser
- 2.创建AOP代理对象
- (1)深究AnnotationAwareAspectJAutoProxyCreator对象
- (2)AOP生成代理类
- (2.1)获取增强方法和增强器
- (2.2)创建代理类
- 2) 接口代理
- 2) CGLIB动态代理
- 五.反思与总结
- 1.JDK动态代理和CGLIB动态代理有什么区别
- 2.什么情况下会使用JDK动态代理和CGLIB代理
一. 前言
AOP是spring的一个核心功能之一,当我们需要将一些行为中的公共的逻辑抽离出来,然而这些行为不具备继承的关系的时候,那么这个时候AOP的作用就显现出来了,比如说日志系统,异常处理系统等等,如果说将这些逻辑糅合在业务代码中,那么这个就会导致代码及其难以维护。
二.什么叫做AOP?
说来话长,大家可参考这篇文章的解释:https://blog.csdn.net/q982151756/article/details/80513340,一句话***AOP(面向切面编程)是一种编程规范***。AOP采用了预编译和动态代理等手段,实现了代码的低耦合,提高了代码的可重用性。

这张图也是引自上边那篇文章,在AOP里边有几个非常重要的概念需要理解。上图是一个简单金融公司得业务图,有一个业务需求,就是在用户贷款申请,贷款管理,入出金管理的时候增加一个操作日志监控,对照着上图,我们来对下边几个概念逐一做一个解释,概念比较绕,大家要多揣摩几遍
- Joinpoint:连接点,就是对应上图贷款申请,贷款管理,入出金管理业务,这些业务在程序中的表现就是一个方法的调用,在代码中所谓的Joinpoint指的就是我们的方法,是允许申明切入点和通知的地方。
- Pointcut:切入点,就是针对Joinpoint进行一定的逻辑关联,申明Advice发生的地方。比如说上图Pointcut申明了贷款申请,贷款管理,入出金管理业务会做日志增强处理,加入再来一个还贷管理,那么没有申明,则不会进行增强处理
- Advice:通知,即针对满足Pointcut的地方做增强处理。
- Aspect:切面,就是关注节点的模块化,是Pointcut和Advice的集合
- Target:目标,是***真正逻辑实现的地方,被织入的类***。
- Proxy:代理,将切面应用于目标对象生成的代理对象
- Weaving:织入,这是一个很重要的概念,它指的是***将切面应用于目标对象生成代理对象的过程***。
三.spring的AOP的应用
具体的应用这篇文章不做过多的赘述,大家可以参照这一片博文:https://blog.csdn.net/qq_41615095/article/details/81240372。
四.spring的AOP的实现机制
1.解析aop:aspectj-autoproxy标签
可以看到想让AOP生效,必须要在spring的配置文件中添加aop:aspectj-autoproxy申明,这样aop才会生效。这个标签明显是属于一个自定义的标签,之前我们在学习spring是如何解析xml标签的时候就说过,默认的标签有import,beans,bean和alias四个。那么这自定义的标签是如何解析的呢?
(1)自定义命名空间【aop】处理器-AopNamespaceHandler
要解析aspectj-autoproxy这个自定义节点,那么必须要注册解析这个节点的解析器,通过全局搜索“aspectj-autoproxy”关键字,我们可以在spring的源码中找到它是在这个类中注册了这个节点的解析器
public class AopNamespaceHandler extends NamespaceHandlerSupport {
    public AopNamespaceHandler() {
    }
    public void init() {
        this.registerBeanDefinitionParser("config", new ConfigBeanDefinitionParser());
        this.registerBeanDefinitionParser("aspectj-autoproxy", new AspectJAutoProxyBeanDefinitionParser());
        this.registerBeanDefinitionDecorator("scoped-proxy", new ScopedProxyBeanDefinitionDecorator());
        this.registerBeanDefinitionParser("spring-configured", new SpringConfiguredBeanDefinitionParser());
    }
}
OKOK,找到这个地方就太好了,终于找到下手的地方了,解析aspectj-autoproxy节点的解析器叫做AspectJAutoProxyBeanDefinitionParser,接下来就很好找下一步的逻辑了。spring在AOP的命名空间处理类AopNamespaceHandler中注册了aspectj-autoproxy这个标签的解析器。那么spring是如何初始化这个命名空间处理器,以及注册这个解析的呢?下边这段代码大家应该还有印象吧
protected void parseBeanDefinitions(Element root, BeanDefinitionParserDelegate delegate) {
	if (delegate.isDefaultNamespace(root)) {
		NodeList nl = root.getChildNodes();
		for(int i = 0; i < nl.getLength(); ++i) {
			Node node = nl.item(i);
			if (node instanceof Element) {
				Element ele = (Element)node;
				if (delegate.isDefaultNamespace(ele)) {
					this.parseDefaultElement(ele, delegate);
				} else {
					delegate.parseCustomElement(ele);
				}
			}
		}
	} else {
		delegate.parseCustomElement(root);
	}
}
这段代码就是spring遍历解析xml节点的代码,那么由于aspectj-autoproxy不属于默认的四个节点之一,那么一定会走下边这一段delegate.parseCustomElement(ele),然后回跳转到parseCustomElement这个方法中
public BeanDefinition parseCustomElement(Element ele, @Nullable BeanDefinition containingBd) {
	String namespaceUri = this.getNamespaceURI(ele);
	if (namespaceUri == null) {
		return null;
	} else {
		NamespaceHandler handler = this.readerContext.getNamespaceHandlerResolver().resolve(namespaceUri);
		if (handler == null) {
			this.error("Unable to locate Spring NamespaceHandler for XML schema namespace [" + namespaceUri + "]", ele);
			return null;
		} else {
			return handler.parse(ele, new ParserContext(this.readerContext, this, containingBd));
		}
	}
}
可以看到这里通过namespaceUri获取到了AopNamespaceHandler,至于子么自定义和使用NamespaceHandler,大家可以自行百度一下,这里不做过多赘述,最后在中调用了AopNamespaceHandler的init方法
...
NamespaceHandler namespaceHandler = (NamespaceHandler)BeanUtils.instantiateClass(handlerClass);
namespaceHandler.init();
handlerMappings.put(namespaceUri, namespaceHandler);
...
这样一来大家是不是很清晰这个自定义标签的解析器是如何注册上来的了?就是在这个spring回根据namespaceUri找到AopNamespaceHandler,然后调用它的init方法,初始化了这个解析器,并注册到spring容器中。
(2)自定义标签【aspectj-autoproxy】解析器-AspectJAutoProxyBeanDefinitionParser
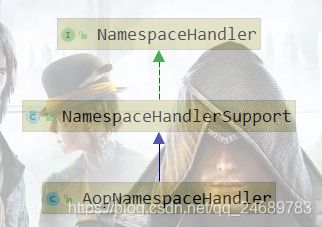
初始化AspectJAutoProxyBeanDefinitionParser这个解析器之后,可以看到调用了handler.parse(ele, new ParserContext(this.readerContext, this, containingBd))这样一个方法。这个方法就是解析这个标签的核心所在,一起去看看这段代码完成了什么东西。这个方法实在抽象类NamespaceHandlerSupport中实现的,这个类是NamespaceHandler的实现类,AopNamespaceHandler也是继承了这个类
public BeanDefinition parse(Element element, ParserContext parserContext) {
	BeanDefinitionParser parser = this.findParserForElement(element, parserContext);
	return parser != null ? parser.parse(element, parserContext) : null;
}
可以看到,这段代码的逻辑很简单。this.findParserForElement(element, parserContext)这一步完成的操作就是根据节点获取对应的解析器,之前已经注册过aspectj-autoproxy的解析器,那么这里获取到的就是AspectJAutoProxyBeanDefinitionParser,然后一起去看看它的parse方法
public BeanDefinition parse(Element element, ParserContext parserContext) {
	AopNamespaceUtils.registerAspectJAnnotationAutoProxyCreatorIfNecessary(parserContext, element);
	this.extendBeanDefinition(element, parserContext);
	return null;
}
这里要注意这一行代码比较重要,AopNamespaceUtils.registerAspectJAnnotationAutoProxyCreatorIfNecessary(parserContext, element),这段代码里创建注册一个很关键的bean到spring容器中
private static BeanDefinition registerOrEscalateApcAsRequired(Class cls, BeanDefinitionRegistry registry, @Nullable Object source) {
	Assert.notNull(registry, "BeanDefinitionRegistry must not be null");
	if (registry.containsBeanDefinition("org.springframework.aop.config.internalAutoProxyCreator")) {
		BeanDefinition apcDefinition = registry.getBeanDefinition("org.springframework.aop.config.internalAutoProxyCreator");
		if (!cls.getName().equals(apcDefinition.getBeanClassName())) {
			int currentPriority = findPriorityForClass(apcDefinition.getBeanClassName());
			int requiredPriority = findPriorityForClass(cls);
			if (currentPriority < requiredPriority) {
				apcDefinition.setBeanClassName(cls.getName());
			}
		}
		return null;
	} else {
		RootBeanDefinition beanDefinition = new RootBeanDefinition(cls);
		beanDefinition.setSource(source);
		beanDefinition.getPropertyValues().add("order", -2147483648);
		beanDefinition.setRole(2);
		registry.registerBeanDefinition("org.springframework.aop.config.internalAutoProxyCreator", beanDefinition);
		return beanDefinition;
	}
}
看看如果没有找到org.springframework.aop.config.internalAutoProxyCreator这个BeanDefinition,那么spring就会去创建一个BeanDefinition,其class类型就是AnnotationAwareAspectJAutoProxyCreator这个类,然后将这个类放入到spring对的容器中。其中还夹杂些关于aspectj-autoproxy相关的一些属性的解析,大家有兴趣自行研究,这里不做过多讨论。至此,spring解析aspectj-autoproxy这个标签的流程基本上就走完了。
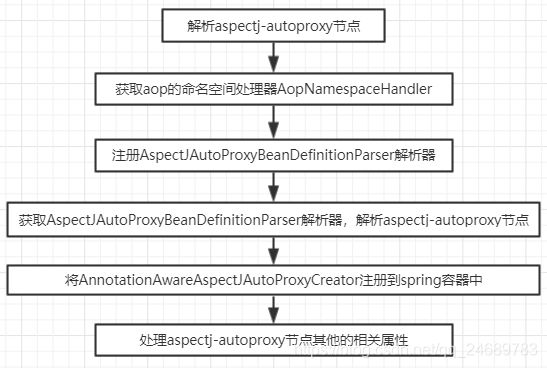
spring解析aspectj-autoproxy节点的流程图如上,总结一句话,aspectj-autoproxy节点最终在spring中的表现,或者说转换的对象就是一个BeanDefinition对象,这个和bean节点是一样的,然后这个BeanDefinition的class是AnnotationAwareAspectJAutoProxyCreator,说明最终的bean一定是AnnotationAwareAspectJAutoProxyCreator的实例对象,那么这个对象有什么用,下边做详细的分析。
2.创建AOP代理对象
前边我们也解释过,AOP的最终的实现就是依赖代理对象的创建。依赖代理对象,我们可以对原对象进行增强处理。aspectj-autoproxy节点是启用AOP的关键所在,而这个节点在spring中最终的表现就是AnnotationAwareAspectJAutoProxyCreator对象,那么势必要深究这个对象的构造是怎么样的,完成了哪些功能。
(1)深究AnnotationAwareAspectJAutoProxyCreator对象
首先来我们来观察一下这个类的构造和继承关系图
有没有发现,一看这个图,我们就大概知道AnnotationAwareAspectJAutoProxyCreator是怎么工作的了,知道它是怎么创建代理对象的了。为什么呢?大家看看它是不是BeanPostProcessor的实现类,这个类在spring中太重要了啊。在我们分析getBean背后的机制的时候,这个类频繁的出现,它的作用就是可以在创建bean的时候,通过一些BeanPostProcessor来对bean进行修饰和处理,以实现个性化定制的bean,这就是spring的灵活之处。AnnotationAwareAspectJAutoProxyCreator是InstantiationAwareBeanPostProcessor的实现类,那么我们就要重点关注这个对象的postProcessBeforeInitialization和postProcessAfterInitialization这两个方法,这两个方法是在它的父类AbstractAutoProxyCreator中实现的,postProcessBeforeInitialization没有做任何处理,主要的逻辑都在postProcessAfterInitialization中
public Object postProcessAfterInitialization(@Nullable Object bean, String beanName) {
	if (bean != null) {
		//构建一个key
		Object cacheKey = this.getCacheKey(bean.getClass(), beanName);
		//如果需要被代理,那么就进行代理处理
		if (this.earlyProxyReferences.remove(cacheKey) != bean) {
			//创建代理类的核心逻辑所在
			return this.wrapIfNecessary(bean, beanName, cacheKey);
		}
	}
	return bean;
}
...
protected Object wrapIfNecessary(Object bean, String beanName, Object cacheKey) {
	//已经创建代理的bean不需要再创建
	if (StringUtils.hasLength(beanName) && this.targetSourcedBeans.contains(beanName)) {
		return bean;
	//不需要创建代理的bean直接跳过
	} else if (Boolean.FALSE.equals(this.advisedBeans.get(cacheKey))) {
		return bean;
	//如果不是基础设施类或者需要跳过的类,那么就需要创建代理类
	} else if (!this.isInfrastructureClass(bean.getClass()) && !this.shouldSkip(bean.getClass(), beanName)) {
		//关键代码,获取被增强的方法,如果有就创建代理
		Object[] specificInterceptors = this.getAdvicesAndAdvisorsForBean(bean.getClass(), beanName, (TargetSource)null);
		if (specificInterceptors != DO_NOT_PROXY) {
			//添加如缓存
			this.advisedBeans.put(cacheKey, Boolean.TRUE);
			//创建代理类
			Object proxy = this.createProxy(bean.getClass(), beanName, specificInterceptors, new SingletonTargetSource(bean));
			//将代理放入缓存
			this.proxyTypes.put(cacheKey, proxy.getClass());
			return proxy;
		} else {
			this.advisedBeans.put(cacheKey, Boolean.FALSE);
			return bean;
		}
	} else {
		this.advisedBeans.put(cacheKey, Boolean.FALSE);
		return bean;
	}
}
代码真是又臭又长啊,看着脑阔疼,嗯,整理一张流程图,可能会更加清晰一些
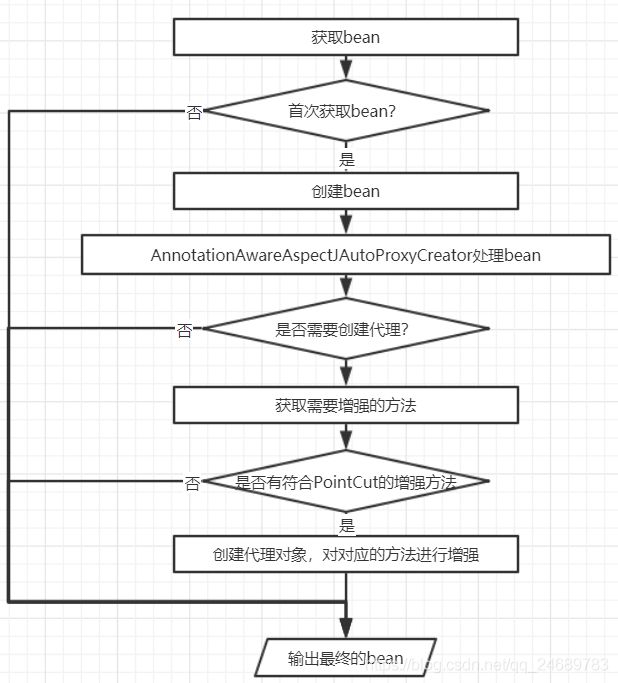
从这张流程图,我们可以得出AnnotationAwareAspectJAutoProxyCreator实在创建bean的时候生效的,完成的工作就是看看这个bean是否需要创建代理,是否符合创建代理的要求。
(2)AOP生成代理类
上边已经分析过spring创建AOP代理类的整体过程,知道了AnnotationAwareAspectJAutoProxyCreator是继承BeanPostProcessor,解析来进行整体的细节分析
(2.1)获取增强方法和增强器
所谓增强器,就是我们用@Before和@After标记的处理方法。这一句的关键实现在哪里呢?getAdvicesAndAdvisorsForBean,就是这个方法,在这个方法中实现了获取增强器,具体的步骤可以研究一下,这个方法是再AbstractAdvisorAutoProxyCreator类中实现的
List advisors = this.findEligibleAdvisors(beanClass, beanName);
从这个方法名可以看出来,获取有资格的Advisor,什么是有资格的呢,切一起来看看
protected List findEligibleAdvisors(Class beanClass, String beanName) {
	//获取增强器
	List candidateAdvisors = this.findCandidateAdvisors();
	//过滤一遍
	List eligibleAdvisors = this.findAdvisorsThatCanApply(candidateAdvisors, beanClass, beanName);
	this.extendAdvisors(eligibleAdvisors);
	if (!eligibleAdvisors.isEmpty()) {
		eligibleAdvisors = this.sortAdvisors(eligibleAdvisors);
	}
	return eligibleAdvisors;
}
这里有一个关键方法findCandidateAdvisors,这个方法就是获取我们用注解标记的增强方法
protected List findCandidateAdvisors() {
	//虽然新版本提倡使用注解,但是还是要兼容老版本XML配置的方式,所以要调用父类的方法获取XML中配置的信息
	List advisors = super.findCandidateAdvisors();
	if (this.aspectJAdvisorsBuilder != null) {
		//获取注解中配置的
		advisors.addAll(this.aspectJAdvisorsBuilder.buildAspectJAdvisors());
	}
	return advisors;
}
为了兼容老版本,所以还会调用一遍父类的findCandidateAdvisors方法,来获取XML中配置的增强器。然后呢?显而易见,注解方式配置的增强其的获取就是通过buildAspectJAdvisors来获取的,这个方法比较关键,不过这个方法太长了,这里我就补贴出来了没大家可以仔细研究一下。这个方法主要干了些什么呢?
- 扫描所有的bean,找出使用@Aspect注解标记的bean
- 解析被@Aspect标记的bean中增强方法的表达式
- 将解析的数据放到缓存中
主要就是这么四个步骤,第一步和第三步那都很简单,那种重点就在这第二步,这第二步是buildAspectJAdvisors方法中调用的this.advisorFactory.getAdvisors(factory)方法,这个方法又是一长串,首先在getAdvisorMethods方法中排除了@Pointcut标记的方法,然后返回进行处理
private List getAdvisorMethods(Class aspectClass) {
	List methods = new ArrayList();
	ReflectionUtils.doWithMethods(aspectClass, (method) -> {
		if (AnnotationUtils.getAnnotation(method, Pointcut.class) == null) {
			methods.add(method);
		}
	});
	methods.sort(METHOD_COMPARATOR);
	return methods;
}
调用getAdvisorMethods获取到了需要处理的方法之后,spring开始遍历这些方法,可以预想到到,这个遍历肯定就是把所有的方法掏出来,找出@Before,@After等注解的相关信息,然后再做处理,接下来一起看看吧
while(var6.hasNext()) {
	Method method = (Method)var6.next();
	//获取增强方法
	Advisor advisor = this.getAdvisor(method, lazySingletonAspectInstanceFactory, advisors.size(), aspectName);
	if (advisor != null) {
		advisors.add(advisor);
	}
}
...
private AspectJExpressionPointcut getPointcut(Method candidateAdviceMethod, Class candidateAspectClass) {
	//查找增强方法
	AspectJAnnotation aspectJAnnotation = AbstractAspectJAdvisorFactory.findAspectJAnnotationOnMethod(candidateAdviceMethod);
	if (aspectJAnnotation == null) {
		return null;
	} else {
		//将解析的信息封装为一个实例对象
		AspectJExpressionPointcut ajexp = new AspectJExpressionPointcut(candidateAspectClass, new String[0], new Class[0]);
		ajexp.setExpression(aspectJAnnotation.getPointcutExpression());
		if (this.beanFactory != null) {
			ajexp.setBeanFactory(this.beanFactory);
		}
		return ajexp;
	}
}
这帖出来的代码我省略了很多,源码实在是太长了,大家一定要自己打开源码看一遍,才能理解。这里我们发现了查找增强方法的核心就在AbstractAspectJAdvisorFactory.findAspectJAnnotationOnMethod方法中
protected static AbstractAspectJAdvisorFactory.AspectJAnnotation findAspectJAnnotationOnMethod(Method method) {
	Class[] var1 = ASPECTJ_ANNOTATION_CLASSES;
	int var2 = var1.length;
	for(int var3 = 0; var3 < var2; ++var3) {
		Class clazz = var1[var3];
		AbstractAspectJAdvisorFactory.AspectJAnnotation foundAnnotation = findAnnotation(method, clazz);
		if (foundAnnotation != null) {
			return foundAnnotation;
		}
	}
	return null;
}
...
private static  AbstractAspectJAdvisorFactory.AspectJAnnotation findAnnotation(Method method, Class toLookFor) {
	A result = AnnotationUtils.findAnnotation(method, toLookFor);
	return result != null ? new AbstractAspectJAdvisorFactory.AspectJAnnotation(result) : null;
}
大家可以看一下ASPECTJ_ANNOTATION_CLASSES这个数组的内容***new Class[]{Pointcut.class, Around.class, Before.class, After.class, AfterReturning.class, AfterThrowing.class}***,那么这一段代码的逻辑很显而易见了,就是找到method上的关于这些注解的信息,这个获取这个注解的方法也有点深,这里也不做细节展开讨论,主要是理解其思想。然后获取到注解之后,将注解里的信息封装成了一个AbstractAspectJAdvisorFactory.AspectJAnnotation对象,然后最后会封装一个InstantiationModelAwarePointcutAdvisorImpl对象返回,大家可以看看这个对象的构造方法中有一句代码this.instantiateAdvice(this.declaredPointcut),这一句代码就是初始化Advisor的,会将注解转换成对应的对象
...
switch(aspectJAnnotation.getAnnotationType()) {
case AtPointcut:
	if (this.logger.isDebugEnabled()) {
		this.logger.debug("Processing pointcut '" + candidateAdviceMethod.getName() + "'");
	}
	return null;
case AtAround:
	springAdvice = new AspectJAroundAdvice(candidateAdviceMethod, expressionPointcut, aspectInstanceFactory);
	break;
case AtBefore:
	springAdvice = new AspectJMethodBeforeAdvice(candidateAdviceMethod, expressionPointcut, aspectInstanceFactory);
	break;
case AtAfter:
	springAdvice = new AspectJAfterAdvice(candidateAdviceMethod, expressionPointcut, aspectInstanceFactory);
	break;
case AtAfterReturning:
	springAdvice = new AspectJAfterReturningAdvice(candidateAdviceMethod, expressionPointcut, aspectInstanceFactory);
	AfterReturning afterReturningAnnotation = (AfterReturning)aspectJAnnotation.getAnnotation();
	if (StringUtils.hasText(afterReturningAnnotation.returning())) {
		((AbstractAspectJAdvice)springAdvice).setReturningName(afterReturningAnnotation.returning());
	}
	break;
case AtAfterThrowing:
	springAdvice = new AspectJAfterThrowingAdvice(candidateAdviceMethod, expressionPointcut, aspectInstanceFactory);
	AfterThrowing afterThrowingAnnotation = (AfterThrowing)aspectJAnnotation.getAnnotation();
	if (StringUtils.hasText(afterThrowingAnnotation.throwing())) {
		((AbstractAspectJAdvice)springAdvice).setThrowingName(afterThrowingAnnotation.throwing());
	}
	break;
default:
	throw new UnsupportedOperationException("Unsupported advice type on method: " + candidateAdviceMethod);
}
...
多余的代码就不贴出来了,至此Advisor创建完毕了,即增强方法从注解到实例对象的转换过程完毕,接下来就是spring根据Advisor来创建代理对象以及对代理对象的方法进行增强了。
(2.2)创建代理类
获取到符合要求的增强方法之后,就要开始创建代理对象了。创建代理对象才是AOP的核心,创建AOP代理又是非常大的一堆代码
protected Object createProxy(Class beanClass, @Nullable String beanName, @Nullable Object[] specificInterceptors, TargetSource targetSource) {
	if (this.beanFactory instanceof ConfigurableListableBeanFactory) {
		AutoProxyUtils.exposeTargetClass((ConfigurableListableBeanFactory)this.beanFactory, beanName, beanClass);
	}
	ProxyFactory proxyFactory = new ProxyFactory();
	proxyFactory.copyFrom(this);
	//判断是创建代理类而不是接口代理,检查proxyTargetClass属性的设置
	if (!proxyFactory.isProxyTargetClass()) {
		if (this.shouldProxyTargetClass(beanClass, beanName)) {
			proxyFactory.setProxyTargetClass(true);
		} else {
			this.evaluateProxyInterfaces(beanClass, proxyFactory);
		}
	}
	//获取所有的增强器
	Advisor[] advisors = this.buildAdvisors(beanName, specificInterceptors);
	//添加增强器
	proxyFactory.addAdvisors(advisors);
	//设置需要代理的类
	proxyFactory.setTargetSource(targetSource);
	this.customizeProxyFactory(proxyFactory);
	//冻结配置好的代理工厂,设置是否还允许修改代理工厂
	proxyFactory.setFrozen(this.freezeProxy);
	if (this.advisorsPreFiltered()) {
		proxyFactory.setPreFiltered(true);
	}
	//创建代理类
	return proxyFactory.getProxy(this.getProxyClassLoader());
}
代码挺长的,其实逻辑并不复杂,获取完增强器,spring会创建一个AOP的代理工厂,将增强器Advisor,代理的对象等相关信息都放到工厂的配置中,然后昨晚所有的准备工作,最后一行代码才是点睛之笔。proxyFactory.getProxy(this.getProxyClassLoader())是创建代理对象的所在
this.createAopProxy().getProxy(classLoader);
这段代码有两个步骤,第一步先创建AopProxy对象,即代理的方式。我们都知道spring的代理有两种,一种是JDK动态代理,一种是CGLIB动态代理。spring是如何选用AOP代理方式的呢
public AopProxy createAopProxy(AdvisedSupport config) throws AopConfigException {
	if (!config.isOptimize() && !config.isProxyTargetClass() && !this.hasNoUserSuppliedProxyInterfaces(config)) {
		return new JdkDynamicAopProxy(config);
	} else {
		Class targetClass = config.getTargetClass();
		if (targetClass == null) {
			throw new AopConfigException("TargetSource cannot determine target class: Either an interface or a target is required for proxy creation.");
		} else {
			return (AopProxy)(!targetClass.isInterface() && !Proxy.isProxyClass(targetClass) ? new ObjenesisCglibAopProxy(config) : new JdkDynamicAopProxy(config));
		}
	}
}
代码先贴在这里,总结我们放后边一点点。创建完AopProxy之后,就要创建代理对象了,调用的是getProxy方法,接口代理和CGLIB代理创建代理对象是不同的
2) 接口代理
接口代理的AopProxy的实现类为JdkDynamicAopProxy。回想一下接口代理的使用方式(https://www.jianshu.com/p/07596979960d),首先是要实现InvocationHandler接口,传入被代理对象,然后利用Proxy类来创建代理对象,我们看一下JdkDynamicAopProxy的类结构

看看看,这样一来是不是spring的AOP也就不神秘了,它就是用了最基本的JDK的动态代理来创建代理对象的,不过JdkDynamicAopProxy对JDK动态代理进行了增强
public Object getProxy(@Nullable ClassLoader classLoader) {
	if (logger.isTraceEnabled()) {
		logger.trace("Creating JDK dynamic proxy: " + this.advised.getTargetSource());
	}
	Class[] proxiedInterfaces = AopProxyUtils.completeProxiedInterfaces(this.advised, true);
	this.findDefinedEqualsAndHashCodeMethods(proxiedInterfaces);
	return Proxy.newProxyInstance(classLoader, proxiedInterfaces, this);
}
最后仍旧是借助于Proxy的newProxyInstance来创建的代理对象,Over。
2) CGLIB动态代理
CGLIB是一种开源的动态代理的方式,利用字节码操作工具为代理对象创建子对象,覆盖原来的方法进行增强。不过在最新的spring(本人看的是spring5)中,spring已经自己实现了CGLIB代理的方式,不过其个开源的使用方式差不多
...
Enhancer enhancer = this.createEnhancer();
if (classLoader != null) {
	enhancer.setClassLoader(classLoader);
	if (classLoader instanceof SmartClassLoader && ((SmartClassLoader)classLoader).isClassReloadable(proxySuperClass)) {
		enhancer.setUseCache(false);
	}
}
enhancer.setSuperclass(proxySuperClass);
enhancer.setInterfaces(AopProxyUtils.completeProxiedInterfaces(this.advised));
enhancer.setNamingPolicy(SpringNamingPolicy.INSTANCE);
enhancer.setStrategy(new CglibAopProxy.ClassLoaderAwareUndeclaredThrowableStrategy(classLoader));
Callback[] callbacks = this.getCallbacks(rootClass);
Class[] types = new Class[callbacks.length];
for(x = 0; x < types.length; ++x) {
	types[x] = callbacks[x].getClass();
}
enhancer.setCallbackFilter(new CglibAopProxy.ProxyCallbackFilter(this.advised.getConfigurationOnlyCopy(), this.fixedInterceptorMap, this.fixedInterceptorOffset));
enhancer.setCallbackTypes(types);
return this.createProxyClassAndInstance(enhancer, callbacks);
...
一目了然,如果有童鞋不了解CGLIB,以及CGLIB的使用,可以参考这篇文章https://www.jianshu.com/p/d0427b4423ff,使用很简单,不再做多余的赘述。
五.反思与总结
1.JDK动态代理和CGLIB动态代理有什么区别
- JDK动态代理只能创建接口代理,不能为类创建代理
- CGLIB代理的方法不能用final修饰,因为其动态为代理对象创建子类,会覆盖父类的方法,final方法不能被重写
2.什么情况下会使用JDK动态代理和CGLIB代理
- 当类实现了接口的时候,默认使用的是JDK的动态代理
- 当类实现了接口,可以强制使用CGLIB动态代理 ,参照https://blog.csdn.net/baidu_20608025/article/details/85704791
- 当类没有实现接口,则强制使用CGLIB动态代理