Alibaba Sentinel 使用ZooKeeper集中管理和推送规则
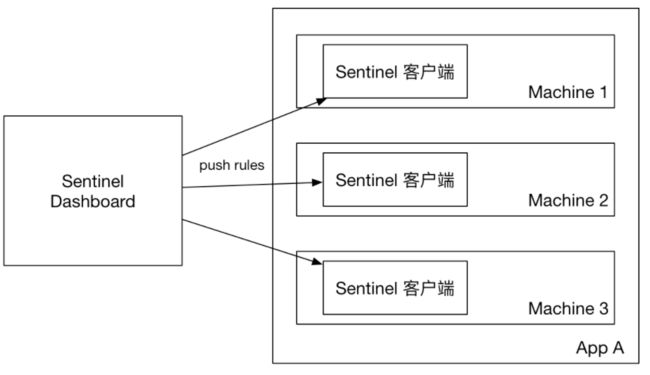
如果不做任何修改,Sentinel Dashboard 的推送规则方式是通过 API 将规则推送至客户端并直接更新到内存中,这种方式规则保存在内存中,重启即消失不建议在线上使用,架构图如下:
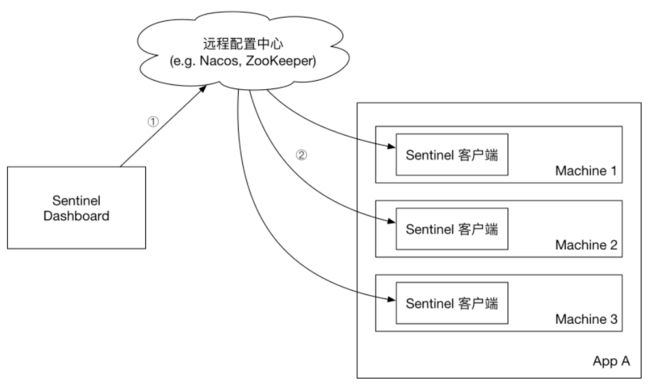
Sentinel官方是建议使用推模式,这种方式规则是持久化的,服务重启不会消失;通过配置中心来保证规则的一致性;规则实时下发,响应速度快,架构图如下:
Sentinel 目前提供了ZooKeeper, Apollo, Nacos 等的动态数据源实现,但是为了使用第二种架构方式我们需要对原来的Dashboard进行一定的改造。
搭建ZooKeeper环境
ZooKeeper常用命令:
1. 启动ZK服务:       sh bin/zkServer.sh start
2. 查看ZK服务状态: sh bin/zkServer.sh status
3. 停止ZK服务:       sh bin/zkServer.sh stop
4. 重启ZK服务:       sh bin/zkServer.sh restart
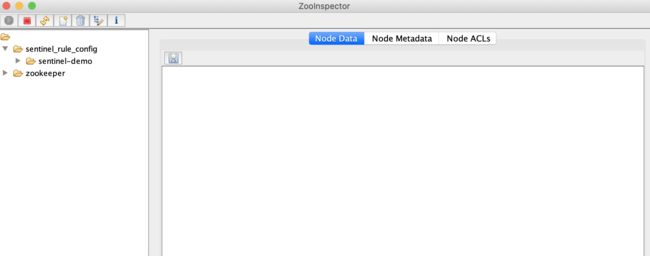
ZooInspector 图形化工具
ZooInspector是ZooKeeper的图形化工具,ZooInspector下载地址:
https://issues.apache.org/jira/secure/attachment/12436620/ZooInspector.zip
解压,进入ZooInspector\build目录,通过如下命令执行jar包:
java -jar zookeeper-dev-ZooInspector.jar //执行成功后,会弹出java ui client
获取源码
https://github.com/alibaba/Sentinel
改造Dashboard工程
引入Zookeeper包
    org.apache.curator
    curator-recipes
    ${curator.version}
    test
去掉
通过Zookeeper来同步
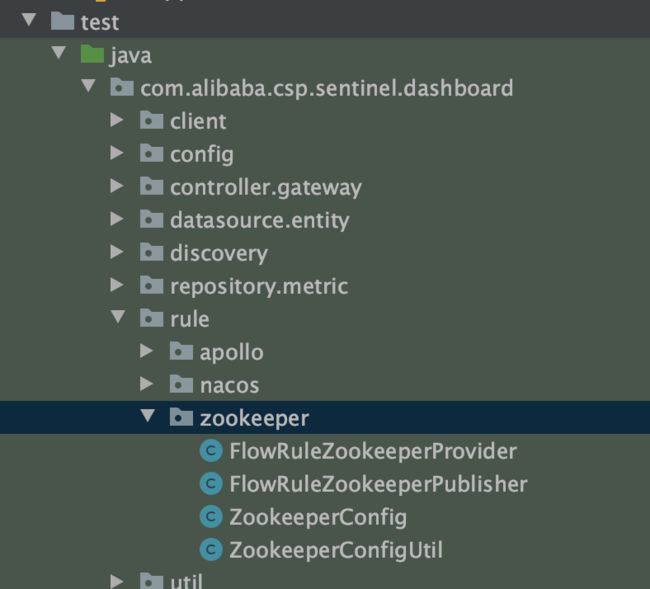
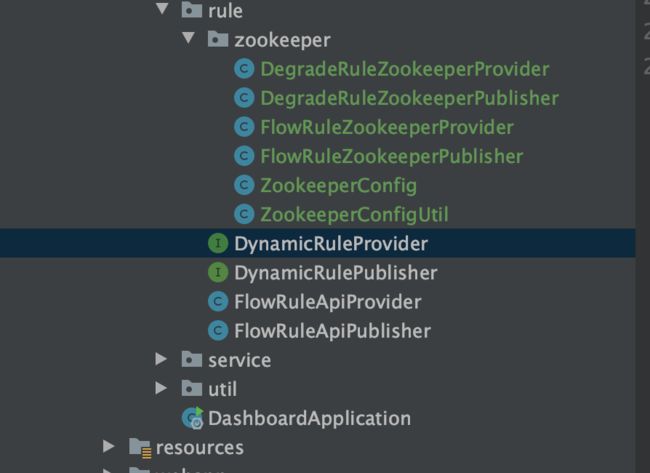
在test目录中,sentinel提供了使用Zookeeper来同步流控规则的实现,我们直接复制到com.alibaba.csp.sentinel.dashboard.rule包中,并根据样例写出降级规则的实现,目录如图:
这里需要注意的一点是,流控规则和降级规则的zkpath:
// 流控规则
final String flowPath = "/sentinel_rule_config/" + appName + "/flow";

// 降级规则
final String degradePath = "/sentinel_rule_config/" + appName + "/degrade";

// 应用启动时指定的-Dproject.name=sentinel-demo参数
String appName = System.getProperty("project.name");
修改Controller,当规则变动时给Zookeeper发消息
FlowControllerV1 流控规则Controller
流控规则Controller可以参考FlowControllerV2类来修改,主要有两点修改:
- apiQueryMachineRules方法,当获取规则时,直接通过zk获取:
- publishRules方法,当规则变更时,通过zk做通知:
DegradeController 降级规则Controller
DegradeController的修改和FlowControllerV1修改的地方时一样的。
修改规则ID的ID生成器
这里算是有个小bug把,规则的ID生成器如InMemDegradeRuleStore使用的是private static AtomicLong ids = new AtomicLong(0);,这样如果Dashboard重新部署的话,就会导致生成规则的id又从0开始了,这样有可能会导致新创建规则的时候,会将老规则给覆盖掉,做如下修改:
InMemoryRuleRepositoryAdapter这个类的子类都有这个问题,可以一起修改。
然后打成jar包,通过如下命令启动:
-Dserver.port=8900 -Dcsp.sentinel.dashboard.server=localhost:8900 -Dproject.name=sentinel-dashboard -Dsentinel.dashboard.auth.username=sentinel -Dsentinel.dashboard.auth.password=123456789
-Dserver.port=8900:用于指定 Sentinel 控制台端口为8900。-Dsentinel.dashboard.auth.username=sentinel:指定登录 Sentinel 控制台的用户名。-Dsentinel.dashboard.auth.password=123456789:指定登录 Sentinel 控制台的密码。
客户端的修改
适配框架
Sentinel 支持主流框架的适配。这里我适配的是Web Servlet。
引入jar包的支持
    com.alibaba.csp
    sentinel-core
    ${sentinel.version}


    com.alibaba.csp
    sentinel-transport-simple-http
    ${sentinel.version}


    com.alibaba.csp
    sentinel-web-servlet
    ${sentinel.version}


    com.alibaba.csp
    sentinel-datasource-zookeeper
    ${sentinel.version}


    org.apache.zookeeper
    zookeeper
    3.4.14


            slf4j-log4j12
            org.slf4j
通过Spring 配置过滤器
@Configuration
public class FilterConfig {

    @Bean
    public FilterRegistrationBean sentinelFilterRegistration() {
        FilterRegistrationBean registration = new FilterRegistrationBean();
        registration.setFilter(new CommonFilter());
        registration.addUrlPatterns("/*");
        registration.setName("sentinelFilter");
        registration.setOrder(1);

        return registration;
    }
}
接入 CommonFilter之后,所有访问的 Web URL 就会被自动统计为 Sentinel 的资源,可以针对单个 URL 维度进行流控。若希望区分不同 HTTP Method,可以将 HTTP_METHOD_SPECIFY 这个 init parameter 设为 true,给每个 URL 资源加上前缀,比如 GET:/foo。更多资料说明请查看文档。
适配 Sentinel 动态数据源,支持规则的持久化
我这里主要适配了流控和降级的规则通知和持久化。
@Configuration
public class SentinelDataSourceInitFuncConfig {

    @Value("${spring.application.name}")
    private String applicationName;

    @PostConstruct
    public void initSentinelDataSourceInitFuncConfig() {

        String appName = StringUtils.isNotBlank(System.getProperty("project.name")) ? System.getProperty("project.name") : applicationName;

        final String remoteAddress = "127.0.0.1:2181";

        // 流控规则
        final String flowPath = "/sentinel_rule_config/" + appName + "/flow";
        ReadableDataSource> redisFlowDataSource = new ZookeeperDataSource<>(remoteAddress, flowPath,
                source -> JSON.parseObject(source, new TypeReference>() {
                }));
        FlowRuleManager.register2Property(redisFlowDataSource.getProperty());

        // 降级规则
        final String degradePath = "/sentinel_rule_config/" + appName + "/degrade";
        ReadableDataSource> redisDegradeDataSource = new ZookeeperDataSource<>(remoteAddress, degradePath,
                source -> JSON.parseObject(source, new TypeReference>() {
                }));
        DegradeRuleManager.register2Property(redisDegradeDataSource.getProperty());
    }
}
这里ZooKeeper的地址可以改成配置项。
业务系统埋点
Sentinel支持多种埋点方式,这里我只列举了对一段特定代码块进行埋点的方式,其他方式可以参考文档,源码如下:
@Override
public Result thread(String arg) {
    String resourceName = "testSentinel";
    int time = random.nextInt(700);
    ContextUtil.enter("entrance1", "appA");
    Entry entry = null;
    String retVal;
    try {
        entry = SphU.entry(resourceName, EntryType.IN);
        Thread.sleep(time);
        if (time > 690) {
            throw new RuntimeException("耗时太长啦");
        }

        retVal = "passed";
    } catch (BlockException e) {
        retVal = "blocked";
    } catch (Exception e) {
        // 异常数统计埋点
        Tracer.trace(e);
        throw new RuntimeException(e);
    } finally {
        if (entry != null) {
            entry.exit();
        }
    }
    return Result.success(retVal + "::" + time);
}
这里需求特别说明的是 EntryType,共有两种类型:IN和 OUT。
IN:是指进入我们系统的入口流量,比如 http 请求或者是其他的 rpc 之类的请求,设置为IN主要是为了保护自己系统。OUT:是指我们系统调用其他第三方服务的出口流量,设置为OUT是为了保护第三方系统。
启动应用
应用启动时需要通过JVM启动参数指定Sentinel Dashboard的地址和端口,并且需要指定项目名称。
-Dcsp.sentinel.dashboard.server=127.0.0.1:8900 -Dproject.name=sentinel-demo
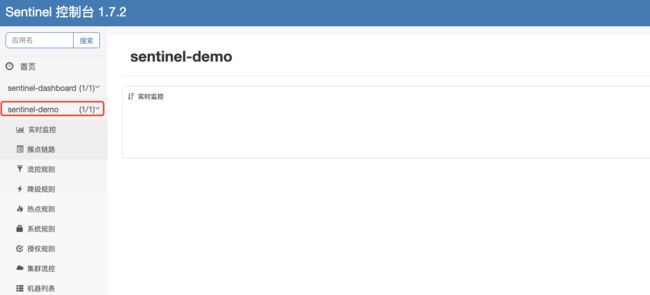
应用被注册到Dashboard上的效果
客户端配置好了与控制台的连接参数之后,并不会主动连接上控制台,需要触发一次客户端的规则才会开始进行初始化,并向控制台发送心跳和客户端规则等信息。
参考
在生产环境中使用-Sentinel
https://github.com/sentinel-group/sentinel-awesome
源码
https://github.com/wyh-spring-ecosystem-student/spring-boot-student/tree/releases
spring-boot-student-sentinel 工程和spring-boot-student-sentinel-dashboard工程
