用于Keras极端罕见事件分类的LSTM自动编码器
在这里,我们将学习LSTM模型的数据准备细节,并构建用于稀有事件分类的LSTM Autoencoder。
这篇文章是我之前使用Autoencoders发布极端罕见事件分类的延续。在上一篇文章中,我们讨论了极少数事件数据中的挑战,其中正面标记数据少于1%。我们使用异常检测的概念为这些过程构建了一个自动编码器分类器。
但是,我们拥有的数据是一个时间序列。但是之前我们使用了Dense层自动编码器,它不使用数据中的时间特征。因此,在这篇文章中,我们将通过构建LSTM Autoencoder来改进我们的方法。
在这里,我们将学习:
LSTM模型的数据准备步骤,
构建和实现LSTM自动编码器,以及
使用LSTM自动编码器进行罕见事件分类。
快速回顾LSTM:
LSTM是一种递归神经网络(RNN)。一般而言,RNN和LSTM特别用于顺序或时间序列数据。
这些模型能够自动提取过去事件的影响。
LSTM因其能够提取过去事件的长期和短期影响而闻名。
在下文中,我们将直接开发LSTM Autoencoder。关于数据问题,我们有关于纸张制造的纸张断裂的实际数据。我们的目标是提前预测休息时间。有关数据,问题和分类方法的详细信息,请参阅使用自动编码器的极端罕见事件分类。
LSTM多变量数据自动编码器

在我们的问题中,我们有一个多变量的时间序列数据。 多变量时间序列数据包含在一段时间内观察到的多个变量。 我们将在此多变量时间序列上构建LSTM自动编码器,以执行罕见事件分类。 如[1]中所述,这是通过使用异常检测方法实现的:
我们在正常(负标记)数据上构建自动编码器,
用它来重建一个新的样本,
如果重建错误很高,我们将其标记为换页符。
LSTM几乎不需要特殊的数据预处理步骤。 在下文中,我们将充分注意这些步骤。
让我们来实现。
Libraries
I like to put together the libraries and global constants first.
%matplotlib inline
import matplotlib.pyplot as plt
import seaborn as sns

import pandas as pd
import numpy as np
from pylab import rcParams

import tensorflow as tf
from keras import optimizers, Sequential
from keras.models import Model
from keras.utils import plot_model
from keras.layers import Dense, LSTM, RepeatVector, TimeDistributed
from keras.callbacks import ModelCheckpoint, TensorBoard

from sklearn.preprocessing import StandardScaler
from sklearn.model_selection import train_test_split
from sklearn.metrics import confusion_matrix, precision_recall_curve
from sklearn.metrics import recall_score, classification_report, auc, roc_curve
from sklearn.metrics import precision_recall_fscore_support, f1_score

from numpy.random import seed
seed(1)
from tensorflow import set_random_seed
set_random_seed(123)
from sklearn.model_selection import train_test_split

SEED = 123 #used to help randomly select the data points
DATA_SPLIT_PCT = 0.2

rcParams['figure.figsize'] = 8, 6
LABELS = ["Normal","Break"]
数据准备
如前所述,LSTM需要在数据准备中采取一些具体步骤。 LSTM的输入是根据时间序列数据创建的三维阵列。 这是一个容易出错的步骤,因此我们将查看详细信息。
Read data
The data is taken from [2]. The link to the data is here.
df = pd.read_csv("data/processminer-rare-event-mts - data.csv")
df.head(n=5)  # visualize the data.
Curve Shifting
正如[1]中所提到的,这种罕见事件的目的是在片断发生之前预测片断。 我们将尝试提前预测4分钟。 对于此数据,这相当于将标签向上移动两行。 可以使用df.y = df.y.shift(-2)直接完成。 但是,这里我们要求执行以下操作,
对于带有标签1的任何行n,make(n-2)? n-1)为1.这样,我们教导分类器预测最多4分钟。 和,
删除行n。 行n被删除,因为我们不想教分类器来预测已经发生的中断。
我们开发了以下功能来执行此曲线移位。
sign = lambda x: (1, -1)[x < 0]

def curve_shift(df, shift_by):
    '''
    This function will shift the binary labels in a dataframe.
    The curve shift will be with respect to the 1s.
    For example, if shift is -2, the following process
    will happen: if row n is labeled as 1, then
    - Make row (n+shift_by):(n+shift_by-1) = 1.
    - Remove row n.
    i.e. the labels will be shifted up to 2 rows up.

    Inputs:
    df       A pandas dataframe with a binary labeled column.
             This labeled column should be named as 'y'.
    shift_by An integer denoting the number of rows to shift.

    Output
    df       A dataframe with the binary labels shifted by shift.
    '''

    vector = df['y'].copy()
    for s in range(abs(shift_by)):
        tmp = vector.shift(sign(shift_by))
        tmp = tmp.fillna(0)
        vector += tmp
    labelcol = 'y'
    # Add vector to the df
    df.insert(loc=0, column=labelcol+'tmp', value=vector)
    # Remove the rows with labelcol == 1.
    df = df.drop(df[df[labelcol] == 1].index)
    # Drop labelcol and rename the tmp col as labelcol
    df = df.drop(labelcol, axis=1)
    df = df.rename(columns={labelcol+'tmp': labelcol})
    # Make the labelcol binary
    df.loc[df[labelcol] > 0, labelcol] = 1

    return df
我们现在将移动数据并验证移位是否正确。 在随后的部分中,我们还有更多的测试步骤。 建议使用它们以确保数据准备步骤按预期工作。
print('Before shifting')  # Positive labeled rows before shifting.
one_indexes = df.index[df['y'] == 1]
display(df.iloc[(np.where(np.array(input_y) == 1)[0][0]-5):(np.where(np.array(input_y) == 1)[0][0]+1), ])

# Shift the response column y by 2 rows to do a 4-min ahead prediction.
df = curve_shift(df, shift_by = -2)

print('After shifting')  # Validating if the shift happened correctly.
display(df.iloc[(one_indexes[0]-4):(one_indexes[0]+1), 0:5].head(n=5))
如果我们在这里注意,我们将正面标签在5/1/99 8:38移动到n-1和n-2个时间戳,并且删除了行n。 此外,中断行和下一行之间的时间差超过2分钟。 这是因为,当发生中断时,机器会暂停状态一段时间。 在此期间,连续行的y = 1。 在提供的数据中,删除这些连续的中断行以防止分类器在已经发生之后学习预测中断。 有关详细信息,请参阅[2]。
在继续之前,我们通过删除时间和其他两个分类列来清理数据。
# Remove time column, and the categorical columns
df = df.drop(['time', 'x28', 'x61'], axis=1)
Prepare Input Data for LSTM
LSTM比其他型号要求更高。 准备适合LSTM的数据可能需要大量的时间和精力。 但是,这通常是值得的。
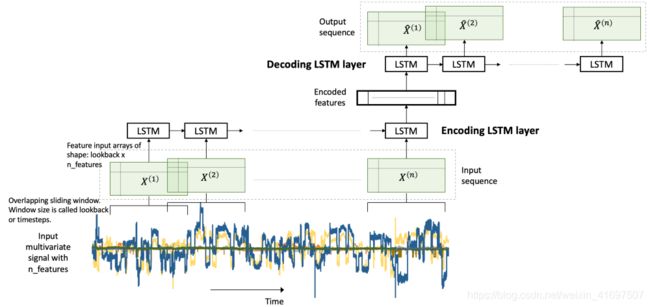
LSTM模型的输入数据是三维数组。 数组的形状是样本x回溯x特征。 让我们理解他们,
samples:这只是观察的数量,换句话说,就是数据点的数量。
回顾:LSTM模型旨在回顾过去。 意思是,在时间t,LSTM将处理数据直到(t-lookback)进行预测。
特征:它是输入数据中存在的特征数。
首先,我们将提取功能和响应。
input_X = df.loc[:, df.columns != 'y'].values  # converts the df to a numpy array
input_y = df['y'].values

n_features = input_X.shape[1]  # number of features
这里的input_X是大小样本x特征的二维数组。 我们希望能够将这样的2D数组转换为大小的3D数组:samples x lookback x features。 请参阅上面的图1以获得视觉理解。
为此,我们开发了一个函数temporalize。
def temporalize(X, y, lookback):
    X = []
    y = []
    for i in range(len(input_X)-lookback-1):
        t = []
        for j in range(1,lookback+1):
            # Gather past records upto the lookback period
            t.append(input_X[[(i+j+1)], :])
        X.append(t)
        y.append(input_y[i+lookback+1])
    return X, y
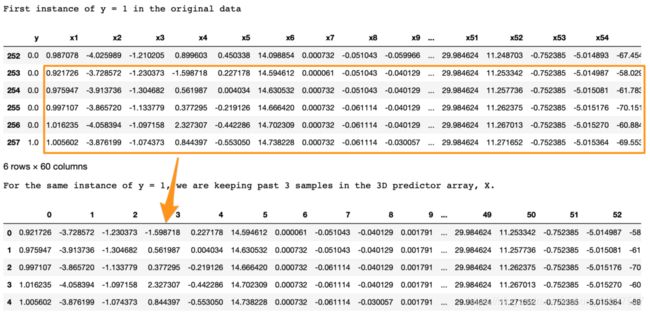
为了测试和演示此函数,我们将使用lookback = 5查看下面的示例。
print('First instance of y = 1 in the original data')
display(df.iloc[(np.where(np.array(input_y) == 1)[0][0]-5):(np.where(np.array(input_y) == 1)[0][0]+1), ])
lookback = 5  # Equivalent to 10 min of past data.
# Temporalize the data
X, y = temporalize(X = input_X, y = input_y, lookback = lookback)
print('For the same instance of y = 1, we are keeping past 5 samples in the 3D predictor array, X.')
display(pd.DataFrame(np.concatenate(X[np.where(np.array(y) == 1)[0][0]], axis=0 )))
我们在这里寻找的是,
在原始数据中,第257行y = 1。
使用lookback = 5,我们希望LSTM查看第257行(包括其自身)之前的5行。
在3D阵列X中,X [i,:,]处的每个2D块表示对应于y [i]的预测数据。 为了得出类比,在回归中y [i]对应于1D向量X [i,:]; 在LSTM中,y [i]对应于2D阵列X [i,:,]。
这个2D块X [i,:,]应该在input_X [i,:]处具有预测变量,并且前面的行应该具有给定的回溯。
正如我们在上面的输出中所看到的,底部的X [i,:,]块与顶部显示的y = 1的前五行相同。
同样,这适用于所有y的整个数据。 此处的示例显示为y = 1的实例,以便于可视化。### Split into train, valid, and test
This is straightforward with the sklearn function.
X_train, X_test, y_train, y_test = train_test_split(np.array(X), np.array(y), test_size=DATA_SPLIT_PCT, random_state=SEED)
X_train, X_valid, y_train, y_valid = train_test_split(X_train, y_train, test_size=DATA_SPLIT_PCT, random_state=SEED)
为了训练自动编码器,我们将使用仅来自负标记数据的X. 因此,我们将对应于y = 0的X分开。
X_train_y0 = X_train[y_train==0]
X_train_y1 = X_train[y_train==1]
X_valid_y0 = X_valid[y_valid==0]
X_valid_y1 = X_valid[y_valid==1]
我们将把X重塑为所需的3D维度:样本x回溯x特征。
X_train = X_train.reshape(X_train.shape[0], lookback, n_features)
X_train_y0 = X_train_y0.reshape(X_train_y0.shape[0], lookback, n_features)
X_train_y1 = X_train_y1.reshape(X_train_y1.shape[0], lookback, n_features)
X_valid = X_valid.reshape(X_valid.shape[0], lookback, n_features)
X_valid_y0 = X_valid_y0.reshape(X_valid_y0.shape[0], lookback, n_features)
X_valid_y1 = X_valid_y1.reshape(X_valid_y1.shape[0], lookback, n_features)
X_test = X_test.reshape(X_test.shape[0], lookback, n_features)
Standardize the Data
通常最好使用标准化数据(转换为高斯,平均值为0,标准差为1)用于自动编码器。
一个常见的标准化错误是:我们将整个数据标准化,然后分成列车测试。 这是不正确的。 在建模过程中,测试数据应该完全看不到任何东西。 因此,我们应该对训练数据进行标准化,并使用其摘要统计数据来规范化测试数据(对于标准化,这些统计数据是每个特征的均值和方差)。
标准化这些数据有点棘手。 这是因为X矩阵是3D,我们希望标准化相对于原始2D数据发生。
为此,我们将需要两个UDF。
flatten:此函数将重新创建从中创建3D阵列的原始2D阵列。 该函数是temporalize的倒数,意味着X = flatten(temporalize(X))。
scale:此函数将缩放我们创建的3D数组作为LSTM的输入。
def flatten(X):
    '''
    Flatten a 3D array.

    Input
    X            A 3D array for lstm, where the array is sample x timesteps x features.

    Output
    flattened_X  A 2D array, sample x features.
    '''
    flattened_X = np.empty((X.shape[0], X.shape[2]))  # sample x features array.
    for i in range(X.shape[0]):
        flattened_X[i] = X[i, (X.shape[1]-1), :]
    return(flattened_X)

def scale(X, scaler):
    '''
    Scale 3D array.

    Inputs
    X            A 3D array for lstm, where the array is sample x timesteps x features.
    scaler       A scaler object, e.g., sklearn.preprocessing.StandardScaler, sklearn.preprocessing.normalize

    Output
    X            Scaled 3D array.
    '''
    for i in range(X.shape[0]):
        X[i, :, :] = scaler.transform(X[i, :, :])

    return X
为什么我们不首先规范原始2D数据然后创建3D数组? 因为,要做到这一点,我们将:将数据拆分为训练和测试,然后进行标准化。 但是,当我们在测试数据上创建3D数组时,我们会丢失最初的样本行直到回顾。 拆分为train-valid-test将导致验证和测试集。
我们将从sklearn中安装标准化对象。 此功能将数据标准化为Normal(0,1)。 请注意,我们需要展平X_train_y0数组以传递给fit函数。
# Initialize a scaler using the training data.
scaler = StandardScaler().fit(flatten(X_train_y0))
We will use our UDF, scale, to standardize X_train_y0 with the fitted transform object scaler.
X_train_y0_scaled = scale(X_train_y0, scaler)
Make sure the scale worked correctly?
X_train的正确转换将确保扁平X_train的每列的均值和方差分别为0和1。 我们测试一下。
a = flatten(X_train_y0_scaled)
print('colwise mean', np.mean(a, axis=0).round(6))
print('colwise variance', np.var(a, axis=0))
上面输出的所有均值和方差分别为0和1。 因此,缩放是正确的。 我们现在将扩展验证和测试集。 我们将再次在这些集合上使用缩放器对象。
X_valid_scaled = scale(X_valid, scaler)
X_valid_y0_scaled = scale(X_valid_y0, scaler)
X_test_scaled = scale(X_test, scaler)
LSTM Autoencoder Training
We will, first, initialize few variables.
timesteps =  X_train_y0_scaled.shape[1] # equal to the lookback
n_features =  X_train_y0_scaled.shape[2] # 59, the number of variables

epochs = 500
batch = 64
lr = 0.0001
We, now, develop a simple architecture.
lstm_autoencoder = Sequential()
# Encoder
lstm_autoencoder.add(LSTM(timesteps, activation='relu', input_shape=(timesteps, n_features), return_sequences=True))
lstm_autoencoder.add(LSTM(16, activation='relu', return_sequences=True))
lstm_autoencoder.add(LSTM(1, activation='relu'))
lstm_autoencoder.add(RepeatVector(timesteps))
# Decoder
lstm_autoencoder.add(LSTM(timesteps, activation='relu', return_sequences=True))
lstm_autoencoder.add(LSTM(16, activation='relu', return_sequences=True))
lstm_autoencoder.add(TimeDistributed(Dense(n_features)))

lstm_autoencoder.summary()

从summary()中,参数总数为5,331。 这大约是培训规模的一半。 因此,这是一个合适的模型。 要拥有更大的架构,我们需要添加正则化,例如 辍学,将在下一篇文章中介绍。
现在,我们将训练自动编码器。
adam = optimizers.Adam(lr)
lstm_autoencoder.compile(loss='mse', optimizer=adam)

cp = ModelCheckpoint(filepath="lstm_autoencoder_classifier.h5",
                               save_best_only=True,
                               verbose=0)

tb = TensorBoard(log_dir='./logs',
                histogram_freq=0,
                write_graph=True,
                write_images=True)

lstm_autoencoder_history = lstm_autoencoder.fit(X_train_y0_scaled, X_train_y0_scaled,
                                                epochs=epochs,
                                                batch_size=batch,
                                                validation_data=(X_valid_y0_scaled, X_valid_y0_scaled),
                                                verbose=2).history

Plotting the change in the loss over the epochs.
plt.plot(lstm_autoencoder_history['loss'], linewidth=2, label='Train')
plt.plot(lstm_autoencoder_history['val_loss'], linewidth=2, label='Valid')
plt.legend(loc='upper right')
plt.title('Model loss')
plt.ylabel('Loss')
plt.xlabel('Epoch')
plt.show()
Classification
Similar to the previous post [1],
这里我们展示了如何使用自动编码器重建错误进行稀有事件分类。 我们遵循这个概念:自动编码器有望重建一个重建错误很高的noif,我们将其归类为一个分页符。
我们需要确定这个门槛。 另请注意,这里我们将使用包含y = 0或1的整个验证集。
valid_x_predictions = lstm_autoencoder.predict(X_valid_scaled)
mse = np.mean(np.power(flatten(X_valid_scaled) - flatten(valid_x_predictions), 2), axis=1)
error_df = pd.DataFrame({'Reconstruction_error': mse,
                        'True_class': y_valid.tolist()})
precision_rt, recall_rt, threshold_rt = precision_recall_curve(error_df.True_class, error_df.Reconstruction_error)
plt.plot(threshold_rt, precision_rt[1:], label="Precision",linewidth=5)
plt.plot(threshold_rt, recall_rt[1:], label="Recall",linewidth=5)
plt.title('Precision and recall for different threshold values')
plt.xlabel('Threshold')
plt.ylabel('Precision/Recall')
plt.legend()
plt.show()
Note that we have to flatten the arrays to compute the mse.
图3. 0.8的阈值应该在精确度和召回率之间提供合理的权衡,因为我们希望更高的召回率。
现在,我们将对测试数据进行分类。
我们不应该从测试数据估计分类阈值。 这会导致过度拟合。
threshold_fixed = 0.7
groups = error_df.groupby('True_class')
fig, ax = plt.subplots()
for name, group in groups:
    ax.plot(group.index, group.Reconstruction_error, marker='o', ms=3.5, linestyle='',
            label= "Fraud" if name == 1 else "Normal")
ax.hlines(threshold_fixed, ax.get_xlim()[0], ax.get_xlim()[1], colors="r", zorder=100, label='Threshold')
ax.legend()
plt.title("Reconstruction error for different classes")
plt.ylabel("Reconstruction error")
plt.xlabel("Data point index")
plt.show();
图4.使用阈值= 0.8进行分类。 阈值线上方的橙色和蓝色点分别代表真阳性和假阳性。
在图4中,阈值线上方的橙色和蓝色点分别代表真阳性和假阳性。 我们可以看到,我们有很多误报。
让我们看看准确性结果。
Test Accuracy
Confusion Matrix
pred_y = [1 if e > threshold_fixed else 0 for e in error_df.Reconstruction_error.values]
conf_matrix = confusion_matrix(error_df.True_class, pred_y)
plt.figure(figsize=(12, 12))
sns.heatmap(conf_matrix, xticklabels=LABELS, yticklabels=LABELS, annot=True, fmt="d");
plt.title("Confusion matrix")
plt.ylabel('True class')
plt.xlabel('Predicted class')
plt.show()

Figure 5. Confusion matrix showing the True Positives and False Positives.
ROC Curve and AUC
false_pos_rate, true_pos_rate, thresholds = roc_curve(error_df.True_class, error_df.Reconstruction_error)
roc_auc = auc(false_pos_rate, true_pos_rate,)
plt.plot(false_pos_rate, true_pos_rate, linewidth=5, label='AUC = %0.3f'% roc_auc)
plt.plot([0,1],[0,1], linewidth=5)
plt.xlim([-0.01, 1])
plt.ylim([0, 1.01])
plt.legend(loc='lower right')
plt.title('Receiver operating characteristic curve (ROC)')
plt.ylabel('True Positive Rate')
plt.xlabel('False Positive Rate')
plt.show()
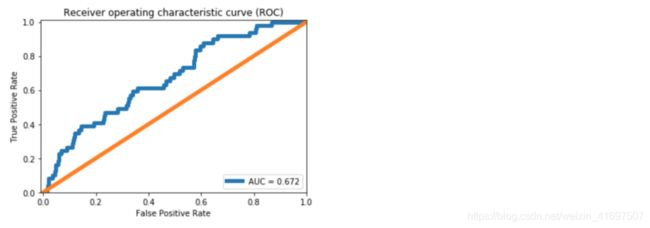
图6. ROC曲线。
与[1]中的密集层自动编码器相比,我们看到AUC提高了约10%。 从图5中的Confusion Matrix,我们可以预测39个中断实例中的10个。 正如[1]中所讨论的,这对造纸厂来说意义重大。 然而,与密集层自动编码器相比,我们实现的改进很小。
主要原因是LSTM模型有更多的参数来估算。 使用LSTM正则化变得很重要。 正规化和其他模型改进将在下一篇文章中讨论。
Github repository
What can be done better?
In the next article, we will learn tuning an Autoencoder. We will go over,
CNN LSTM Autoencoder,
Dropout layer,
LSTM Dropout (Dropout_U and Dropout_W)
Gaussian-dropout layer
SELU activation, and
alpha-dropout with SELU activation.
Conclusion
这篇文章继续在[1]中关于极端罕见事件二进制标记数据的工作。 为了利用时间模式,LSTM Autoencoders用于为多变量时间序列过程构建罕见的事件分类器。 讨论了有关LSTM模型的数据预处理步骤的详细信息。 训练简单的LSTM自动编码器模型并用于分类。 发现了对密集自动编码器的准确性的一些改进。 为了进一步改进,我们将在下一篇文章中探讨使用Dropout和其他技术改进Autoencoder的方法。
References
- [Extreme Rare Event Classification using Autoencoders in Keras](https://towardsdatascience.com/extreme-rare-event-classification-using-autoencoders-in-keras-a565b386f0980
- Ranjan, C., Mustonen, M., Paynabar, K., & Pourak, K. (2018). Dataset: Rare Event Classification in Multivariate Time Series. arXiv preprint arXiv:1809.10717
- Time-series forecasting with deep learning & LSTM autoencoders
- Complete code: LSTM Autoencoder


