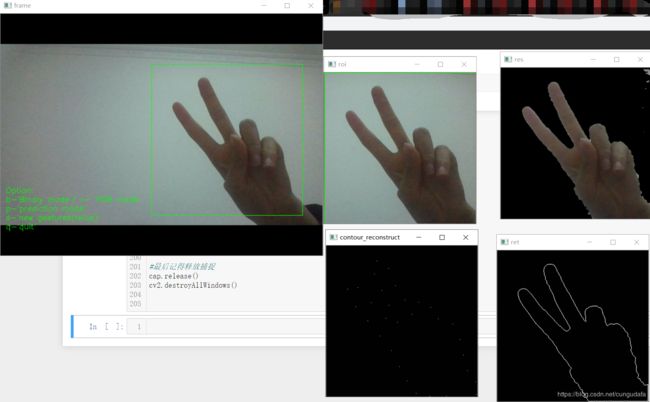
python+opencv提取视频中手部轮廓
目录
- 一、高斯滤波
- (1.1)思路
- (1.2)源码
- 二、YCrCb肤色检测
- (2.1)思路
- (2.2)源码
- 三、傅里叶描述子提取手部轮廓
- (3.1)思路
- (3.2)源码
一、高斯滤波
(1.1)思路
- 加载图像(opencv,截图保存saveROI)
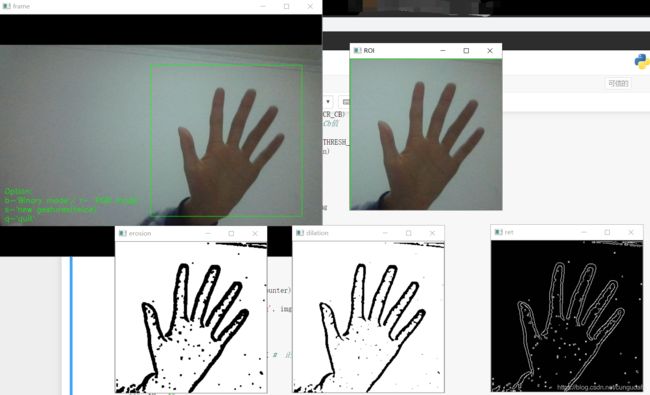
- 边缘轮廓(
高斯滤波,cv2.GaussianBlur) - 图像去噪(numpy二值化处理)
- 轮廓提取(canny检测,cv2.findContours)
- 绘制轮廓(cv2.drawContours)
(1.2)源码
参考于:基于opencv和Tensorflow的实时手势识别(1)
# 导入需要的包
import cv2
import os
import numpy as np


# 显示ROI为二值模式
def binaryMask(frame, x0, y0, width, height):
    # 显示方框
    cv2.rectangle(frame, (x0, y0), (x0+width, y0+height), (0, 255, 0))
    #提取ROI像素
    roi = frame[y0:y0+height, x0:x0+width] #
	# 高斯滤波处理
    gray = cv2.cvtColor(roi, cv2.COLOR_BGR2GRAY)
    # 高斯模糊 斯模糊本质上是低通滤波器,输出图像的每个像素点是原图像上对应像素点与周围像素点的加权和
    # 高斯矩阵的尺寸越大,标准差越大,处理过的图像模糊程度越大
    blur = cv2.GaussianBlur(gray, (5, 5), 2) # 高斯模糊,给出高斯模糊矩阵和标准差

    # 当同一幅图像上的不同部分的具有不同亮度时。这种情况下我们需要采用自适应阈值
    # 参数: src 指原图像,原图像应该是灰度图。 x :指当像素值高于(有时是小于)阈值时应该被赋予的新的像素值
    #  adaptive_method  指: CV_ADAPTIVE_THRESH_MEAN_C 或 CV_ADAPTIVE_THRESH_GAUSSIAN_C
    # block_size           指用来计算阈值的象素邻域大小: 3, 5, 7, ..
    #   param1           指与方法有关的参数    #
    th3 = cv2.adaptiveThreshold(blur, 255, cv2.ADAPTIVE_THRESH_GAUSSIAN_C, cv2.THRESH_BINARY_INV, 11, 2)
    ret, res = cv2.threshold(th3, 70, 255, cv2.THRESH_BINARY_INV+cv2.THRESH_OTSU) # ret还是bool类型

    "这里可以插入代码调用网络"
    # 二值化处理
    kernel = np.ones((3,3), np.uint8) #设置卷积核
    erosion = cv2.erode(res, kernel) #腐蚀操作 开运算:先腐蚀后膨胀,去除孤立的小点,毛刺
    cv2.imshow("erosion",erosion)
    dilation = cv2.dilate(erosion, kernel)#膨胀操作 闭运算:先膨胀后腐蚀,填平小孔,弥合小裂缝
    cv2.imshow("dilation",dilation)
    # 轮廓提取
    binaryimg = cv2.Canny(res, 50, 200) #二值化,canny检测
    h = cv2.findContours(binaryimg,cv2.RETR_TREE,cv2.CHAIN_APPROX_NONE) #寻找轮廓
    contours = h[0] #提取轮廓
    ret = np.ones(res.shape, np.uint8) #创建黑色幕布
    cv2.drawContours(ret,contours,-1,(255,255,255),1) #绘制白色轮廓
    cv2.imshow("ret", ret)

    # 保存手势
    if saveImg == True and binaryMode == True:
        saveROI(res)
    elif saveImg == True and binaryMode == False:
        saveROI(roi)
    return res

# 保存ROI图像
def saveROI(img):
    global path, counter, gesturename, saveImg
    if counter > numofsamples:
        # 恢复到初始值,以便后面继续录制手势
        saveImg = False
        gesturename = ''
        counter = 0
        return

    counter += 1
    name = gesturename + str(counter) # 给录制的手势命名
    print("Saving img: ", name)
    cv2.imwrite(path+name+'.png', img) # 写入文件
    time.sleep(0.05)

# 设置一些常用的一些参数
# 显示的字体 大小 初始位置等
font = cv2.FONT_HERSHEY_SIMPLEX #  正常大小无衬线字体
size = 0.5
fx = 10
fy = 355
fh = 18
# ROI框的显示位置
x0 = 300
y0 = 100
# 录制的手势图片大小
width = 300
height = 300
# 每个手势录制的样本数
numofsamples = 300
counter = 0 # 计数器,记录已经录制多少图片了
# 存储地址和初始文件夹名称
gesturename = ''
path = ''
# 标识符 bool类型用来表示某些需要不断变化的状态
binaryMode = False # 是否将ROI显示为而至二值模式
saveImg = False # 是否需要保存图片

# 创建一个视频捕捉对象
cap = cv2.VideoCapture(0) # 0为(笔记本)内置摄像头

while(True):
    # 读帧
    ret, frame = cap.read() # 返回的第一个参数为bool类型,用来表示是否读取到帧,如果为False说明已经读到最后一帧。frame为读取到的帧图片
    # 图像翻转(如果没有这一步,视频显示的刚好和我们左右对称)
    frame = cv2.flip(frame, 2)# 第二个参数大于0:就表示是沿y轴翻转
    # 显示ROI区域 # 调用函数
    roi = binaryMask(frame, x0, y0, width, height)

    # 显示提示语
    cv2.putText(frame, "Option: ", (fx, fy), font, size, (0, 255, 0))  # 标注字体
    cv2.putText(frame, "b-'Binary mode'/ r- 'RGB mode' ", (fx, fy + fh), font, size, (0, 255, 0))  # 标注字体
    cv2.putText(frame, "s-'new gestures(twice)'", (fx, fy + 2 * fh), font, size, (0, 255, 0))  # 标注字体
    cv2.putText(frame, "q-'quit'", (fx, fy + 3 * fh), font, size, (0, 255, 0))  # 标注字体

    key = cv2.waitKey(1) & 0xFF # 等待键盘输入,
    if key == ord('b'):  # 将ROI显示为二值模式
        # binaryMode = not binaryMode
        binaryMode = True
        print("Binary Threshold filter active")
    elif key == ord('r'): # RGB模式
        binaryMode = False

        if key == ord('i'):  # 调整ROI框
            y0 = y0 - 5
    elif key == ord('k'):
        y0 = y0 + 5
    elif key == ord('j'):
        x0 = x0 - 5
    elif key == ord('l'):
        x0 = x0 + 5

    if key == ord('q'):
        break

    if key == ord('s'):
        """录制新的手势(训练集)"""
        # saveImg = not saveImg # True
        if gesturename != '':  #
            saveImg = True
        else:
            print("Enter a gesture group name first, by enter press 'n'! ")
            saveImg = False
    elif key == ord('n'):
        # 开始录制新手势
        # 首先输入文件夹名字
        gesturename = (input("enter the gesture folder name: "))
        os.makedirs(gesturename)

        path = "./" + gesturename + "/" # 生成文件夹的地址  用来存放录制的手势

    #展示处理之后的视频帧
    cv2.imshow('frame', frame)
    if (binaryMode):
        cv2.imshow('ROI', roi)
    else:
        cv2.imshow("ROI", frame[y0:y0+height, x0:x0+width])


#最后记得释放捕捉
cap.release()
cv2.destroyAllWindows()
二、YCrCb肤色检测
(2.1)思路
- 加载图像(opencv,截图保存saveROI)
- 肤色检测(
YCrCb颜色空间的Cr分量+Otsu法阈值分割算法) - 图像去噪(numpy二值化处理)
- 轮廓提取(canny检测,cv2.findContours)
- 绘制轮廓(cv2.drawContours)
(2.2)源码
# 导入需要的包
import cv2
import os
import numpy as np


# 显示ROI为二值模式
def binaryMask(frame, x0, y0, width, height):
    cv2.rectangle(frame,(x0,y0),(x0+width, y0+height),(0,255,0)) #画出截取的手势框图
    roi = frame[y0:y0+height, x0:x0+width] #获取手势框图
    cv2.imshow("roi", roi) #显示手势框图
    # 肤色检测
    res = skinMask(roi) #进行肤色检测
    cv2.imshow("res", res) #显示肤色检测后的图像

    "这里可以插入代码调用网络"
    # 二值化处理
    kernel = np.ones((3,3), np.uint8) #设置卷积核
    erosion = cv2.erode(res, kernel) #腐蚀操作 开运算:先腐蚀后膨胀,去除孤立的小点,毛刺
    cv2.imshow("erosion",erosion)
    dilation = cv2.dilate(erosion, kernel)#膨胀操作 闭运算:先膨胀后腐蚀,填平小孔,弥合小裂缝
    cv2.imshow("dilation",dilation)
    # 轮廓提取
    binaryimg = cv2.Canny(res, 50, 200) #二值化,canny检测
    h = cv2.findContours(binaryimg,cv2.RETR_TREE,cv2.CHAIN_APPROX_NONE) #寻找轮廓
    contours = h[0] #提取轮廓
    ret = np.ones(res.shape, np.uint8) #创建黑色幕布
    cv2.drawContours(ret,contours,-1,(255,255,255),1) #绘制白色轮廓
    cv2.imshow("ret", ret)

    # 保存手势
    if saveImg == True and binaryMode == True:
        saveROI(res)
    elif saveImg == True and binaryMode == False:
        saveROI(roi)
    return res


####YCrCb颜色空间的Cr分量+Otsu法阈值分割算法
def skinMask(roi):
    YCrCb = cv2.cvtColor(roi, cv2.COLOR_BGR2YCR_CB) #转换至YCrCb空间
    (y,cr,cb) = cv2.split(YCrCb) #拆分出Y,Cr,Cb值
    cr1 = cv2.GaussianBlur(cr, (5,5), 0)
    _, skin = cv2.threshold(cr1, 0, 255, cv2.THRESH_BINARY + cv2.THRESH_OTSU) #Ostu处理
    res = cv2.bitwise_and(roi,roi, mask = skin)
    return res


# 保存ROI图像
def saveROI(img):
    global path, counter, gesturename, saveImg
    if counter > numofsamples:
        # 恢复到初始值,以便后面继续录制手势
        saveImg = False
        gesturename = ''
        counter = 0
        return

    counter += 1
    name = gesturename + str(counter) # 给录制的手势命名
    print("Saving img: ", name)
    cv2.imwrite(path+name+'.png', img) # 写入文件
    time.sleep(0.05)

# 设置一些常用的一些参数
# 显示的字体 大小 初始位置等
font = cv2.FONT_HERSHEY_SIMPLEX #  正常大小无衬线字体
size = 0.5
fx = 10
fy = 355
fh = 18
# ROI框的显示位置
x0 = 300
y0 = 100
# 录制的手势图片大小
width = 300
height = 300
# 每个手势录制的样本数
numofsamples = 300
counter = 0 # 计数器,记录已经录制多少图片了
# 存储地址和初始文件夹名称
gesturename = ''
path = ''
# 标识符 bool类型用来表示某些需要不断变化的状态
binaryMode = False # 是否将ROI显示为而至二值模式
saveImg = False # 是否需要保存图片

# 创建一个视频捕捉对象
cap = cv2.VideoCapture(0) # 0为(笔记本)内置摄像头

while(True):
    # 读帧
    ret, frame = cap.read() # 返回的第一个参数为bool类型,用来表示是否读取到帧,如果为False说明已经读到最后一帧。frame为读取到的帧图片
    # 图像翻转(如果没有这一步,视频显示的刚好和我们左右对称)
    frame = cv2.flip(frame, 2)# 第二个参数大于0:就表示是沿y轴翻转
    # 显示ROI区域 # 调用函数
    roi = binaryMask(frame, x0, y0, width, height)

    # 显示提示语
    cv2.putText(frame, "Option: ", (fx, fy), font, size, (0, 255, 0))  # 标注字体
    cv2.putText(frame, "b-'Binary mode'/ r- 'RGB mode' ", (fx, fy + fh), font, size, (0, 255, 0))  # 标注字体
    cv2.putText(frame, "s-'new gestures(twice)'", (fx, fy + 2 * fh), font, size, (0, 255, 0))  # 标注字体
    cv2.putText(frame, "q-'quit'", (fx, fy + 3 * fh), font, size, (0, 255, 0))  # 标注字体

    key = cv2.waitKey(1) & 0xFF # 等待键盘输入,
    if key == ord('b'):  # 将ROI显示为二值模式
        # binaryMode = not binaryMode
        binaryMode = True
        print("Binary Threshold filter active")
    elif key == ord('r'): # RGB模式
        binaryMode = False

        if key == ord('i'):  # 调整ROI框
            y0 = y0 - 5
    elif key == ord('k'):
        y0 = y0 + 5
    elif key == ord('j'):
        x0 = x0 - 5
    elif key == ord('l'):
        x0 = x0 + 5

    if key == ord('q'):
        break

    if key == ord('s'):
        """录制新的手势(训练集)"""
        # saveImg = not saveImg # True
        if gesturename != '':  #
            saveImg = True
        else:
            print("Enter a gesture group name first, by enter press 'n'! ")
            saveImg = False
    elif key == ord('n'):
        # 开始录制新手势
        # 首先输入文件夹名字
        gesturename = (input("enter the gesture folder name: "))
        os.makedirs(gesturename)

        path = "./" + gesturename + "/" # 生成文件夹的地址  用来存放录制的手势

    #展示处理之后的视频帧
    cv2.imshow('frame', frame)
    if (binaryMode):
        cv2.imshow('ROI', roi)
    else:
        cv2.imshow("ROI", frame[y0:y0+height, x0:x0+width])


#最后记得释放捕捉
cap.release()
cv2.destroyAllWindows()
三、傅里叶描述子提取手部轮廓
(3.1)思路
- 加载图像(opencv,截图保存saveROI)
- 肤色检测(YCrCb颜色空间的Cr分量+Otsu法阈值分割算法)
- 图像去噪(numpy二值化处理)
- 轮廓提取(canny检测,cv2.findContours->
傅里叶描述子Laplacian) 二次去噪(numpy二值化处理)- 绘制轮廓(cv2.drawContours)

(3.2)源码
# 导入需要的包
import cv2
import os
import numpy as np

MIN_DESCRIPTOR = 32  # surprisingly enough, 2 descriptors are already enough

##计算傅里叶描述子
def fourierDesciptor(res):
    #Laplacian算子进行八邻域检测
    gray = cv2.cvtColor(res, cv2.COLOR_BGR2GRAY)
    dst = cv2.Laplacian(gray, cv2.CV_16S, ksize = 3)
    Laplacian = cv2.convertScaleAbs(dst)
    contour = find_contours(Laplacian)#提取轮廓点坐标
    contour_array = contour[0][:, 0, :]#注意这里只保留区域面积最大的轮廓点坐标
    ret_np = np.ones(dst.shape, np.uint8) #创建黑色幕布
    ret = cv2.drawContours(ret_np,contour[0],-1,(255,255,255),1) #绘制白色轮廓
    cv2.imshow("ret", ret)
    contours_complex = np.empty(contour_array.shape[:-1], dtype=complex)
    contours_complex.real = contour_array[:,0]#横坐标作为实数部分
    contours_complex.imag = contour_array[:,1]#纵坐标作为虚数部分
    fourier_result = np.fft.fft(contours_complex)#进行傅里叶变换
    #fourier_result = np.fft.fftshift(fourier_result)
    descirptor_in_use = truncate_descriptor(fourier_result)#截短傅里叶描述子
    # 绘图显示
    reconstruct(ret, descirptor_in_use)
    return ret, descirptor_in_use

def find_contours(Laplacian):
    #binaryimg = cv2.Canny(res, 50, 200) #二值化,canny检测
    h = cv2.findContours(Laplacian,cv2.RETR_EXTERNAL,cv2.CHAIN_APPROX_NONE) #寻找轮廓
    contour = h[0]
    contour = sorted(contour, key = cv2.contourArea, reverse=True)#对一系列轮廓点坐标按它们围成的区域面积进行排序
    return contour

#截短傅里叶描述子
def truncate_descriptor(fourier_result):
    descriptors_in_use = np.fft.fftshift(fourier_result)

    #取中间的MIN_DESCRIPTOR项描述子
    center_index = int(len(descriptors_in_use) / 2)
    low, high = center_index - int(MIN_DESCRIPTOR / 2), center_index + int(MIN_DESCRIPTOR / 2)
    descriptors_in_use = descriptors_in_use[low:high]

    descriptors_in_use = np.fft.ifftshift(descriptors_in_use)
    return descriptors_in_use

##由傅里叶描述子重建轮廓图
def reconstruct(img, descirptor_in_use):
    contour_reconstruct = np.fft.ifft(descirptor_in_use)
    contour_reconstruct = np.array([contour_reconstruct.real,contour_reconstruct.imag])
    contour_reconstruct = np.transpose(contour_reconstruct)
    contour_reconstruct = np.expand_dims(contour_reconstruct, axis = 1)
    if contour_reconstruct.min() < 0:
        contour_reconstruct -= contour_reconstruct.min()
    contour_reconstruct *= img.shape[0] / contour_reconstruct.max()
    contour_reconstruct = contour_reconstruct.astype(np.int32, copy = False)

    black_np = np.ones(img.shape, np.uint8) #创建黑色幕布
    black = cv2.drawContours(black_np,contour_reconstruct,-1,(255,255,255),1) #绘制白色轮廓
    cv2.imshow("contour_reconstruct", black)
    #cv2.imwrite('recover.png',black)
    return black

# 显示ROI为二值模式
def binaryMask(frame, x0, y0, width, height):
    cv2.rectangle(frame,(x0,y0),(x0+width, y0+height),(0,255,0)) #画出截取的手势框图
    roi = frame[y0:y0+height, x0:x0+width] #获取手势框图
    cv2.imshow("roi", roi) #显示手势框图
    res = skinMask(roi) #进行肤色检测
    cv2.imshow("res", res) #显示肤色检测后的图像

    ret, fourier_result = fourierDesciptor(res)# 傅里叶描述子获取轮廓点

    # 保存手势
    if saveImg == True and binaryMode == True:
        saveROI(res)
    elif saveImg == True and binaryMode == False:
        saveROI(roi)
    return res


####YCrCb颜色空间的Cr分量+Otsu法阈值分割算法
def skinMask(roi):
    YCrCb = cv2.cvtColor(roi, cv2.COLOR_BGR2YCR_CB) #转换至YCrCb空间
    (y,cr,cb) = cv2.split(YCrCb) #拆分出Y,Cr,Cb值
    cr1 = cv2.GaussianBlur(cr, (5,5), 0)
    _, skin = cv2.threshold(cr1, 0, 255, cv2.THRESH_BINARY + cv2.THRESH_OTSU) #Ostu处理
    res = cv2.bitwise_and(roi,roi, mask = skin)
    return res


# 保存ROI图像
def saveROI(img):
    global path, counter, gesturename, saveImg
    if counter > numofsamples:
        # 恢复到初始值,以便后面继续录制手势
        saveImg = False
        gesturename = ''
        counter = 0
        return

    counter += 1
    name = gesturename + str(counter) # 给录制的手势命名
    print("Saving img: ", name)
    cv2.imwrite(path+name+'.png', img) # 写入文件
    time.sleep(0.05)

# 设置一些常用的一些参数
# 显示的字体 大小 初始位置等
font = cv2.FONT_HERSHEY_SIMPLEX #  正常大小无衬线字体
size = 0.5
fx = 10
fy = 355
fh = 18
# ROI框的显示位置
x0 = 300
y0 = 100
# 录制的手势图片大小
width = 300
height = 300
# 每个手势录制的样本数
numofsamples = 300
counter = 0 # 计数器,记录已经录制多少图片了
# 存储地址和初始文件夹名称
gesturename = ''
path = ''
# 标识符 bool类型用来表示某些需要不断变化的状态
binaryMode = False # 是否将ROI显示为而至二值模式
saveImg = False # 是否需要保存图片

# 创建一个视频捕捉对象
cap = cv2.VideoCapture(0) # 0为(笔记本)内置摄像头

while(True):
    # 读帧
    ret, frame = cap.read() # 返回的第一个参数为bool类型,用来表示是否读取到帧,如果为False说明已经读到最后一帧。frame为读取到的帧图片
    # 图像翻转(如果没有这一步,视频显示的刚好和我们左右对称)
    frame = cv2.flip(frame, 2)# 第二个参数大于0:就表示是沿y轴翻转
    # 显示ROI区域 # 调用函数
    roi = binaryMask(frame, x0, y0, width, height)

    # 显示提示语
    cv2.putText(frame, "Option: ", (fx, fy), font, size, (0, 255, 0))  # 标注字体
    cv2.putText(frame, "b-'Binary mode'/ r- 'RGB mode' ", (fx, fy + fh), font, size, (0, 255, 0))  # 标注字体
    cv2.putText(frame, "p-'prediction mode'", (fx, fy + 2 * fh), font, size, (0, 255, 0))  # 标注字体
    cv2.putText(frame, "s-'new gestures(twice)'", (fx, fy + 3 * fh), font, size, (0, 255, 0))  # 标注字体
    cv2.putText(frame, "q-'quit'", (fx, fy + 4 * fh), font, size, (0, 255, 0))  # 标注字体

    key = cv2.waitKey(1) & 0xFF # 等待键盘输入,
    if key == ord('b'):  # 将ROI显示为二值模式
        # binaryMode = not binaryMode
        binaryMode = True
        print("Binary Threshold filter active")
    elif key == ord('r'): # RGB模式
        binaryMode = False

        if key == ord('i'):  # 调整ROI框
            y0 = y0 - 5
    elif key == ord('k'):
        y0 = y0 + 5
    elif key == ord('j'):
        x0 = x0 - 5
    elif key == ord('l'):
        x0 = x0 + 5

    if key == ord('p'):
        """调用模型开始预测"""
        print("using CNN to predict")
    if key == ord('q'):
        break

    if key == ord('s'):
        """录制新的手势(训练集)"""
        # saveImg = not saveImg # True
        if gesturename != '':  #
            saveImg = True
        else:
            print("Enter a gesture group name first, by enter press 'n'! ")
            saveImg = False
    elif key == ord('n'):
        # 开始录制新手势
        # 首先输入文件夹名字
        gesturename = (input("enter the gesture folder name: "))
        os.makedirs(gesturename)

        path = "./" + gesturename + "/" # 生成文件夹的地址  用来存放录制的手势

    #展示处理之后的视频帧
    cv2.imshow('frame', frame)
    if (binaryMode):
        cv2.imshow('ROI', roi)
    else:
        cv2.imshow("ROI", frame[y0:y0+height, x0:x0+width])


#最后记得释放捕捉
cap.release()
cv2.destroyAllWindows()

