VirtualBox在CentOS中安装VBOXADDITIONS
在 Oracle Linux 上安装 Shared Folders
对于 Oracle Database 11g,ZIP 安装文件总共有 2 GB 多。由于需要从每个来宾 VM 访问它们以安装数据库,我决定利用 Oracle VM VirtualBox 的 Shared Folders。Shared Folders 特性允许来宾 VM 访问主机文件系统中的存储,因此它允许我对每个 VM 都访问相同的安装文件。
Shared Folders 是 Oracle VM VirtualBox 的 Guest Additions 中提供的附加功能。Guest Additions 程序包提供可增强来宾操作系统基本功能的设备驱动程序和系统应用程序。除了 Shared Folders 功能之外,Guest Additions 还包含多个操作系统特定的插件,如无缝窗口、鼠标指针集成和更好的视频支持。
Oracle VM VirtualBox 安装目录中的 ISO 文件中提供了受支持的来宾操作系统类型的 Guest Additions。要安装适用于特定 VM 的 Guest Additions,可将来宾 VM 中的 ISO 文件挂载为虚拟 CD-ROM 映像(如果尚未挂载)并从那里进行安装。我使用了 Linux 来宾中的一个终端窗口,并将目录更改为 ISO 挂载点以运行安装脚本。我第一次尝试在 Oracle Linux 来宾 VM 中安装 Guest Additions 时,安装失败了,如清单 2 所示。
清单 2:Guest Additions 安装失败# sh ./VBoxLinuxAdditions.run Verifying archive integrity... All good. Uncompressing VirtualBox 4.1.2 Guest Additions for Linux......... VirtualBox Guest Additions installer Removing existing VirtualBox DKMS kernel modules [ OK ] Removing existing VirtualBox non-DKMS kernel modules [ OK ] Building the VirtualBox Guest Additions kernel modules The headers for the current running kernel were not found. If the following module compilation fails then this could be the reason. The missing package can be probably installed with yum install kernel-devel-2.6.32-100.26.2.el5 Building the main Guest Additions module [FAILED] (Look at /var/log/vboxadd-install.log to find out what went wrong) Installing the Window System drivers Installing X.Org 7.1 modules [ OK ] Setting up the Window System to use the Guest Additions [ OK ] You may need to restart the hal service and the Window System (or just restart the guest system) to enable the Guest Additions. Installing graphics libraries and desktop services component[ OK ] Press Return to close this window...
清单 2 中所示输出的日志文件 /var/log/vboxadd-install.log 指示问题在于缺少内核资源:
# more /var/log/vboxadd-install.log /tmp/vbox.0/Makefile.include.header:94: *** Error: unable to find the sources of your current Linux kernel. Specify KERN_DIR=and run Make again. Stop.
在 Fat Bloke 博客的帮助下,我确认了问题的根源。Oracle Linux 自带了两个内核:一个是与 Red Hat 100% 兼容的,另一个是 Unbreakable Enterprise Kernel (UEK)。我的 Linux 来宾运行的是 UEK,因此需要安装相应的gcc 和 kernel-uek-devel 程序包,以便 Guest Additions 安装能够正常工作。这是因为 Guest Additions 安装需要构建和安装内核驱动程序。我使用了以下yum install 命令来下载和安装缺少的程序包:
# yum update

# yum install gcc
# yum install kernel-uek-devel  		(yum output not shown)
这次,脚本运行无误,如清单 3 所示。
清单 3:Guest Additions 安装成功# sh ./VBoxLinuxAdditions.run Verifying archive integrity... All good. Uncompressing VirtualBox 4.1.2 Guest Additions for Linux......... VirtualBox Guest Additions installer Removing installed version 4.1.2 of VirtualBox Guest Additions... Removing existing VirtualBox DKMS kernel modules [ OK ] Removing existing VirtualBox non-DKMS kernel modules [ OK ] Building the VirtualBox Guest Additions kernel modules Building the main Guest Additions module [ OK ] Building the shared folder support module [ OK ] Building the OpenGL support module [FAILED] (Look at /var/log/vboxadd-install.log to find out what went wrong) Installing the Window System drivers Installing X.Org 7.1 modules [ OK ] Setting up the Window System to use the Guest Additions [ OK ] You may need to restart the hal service and the Window System (or just restart the guest system) to enable the Guest Additions. Installing graphics libraries and desktop services component[ OK ] Press Return to close this window...
注意,OpenGL 模块仍然失败,因为 Oracle Solaris 主机平台没有 OpenGL 驱动程序(Windows、现代 Linux 环境和 Mac OS X 不是这样),但这并不重要,也与我想做的无关。
使用 Shared Folders
为了能够从 Linux 来宾 VM 访问主机文件夹,首先要确保该文件夹已经正确导出以备共享。然后,只需单击来宾 VM 的 Oracle VM VirtualBox Manager 窗口中Details 下的 Shared Folders。于是显示一个弹出窗口,允许配置我想要访问的主机文件夹的路径和该来宾 VM 用于挂载点的文件夹名称,如图 5 所示。还可以使用 VBoxManage 命令在命令行设置对 Shared Folders 的访问;参见用户手册。
图 5. 设置 Shared Folders
默认情况下,来宾 VM 将主机文件夹挂载为 /media/sf_,其中 /Downloads 中的内容在来宾 VM 的 /media/sf_Downloads 中。现在,我可以在来宾 VM 中访问已下载的数据库 ZIP 文件。
VirtualBox安装上最新的CentOS6.4,安装增强组件时却发现
Building the OpenGL support module [FAILED]
最后网上一找,得到解决方法
cd /media/VBOXADDITIONS_4.1.8_75467/
export MAKE='/usr/bin/gmake -i'
./VBoxLinuxAdditions.run
安装的时候使用"make -i" , -i, --ignore-errors Ignore errors from commands.忽略错误。
快乐无极提示您:默认安装的CentOS,在安装VBOXADDITIONS前还需要
yum groupinstall "Development Tools"
yum install kernel-devel
oracle vm,virtualbox增强包VboxAdditions的安装和共享文件夾
1开机登录linux系统 点击 设备—安装增强功能
2桌面上会显示VBOXADDITIONS_4.1.2_73507
3 不是root用户的切换到root用户输入su – 按下确定
4 输入cd /media/ 点确定
5 输入cd VBOXADDITIONS_4.1.2_73507
6 输入 sh ./ VBoxLinuxAdditions.run(看具体文件名叫什么)
7安装好重启
这样这个增强包就装好了
接着和主机共享文件
1首先先在主机上新建一个文件夹共享这个文件夹
2然后点击虚拟机上的 设备按钮
然后点添加数据空间
分配好了确定
在root的权限下实施如下命令:#mkdir /mnt/gongxiang 建树一个目录来挂载共享文件夹;当然你可以在任何处所建树一个目录
然后输入这个命令 # mount -t vboxsf gongxiang /mnt/gongxiang
到这如果你要和主机共享什么文件 就把这个文件拖到这个文件夹里
设置共享文件夹
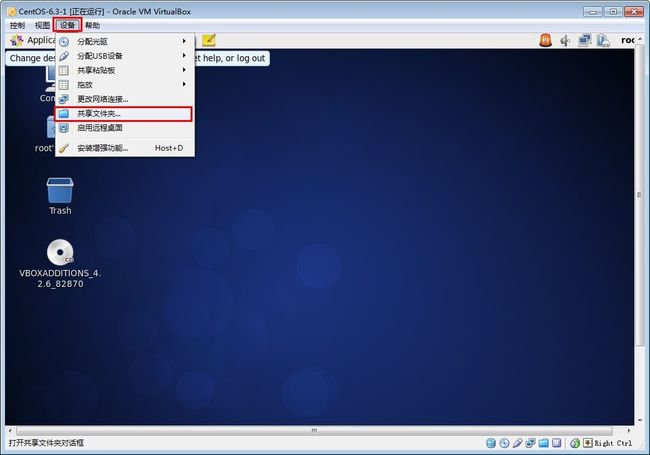
点击【设备】,选择【共享文件夹】菜单,如下图所示。
点击添加一个共享文件夹,选项固定和临时是指该文件夹是否是持久的。共享名可以随意取,如【share1】,尽量使用英文名称,不要有空格,选择文件夹所处的位置,比如【E:\share1】,点击确定,如下图所示。
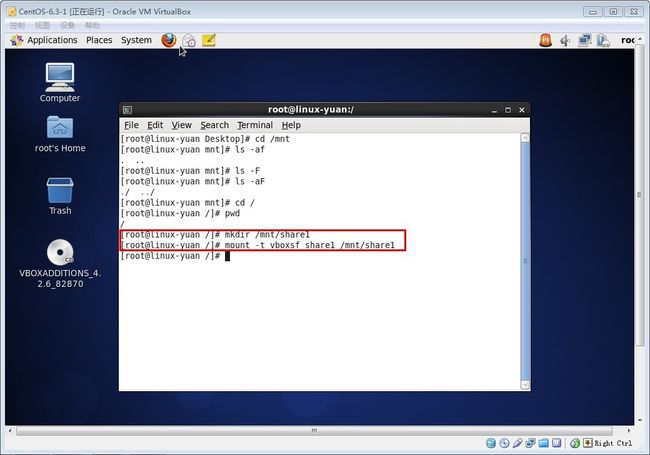
打开终端,在CentOS系统中建立一个文件夹,如在/mnt下建立一个share1文件夹。
代码如下:
- mkdir /mnt/share1
在CentOS系统中,访问在之前系统中设立的共享文件夹。
代码如下:
- mount -t vboxsf share1 /mnt/share1
其中"share1"是之前创建的共享文件夹的名字。而"/mnt/share1"是在CentOS中共享文件夹的路径,如下图所示。
现在虚拟机和主机可以互传文件了,在原系统“E:\share1”中拷贝两个文件,然后在CentOS中查看,如下图所示,就可以在此CentOS中看到这两个文件了。
设置共享文件夹完成。
http://hermosa-young.iteye.com/blog/1798006


