初步探索Android的蓝牙实现
蓝牙是十世纪的一位国王Harald Bluetooth的绰号(相传他喜欢吃蓝莓,所以牙齿变成了蓝色),他将纷争不断的丹麦部落统一为一个王国,传说中他还引入了基督教。刚好伟大的Jim Kardach在读一本和蓝牙国王有关的书籍,这位开发了允许电话和计算机通讯的系统的员工,就把他公司(瑞典爱立信,蓝牙创始人)做的统一了各种移动电子设备之间的通讯问题的技术叫做了蓝牙。蓝牙统一了王国,而蓝牙技术统一了移动设备之间的通讯方式。
好的,介绍扯完了,下面讲一下Android上实现蓝牙的方法:
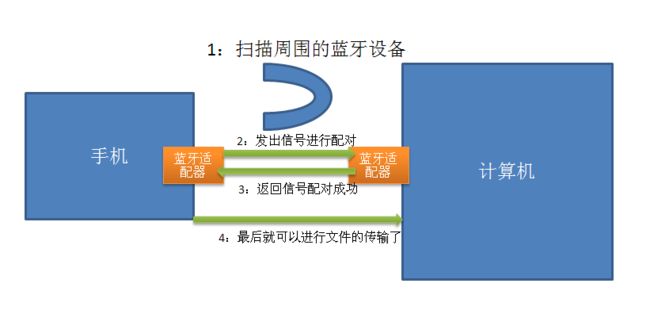
1.蓝牙的工作机制(参考博文)
首先两个设备上都要有蓝牙设备或者专业一点叫蓝牙适配器,以手机和电脑为例我画了如下流程图。其次在手机上进行扫描,扫描周围蓝蓝牙设备,先找到手机附近的电脑,然后给它发出一个信号需要进行蓝牙的配对,再次返回一个信号说明手机和电脑已经配对成功了,最后配对成功后可以进行文件传输了。这是一个最基本的一个流程。
2.与蓝牙相关的类
网上找了一下,最重要的就是两个类:BluetoothAdapter(可以理解为当前设备)和BluetoothDevice(远程设备).
3.配置蓝牙的Permission
在AndroidMenifest.xml里面设置蓝牙使用的权限。
4.搭建蓝牙
在你的机子和别的机子蓝牙配对之前,你首先要知道,蓝牙在你这台机子上支不支持,能不能用,有没有启用。
你只要通过静态方法BluetoothAdapter.getDefaultAdapter(),就可以获得BluetoothAdapter的一个实例。看看他有没有空就可以知道你的机子能不能用蓝牙了。
BluetoothAdapter mBluetoothAdapter = BluetoothAdapter.getDefaultAdapter();
if (mBluetoothAdapter == null) {
    //设备不支持蓝牙
}
然后再看看你机子有没有启动蓝牙,直接通过你BluetoothAdapter的获得的实例的isEnabled方法就可以了。
如果蓝牙在这台机子上支持,能用,但是没有启动,就要调用Intent去问问看系统要不要启动蓝牙。
f (!mBluetoothAdapter.isEnabled()) {
    Intent enableBtIntent = new Intent(BluetoothAdapter.ACTION_REQUEST_ENABLE);
    startActivityForResult(enableBtIntent, REQUEST_ENABLE_BT);
}
然后你的机子会跳到蓝牙的程序,去启动蓝牙。启动之后返回当前Activity,调用Activity的onActivityResult()回调方法,蓝牙程序会返回给你两个整数常量:RESULT_OK和RESULT_CANCELED,看英文想必就大概知道什么意思了吧。
这两个常量都是Activity里面设定的常量,直接用就可以了。
protected void onActivityResult(int requestCode, int resultCode, Intent data) {
        switch (requestCode) {
            case RESULT_OK:
                //用户开启了蓝牙
                break;
            case RESULT_CANCELED:
                //用户拒绝开启蓝牙
                break;
        }
    }
5.寻找设备
Using the BluetoothAdapter, you can find remote Bluetooth devices either through device discovery or by querying the list of paired (bonded) devices.
这是AndroidDeveloper上的原话,就是说要用BluetoothAdapter找其他的蓝牙设备,要通过设备discovery,通过查询配对的设备。
在讲具体实现之前,讲一下蓝牙配对(Paired)和蓝牙连接(Connected)的区别:
配对:两个机子只是意识到了彼此的存在,互相有一个共有的密码(用于验证),具备了加密传输的能力。好比一个男单身狗和一个女单身狗相遇搭讪····
连接:两个机子连在了一起,通过RFCOMM(蓝牙的通讯协议)传输数据。好比刚才的男单身狗和女单身狗在一起了····
接下来将如何查询设备。
- 查询Paired的设备
//通过mBluetoothAdapter.getBondedDevices()返回一个BluetoothDevice的Set
Set pairedDevices = mBluetoothAdapter.getBondedDevices();
// 如果有设备
if (pairedDevices.size() > 0) {
    // 循环遍历
    for (BluetoothDevice device : pairedDevices) {
        // 通过Adapter把这些加到ListView中
        mArrayAdapter.add(device.getName() + "\n" + device.getAddress());
    }
}
- Discovery设备,通过广播接收者实现
//创建一个广播接收者用于接收信息
private final BroadcastReceiver mReceiver = new BroadcastReceiver() {
    public void onReceive(Context context, Intent intent) {
        //收到获取的广播的Action,好比你听广播的时候的频率
        String action = intent.getAction();
        //我要的广播的“频率”符合要求,Action符合要求
        if (BluetoothDevice.ACTION_FOUND.equals(action)) {
            //从Intent中获取BluetoothDevice对象
            BluetoothDevice device = intent.getParcelableExtra(BluetoothDevice.EXTRA_DEVICE);
            //信息加到ListView中去
            mArrayAdapter.add(device.getName() + "\n" + device.getAddress());
        }
    }
};
//注册广播
IntentFilter filter = new IntentFilter(BluetoothDevice.ACTION_FOUND);
registerReceiver(mReceiver, filter); //不要忘了在onDestroy中销毁广播
另外要让机子可以被扫描,还有一步是通过Intent开启蓝牙的扫描。通过startActivityForResult()方法
Intent discoverableIntent = new
Intent(BluetoothAdapter.ACTION_REQUEST_DISCOVERABLE);
//扫描蓝牙设备的间隔时间,默认120秒,最大3600秒
discoverableIntent.putExtra(BluetoothAdapter.EXTRA_DISCOVERABLE_DURATION, 300);
startActivity(discoverableIntent);
然后会显示如下的界面,就是说我们的软件要让你的手机可以被其他设备所扫描300s,你愿意吗?(我愿意~ :-))
6.连接设备
这里有一个很重要的类叫BluetoothSocket,其实他和TCP Socket的原理是一样的,一个服务端,一个客户端,客户端触发连接,服务端处理请求。只不过这里的Socket基于蓝牙的RFCOMM协议罢了,这个协议的内容我们不作深入探讨。我们之研究他们如何实现。
不过这里有一种实现的技术,就是让两个设备都成为服务端和客户端,这样两个设备都可以触发和接收请求啦~
注意:两个机子配对了,那么Android会自动产生一个对话框(如下图),然后Pair就连在一起了。
回想一下你用蓝牙的时候的怎么用的,比如电脑说要连手机,然后电脑手机上都会产生一个密码,然后让你确认密码是否一致,你说是的话就他们就连在一起了。
先说说服务端的实现,大概就是:服务端要监听来自客户端的连接请求(要用到一个BluetoothServerSocket对象),被允许后可以产生一个BluetoothSocket对象。获得BluetoothSocket对象后就可以将BluetoothServerSocket对象给“丢弃”了。
实现过程如下:
- 通过listenUsingRfcommWithServiceRecord(String, UUID)方法获取BluetoothServerSocket 对象。String可以理解为你服务端名字的代号。UUID的相关内容参考以下英文文献,我没有深入研究过,因为在蓝牙协议中要用到这个信息所以有了这个内容:
About UUID
A Universally Unique Identifier (UUID) is a standardized 128-bit format for a string ID used to uniquely identify information. The point of a UUID is that it's big enough that you can select any random and it won't clash. In this case, it's used to uniquely identify your application's Bluetooth service. To get a UUID to use with your application, you can use one of the many random UUID generators on the web, then initialize a UUID withfromString(String).
- 调用accept()实现监听
- 通过close()关闭BluetoothServerSocket
private class AcceptThread extends Thread {
    private final BluetoothServerSocket mmServerSocket;

    public AcceptThread() {

        // 建立BluetoothServerSocket的tmp,因为mmServerSocket是final类型的只能赋值一次,
        //所以要这个tmp作中转站
        BluetoothServerSocket tmp = null;

        try {
            // MY_UUID 是这款应用的UUID
            tmp = mBluetoothAdapter.listenUsingRfcommWithServiceRecord(NAME, MY_UUID);
        } catch (IOException e) { }
        mmServerSocket = tmp;
    }

    public void run() {
        BluetoothSocket socket = null;
        //保持监听知道发生异常
        while (true) {
            try {
                socket = mmServerSocket.accept();
            } catch (IOException e) {
                break;
            }
            //连接被允许了
            if (socket != null) {
                //调用管理这个socket的函数(自己写的)
                manageConnectedSocket(socket);
                //关闭ServerSocket
                mmServerSocket.close();
                break;
            }
        }
    }

    /** 线程关闭mServerSocket也会关闭 */
    public void cancel() {
        try {
            mmServerSocket.close();
        } catch (IOException e) { }
    }
}
下面讲讲客户端的实现:
- 为了从serverSocket上获取BluetoothSocket,你必须要先获取BluetoothDevice。
- 通过BluetoothDevice的createRfcommSocketToServiceRecord(UUID)方法获取BluetoothSocket的对象
- 通过connect()方法触发连接,conect()方法要在主线程之外实现!!!
private class ConnectThread extends Thread {
    private final BluetoothSocket mmSocket;
    private final BluetoothDevice mmDevice;

    public ConnectThread(BluetoothDevice device) {
        //和Server端一样的原理
        BluetoothSocket tmp = null;
        //获取蓝牙设备
        mmDevice = device;

        try {
            // MY_UUID is the app's UUID string, also used by the server code
            tmp = device.createRfcommSocketToServiceRecord(MY_UUID);
        } catch (IOException e) { }
        mmSocket = tmp;
    }

    public void run() {
        // 停止搜索设备,会降低连接的速度
        mBluetoothAdapter.cancelDiscovery();

        try {
            // 通过Socket建立连接
            //直到他成功或者抛出异常
            mmSocket.connect();
        } catch (IOException connectException) {
            // 不能连接,关闭Socket
            try {
                mmSocket.close();
            } catch (IOException closeException) { }
            return;
        }

        // Do work to manage the connection (in a separate thread)
        manageConnectedSocket(mmSocket);
    }

    /** Will cancel an in-progress connection, and close the socket */
    public void cancel() {
        try {
            mmSocket.close();
        } catch (IOException e) { }
    }
}
7.管理连接
终于到最后一步了,这里我们通过BluetoothSocket获得InputStream和OutputStream,通过read和write方法就可以做数据传输的事情了!注意:读取这些数据要异步处理(因为read和write方法会阻塞主线程)!
private class ConnectedThread extends Thread {
    private final BluetoothSocket mmSocket;
    private final InputStream mmInStream;
    private final OutputStream mmOutStream;
    public ConnectedThread(BluetoothSocket socket) {
        mmSocket = socket;
        //这里的tmp和之前的原理一样
        InputStream tmpIn = null;
        OutputStream tmpOut = null;

        //获取输出流和输入流
        try {
            tmpIn = socket.getInputStream();
            tmpOut = socket.getOutputStream();
        } catch (IOException e) { }

        mmInStream = tmpIn;
        mmOutStream = tmpOut;
    }

    public void run() {
        byte[] buffer = new byte[1024];  //存储流数据的载体
        int bytes; //read的bytes数

        //保持监听输入流直到出现异常
        while (true) {
            try {
                //从输入流中读取信息
                bytes = mmInStream.read(buffer);
                //利用Handler向主线程发送这些信息
                mHandler.obtainMessage(MESSAGE_READ, bytes, -1, buffer)
                        .sendToTarget();
            } catch (IOException e) {
                break;
            }
        }
    }

    /*从主线程中调用这个方法实现写出*/
    public void write(byte[] bytes) {
        try {
            mmOutStream.write(bytes);
        } catch (IOException e) { }
    }

    /*调用这个方法关闭连接*/
    public void cancel() {
        try {
            mmSocket.close();
        } catch (IOException e) { }
    }
}
(END)
