- Spring Boot集成Spring MVC:快速搭建Web应用
软件职业规划
springspringspringbootmvc
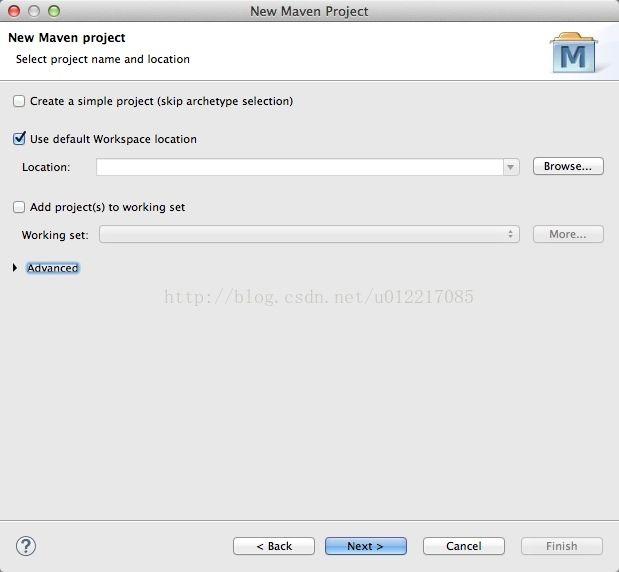
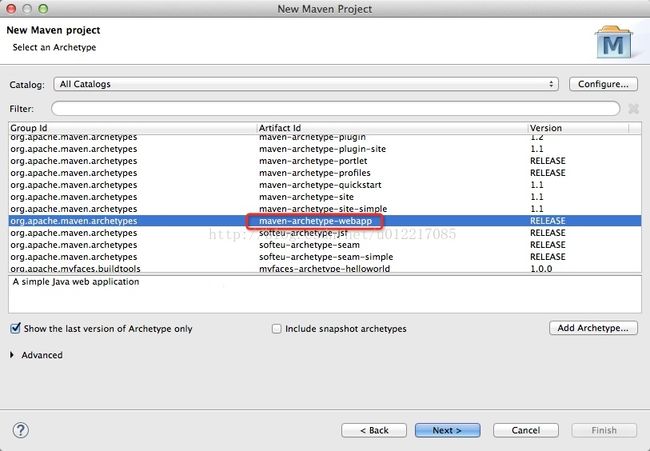
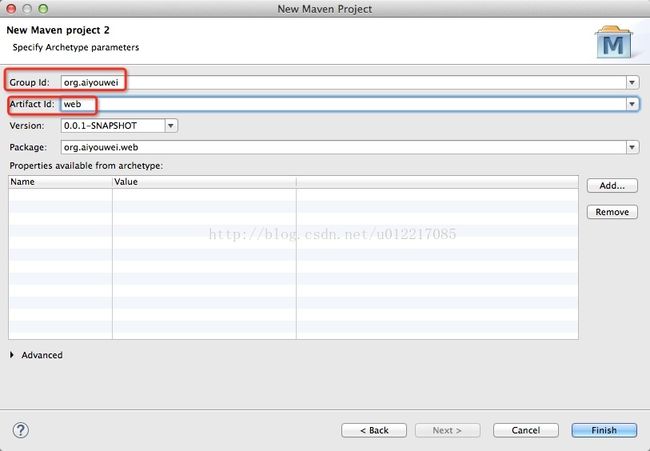
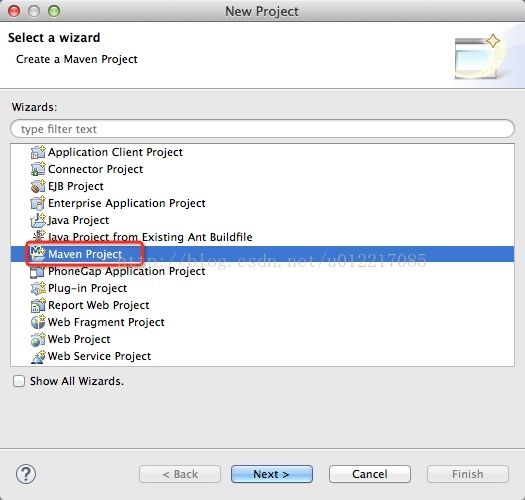
在SpringBoot项目中集成SpringMVC是一个非常常见的需求。SpringBoot已经内置了对SpringMVC的支持,因此集成过程相对简单。1.创建SpringBoot项目你可以通过以下方式创建一个SpringBoot项目:使用SpringInitializr(start.spring.io)在线生成项目。使用IDE(如IntelliJIDEA或Eclipse)的SpringBoot插
- SpringBoot Spring MVC
深度视觉机器
SpringBootspringboot
一、初始SpringMVC1.1什么是SpringMVC1、SpringMVC是Spring框架的一部分 SpringMVC是一种轻量级的、基于MVC的Web层应用框架。SpringMVC通过把模型-视图-控制器分离,将Web层进行职责解耦,把复杂的web应用分成逻辑清晰的几部分,简化开发,减少出错,方便组内开发人员之间的配合。
- SpringBoot中实现WebMvcConfigurer,配置跨域无效
TNTnine
Springspringbootjava后端
跨域配置如下:@ConfigurationpublicclassCorsConfigimplementsWebMvcConfigurer{/***跨域配置*-Access-Control-Allow-Origin的介绍:*-https://blog.csdn.net/MicroAnswer/article/details/102913571*-SpringMVC路径匹配规则:*-1、https:/
- Spring MVC 的核心以及执行流程
小马不敲代码
JAVA相关框架springmvcjava
SpringMVC的核心SpringMVC是Spring框架中的一个重要模块,它采用了经典的MVC(Model-View-Controller)设计模式。MVC是一种软件架构的思想,它将软件按照模型(Model)、视图(View)和控制器(Controller)三个核心组件来划分,以提高应用程序的可维护性、可测试性和可扩展性。•模型(Model):表示应用程序中的数据和业务逻辑。在SpringMV
- SpringMVC的工作原理
冰糖心书房
2025Java面试系列java
SpringMVC工作原理详解SpringMVC是Spring框架中用于构建Web应用程序的模块。它基于MVC(Model-View-Controller)设计模式,提供了一种清晰且可维护的方式来处理Web请求和生成响应。以下是SpringMVC工作原理的详细说明,包括各个组件的作用以及它们如何协同工作:1.用户发起请求(BrowserRequest):用户在浏览器输入URL,发起一个HTTP请求
- spring boot的约定大于配置
猿二哈
springbootjavaspring
约定大于配置是一种系统设计思想(软件设计的范式),它能够帮助我们免去许多在写程序时需要配置且只需要配置一次的操作(减少对配置项的维护,)springboot就是基于这种思想下的产物,(类似spring框架下的脚手架,能够快速开发基于spring下的应用程序)(免去了在开发应用程序时只需配置一次的操作,比如维护web.xml文件,dispatchservelet(springMVC中的文件)文件,应
- 什么是MVC?什么是SpringMVC?什么是三层架构?
m0_74824802
面试学习路线阿里巴巴mvc架构
文章目录应用分层什么是MVC?什么是SpringMVC?三层架构三层架构和MVC的关系应用分层在讲解什么是MVC之前,先来理解一下什么是应用分层。应用分层是一种软件开发设计思想,将应用程序划分成N个层次,每个层次都分别负责自己的职责,多个层次之间来协同提供完整的功能,根据项目的复杂度,将项目分成三层或四层等。举个例子:比如,一个公司创始初期,创始人要身兼数职,既要做财务,又要做人事,又要做行政,但
- java word在线编辑_[原创]Java开发在线打开编辑保存Word文件(支持多浏览器)
嘻嘻哈哈哦哦吧
javaword在线编辑
Java调用PageOffice实现在线编辑保存Word文件(以jsp调用为例,支持SSM、SSH、SpringMVC等流行框架)1.下载PageOffice开发包:http://www.zhuozhengsoft.com/dowm/下载PageOfficeforJAVA2.以Myeclipse为例,新建一个WebProject,比如:wordonline3.解压PageOffice开发包,拷贝“
- 19.4 集成Spring MVC-《SSM深入解析与项目实战》
谙忆
SSM项目实战
19.4集成SpringMVC-《SSM深入解析与项目实战》项目中所有的源码都可以在此链接的仓库中找到:https://github.com/chenhaoxiang/uifuture-ssm文章目录19.4集成SpringMVC27:Freemarker依赖application-mvc.xml文件web.xml文件内容web.xml做了什么index.ftl配置方法跳转页面19.4集成Spri
- 应用分层、三层架构和MVC架构
小猪同学hy
java架构mvc
前言在前面中,我们已经学习了SpringMVC的一些基础操作,那么后面就用一些简单的案例来巩固一下。在开始学习做案例之前,我们先来了解一下在软件开发中常见的设计模式和架构。应用分层含义应用分层是一种软件开发设计思想,将应用程序分成N个层次,每个层次各司其职,多个层次之间协同提供完整的功能。根据项目的复杂度,可以把项目分为三层、四层或者更多层。我们前面学习的MVC设计模式,就是应用分层的一种具体体现
- 深入理解Spring MVC中的后缀模式匹配
t0_54manong
springmvcjava个人开发
在SpringMVC开发中,RequestMappingHandlerMapping的setUseRegisteredSuffixPatternMatch()方法是一个容易被忽视但非常重要的配置选项。它决定了是否启用后缀模式匹配(即以.*结尾的路径匹配)。默认情况下,该选项为true,这意味着一个映射为/xyz的处理器也会匹配/xyz.abc或/xyz.abc.test等路径,但不会匹配xyzab
- 基于JavaSpringmvc+myabtis+html的鲜花商城系统设计和实现
网顺技术团队
成品程序项目html前端课程设计java开发语言mybatis
基于JavaSpringmvc+myabtis+html的鲜花商城系统设计和实现作者主页网顺技术团队欢迎点赞收藏⭐留言文末获取源码联系方式查看下方微信号获取联系方式承接各种定制系统精彩系列推荐精彩专栏推荐订阅不然下次找不到哟Java毕设项目精品实战案例《1000套》感兴趣的可以先收藏起来,还有大家在毕设选题,项目以及论文编写等相关问题都可以给我留言咨询,希望帮助更多的人文章目录基于JavaSpri
- 【课程设计】Java EE SSM 试卷管理系统
鱼弦
课程设计java-eejava
JavaEESSM试卷管理系统简介试卷管理系统是一个用于教育机构、培训中心等单位的在线考试和评估工具。该系统帮助教师管理考试题目、生成试卷,并将试卷导出为Word文档。应用使用场景学校与教育机构:用于日常测验、期中和期末考试。企业培训:用于员工技能测试和评估。在线教育平台:用于提供学生练习题和模拟考试。原理解释架构系统基于JavaEE开发,采用了Spring、SpringMVC和MyBatis(S
- Java进阶必读书籍推荐
m0_74824054
面试学习路线阿里巴巴java开发语言
一java编程入门《java编程思想》,《Agilejava》中文版,《你必须知道的261个java语言问题》二java编程进阶《编程匠艺——如何编写卓越的代码》,《重构改善既有代码的设计》,《驱动测试开发byExample》三java架构师之路《ExpertOne-on-OneJ2EEDesignandDevelopment》,《企业应用架构模式》,《敏捷软件开发原则、模式和实践》四软件开发过程
- day---04
健子bui
CSDN使用java
1.SpringMVC调用流程1.1组件说明1.1.0Servlet作用在这里插入图片描述1.1.1前端控制器(Servlet机制)作用:SpringMVC中控制用户的请求的转发…/响应的规则1.1.2处理器映射器铺垫:404什么错误请求资源没有找到.作用:标识用户的请求路径/后端执行的方法的映射关系.数据结构:Map工作过程:当tomcat服务器启动时,带动SpringMVC的组件运行.将所有的
- 最新计算机专业开题报告案例84:基于Springboot框架的校园点餐系统的设计与实现
平姐设计
微信小程序项目实战java项目实战计算机毕业设计开题报告100套springbootjava校园点餐管理系统餐厅管理在线支付开题报告国内外研究现状
计算机毕业设计100套微信小程序项目实战java项目实战需要源码可以滴滴我请文末卡片dd我获取更详细的演示视频撰写不易,感谢支持!目录一、研究背景和意义1.1研究背景1.2研究意义二、国内外研究状况2.1后端技术2.1.1基于SpringBoot的校园点餐系统设计与实现2.1.2基于SpringMVC的校园点餐系统设计与实现2.1.3基于Mybatis的校园点餐系统设计与实现2.2前端技术2.2.
- Spring Boot项目中实现文件的上传、下载和预览功能
战族狼魂
javaSpringbootspringboot后端java
在SpringBoot项目中实现文件的上传、下载和预览功能,可以通过使用SpringMVC的MultipartFile接口来处理文件上传,并使用HttpServletResponse或Resource来实现文件下载和预览。下面是如何实现这些功能的完整示例。1.引入依赖确保在pom.xml中引入了SpringBoot的相关依赖。通常情况下,SpringBootStarterWeb已经包含了必要的依赖
- Spring MVC拦截器(Interceptor)
暮晓引流软件
面试学习路线阿里巴巴mvcspringjava后端c#
在系统中,经常需要在处理用户请求之前和之后执行一些行为,例如检测用户的权限,或者将请求的信息记录到日志中,即平时所说的“权限检测”及“日志记录”。当然不仅仅这些,所以需要一种机制,拦截用户的请求,在请求的前后添加处理逻辑。SpringMVC提供了Interceptor拦截器机制,用于请求的预处理和后处理。在开发一个网站时可能有这样的需求:某些页面只希望几个特定的用户浏览。对于这样的访问权限控制,应
- Spring MVC中的拦截器和Servlet中的filter(过滤器)有什么区别?
猫猫爱敲代码
springmvcservlet
一、作用范围过滤器(Filter):作用于整个Web应用程序,可以对所有的Servlet和JSP等资源进行过滤处理,是Servlet规范的一部分,独立于特定的框架。例如,一个用于编码转换的过滤器可以对所有请求和响应进行字符集的转换,无论请求是针对哪个具体的业务模块。拦截器(Interceptor):主要作用于SpringMVC框架中的请求处理过程,仅对SpringMVC管理的控制器方法的调用进行拦
- Spring MVC 拦截器(Interceptor)与过滤器(Filter)的区别?
许苑向上
springmvcjava
1、两者概述拦截器(Interceptor):只会拦截那些被@Controller或@RestController标注的类中的方法处理的请求,也就是那些由SpringMVC调度的请求。过滤器(Filter):会拦截所有类型的HTTP请求,包括静态资源和后台API。2、什么是Controller处理的请求?Controller是SpringMVC的核心组件之一,用于处理用户的HTTP请求,并返回响应
- Maven Web项目解决跨域问题
Smile_Miracle
Java开发Java开发经验积累springmvc服务器web
跨域问题目前笔者所用到的方案大致有三种:jsonp,SpringMVC4以上注解方式和cros三方过滤器。JsonpJSONP(JSONwithPadding)是一个非官方的协议,它允许在服务器端集成Scripttags返回至客户端,通过javascriptcallback的形式实现跨域访问(这仅仅是JSONP简单的实现形式)。Jsonp原理:首先在客户端注册一个callback,然后把callb
- controller方法直接返回对象报错
cskf
springmvcspringmvc
controller方法返回对象,报错HTTPStatus500–InternalServerErrorTypeExceptionReportMessageServlet.init()forservlet[springmvc-01]threwexceptionDescriptionTheserverencounteredanunexpectedconditionthatpreventeditfro
- java ssm mysql 开源_SSM(Spring+Spring MVC+Mybatis)开发简约漂亮的java开源博客管理系统,其中前台后台功能完整。...
weixin_39750598
javassmmysql开源
项目描述本项目通过SSM(SpringMVC+Mybatis+Spring)框架编写的一个人博客管理系统,使用hexo主题,以及MAVEN进行对项目管理,并且前端具有粒子和点击爱心效果.后端的页面框架为bootstrap.数据库为mysql.运行环境jdk8+tomcat8+mysql+eclipse+maven(idea)项目技术(必填)spring+springmvc+mybatis+boot
- SpringBoot的单机模式是否需要消息队列?分布式应用中消息队列如何和服务的发现与注册、配置中心、SpringMVC相配合
陈老师还在写代码
SpringBoot100问springbootjava后端
单机模式是否需要消息队列在单机模式下,通常不需要消息队列,因为所有组件都在同一台机器上运行,可以直接通过方法调用或本地事件进行通信。消息队列主要用于解决分布式系统中的异步通信、解耦、流量削峰等问题,而这些在单机模式下并不常见。不过,某些场景下单机模式也可能使用消息队列:异步处理:将耗时操作异步化,提升响应速度。解耦:模块间通过消息队列通信,降低耦合度。流量削峰:应对突发流量,避免系统过载。分布式应
- Java 高频面试闯关秘籍
向画
java前端面试开发语言职场和发展
目录Java基础篇:涵盖OOP、多线程、集合等基础知识。Java高级篇:深入探讨HashMap、JVM、线程池等高级特性。Java框架篇:介绍Spring、SpringMVC、MyBatis等常用框架。Mysql数据库篇:包含SQL语句、事务、索引等数据库知识。分布式技术篇:讲解Redis、消息队列、ElasticSearch等分布式技术。项目管理工具Git篇:阐述Git的使用流程和常见命令。综合
- @RequestParam 和 @PathVariable区别
是小傲雨呀^_^
java注解
@RequestParam和@PathVariable都是SpringMVC中用于处理HTTP请求参数的两种注解,它们的主要区别如下:1.用途@RequestParam:用于从URL的查询参数中获取值。@PathVariable:用于从URL的路径中获取值。2.URL示例@RequestParam:/users?id=123这里的id是查询参数。@PathVariable:/users/123这里
- Java Web学习总结(32)——Java程序员最亲睐的Web框架
一杯甜酒
JavaWeb
这一次,我们要讨论的是web框架。只有少数几种语言像Java一样提供了各种各样的web框架,上面的统计图就是一个证据。下面是其他开发者所使用web框架列表:springMVC/SpringBoot:Spring可以帮助各地的开发团队构建简单轻便、快捷灵活基于JVM的系统和应用程序Vert.x:一个用于在JVM上构建反应式应用程序的工具包JSF:官方的JavaEEweb框架PlayFramework
- JavaEE Spring MVC入门——第一个Spring MVC应用程序(教材学习笔记)
「已注销」
SpringMVC是Spring提供的一个实现了WebMVC设计模式的轻量级Web框架,下面通过一个小例子学习一下什么是SpringMVC一、创建项目,引入jar包在Eclipse中创建一个名为chapter11的web项目,在项目的lib目录下导入所需的jar包,具体如下:二、配置前端控制器在web.xml文件中配置前端控制器,DispatcherServlet,如下面所示:springmvc
- 【系统设计】Spring、SpringMVC 与 Spring Boot
土豆炒马铃薯。
SpringSpringBootSpringMVCspringspringbootjava后端springMVC开发语言
一、Spring框架:企业级开发的基石1.历史背景Spring框架诞生于2003年,由RodJohnson提出,旨在解决传统EJB(EnterpriseJavaBeans)开发的复杂性和低效问题。它通过轻量级的依赖注入(DI)和面向切面编程(AOP)两大核心特性,彻底改变了Java企业级应用的开发方式。2.核心功能控制反转(IoC)与依赖注入(DI)通过IoC容器管理对象生命周期和依赖关系,避免硬
- @ModelAttribute 注解:Spring MVC 中模型管理的得力助手
码农技术栈
springcloudspringbootjava微服务后端
@ModelAttribute注解在Spring中的作用,就像是给Web页面的数据准备了一个“小助手”。想象一下,你要去一个餐厅吃饭,点菜之前,服务员可能会先给你上一些免费的开胃小菜或者餐前小吃。这些小吃虽然不是主食,但它们能帮你先垫垫肚子,让你在正式点菜之前就有点东西可吃。在SpringMVC的Web开发中,@ModelAttribute注解就起到了类似的作用。它通常用在方法上,这个方法会在Co
- java封装继承多态等
麦田的设计者
javaeclipsejvmcencapsulatopn
最近一段时间看了很多的视频却忘记总结了,现在只能想到什么写什么了,希望能起到一个回忆巩固的作用。
1、final关键字
译为:最终的
&
- F5与集群的区别
bijian1013
weblogic集群F5
http请求配置不是通过集群,而是F5;集群是weblogic容器的,如果是ejb接口是通过集群。
F5同集群的差别,主要还是会话复制的问题,F5一把是分发http请求用的,因为http都是无状态的服务,无需关注会话问题,类似
- LeetCode[Math] - #7 Reverse Integer
Cwind
java题解MathLeetCodeAlgorithm
原题链接:#7 Reverse Integer
要求:
按位反转输入的数字
例1: 输入 x = 123, 返回 321
例2: 输入 x = -123, 返回 -321
难度:简单
分析:
对于一般情况,首先保存输入数字的符号,然后每次取输入的末位(x%10)作为输出的高位(result = result*10 + x%10)即可。但
- BufferedOutputStream
周凡杨
首先说一下这个大批量,是指有上千万的数据量。
例子:
有一张短信历史表,其数据有上千万条数据,要进行数据备份到文本文件,就是执行如下SQL然后将结果集写入到文件中!
select t.msisd
- linux下模拟按键输入和鼠标
被触发
linux
查看/dev/input/eventX是什么类型的事件, cat /proc/bus/input/devices
设备有着自己特殊的按键键码,我需要将一些标准的按键,比如0-9,X-Z等模拟成标准按键,比如KEY_0,KEY-Z等,所以需要用到按键 模拟,具体方法就是操作/dev/input/event1文件,向它写入个input_event结构体就可以模拟按键的输入了。
linux/in
- ContentProvider初体验
肆无忌惮_
ContentProvider
ContentProvider在安卓开发中非常重要。与Activity,Service,BroadcastReceiver并称安卓组件四大天王。
在android中的作用是用来对外共享数据。因为安卓程序的数据库文件存放在data/data/packagename里面,这里面的文件默认都是私有的,别的程序无法访问。
如果QQ游戏想访问手机QQ的帐号信息一键登录,那么就需要使用内容提供者COnte
- 关于Spring MVC项目(maven)中通过fileupload上传文件
843977358
mybatisspring mvc修改头像上传文件upload
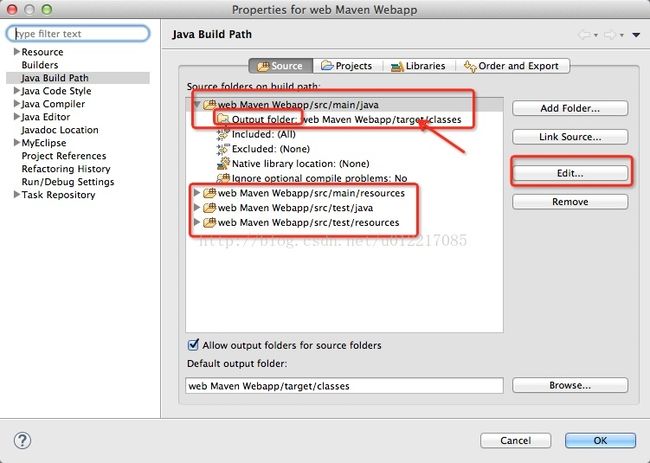
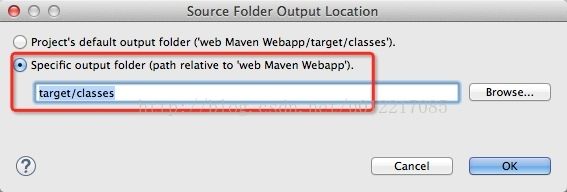
Spring MVC 中通过fileupload上传文件,其中项目使用maven管理。
1.上传文件首先需要的是导入相关支持jar包:commons-fileupload.jar,commons-io.jar
因为我是用的maven管理项目,所以要在pom文件中配置(每个人的jar包位置根据实际情况定)
<!-- 文件上传 start by zhangyd-c --&g
- 使用svnkit api,纯java操作svn,实现svn提交,更新等操作
aigo
svnkit
原文:http://blog.csdn.net/hardwin/article/details/7963318
import java.io.File;
import org.apache.log4j.Logger;
import org.tmatesoft.svn.core.SVNCommitInfo;
import org.tmateso
- 对比浏览器,casperjs,httpclient的Header信息
alleni123
爬虫crawlerheader
@Override
protected void doGet(HttpServletRequest req, HttpServletResponse res) throws ServletException, IOException
{
String type=req.getParameter("type");
Enumeration es=re
- java.io操作 DataInputStream和DataOutputStream基本数据流
百合不是茶
java流
1,java中如果不保存整个对象,只保存类中的属性,那么我们可以使用本篇文章中的方法,如果要保存整个对象 先将类实例化 后面的文章将详细写到
2,DataInputStream 是java.io包中一个数据输入流允许应用程序以与机器无关方式从底层输入流中读取基本 Java 数据类型。应用程序可以使用数据输出流写入稍后由数据输入流读取的数据。
- 车辆保险理赔案例
bijian1013
车险
理赔案例:
一货运车,运输公司为车辆购买了机动车商业险和交强险,也买了安全生产责任险,运输一车烟花爆竹,在行驶途中发生爆炸,出现车毁、货损、司机亡、炸死一路人、炸毁一间民宅等惨剧,针对这几种情况,该如何赔付。
赔付建议和方案:
客户所买交强险在这里不起作用,因为交强险的赔付前提是:“机动车发生道路交通意外事故”;
如果是交通意外事故引发的爆炸,则优先适用交强险条款进行赔付,不足的部分由商业
- 学习Spring必学的Java基础知识(5)—注解
bijian1013
javaspring
文章来源:http://www.iteye.com/topic/1123823,整理在我的博客有两个目的:一个是原文确实很不错,通俗易懂,督促自已将博主的这一系列关于Spring文章都学完;另一个原因是为免原文被博主删除,在此记录,方便以后查找阅读。
有必要对
- 【Struts2一】Struts2 Hello World
bit1129
Hello world
Struts2 Hello World应用的基本步骤
创建Struts2的Hello World应用,包括如下几步:
1.配置web.xml
2.创建Action
3.创建struts.xml,配置Action
4.启动web server,通过浏览器访问
配置web.xml
<?xml version="1.0" encoding="
- 【Avro二】Avro RPC框架
bit1129
rpc
1. Avro RPC简介 1.1. RPC
RPC逻辑上分为二层,一是传输层,负责网络通信;二是协议层,将数据按照一定协议格式打包和解包
从序列化方式来看,Apache Thrift 和Google的Protocol Buffers和Avro应该是属于同一个级别的框架,都能跨语言,性能优秀,数据精简,但是Avro的动态模式(不用生成代码,而且性能很好)这个特点让人非常喜欢,比较适合R
- lua set get cookie
ronin47
lua cookie
lua:
local access_token = ngx.var.cookie_SGAccessToken
if access_token then
ngx.header["Set-Cookie"] = "SGAccessToken="..access_token.."; path=/;Max-Age=3000"
end
- java-打印不大于N的质数
bylijinnan
java
public class PrimeNumber {
/**
* 寻找不大于N的质数
*/
public static void main(String[] args) {
int n=100;
PrimeNumber pn=new PrimeNumber();
pn.printPrimeNumber(n);
System.out.print
- Spring源码学习-PropertyPlaceholderHelper
bylijinnan
javaspring
今天在看Spring 3.0.0.RELEASE的源码,发现PropertyPlaceholderHelper的一个bug
当时觉得奇怪,上网一搜,果然是个bug,不过早就有人发现了,且已经修复:
详见:
http://forum.spring.io/forum/spring-projects/container/88107-propertyplaceholderhelper-bug
- [逻辑与拓扑]布尔逻辑与拓扑结构的结合会产生什么?
comsci
拓扑
如果我们已经在一个工作流的节点中嵌入了可以进行逻辑推理的代码,那么成百上千个这样的节点如果组成一个拓扑网络,而这个网络是可以自动遍历的,非线性的拓扑计算模型和节点内部的布尔逻辑处理的结合,会产生什么样的结果呢?
是否可以形成一种新的模糊语言识别和处理模型呢? 大家有兴趣可以试试,用软件搞这些有个好处,就是花钱比较少,就算不成
- ITEYE 都换百度推广了
cuisuqiang
GoogleAdSense百度推广广告外快
以前ITEYE的广告都是谷歌的Google AdSense,现在都换成百度推广了。
为什么个人博客设置里面还是Google AdSense呢?
都知道Google AdSense不好申请,这在ITEYE上也不是讨论了一两天了,强烈建议ITEYE换掉Google AdSense。至少,用一个好申请的吧。
什么时候能从ITEYE上来点外快,哪怕少点
- 新浪微博技术架构分析
dalan_123
新浪微博架构
新浪微博在短短一年时间内从零发展到五千万用户,我们的基层架构也发展了几个版本。第一版就是是非常快的,我们可以非常快的实现我们的模块。我们看一下技术特点,微博这个产品从架构上来分析,它需要解决的是发表和订阅的问题。我们第一版采用的是推的消息模式,假如说我们一个明星用户他有10万个粉丝,那就是说用户发表一条微博的时候,我们把这个微博消息攒成10万份,这样就是很简单了,第一版的架构实际上就是这两行字。第
- 玩转ARP攻击
dcj3sjt126com
r
我写这片文章只是想让你明白深刻理解某一协议的好处。高手免看。如果有人利用这片文章所做的一切事情,盖不负责。 网上关于ARP的资料已经很多了,就不用我都说了。 用某一位高手的话来说,“我们能做的事情很多,唯一受限制的是我们的创造力和想象力”。 ARP也是如此。 以下讨论的机子有 一个要攻击的机子:10.5.4.178 硬件地址:52:54:4C:98
- PHP编码规范
dcj3sjt126com
编码规范
一、文件格式
1. 对于只含有 php 代码的文件,我们将在文件结尾处忽略掉 "?>" 。这是为了防止多余的空格或者其它字符影响到代码。例如:<?php$foo = 'foo';2. 缩进应该能够反映出代码的逻辑结果,尽量使用四个空格,禁止使用制表符TAB,因为这样能够保证有跨客户端编程器软件的灵活性。例
- linux 脱机管理(nohup)
eksliang
linux nohupnohup
脱机管理 nohup
转载请出自出处:http://eksliang.iteye.com/blog/2166699
nohup可以让你在脱机或者注销系统后,还能够让工作继续进行。他的语法如下
nohup [命令与参数] --在终端机前台工作
nohup [命令与参数] & --在终端机后台工作
但是这个命令需要注意的是,nohup并不支持bash的内置命令,所
- BusinessObjects Enterprise Java SDK
greemranqq
javaBOSAPCrystal Reports
最近项目用到oracle_ADF 从SAP/BO 上调用 水晶报表,资料比较少,我做一个简单的分享,给和我一样的新手 提供更多的便利。
首先,我是尝试用JAVA JSP 去访问的。
官方API:http://devlibrary.businessobjects.com/BusinessObjectsxi/en/en/BOE_SDK/boesdk_ja
- 系统负载剧变下的管控策略
iamzhongyong
高并发
假如目前的系统有100台机器,能够支撑每天1亿的点击量(这个就简单比喻一下),然后系统流量剧变了要,我如何应对,系统有那些策略可以处理,这里总结了一下之前的一些做法。
1、水平扩展
这个最容易理解,加机器,这样的话对于系统刚刚开始的伸缩性设计要求比较高,能够非常灵活的添加机器,来应对流量的变化。
2、系统分组
假如系统服务的业务不同,有优先级高的,有优先级低的,那就让不同的业务调用提前分组
- BitTorrent DHT 协议中文翻译
justjavac
bit
前言
做了一个磁力链接和BT种子的搜索引擎 {Magnet & Torrent},因此把 DHT 协议重新看了一遍。
BEP: 5Title: DHT ProtocolVersion: 3dec52cb3ae103ce22358e3894b31cad47a6f22bLast-Modified: Tue Apr 2 16:51:45 2013 -070
- Ubuntu下Java环境的搭建
macroli
java工作ubuntu
配置命令:
$sudo apt-get install ubuntu-restricted-extras
再运行如下命令:
$sudo apt-get install sun-java6-jdk
待安装完毕后选择默认Java.
$sudo update- alternatives --config java
安装过程提示选择,输入“2”即可,然后按回车键确定。
- js字符串转日期(兼容IE所有版本)
qiaolevip
TODateStringIE
/**
* 字符串转时间(yyyy-MM-dd HH:mm:ss)
* result (分钟)
*/
stringToDate : function(fDate){
var fullDate = fDate.split(" ")[0].split("-");
var fullTime = fDate.split("
- 【数据挖掘学习】关联规则算法Apriori的学习与SQL简单实现购物篮分析
superlxw1234
sql数据挖掘关联规则
关联规则挖掘用于寻找给定数据集中项之间的有趣的关联或相关关系。
关联规则揭示了数据项间的未知的依赖关系,根据所挖掘的关联关系,可以从一个数据对象的信息来推断另一个数据对象的信息。
例如购物篮分析。牛奶 ⇒ 面包 [支持度:3%,置信度:40%] 支持度3%:意味3%顾客同时购买牛奶和面包。 置信度40%:意味购买牛奶的顾客40%也购买面包。 规则的支持度和置信度是两个规则兴
- Spring 5.0 的系统需求,期待你的反馈
wiselyman
spring
Spring 5.0将在2016年发布。Spring5.0将支持JDK 9。
Spring 5.0的特性计划还在工作中,请保持关注,所以作者希望从使用者得到关于Spring 5.0系统需求方面的反馈。