portainer(1):使用 1.22.0 版本,二进制搭建服务端环境,修改端口,agent连接成功
前言
本文的原文连接是: https://blog.csdn.net/freewebsys/article/details/100717108
未经博主允许不得转载。
博主地址是:http://blog.csdn.net/freewebsys
1,关于portainer
是一个开源的,轻量化的docker集群管理系统。
非常的方便好用,使用中小型企业,管理1000 个服务器足够了。底层是基于 swarm 做的。
项目地址:
https://github.com/portainer/portainer
官网:
https://www.portainer.io/
文档:
https://portainer.readthedocs.io/en/stable/deployment.html
最新的安装包:
https://github.com/portainer/portainer/releases
2,安装管理端
首先下载最新的安装包:
https://github.com/portainer/portainer/releases
选择 linux64 的版本。里面就两个执行文件 docker 和 portainer ,其中docker 可以不用启动也行呢。
启动参数:
Flags:
      --help                     Show context-sensitive help (also try --help-long and --help-man).
      --version                  Show application version.
  -p, --bind=":9000"             Address and port to serve Portainer
      --tunnel-addr="0.0.0.0"    Address to serve the tunnel server
      --tunnel-port="2000"       Port to serve the tunnel server
  -a, --assets="./"              Path to the assets
  -d, --data="/data"             Path to the folder where the data is stored
  -H, --host=HOST                Endpoint URL
      --external-endpoints=EXTERNAL-ENDPOINTS
                                 Path to a file defining available endpoints
      --no-auth                  Disable authentication
      --no-analytics             Disable Analytics in app
      --tlsverify                TLS support
      --tlsskipverify            Disable TLS server verification
      --tlscacert="/certs/ca.pem"
                                 Path to the CA
      --tlscert="/certs/cert.pem"
                                 Path to the TLS certificate file
      --tlskey="/certs/key.pem"  Path to the TLS key
      --ssl                      Secure Portainer instance using SSL
      --sslcert="/certs/portainer.crt"
                                 Path to the SSL certificate used to secure the Portainer instance
      --sslkey="/certs/portainer.key"
                                 Path to the SSL key used to secure the Portainer instance
      --sync-interval="60s"      Duration between each synchronization via the external endpoints source
      --snapshot                 Start a background job to create endpoint snapshots
      --snapshot-interval="5m"   Duration between each endpoint snapshot job
      --admin-password=ADMIN-PASSWORD
                                 Hashed admin password
      --admin-password-file=ADMIN-PASSWORD-FILE
                                 Path to the file containing the password for the admin user
  -l, --hide-label=HIDE-LABEL ...
                                 Hide containers with a specific label in the UI
      --logo=LOGO                URL for the logo displayed in the UI
  -t, --templates=TEMPLATES      URL to the templates definitions.
      --template-file="/templates.json"
                                 Path to the templates (app) definitions on the filesystem
这边只需要修改下:这里需要两个端口http端口是9090 ,ws端口是 8080 。必须两个端口都可以访问才行。
./portainer --data /data --bind=":9090" --tunnel-port="8080" --template-file "${PWD}/templates.json"
启动之后初始化密码,需要在 5分钟之内设置,否则http服务就关闭了。然后开始配置edge agent。
输入ip:9090 端口,修改过的。

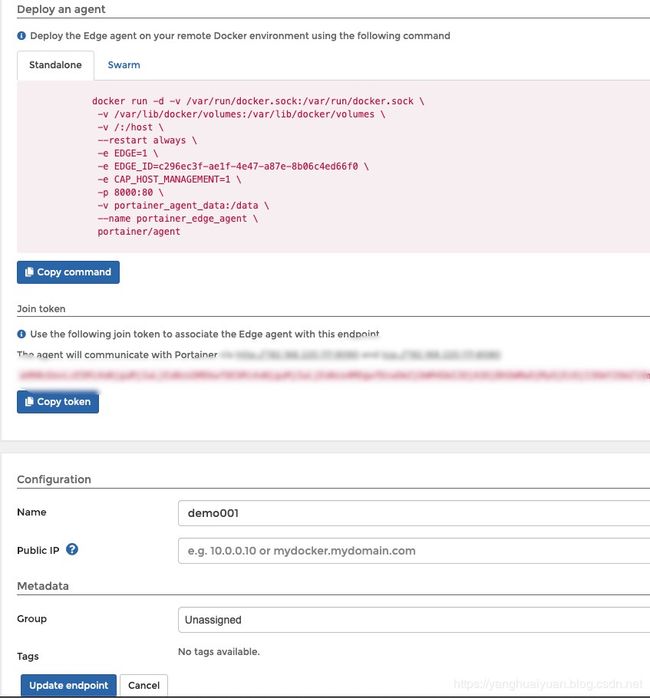
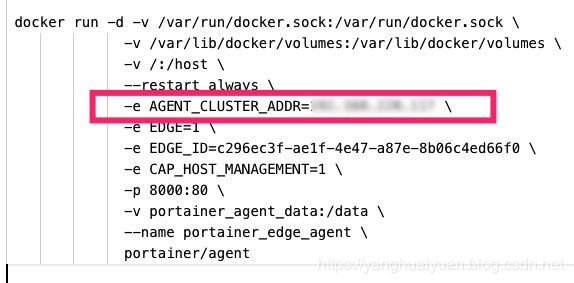
拷贝docker 命令执行:需要加上 AGENT_CLUSTER_ADDR 参数,就是管理段IP,否则启动不了。
在客户端访问:http://localhost:8000 端口:

然后把token输入:提交成功。

在更新 node 节点信息。显示节点key,说明已经注册成功。

然后就可以预览,查看整个 agent 的情况了。

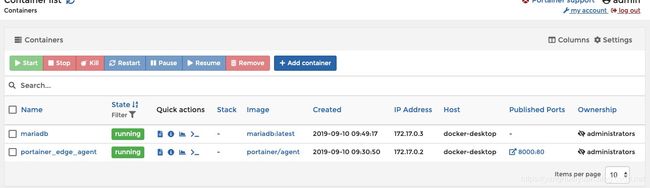
可以看到一个 agent 程序在跑着呢,这个不能关闭。

创建一个 mariadb 的容器。

配置root 密码:

点击执行即可:执行成功,可以看到两个容器跑起来了。
3,总结
portainer 还是非常简单的,只需要简单几下就可以管理客户端端的docker程序。
但是这个只是一个服务器的,多个服务器还没有集群,其中的集群使用的是swarm。
资料比较少,网络都通了。就可以了。
在注册一个 angent的 时候,首先在服务端生层一个 token,然后在客户端提交这个token,做验证。
保证安全性。验证完成之后就可以对客户端的docker进行管理升级操作了。
本文的原文连接是:
https://blog.csdn.net/freewebsys/article/details/100717108
博主地址是:http://blog.csdn.net/freewebsys
