win10 & spacemacs & python & R & org 学习笔记
to be continue,还在修改当中。也许有点用。
1.什么是python,什么是R,什么是org,为什么使用他们
先将org,org是用来软件可以用来写学术笔记,可以用来规划自己的生活。如果不考虑手写的话,那么可以算得上是最为方便的笔记了。如果需要手写可以导出文本后导入onenote进行编辑。具体功能有视频介绍*添加链接
pyhton则是现在最为常见的变成语言,可以做非常多不同类型的事情,比如画分析图,分析数据,建立网站,甚至听说可以做游戏。
R是一门统计语言,我本人作为经济学的学生需要使用到她。
2. 什么是spacemacs,为什么选择spacemacs
曾经也用过很多编辑器,但是不同和的语言难以在一个编辑器里面实现。切换语言同时需要切换编辑器感觉不够优雅,所以决定从vim和emacs里面选择一个。vim用的人好多,不是很能够装x,所以决定用emacs。spacemacs的话界面很好看,而且好像难度小一点。就是你了。
3. 为什么是window平台
屌丝买不起mac。穷玩车富玩表,屌丝玩电脑(游戏),win平台可以玩游戏。所以只能是win系统了,windows系统确实要走一些弯路,但是毕竟是用的人最多的平台,而且很多软件只支持win平台。我用的win10家庭版。
4.spacemacs 的安装
- 下载emacs和spacemacs软件
- 安装emacs软件
- 打开emacs软件,安装目录或者安装目录下的bin文件夹或者根目录应该要出现 ".emacs.d"文件夹
- 把spacemacs软件解压后导入到上述文件夹
- 再次打开emacs,然后都选择第一个属性
可能报错:
1.报错如图
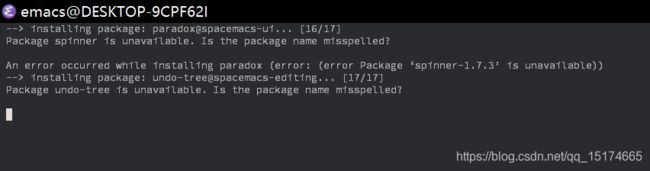
此时,根据GitHub的提示
应该要使用win键+R键 运行 输入cmd 然后在命令行cd到emacs的安装目录(你也可以在emacs的安装目录的文件夹上面的地址栏当中直接输入cmd,这样cmd的位置就在你想要的目录内咯),使用emacs --insecure 命令来打开emacs。下方应该出现":80",而不是冒号443。
2.修改字体,以及不能够改变字体大小的原因。(因为字太小,十分影响体验,因此先解决这个问题)
修改字体必须进入spacemacs 的配置当中才能够修改。快捷键SPC e d(每次修改好设置需要按SPC e R才能够让自己的修改后的配置实现)
进入到 .spacemacs以后,输入
   dotspacemacs-default-font '("Source Code Pro"
                               :size 24
                               :weight normal
                               :width normal
                               :powerline-scale 1.1)
(其他不用管,size那边是调整大小)
有时候会出现没有这个问题是因为没有安装相应字体导致的。
解决思路:
1.可以改成电脑已经安装的字体(最好不要,因为官方推荐的这个字体编程还是合适的,而且你要查其他字体的名字也麻烦。)
2.也可以下载spacemacs推荐的字体安装到自己的主机。也就是下载字体以后双击。
5. python的安装
在spacemacs当中按SPC h l 然后输入python,选取,你会找到一个帮助文档。里面指明了python可以实现的内容和功能。
有如下主要内容:
- 安装
- 自动补全
- 语法检查
- test runner 也就是测试环境
- 自动规整python程序格式
- 自动减少你不需要import的python包
- pylookup(暂时不会这个功能)
- hy-mode (暂时不会这个功能)
- 版本控制
- 虚拟环境
- 同步代码等等
首先考虑的应该是python的版本控制和虚拟环境。
python的安装应该使用虚拟环境来进行。这样的好处在于,可以管理python的版本,有些时候你需要python2.x版本,有些时候你需要python3.x版本。此外,还有一种情况是不同的项目需要用到不同的package,因为python是功能非常丰富的编程语言。为了编程环境的稳定,以及python程序的轻便,高效,应该建立不同的虚拟环境。
要实现上述两大功能分别需要用到两个工具。
pyenv——控制python版本
pyvenv——控制python的虚拟环境
5.1 pyenv的安装(实际上是pyenv-win)
根据spacemacs的提示(在spacemacs当中按SPC h l ,然后输入python,回车),也就是pyenv 我们可以看到详细的说明。但是,安装pyenv的时候,由于本人使用的是windows10,因此实际上需要下载的是pyenv-win这个软件。这个时候假定我们并没有下载python(最好卸载掉之前的python,以免搞混),因此,我没有办法使用网页当中的python自带的pip命令来安装包,所以,我下载zip版本,解压到自己喜欢的文件夹当中,然后添加\shims和\bin这两个文件夹的路径到我的电脑-属性-高级-环境变量-path当中(注意,是两个文件夹,不是一个)。如图(实际上应该添加到系统变量里面的path比较好):
然后你就可以在系统的任意位置使用pyenv-win啦。
5.2pyenv-win的使用
pyenv-win 可以做到如下:
commands List all available pyenv commands
local Set or show the local application-specific Python version
global Set or show the global Python version
shell Set or show the shell-specific Python version
install Install a Python version using python-build
uninstall Uninstall a specific Python version
rehash Rehash pyenv shims (run this after installing executables)
version Show the current Python version and its origin
versions List all Python versions available to pyenv
exec Runs an executable by first preparing PATH so that the selected Python
要使用命令的时候记得前面要加上pyenv空格
通过pyenv你就可以新建一个python版本。而后,虚拟环境则在这个版本之上进行构建。
在emacs当中 进入.py 文件以后,SPC m v s 就可以设定自己所要使用的版本。
5.5安装ipython
pip install ipython就可以了
但是需要注意!你的ipython要安装在global当中spacemacs才不会有警告
5.4 管理python的环境–pyvenv的安装(实际上是 virtualenv 的安装)
主要参考资料
virtualenv是什么: is a tool to create isolated Python environments. virtualenv creates a folder which contains all the necessary executables to use the packages that a Python project would need.
也就是说你可以使用一个文件夹来安放自己的包,使不同需求之间的python不会互相打扰。
先cd到virtualenv的安装目录当中,可以是global或者是local
升级pip,在cmd中输入“python -m pip install --upgrade pip”
1.pip install virtualenv
然后添加环境变量,这样cd到其他位置的时候 才可以使用哦
2.cd 到对应的文件夹下面。我的是test4
3.virtualenv venv 这样就创建了虚拟环境了。
4.创建虚拟环境
如果你希望在cmd里面使用他
5.接下来是激活,cd到环境名称\Scripts下的activate
6.你的名字被改了发现没有?
7.From now on, any package that you install using pip will be placed in the venv folder, isolated from the global
Python installation.
8.你可以deactive他,如果你不想要了的话
9.要想删除这个环境就直接删掉文件夹就好了
10.Running virtualenv with the option --no-site-packages will not include the packages that are installed globally. This can be useful for keeping the package list clean in case it needs to be accessed later. [This is the default behavior for virtualenv 1.7 and later.]
11.然后你需要安装自己想要的packages
12.在spacemacs当中打开上述路径中的.py 文件。SPC m V a 选择自己创建的虚拟环境,然后回车激活。
13.这样就可以运行本来global环境当中无法运行的packages啦。
美中不足的是,这个时候你运行其他路径的.py文件,你所采用的依然是之前activate的环境。而不是路径当中存在的环境。
如果是想要在spacemacs当中使用:
注意:一定要安装ipython,用pip install ipython就可以安装。安装以后要不一定添加路径!! 但是不添加路径的话emacs是比较难以找到python.exe文件位置的!需要把Scripts上一级文件夹作为寻找的路径
然后在打开filename.py 以后,SPC m V a 激活之前安装的文件夹。类路径是包括Lib Scripts文件夹的上级文件夹。
实验方法:做两个虚拟环境,其中一个安装numpy,另一个则不。分别激活两个虚拟环境然后import numpy来试试看是否激活。
workon home 的设置
参考文献
参考文献
workon 的使用前提是安装了ipython!!
virtualenvwrapper provides a set of commands which makes working with virtual environments much more pleasant. It also places all your virtual environments in one place.在window是环境当中,安装方法是:$ pip install virtualenvwrapper-win。 用mkvirtualenv project_folder 创建虚拟环境。会自动进入虚拟环境当中。如果想要推出该虚拟环境的编辑,请使用命令:deactivate, 再次进入该环境:workon 虚拟环境名称删除这个虚拟环境则用rmvirtualenv venv
在emacs使用之前,你还要把这些环境变量的根目录作为WORKON_HOME记录到环境变量当中。
如果你想要使用某一个版本的python来做workon的虚拟环境那么:
mkvirtualenv --python=安装路径 虚拟环境的名称
Other useful commands
lsvirtualenv
List all of the environments.
cdvirtualenv
Navigate into the directory of the currently activated virtual environment, so you can browse its site-packages, for example.
cdsitepackages
Like the above, but directly into site-packages directory.
lssitepackages
Shows contents of site-packages directory.
注意,这些虚拟环境是建立在统一的路径当中的。
使用方法,在spacemacs当中,打开.py文件,SPC m V w
在spacemacs当中使用shell
spacemacs有好多种shell,为了和windows统一,我们用自带的shell
在添加shell如下:
(shell :variables
            shell-default-shell 'shell
            shell-default-height 30
            shell-default-position 'right)
这样, 就可以让默认shell在右边
YAPF --自动整理程序的格式,增强程序易读性
首先要pip install YAPF
其次,在emacs的设定文件 SPC f e d 当中,增加一行:
(setq-default dotspacemacs-configuration-layers '(
(python :variables python-enable-yapf-format-on-save t)
输入完程序以后,SPC m =
就会帮你把程序变得易读。
autoflake–去掉不需要的包,不会import不需要的包
pip install autoflake
就安装了
使用 SPC m i
isort --帮你把你程序内import的包排列整齐
pip install isort 就可以安装
使用:SPC m I
配置auto-completion
只需要在SPC f e d 当中auto-completion 前面去掉那个;; 符号就可以了
但是要实现该功能,相应的python必须要安装ipython!
Test runner 的配置
参考资料
- 为什么使用test runner
实际上我们平时跑程序就是在测试程序了。但是有时候一个函数可能需要对于不同类型的数据有不同的反映和不同的结果。就需要用的test runner 来简化测试的流程。 - 测试分为整体测试和单元测试
- Test runner 可以发现在一个流程当中的不同问题,毕竟简单的问题我们直接run就好啦
- 最常用的三个test Runner: ①unittest②nose or nose2③pytest。spacemacs支持后两个test方式。
测试的两种方式①是整体测试②是单元测试。
先来看看单元测试。如果要进行单元测试,可以运行一个已经知道结果的程序,比如sum函数,>>> assert sum([1, 2, 3]) == 6, "Should be 6"如果结果正确,那么会输出6这个数字,如果结果不正确,那么会输出Should be 6 这个结果。
除了使用REPL方式,你还应该把程序输入到命名为test_sum.py的文件当中:
def test_sum():
    assert sum([1, 2, 3]) == 6, "Should be 6"

if __name__ == "__main__":
    test_sum()
    print("Everything passed")
还可以测试不同的输入类型:
def test_sum():
    assert sum([1, 2, 3]) == 6, "Should be 6"

def test_sum_tuple():
    assert sum((1, 2, 2)) == 6, "Should be 6"

if __name__ == "__main__":
    test_sum()
    test_sum_tuple()
    print("Everything passed")
接下来让我们回到整体测试,毕竟这才是我们的目的。
unittest
unittest requires that:
- You put your tests into classes as methods
- You use a series of special assertion methods in the unittest.TestCase class instead of the built-in assert statement
To convert the earlier example to a unittest test case, you would have to:
1.Import unittest from the standard library(注意unittest有分python2和python3版本!)
2.Create a class called TestSum that inherits from the TestCase class
3.Convert the test functions into methods by adding self as the first argument
4.Change the assertions to use the self.assertEqual() method on the TestCase class
5.Change the command-line entry point to call unittest.main()
Follow those steps by creating a new file test_sum_unittest.py with the following code:
import unittest


class TestSum(unittest.TestCase):

    def test_sum(self):
        self.assertEqual(sum([1, 2, 3]), 6, "Should be 6")

    def test_sum_tuple(self):
        self.assertEqual(sum((1, 2, 2)), 6, "Should be 6")

if __name__ == '__main__':
    unittest.main()
nose
很复杂的情况下unittest就变得麻烦了。nose可以和unittest和谐相处。建议用nose2。
To get started with nose2, install nose2 from PyPI and execute it on the command line. nose2 will try to discover all test scripts named test.py* and test cases inheriting from unittest.TestCase in your current directory:
pytest
pytest supports execution of unittest test cases. The real advantage of pytest comes by writing pytest test cases. pytest test cases are a series of functions in a Python file starting with the name test_.
pytest的其他优点:
1.Support for the built-in assert statement instead of using special self.assert*() methods
2.Support for filtering for test cases
3.Ability to rerun from the last failing test
4.An ecosystem of hundreds of plugins to extend the functionality
Writing the TestSum test case example for pytest would look like this:
def test_sum():
    assert sum([1, 2, 3]) == 6, "Should be 6"

def test_sum_tuple():
    assert sum((1, 2, 2)) == 6, "Should be 6"
pytest主要参考文献