Jenkins 自动部署常见配置方式以及过程
搭建一个jenkins 自动构建工具
https://www.cnblogs.com/loveyouyou616/p/8714544.html
1、弄好机器之间的ssh ,将git 仓库填入:

2、配置远程目录
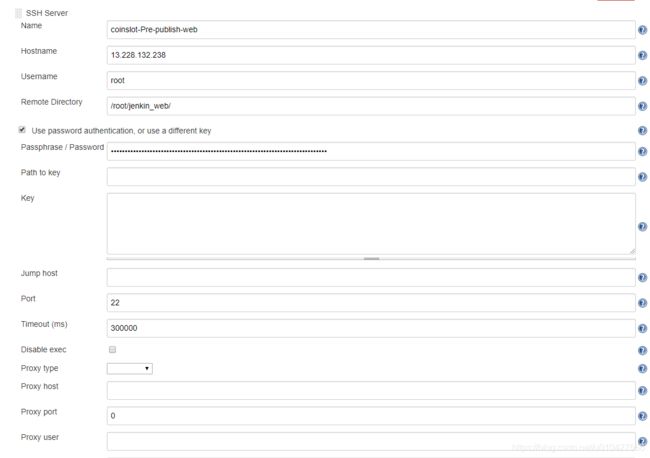
通常Jenkins 机器和构建的机器是不一样的,我们需要将Jenkins 的workspace 工程空间下的代码拉到构建机器上:
点开系统配置 下 SSH Servers 出,新增一个

填写名称 机器ip 用户名,以及目标目录。点开高级配置填入用户密码。
完整如下:

3、 在构建配置中,填入 source files 和remote directory ,已经之后需要执行的命令。

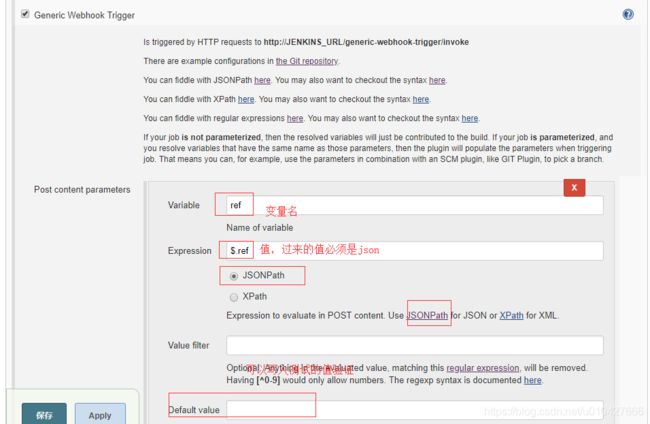
4、自动构建钩子Generic Webhook Trigger 插件使用(遇坑已解决)
默认认为你已经安装好webhook 插件了,安装之后使用restlet_client 自行模拟触发请求,正常方式:
http://${ip}/generic-webhook-trigger/invoke 带上git 的分支信息


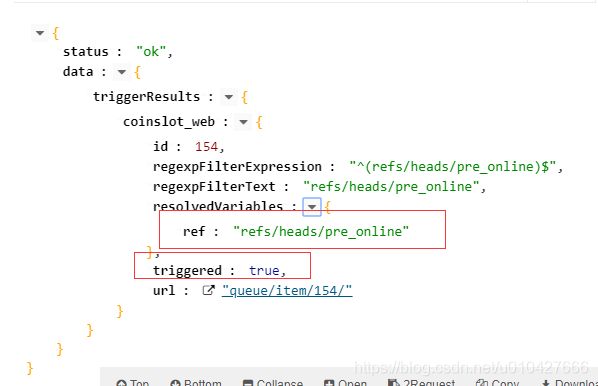
使用restlet (谷歌插件模拟测试gitlab发送过来的数据)测试 不是pre_online 分支

是pre_online 分支,triggered 为true 表明触发构建

接下来就是在git 参考那里写hooks shell 脚本了。(waiting…)
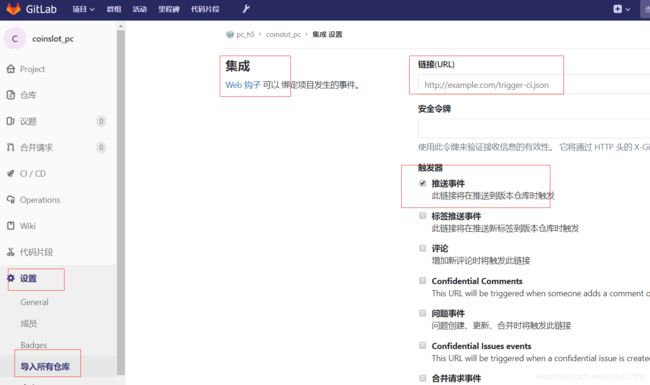
gitlab 那配置webhooks 触发(每当git push远程分支的时候)
1、在工程的设置=》 导入所有仓库 那里。
2、在Jenkins 里填上: http://${ip}/generic-webhook-trigger/invoke
其实gitlab 触发之后发送给Jenkins (post json)是类似如下的数据:
{
    "before": "fb32ef5812dc132ece716a05c50c7531c6dc1b4d",
    "after": "ac63b9ba95191a1bf79d60bc262851a66c12cda1",
    "ref": "refs/heads/master",
    "user_name": "123",
    "user": {
        "email": "[email protected]",
        "name": "123",
        "time": "2016-12-09T17:28:02 08:00"
    },
    "repository": {
        "name": "webhook",
        "url": "http://git.oschina.net/oschina/webhook",
        "description": "",
        "homepage": "http://git.oschina.net/oschina/webhook"
    },
    "commits": [
        {
            "id": "ac63b9ba95191a1bf79d60bc262851a66c12cda1",
            "message": "1234 bug fix",
            "timestamp": "2016-12-09T17:28:02 08:00",
            "url": "http://git.oschina.net/oschina/webhook/commit/ac63b9ba95191a1bf79d60bc262851a66c12cda1",
            "author": {
                "name": "123",
                "email": "[email protected]",
                "time": "2016-12-09T17:28:02 08:00"
            }
        }
    ],
    "total_commits_count": 1,
    "commits_more_than_ten": false,
    "project": {
        "name": "webhook",
        "path": "webhook",
        "url": "http://git.oschina.net/oschina/webhook",
        "git_ssh_url": "[email protected]:oschina/webhook.git",
        "git_http_url": "https://git.oschina.net/oschina/webhook.git",
        "git_svn_url": "svn://git.oschina.net/oschina/webhook",
        "namespace": "oschina",
        "path_with_namespace": "oschina/webhook",
        "default_branch": "master"
    },
    "hook_name": "push_hooks",
    "password": "pwd"
}
附上:
常用自动构建脚本
ssh [email protected] &&
cd /data/jenkins/workspace/coinslot_web && cnpm install &&
npm run build &&
tar -zcvf coinslot.tar.gz -C ./dist . &&
scp -r ./coinslot.tar.gz [email protected]:/home/www/web &&
cd /home/www/web &&
tar -zxvf ./coinslot.tar.gz
rm -rf /home/service/www/web/* &&
参考链接:
https://www.cnblogs.com/StitchSun/articles/4712287.html
https://blog.csdn.net/richard_jason/article/details/53188200
https://www.cnblogs.com/kevingrace/p/6479813.html
https://www.cnblogs.com/ceshi2016/p/6529532.html
构建结果通知。
https://www.cnblogs.com/jianxuanbing/p/7211006.html
钉钉通知构建结果
https://www.jianshu.com/p/9e72c79a2f78

