centos磁盘管理(标准模式)
一块物理磁盘可以分:
1)四个主分区
2)三个主分区+一个扩展分区+最多64个逻辑分区
相关命令:
df : 查看当前磁盘分区情况
-m 以兆为单位显示
-h 以兆或G显示
fdisk: 对磁盘进行分区
free -m :查看内存使用情况和swap分区
标准模式下对磁盘进行管理步骤:
1)导入磁盘
2)分区
3)格式化分区
4)挂载分区
下面是详细步骤:
[root@localhost ~]# fdisk -l

Disk /dev/sda: 21.5 GB, 21474836480 bytes, 41943040 sectors
Units = sectors of 1 * 512 = 512 bytes
Sector size (logical/physical): 512 bytes / 512 bytes
I/O size (minimum/optimal): 512 bytes / 512 bytes
Disk label type: dos
Disk identifier: 0x000a07ca

   Device Boot      Start         End      Blocks   Id  System
/dev/sda1   *        2048      976895      487424   83  Linux
/dev/sda2          976896     8787967     3905536   82  Linux swap / Solaris
/dev/sda3         8787968    38084607    14648320   83  Linux
查看当前有几块磁盘和磁盘的分区,可以看到磁盘有三块分区
[root@localhost ~]# df -h
Filesystem      Size  Used Avail Use% Mounted on
/dev/sda3        14G  1.7G   13G  12% /
devtmpfs        983M     0  983M   0% /dev
tmpfs           993M     0  993M   0% /dev/shm
tmpfs           993M  8.6M  984M   1% /run
tmpfs           993M     0  993M   0% /sys/fs/cgroup
/dev/sda1       473M  111M  362M  24% /boot
tmpfs           199M     0  199M   0% /run/user/0
查看磁盘挂载情况,可以看到现在有一块磁盘(sda1)分了三块分区
/dev/sda1
/dev/sda2 : 交换分区 可以通过 free -m 查看
/dev/sda3
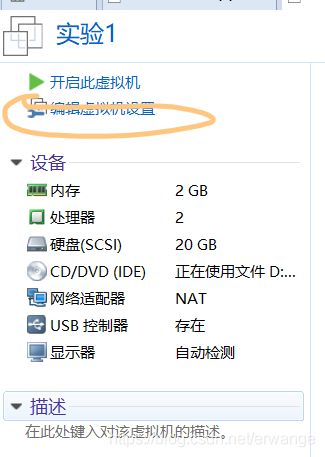
那么我现在想要再增加一块磁盘进行使用,怎么办?
首先关机 init -0
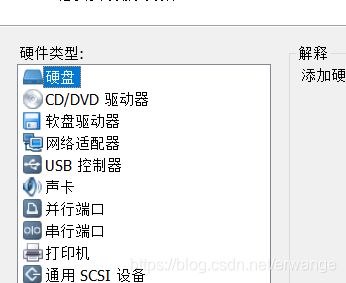
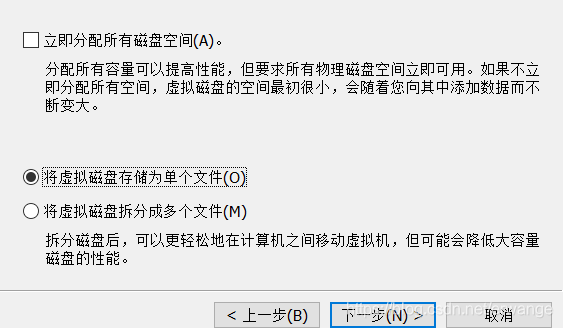
然后导入一块磁盘:
[root@localhost ~]# init 0


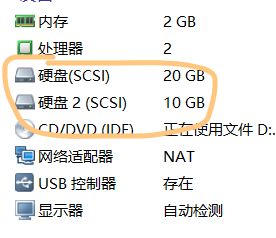
就可以看到虚拟机配置有了两块磁盘。
这时候开机,查看磁盘分配情况
[root@localhost ~]# df -h
Filesystem      Size  Used Avail Use% Mounted on
/dev/sda3        14G  1.7G   13G  12% /
devtmpfs        983M     0  983M   0% /dev
tmpfs           993M     0  993M   0% /dev/shm
tmpfs           993M  8.6M  984M   1% /run
tmpfs           993M     0  993M   0% /sys/fs/cgroup
/dev/sda1       473M  111M  362M  24% /boot
tmpfs           199M     0  199M   0% /run/user/0
这个没有变化,因为磁盘还没有被挂载和格式化
但是查看查看磁盘
[root@localhost ~]# fdisk -l

Disk /dev/sdb: 10.7 GB, 10737418240 bytes, 20971520 sectors
Units = sectors of 1 * 512 = 512 bytes
Sector size (logical/physical): 512 bytes / 512 bytes
I/O size (minimum/optimal): 512 bytes / 512 bytes


Disk /dev/sda: 21.5 GB, 21474836480 bytes, 41943040 sectors
Units = sectors of 1 * 512 = 512 bytes
Sector size (logical/physical): 512 bytes / 512 bytes
I/O size (minimum/optimal): 512 bytes / 512 bytes
Disk label type: dos
Disk identifier: 0x000a07ca

   Device Boot      Start         End      Blocks   Id  System
/dev/sda1   *        2048      976895      487424   83  Linux
/dev/sda2          976896     8787967     3905536   82  Linux swap / Solaris
/dev/sda3         8787968    38084607    14648320   83  Linux
这里是有变化的,可以看到这里多了一个/dev/sdb 有10个G未分配。
下面呢,我们就开始对这个磁盘进行分配。
输入fdisk 进入磁盘分配模式:
[root@localhost ~]# fdisk /dev/sdb
Welcome to fdisk (util-linux 2.23.2).

Changes will remain in memory only, until you decide to write them.
Be careful before using the write command.

Device does not contain a recognized partition table
Building a new DOS disklabel with disk identifier 0xac2ce59a.

Command (m for help):
这里有提示按m寻求帮助
Command (m for help): m
Command action
   a   toggle a bootable flag
   b   edit bsd disklabel
   c   toggle the dos compatibility flag
   d   delete a partition
   g   create a new empty GPT partition table
   G   create an IRIX (SGI) partition table
   l   list known partition types
   m   print this menu    //打开菜单
   n   add a new partition  //添加分区
   o   create a new empty DOS partition table
   p   print the partition table  //打印分区结果
   q   quit without saving changes //退出不保存
   s   create a new empty Sun disklabel
   t   change a partition's system id //改变分区系统id
   u   change display/entry units
   v   verify the partition table
   w   write table to disk and exit //保存并退出
   x   extra functionality (experts only)
按照这些命令,我们开始对/dev/sdb 这块磁盘进行管理:
上面已经说到一块磁盘最多四块主分区或者是三块主分区+一块扩展分区+若干逻辑分区,这里我们选择后者进行管理:
Command (m for help): n
Partition type:
   p   primary (0 primary, 0 extended, 4 free)
   e   extended
Select (default p):
Using default response p
Partition number (1-4, default 1): //当主分区不满足三个的时候默认是主分区
First sector (2048-20971519, default 2048):
Using default value 2048
Last sector, +sectors or +size{K,M,G} (2048-20971519, default 20971519): 2G^[[D
Value out of range.
Last sector, +sectors or +size{K,M,G} (2048-20971519, default 20971519): +2G//给它分配两个G的空间
Partition 1 of type Linux and of size 2 GiB is set
这里我划分了一个2G的主分区,同样的方法划分第二和第三个主分区。
Command (m for help): n
Partition type:
   p   primary (3 primary, 0 extended, 1 free)
   e   extended
Select (default e):
这里我在继续创建分区时默认就是扩展分区了,因为在前面主分区已经有三个了,当然也可以在划分一个主分区,不过就不能划分扩展分区了。
为了更加合理的管理磁盘,我推荐建立一个扩展分区。
Select (default e): e
Selected partition 4
First sector (12584960-20971519, default 12584960):
Using default value 12584960
Last sector, +sectors or +size{K,M,G} (12584960-20971519, default 20971519):
Using default value 20971519
Partition 4 of type Extended and of size 4 GiB is set
因为是扩展分区,默认是把所有的剩余空间全部划分给它。但是扩展分区只是一个标记,它是不能被使用的。如果要使用剩余的空间就要在扩展分区中再划分逻辑分区。
下面开始划分逻辑分区:
Command (m for help): n
All primary partitions are in use
Adding logical partition 5 //增加逻辑分区
First sector (12587008-20971519, default 12587008):
Using default value 12587008
Last sector, +sectors or +size{K,M,G} (12587008-20971519, default 20971519): +@^H
Unsupported suffix: ''.
Supported: 10^N: KB (KiloByte), MB (MegaByte), GB (GigaByte)
            2^N: K  (KibiByte), M  (MebiByte), G  (GibiByte)
Last sector, +sectors or +size{K,M,G} (12587008-20971519, default 20971519): +2G
Partition 5 of type Linux and of size 2 GiB is set
这里我们再n,增加的就是逻辑分区。
所有的分区全部划分好了,要保存退出。
Command (m for help): w
The partition table has been altered!

Calling ioctl() to re-read partition table.
Syncing disks.
这里显示分区划分被应用了,这是我们再查看:
[root@localhost ~]# fdisk -l

Disk /dev/sdb: 10.7 GB, 10737418240 bytes, 20971520 sectors
Units = sectors of 1 * 512 = 512 bytes
Sector size (logical/physical): 512 bytes / 512 bytes
I/O size (minimum/optimal): 512 bytes / 512 bytes
Disk label type: dos
Disk identifier: 0xac2ce59a

   Device Boot      Start         End      Blocks   Id  System
/dev/sdb1            2048     4196351     2097152   83  Linux
/dev/sdb2         4196352     8390655     2097152   83  Linux
/dev/sdb3         8390656    12584959     2097152   83  Linux
/dev/sdb4        12584960    20971519     4193280    5  Extended
/dev/sdb5        12587008    16781311     2097152   83  Linux
/dev/sdb6        16783360    20971519     2094080   83  Linux

Disk /dev/sda: 21.5 GB, 21474836480 bytes, 41943040 sectors
Units = sectors of 1 * 512 = 512 bytes
Sector size (logical/physical): 512 bytes / 512 bytes
I/O size (minimum/optimal): 512 bytes / 512 bytes
Disk label type: dos
Disk identifier: 0x000a07ca

   Device Boot      Start         End      Blocks   Id  System
/dev/sda1   *        2048      976895      487424   83  Linux
/dev/sda2          976896     8787967     3905536   82  Linux swap / Solaris
/dev/sda3         8787968    38084607    14648320   83  Linux
可以看到这是的/dev/sdb这块磁盘划分出了6个分区。但是实际能用的只有5个分区,因为扩展分区不能使用。
现在划定的分区,就需要对分区进行格式化,在Linux有多种的文件类型,可以按照特定功能对磁盘空间进行格式化。
[root@localhost home]# mkfs.xfs /dev/sdb1
meta-data=/dev/sdb1              isize=512    agcount=4, agsize=131072 blks
         =                       sectsz=512   attr=2, projid32bit=1
         =                       crc=1        finobt=0, sparse=0
data     =                       bsize=4096   blocks=524288, imaxpct=25
         =                       sunit=0      swidth=0 blks
naming   =version 2              bsize=4096   ascii-ci=0 ftype=1
log      =internal log           bsize=4096   blocks=2560, version=2
         =                       sectsz=512   sunit=0 blks, lazy-count=1
realtime =none                   extsz=4096   blocks=0, rtextents=0
接下来我们就要对这些空间进行挂载,比如我有一个用户,只能使用两个G的磁盘,那么我就要给他的家目录挂载两个G的磁盘空间。
[root@localhost ~]# useradd -u 1001 -g 1001 -d /home/lala lala
[root@localhost ~]# passwd lala
Changing password for user lala.
New password:
BAD PASSWORD: The password is shorter than 8 characters
Retype new password:
passwd: all authentication tokens updated successfully.
[root@localhost ~]# cd /home
[root@localhost home]# ll
total 0
drwx------. 3 lala lala 78 Feb 28 18:59 lala
这里我创建了一个普通用户,我现在要把2G的磁盘挂载到他的家目录。
[root@localhost home]# mount /dev/sdb1 /home/lala
[root@localhost home]# df -h
Filesystem      Size  Used Avail Use% Mounted on
/dev/sda3        14G  1.7G   13G  12% /
devtmpfs        983M     0  983M   0% /dev
tmpfs           993M     0  993M   0% /dev/shm
tmpfs           993M  8.6M  984M   1% /run
tmpfs           993M     0  993M   0% /sys/fs/cgroup
/dev/sda1       473M  111M  362M  24% /boot
tmpfs           199M     0  199M   0% /run/user/0
/dev/sdb1       2.0G   33M  2.0G   2% /home/lala //我创建的挂载点
这就可以看到挂载/dev/sdb1这一磁盘分区挂载到了/home/lala下。
但是这种手动挂载再重启后不能保留,这是就要去编辑一个文件让它自动挂载在这个路径。
[root@localhost ~]# df -h
Filesystem      Size  Used Avail Use% Mounted on
/dev/sda3        14G  1.7G   13G  12% /
devtmpfs        983M     0  983M   0% /dev
tmpfs           993M     0  993M   0% /dev/shm
tmpfs           993M  8.6M  984M   1% /run
tmpfs           993M     0  993M   0% /sys/fs/cgroup
/dev/sda1       473M  111M  362M  24% /boot
tmpfs           199M     0  199M   0% /run/user/0
重启后发现刚才挂载的分区没有了。
下面就要编辑自动挂载的文件 /etc/fstab
[root@localhost etc]# vi /etc/fstab
UUID=8a758324-655b-4536-ba4d-2dc9f1859558 /                       xfs     defaults        0 0
UUID=69ef22e9-6896-4f68-83ed-9971fd6c5021 /boot                   xfs     defaults        0 0
UUID=3f219dc4-6516-40bb-a90d-e5864a96bb48 swap                    swap    defaults        0 0
/dev/sdb1                                 /home/lala              xfs     defaults        0 0
参照格式可以是uuid 也可以是绝对路径。
blkid 可以查看分区的uuid.
保存退出后,在输入mount -a,就可以挂载了。
[root@localhost etc]# mount -a
[root@localhost etc]# df -h
Filesystem      Size  Used Avail Use% Mounted on
/dev/sda3        14G  1.7G   13G  12% /
devtmpfs        983M     0  983M   0% /dev
tmpfs           993M     0  993M   0% /dev/shm
tmpfs           993M  8.6M  984M   1% /run
tmpfs           993M     0  993M   0% /sys/fs/cgroup
/dev/sda1       473M  111M  362M  24% /boot
tmpfs           199M     0  199M   0% /run/user/0
/dev/sdb1       2.0G   33M  2.0G   2% /home/lala
这是即使我们重启它也挂载在那里了。