R_3D图(五)
![]()
作者:李誉辉
四川大学在读研究生
前言
这篇是plot3D包绘图系列之五,也是本系列的最终篇。前一篇请戳:R_3D图(四),原本分两篇连载,但有读者反应更新太慢,所以今天一并把最后内容都呈现给大家。感谢大家的转发和点赞。
5 辅助几何对象
segments3D()在三维空间画直线段。arrows3D()在三维空间画箭头。box3D()在三维空间画立方体框。border3D()在三维空间画立方体polygon3D()在三维空间画多边形。rect3D()在三维空间画矩形。二维空间的画图对象分别为:
segments2D(),arrows2D(),rect2D(),polygon2D()。
语法:
arrows3D (x0, y0, z0, x1 = x0, y1 = y0, z1 = z0, ...,
         colvar = NULL, phi = 40, theta = 40,
         col = NULL, NAcol = "white", breaks = NULL,
         colkey = NULL, panel.first = NULL,
         clim = NULL, clab = NULL, bty = "b", type = "triangle",
         add = FALSE, plot = TRUE)

segments3D (x0, y0, z0, x1 = x0, y1 = y0, z1 = z0, ...,
         colvar = NULL, phi = 40, theta = 40,
         col = NULL, NAcol = "white", breaks = NULL,
         colkey = NULL, panel.first = NULL,
         clim = NULL, clab = NULL, bty = "b",
         add = FALSE, plot = TRUE)

box3D (x0, y0, z0, x1, y1, z1, ...,
         colvar = NULL, phi = 40, theta = 40,
         col = NULL, NAcol = "white", breaks = NULL,
         border = NA, facets = TRUE, colkey = NULL,
         panel.first = NULL, clim = NULL, clab = NULL, bty = "b",
         add = FALSE, plot = TRUE)

border3D(x0, y0, z0, x1, y1, z1, ...,
         colvar = NULL, phi = 40, theta = 40,
         col = NULL, NAcol = "white", breaks = NULL,
         colkey = NULL, panel.first = NULL,
         clim = NULL, clab = NULL, bty = "b",
         add = FALSE, plot = TRUE)

rect3D (x0, y0, z0, x1 = NULL, y1 = NULL, z1 = NULL, ...,
         colvar = NULL, phi = 40, theta = 40,
         col = NULL, NAcol = "white", breaks = NULL,
         border = NA, facets = TRUE, colkey = NULL,
         panel.first = NULL, clim = NULL, clab = NULL, bty = "b",
         add = FALSE, plot = TRUE)

polygon3D (x, y, z, ...,
         colvar = NULL, phi = 40, theta = 40,
         col = NULL, NAcol = "white", breaks = NULL,
         border = NA, facets = TRUE, colkey = NULL,
         panel.first = NULL, clim = NULL, clab = NULL, bty = "b",
         add = FALSE, plot = TRUE)

arrows2D (x0, y0, x1 = x0, y1 = y0, ..., colvar = NULL,
         col = NULL, NAcol = "white", breaks = NULL,
         colkey = NULL, clim = NULL, clab = NULL,
         type = "triangle", add = FALSE, plot = TRUE)

segments2D (x0, y0, x1 = x0, y1 = y0, ..., colvar = NULL,
         col = NULL, NAcol = "white", breaks = NULL,
         colkey = NULL, clim = NULL, clab = NULL,
         add = FALSE, plot = TRUE)

rect2D (x0, y0, x1 = x0, y1 = y0, ..., colvar = NULL,
         col = NULL, NAcol = "white", breaks = NULL,
         colkey = NULL, clim = NULL, clab = NULL,
         add = FALSE, plot = TRUE)

polygon2D (x, y, ..., colvar = NULL,
         col = NULL, NAcol = "white", breaks = NULL,
         border = NA, facets = TRUE,
         colkey = NULL, clim = NULL, clab = NULL,
         add = FALSE, plot = TRUE)
参数解释:
x0, y0, z0, 表示起点坐标。
x1, y1, z1, 表示结束点坐标。
x, y, z, 表示多边形polygon的坐标。
colvar, 同样表示着色变量。
theta, phi, 同样表示指定观察方向,与
persp()中一样。col, 同样表示指定颜色板。
NAcol, 同样表示指定
colvar缺失值显示的颜色。breaks, 表示指定
colvar的断点,为数字向量,长度应该比col参数大1个。
需要增序排列,默认自动增序排列。colkey, 为逻辑值或
NULL(默认), 也可以用列表传递colkey参数。 当colkey = NULL时,若col参数是一个向量,才会自动添加图例,col参数是一个字符串则不添加图例。 设定colkey = list(plot = FALSE)则为图例留下空间,但不显示图例。colkey = FALSE则不绘制图例。border, 表示指定网格线的颜色,默认
NA不显示网格线。facets, 为逻辑值或NA,表示是否显示网格面, 默认
TRUE显示网格面,FALSE则显示白色网格面,并将col参数赋予网格线着色。NA则表示网格面透明。panel.first, 表示指定一种变换函数,常常用于绘制背景网格和三维散点图的平滑处理。
该函数的其中一个参数应该是pmat矩阵变换。见persp3D()中的例子。clab, 表示指定图例标题内容,仅当
colkey = TRUE时有效,
默认位置于主标题同一高度,降低高度,使用向量指定,第一个元素为空字符串。clim, 表示指定
colvar的显示范围,仅仅当colvar被指定时生效,超出范围的colvar将作为NA显示。bty, 表示指定box的类型,默认仅仅画背景panels,只有当
persp()中的box = TRUE时才有效。
其它与perspbox()函数中一致,bty = c(“b”, “b2”, “f”, “g”, “bl”, “bl2”, “u”, “n”)其中之一。type, 表示指定箭头arrow的类型:
"simple"(默认),"curved","triangle","cone"。add, 表示是否将该绘图对象加入到已存在的绘图对象中,
TRUE相当于增加图层,默认FALSE则新建。plot, 表示是否立即绘图,默认
TRUE则立即绘图,FALSE则往下传递绘图参数,直到最后一个图层一起绘制。…, 其它参数,包括公共参数,
persp()中的参数,perspbox()中的一些参数。persp()中的一些参数:xlim, ylim, zlim, xlab, ylab, zlab, main, sub,
r, d, scale, expand, box, axes, nticks, ticktype。
同样xlim,ylim, zlim也只限制坐标轴范围,超出该范围的图形仍然会绘制出来,
使用plotdev()设定图形范围。perspbox()中的一些参数: col.axis, col.panel, lwd.panel, col.grid, lwd.grid。
公共参数:alpha透明度,从0(全透明)到1(不透明)。lty线型,lwd线宽。shade和lighting没有任何作用。
对于箭头arrows, 还有
length,code,angle三个参数。对于多边形polygon, 还有border表示指定边线颜色。
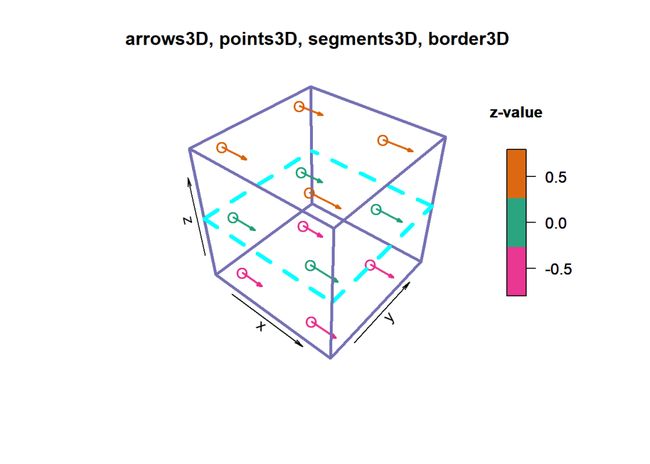
5.1 箭头,线段,立方体框
library(plot3D)

# Create a grid of x, y, and z values
xx <- yy <- seq(-0.6, 0.4, len = 2)
zz <- seq(-0.8, 0.8, by = 0.8)

M <- mesh(xx, yy, zz)
x0 <- M$x; y0 <- M$y; z0 <- M$z
x1 <- x0 + 0.3 # 箭头终点坐标

Col <- c("#e7298a", "#1b9e77", "#d95f02")

# 画箭头
arrows3D(x0, y0, z0, x1 = x1, colvar = z0, lwd = 2, # 箭头指向x方向,颜色于z有关
         d = 2, clab = "z-value", col = Col, length = 0.1, alpha = 0.5,
         xlim = c(-0.8, 0.8), ylim = c(-0.8, 0.8),
         colkey = list(length = 0.5, dist = -0.1), # 列表传递图例参数
         main = "arrows3D, points3D, segments3D, border3D")

# 给箭头起点增加一个点
points3D(x0, y0, z0, add = TRUE, colvar = z0,
         colkey = FALSE, pch = "O", cex = 1, col = Col)

# segments数据源
x0 <- c(-0.8, 0.8,  0.8, -0.8)
x1 <- c( 0.8, 0.8, -0.8, -0.8)
y0 <- c(-0.8, -0.8, 0.8, -0.8)
y1 <- c(-0.8,  0.8, 0.8, 0.8)
z0 <- c(0., 0., 0., 0.)

# segments3D画线段,这里画闭合的线
segments3D(x0, y0, z0, x1, y1, z1 = z0,
           add = TRUE, col = "cyan", lwd = 4, lty = 2) # 线宽为4,线型为2(虚线)

# border3D画立方体
border3D(-0.8, -0.8, -0.8, 0.8, 0.8, 0.8, # 坐标是立方体内最长的线段的两头的点的坐标
         col = "#7570b3", add = TRUE, lwd = 3)
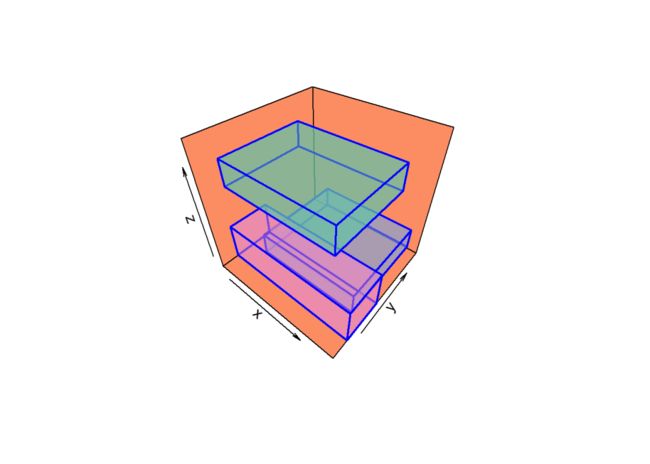
5.2 box3D()立方体
box3D()与border3D()坐标参数一样,都是立方体内最长的对角线两端的坐标。
library(plot3D)
library(RColorBrewer)

# box3D画立方体
box3D(x0 = -0.8, y0 = -0.8, z0 = -0.8, # 立方体起点坐标
      x1 = 0.8, y1 = 0.8, z1 = 0.8, # 立方体终点坐标
      border = "magenta", lwd = 2,
      col = "cyan", alpha = 0.4,
      main = "box3D")

# box3D画多个立方体嵌套
box3D(x0 = seq(-0.8, -0.1, len = 8),
      y0 = seq(-0.8, -0.1, len = 8),
      z0 = seq(-0.8, -0.1, len = 8),
      x1 = seq(0.8, 0.1, len = 8),
      y1 = seq(0.8, 0.1, len = 8),
      z1 = seq(0.8, 0.1, len = 8),
      col = brewer.pal(9, name = "Paired")[-1], alpha = 0.3, # 使用RColorBrewer中的色板
      border = "black", lwd = 2, phi = 20,
      bty = "u", col.panel = brewer.pal(9, name = "Paired")[1]) # 自定义panel颜色


# 随意画几个立方体
set.seed(112)
box3D(x0 = runif(3), y0 = runif(3), z0 = runif(3),
      x1 = runif(3), y1 = runif(3), z1 = runif(3),
      col = brewer.pal(4, name = "Set2")[-2], alpha = 0.5,
      border = "blue", lwd = 2,  # border指定立方体边框线颜色
      bty = "u", col.panel = brewer.pal(4, name = "Set2")[2])
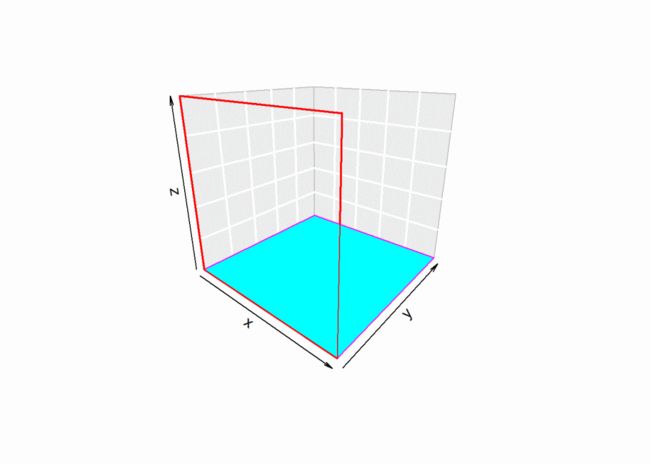
5.3 rect3D()矩形
相比box3D(),其默认没有x1, y1, z1坐标参数,
当矩形与坐标轴组成的平面平行时,可能缺少多个坐标参数,可能是x,y,z,也可能是x0,y0,z0, 其它没有区别。
library(plot3D)

# z相同,都平行与x-y平面
rect3D(x0 = seq(-0.8, -0.1, by = 0.1),
       y0 = seq(-0.8, -0.1, by = 0.1),
       z0 = seq(-0.8, -0.1, by = 0.1),
       x1 = seq(0.8, 0.1, by = -0.1),
       y1 = seq(0.8, 0.1, by = -0.1),
       col = brewer.pal(9, name = "Paired")[-1], alpha = 0.3, # 使用RColorBrewer中的色板
       border = "black",lwd = 2, phi = 20, main = "rect3D",
       bty = "u", col.panel = brewer.pal(9, name = "Paired")[1])

# y相同,平行于x-z平面,facets = NA表示矩形透明,只显示边框
rect3D(x0 = 0, y0 = 0, z0 = 0, x1 = 1, z1 = 5,
       ylim = c(0, 1), facets = NA, border = "red",
       bty = "g", lwd = 2, phi = 20)

## 添加一个矩形对象
rect3D(x0 = 0, y0 = 0, z0 = 0, x1 = 1, y1 = 1,
       border = "magenta", col = "cyan", add = TRUE)
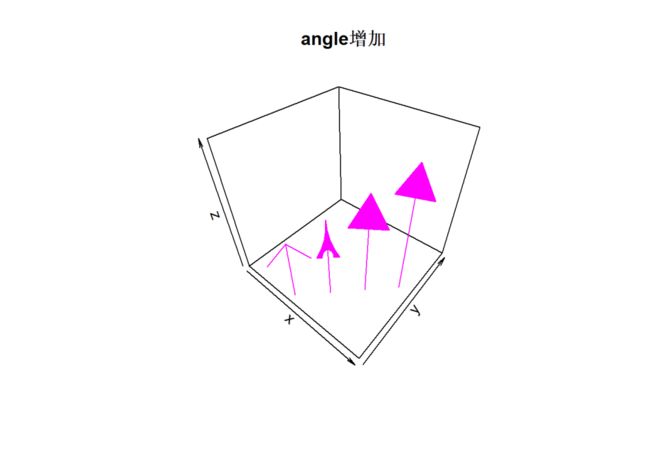
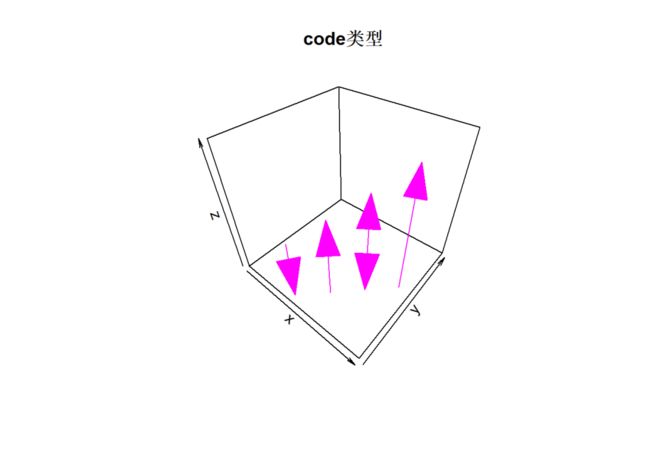
5.4 箭头type, length, angle, code
library(plot3D)

x0 <- 1:4
y0 <- 1:4
z0 <- c(0, 0, 0, 0)

x1 <- x0
y1 <- y0
z1 <- 3:6


# type
arrows3D(x0, y0, z0, x1, y1, z1, col = "magenta", type = c("simple", "curved",
    "triangle", "cone"), length = 0.8, xlim = c(0, 5), ylim = c(0, 5), zlim = c(2,
    7), main = "type类型")

# length减小
arrows3D(x0, y0, z0, x1, y1, z1, col = "magenta", type = c("simple", "curved",
    "triangle", "cone"), length = 0.5, angle = 30, xlim = c(0, 5), ylim = c(0,
    5), zlim = c(2, 7), main = "length减小")

# angle增加
arrows3D(x0, y0, z0, x1, y1, z1, col = "magenta", type = c("simple", "curved",
    "triangle", "cone"), length = 0.8, angle = 50, xlim = c(0, 5), ylim = c(0,
    5), zlim = c(2, 7), main = "angle增加")

# code类型
arrows3D(x0, y0, z0, x1, y1, z1, col = "magenta", type = "triangle", length = 0.8,
    angle = 30, code = c(1, 2, 3, 4), xlim = c(0, 5), ylim = c(0, 5), zlim = c(2,
        7), main = "code类型")
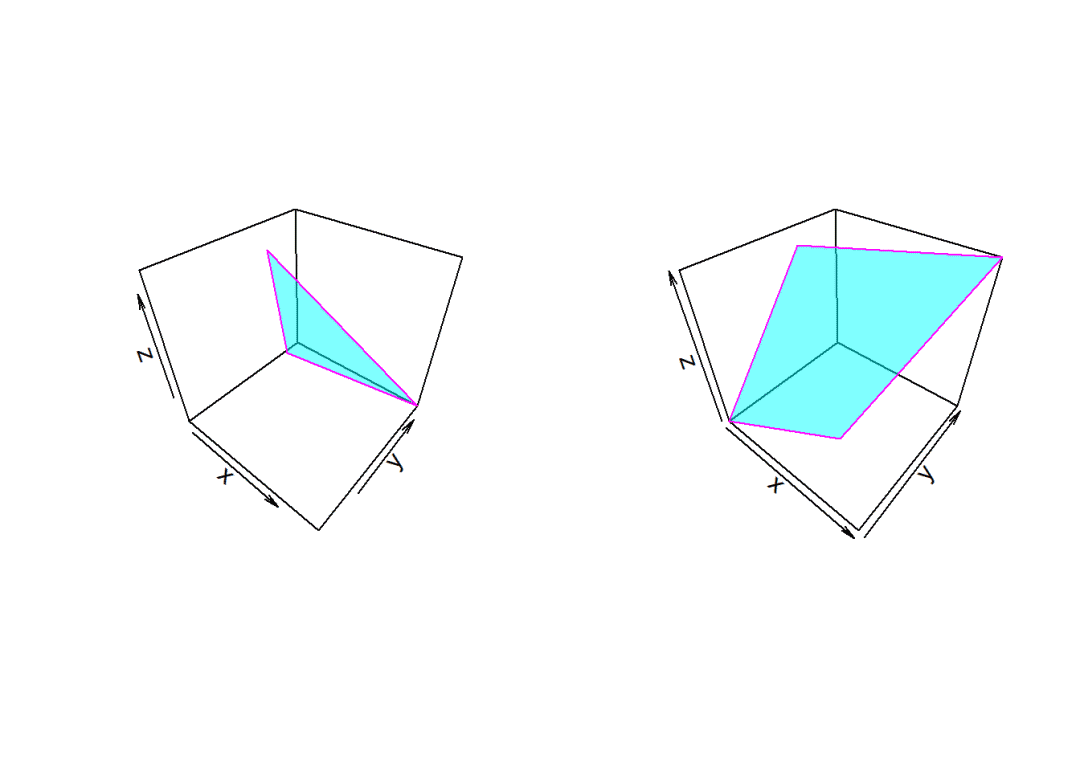
5.5 polygon3D()
与ggplot2中不一样,默认是根据按顺序连线,没有多边型分组和点顺序选项。 绘制几个简单多边形还行,批量绘制复杂的多边形很麻烦。
library(plot3D)

par(mfrow = c(1, 2))

# 三角形
set.seed(1211)
coord_1 <- data.frame(x = runif(3), y = runif(3), z = runif(3))
polygon3D(coord_1$x, coord_1$y, coord_1$z, col = "cyan", alpha = 0.5, border = "magenta")

# 四边形, 四个点必须在同一平面
coord_2 <- data.frame(x = c(1, 4, 6, 2), y = c(1, 3, 7, 4), z = c(1, 1, 3, 3))
polygon3D(coord_2$x, coord_2$y, coord_2$z, col = "cyan", alpha = 0.5, border = "magenta")
5.6 rect2D()
与rect3D()相比,没有z坐标。同样是利用矩形对角线2点的坐标绘图。
library(plot3D)
library(RColorBrewer)

# 绘制7个矩阵
set.seed(1235)
rect2D(x0 = runif(7), y0 = runif(7), x1 = runif(7), y1 = runif(7), colvar = 1:7,
    col = brewer.pal(n = 7, name = "Set2"), border = "blue", alpha = 0.4, lwd = 2,
    main = "rect2D")
5.7 polygon2D()
与ggplot2中不一样,默认是根据按顺序连线,没有多边型分组和点顺序选项。 绘制几个简单多边形还行,批量绘制复杂的多边形很麻烦。
与polygon3D()相比,没有z轴坐标。
library(plot3D)

par(mfrow = c(1, 2))

# 三角形
set.seed(1212)
coord_1 <- data.frame(x = runif(3), y = runif(3))
polygon2D(coord_1$x, coord_1$y, col = "cyan", alpha = 0.5, border = "magenta")

# 四边形, 四个点必须在同一平面
coord_2 <- data.frame(x = c(1, 4, 6, 2), y = c(1, 3, 7, 4))
polygon2D(coord_2$x, coord_2$y, col = "cyan", alpha = 0.5, border = "magenta")
6 三维网格surf3D()与spheresurf3D()
surf3D()用于绘制立体图形,网格为立体网格,不是persp()那种平面网格。
x,y,z都是矩阵数据。可以构成立体封闭的图形。spheresurf3D()用于绘制立体球。
语法:
surf3D (x, y, z, ..., colvar = z, phi = 40, theta = 40,
        col = NULL, NAcol = "white", breaks = NULL,
        border = NA, facets = TRUE, colkey = NULL,
        panel.first = NULL, clim = NULL, clab = NULL, bty = "n",
        lighting = FALSE, shade = NA, ltheta = -135, lphi = 0,
        inttype = 1, add = FALSE, plot = TRUE)

spheresurf3D (colvar = matrix(nrow = 50, ncol = 50, data = 1:50, byrow = TRUE),
        ..., phi = 0, theta = 0,
        col = NULL, NAcol = "white", breaks = NULL,
        border = NA, facets = TRUE, contour = FALSE,
        colkey = NULL, resfac = 1,
        panel.first = NULL, clim = NULL, clab = NULL, bty = "n",
        lighting = FALSE, shade = NA, ltheta = -135, lphi = 0,
        inttype = 1, full = FALSE, add = FALSE, plot = TRUE)
语法解释: 与persp()大多数都相同,只有坐标轴参数不一样。
6.1 surf3D()
立体网格比较复杂,用得也比较少,立体图因为视角的问题,不是很好的可视化工具。
真正需要手动绘制复杂的立体图的地方,肯定是用机械工程领域的软件:UG,solidworks等。
其它需要网格颜色映射到colvar变量的地方,也会使用CAE软件,如Ansys。
所以这个功能是比较鸡肋的, 下面仅仅示范一下,不会深入讲解。
library(plot3D)

# 创建矩阵数据
X <- seq(0, pi, length.out = 50)
Y <- seq(0, 2 * pi, length.out = 50)
M <- mesh(X, Y)
phi <- M$x
theta <- M$y

# x, y and z grids
r <- sin(4 * phi)^3 + cos(2 * phi)^3 + sin(6 * theta)^2 + cos(6 * theta)^4
x <- r * sin(phi) * cos(theta)
y <- r * cos(phi)
z <- r * sin(phi) * sin(theta)

surf3D(x, y, z, colvar = y, colkey = FALSE, box = FALSE, theta = 60, border = NA,
    xlim = range(x) * 0.8, col = ramp.col(col = c("cyan", "magenta"), n = length(y)),
    ylim = range(y) * 0.8, zlim = range(z) * 0.8)

# border = 'blue'增加网格线
surf3D(x, y, z, colvar = y, colkey = FALSE, box = FALSE, theta = 60, border = "blue",
    xlim = range(x) * 0.8, col = ramp.col(col = c("cyan", "magenta"), n = length(y)),
    ylim = range(y) * 0.8, zlim = range(z) * 0.8)
6.2 spheresurf3D()
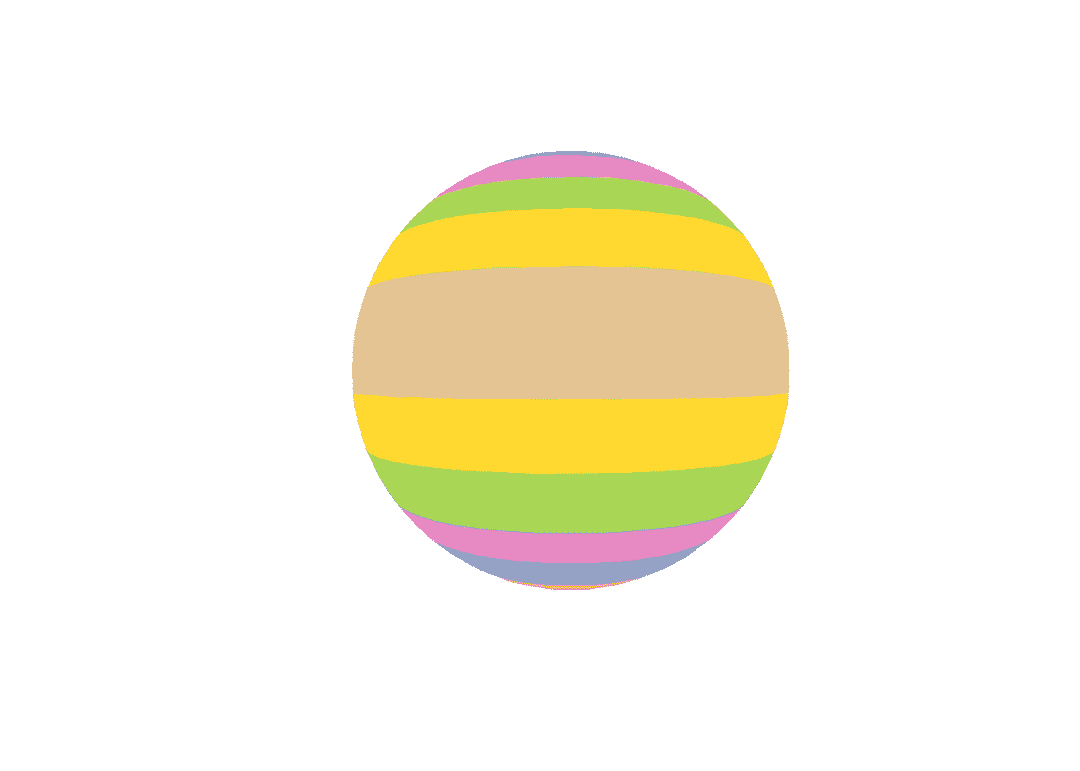
比surf3D简单,不需要考虑网格数据构成。 优点是可以绘制颜色渐变的圆,其它函数都不行。
library(plot3D)
library(RColorBrewer)


# spheresurf3D() # 默认绘图,颜色沿z轴方向渐变

# true ranges are [-1, 1]; set limits to [-0.8, 0.8] to make larger plots
lim <- c(-0.8, 0.8)
spheresurf3D(col = ramp.col(col = c("cyan", "magenta"), n = 50), colkey = FALSE,
    xlim = lim, ylim = lim, zlim = lim)

spheresurf3D(col = ramp.col(col = c("cyan", "magenta"), n = 10), colkey = FALSE,
    xlim = lim, ylim = lim, zlim = lim)

spheresurf3D(col = c(brewer.pal(n = 7, name = "Set2"), rev(brewer.pal(n = 7,
    name = "Set2"))), colkey = FALSE, xlim = lim, ylim = lim, zlim = lim)

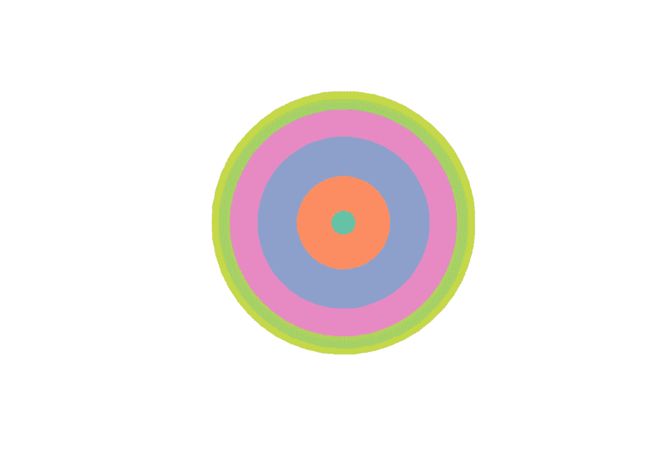
# phi = 90,变成同心圆,彩虹圆环
spheresurf3D(col = c(brewer.pal(n = 7, name = "Set2"), rev(brewer.pal(n = 7,
name = "Set2"))), phi = 90, colkey = FALSE, xlim = lim, ylim = lim, zlim = lim)![]()
····
往期精彩:
R_插值_拟合_回归_样条
R_circlize包_和弦图(一)
R_circlize包_和弦图(二)
R_ggplot2基础(一)
R_ggplot2基础(二)
R_ggplot2基础(三)
R_ggplot2基础(四)
R_3D图(一)
R_3D图(二)
R_3D图(三)
····
![]()
![]()
公众号后台回复关键字即可学习
回复 爬虫 爬虫三大案例实战
回复 Python 1小时破冰入门回复 数据挖掘 R语言入门及数据挖掘
回复 人工智能 三个月入门人工智能
回复 数据分析师 数据分析师成长之路
回复 机器学习 机器学习的商业应用
回复 数据科学 数据科学实战
回复 常用算法 常用数据挖掘算法
