Springboot整合Elasticsearch(High-level-Client)
前言
通过学习Elasticsearch一小段时间来稍微认识了一点ES的体系架构。发现ES最大的坑就是版本兼容性问题了—在整合Springboot也不例外,但是,有一种方式能较好的解决—通过restclient。
项目github地址springboot_elasticsearch求star
内容
当前springboot整合ElasticSearch的方法主体分为2大种——restclient和transportclient。其中transportclient将逐渐被遗弃。而restclient会变得更加流行。
其中
-
transportclient:
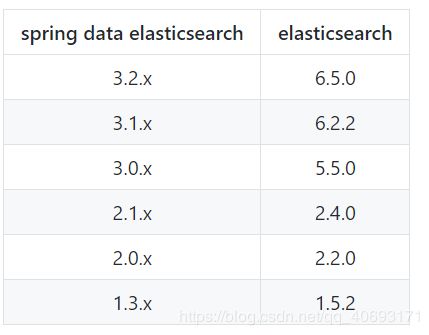
通过监听9300端口tcp链接进行数据传输,他可以触摸到es的API和结构。在Springboot集成ES的两种方式种,一般有spring-boot-starter-data-elasticsearch和Spring-data-elasticsearch。其中spring-boot-starter-data-elasticsearch。第一个是Springboot官方的整合包,使用更方便。但是更新缓慢,支持版本较低。而ES版本更新较快。版本不一致直接整合不上。而Spring-data-elasticsearch对版本支持稍微好一点。版本对应关系。你会发现对新版本支持还是比较差的。

-
restclient:
rest,不难想到http,restclient就是采用http进行交互。restclient相比transport最大的好处就是—对于版本兼容性较好。然而,restclient也分为两种——high—level和low—level两种,两者原理基本一致,区别最大的就是封装性。low—level各种操作都要你自己封装,并且java本身不支持json还需要引用第三方包。而high—level是针对elasticsearch的api进行高级封装,和elasticsearch的版本关联大一些。因为以前学过爬虫,所以对这方面的理解还好一点,两个可以这么类比一下:low—level就行原生爬虫,啥东西都要你自己写,而high—level就像是框架一般,各种方法帮你稍微封装好。使用起来较为方便。 -
用哪一个?
官方明确说明transportclient在elasticsearch高版本会直接遗弃。只支持restclient。为了顺应ES的潮流,还是要用restclient。并且transportclient在高并发会有性能问题。
Springboot简单整合elasticsearch-rest-high-level-client
- maven依赖
 org.elasticsearchgroupId>
 elasticsearchartifactId>
 dependency>

 org.elasticsearch.clientgroupId>
 elasticsearch-rest-high-level-clientartifactId>
 6.6.1version>
 dependency>
- esConfig.java文件
import org.apache.http.HttpHost;
import org.apache.http.client.config.RequestConfig.Builder;
import org.apache.http.impl.nio.client.HttpAsyncClientBuilder;
import org.elasticsearch.client.RestClient;
import org.elasticsearch.client.RestClientBuilder;
import org.elasticsearch.client.RestClientBuilder.HttpClientConfigCallback;
import org.elasticsearch.client.RestClientBuilder.RequestConfigCallback;
import org.elasticsearch.client.RestHighLevelClient;
import org.springframework.context.annotation.Bean;
import org.springframework.context.annotation.Configuration;


import java.util.ArrayList;

@Configuration
public class esConfig {

 private static String hosts = "127.0.0.1"; // 集群地址,多个用,隔开
 private static int port = 9200; // 使用的端口号
 private static String schema = "http"; // 使用的协议
 private static ArrayList hostList = null;

 private static int connectTimeOut = 1000; // 连接超时时间
 private static int socketTimeOut = 30000; // 连接超时时间
 private static int connectionRequestTimeOut = 500; // 获取连接的超时时间

 private static int maxConnectNum = 100; // 最大连接数
 private static int maxConnectPerRoute = 100; // 最大路由连接数

 static {
 hostList = new ArrayList<>();
 String[] hostStrs = hosts.split(",");
 for (String host : hostStrs) {
 hostList.add(new HttpHost(host, port, schema));
 }
 }
 @Bean
 public RestHighLevelClient client() {
 RestClientBuilder builder = RestClient.builder(hostList.toArray(new HttpHost[0]));
 // 异步httpclient连接延时配置
 builder.setRequestConfigCallback(new RestClientBuilder.RequestConfigCallback() {
 @Override
 public Builder customizeRequestConfig(Builder requestConfigBuilder) {
 requestConfigBuilder.setConnectTimeout(connectTimeOut);
 requestConfigBuilder.setSocketTimeout(socketTimeOut);
 requestConfigBuilder.setConnectionRequestTimeout(connectionRequestTimeOut);
 return requestConfigBuilder;
 }
 });
 // 异步httpclient连接数配置
 builder.setHttpClientConfigCallback(new HttpClientConfigCallback() {
 @Override
 public HttpAsyncClientBuilder customizeHttpClient(HttpAsyncClientBuilder httpClientBuilder) {
 httpClientBuilder.setMaxConnTotal(maxConnectNum);
 httpClientBuilder.setMaxConnPerRoute(maxConnectPerRoute);
 return httpClientBuilder;
 }
 });
 RestHighLevelClient client = new RestHighLevelClient(builder);
 return client;
 }

}
- pojo类
package com.elasticsearch.pojo;

public class dog {
 private String name;
 private String type;
 private int age;
 private String details;//介绍


 public dog(String name, String type, int age,String details) {
 this.name = name;
 this.type = type;
 this.age = age;
 this.details=details;
 }

 public String getName() {
 return name;
 }

 public void setName(String name) {
 this.name = name;
 }

 public String getType() {
 return type;
 }

 public void setType(String type) {
 this.type = type;
 }

 public int getAge() {
 return age;
 }

 public void setAge(int age) {
 this.age = age;
 }

 public String getDetails() {
 return details;
 }

 public void setDetails(String details) {
 this.details = details;
 }
}
- Esteamplate封装你想要的操作,比如你想创建索引,删除索引,查找,插入等等操作,你可以将方法封装起来供使用。我将Esteamplate封装成一个bean对象用于注入。这里我用了一个自增id作为每个插入的索引id(可配合redis),实际可以根据场景进行自由封装,对于
ES的更新操作。你只需要将根据index,type和id等信息进行插入就会覆盖。
package com.elasticsearch.service;


import com.elasticsearch.pojo.dog;

import org.elasticsearch.action.admin.indices.create.CreateIndexRequest;
import org.elasticsearch.action.admin.indices.create.CreateIndexResponse;
import org.elasticsearch.action.admin.indices.delete.DeleteIndexRequest;
import org.elasticsearch.action.admin.indices.get.GetIndexRequest;
import org.elasticsearch.action.index.IndexRequest;
import org.elasticsearch.action.index.IndexResponse;
import org.elasticsearch.action.search.SearchRequest;
import org.elasticsearch.action.search.SearchResponse;
import org.elasticsearch.client.RequestOptions;
import org.elasticsearch.client.RestHighLevelClient;
import org.elasticsearch.common.xcontent.XContentType;
import org.elasticsearch.index.query.BoolQueryBuilder;
import org.elasticsearch.index.query.QueryBuilders;
import org.elasticsearch.search.builder.SearchSourceBuilder;

import org.json.JSONObject;
import org.slf4j.Logger;
import org.slf4j.LoggerFactory;
import org.springframework.beans.factory.annotation.Autowired;
import org.springframework.stereotype.Component;
import org.springframework.stereotype.Service;

import java.io.IOException;
@Component
public class Esteamplate {
 @Autowired
 private RestHighLevelClient client;
 private int indexid=0;
 private static final Logger log= LoggerFactory.getLogger(Esteamplate.class);
 private boolean addindex(String index) throws IOException {
//

 CreateIndexRequest request = new CreateIndexRequest(index);
 CreateIndexResponse createIndexResponse = client.indices().create(request, RequestOptions.DEFAULT);
 JSONObject jsonObject=new JSONObject(createIndexResponse);
 log.info("createIndex: " jsonObject.toString());
 return true;
 }
 public boolean deleteIndex(String indexName) {
 DeleteIndexRequest index = new DeleteIndexRequest(indexName);
 try {
 client.indices().delete(index);
 return true;
 } catch (IOException e) {
 e.printStackTrace();
 return false;
 }

 }

 public JSONObject addDogs(String index, String type, dog dog) throws IOException {

 GetIndexRequest request = new GetIndexRequest();
 request.indices(index);
 if(!client.indices().exists(request,RequestOptions.DEFAULT))//添加之前判断是否存在index
 {
 addindex(index);
 }

 IndexRequest indexRequest=new IndexRequest(index,type,String.valueOf(indexid ));//用自增id作为唯一index
 indexRequest.source((new JSONObject(dog)).toString(), XContentType.JSON);
 IndexResponse indexResponse=client.index(indexRequest,RequestOptions.DEFAULT);
 JSONObject jsonObject=new JSONObject(indexResponse);
 log.info("addDog: " jsonObject.toString());
 return jsonObject;
 }

 public JSONObject searchdog(String index, String type, String detail) throws IOException {
 BoolQueryBuilder boolBuilder = QueryBuilders.boolQuery();
 boolBuilder.must(QueryBuilders.matchQuery("detail", detail)); // 这里可以根据字段进行搜索,must表示符合条件的,相反的mustnot表示不符合条件的
 // boolBuilder.must(QueryBuilders.matchQuery("id", tests.getId().toString()));

 SearchSourceBuilder sourceBuilder = new SearchSourceBuilder();
 sourceBuilder.query(boolBuilder);

 sourceBuilder.from(0);
 sourceBuilder.size(10); // 获取记录数,默认10
 //sourceBuilder.fetchSource(new String[] { "user", "title","desc" }, new String[] {}); // 第一个是获取字段,第二个是过滤的字段,默认获取全部
 SearchRequest searchRequest = new SearchRequest(index);
 searchRequest.types(type);
 searchRequest.source(sourceBuilder);
 SearchResponse response = client.search(searchRequest, RequestOptions.DEFAULT);
 System.out.println(new JSONObject(response).toString());
 return new JSONObject(response);
 }
}
- controller:
package com.elasticsearch.controller;


import com.elasticsearch.pojo.dog;
import com.elasticsearch.service.Esteamplate;
import org.json.JSONObject;
import org.springframework.beans.factory.annotation.Autowired;
import org.springframework.stereotype.Controller;
import org.springframework.web.bind.annotation.GetMapping;
import org.springframework.web.bind.annotation.ResponseBody;

import java.io.IOException;

@Controller
public class esController {
 @Autowired
 private Esteamplate esteamplate;

 @ResponseBody
 @GetMapping("adddog")
 public String adddog(String name, String dogtype, String detail) throws IOException {
 dog dog=new dog(name, dogtype,2, detail);
 JSONObject jsonObject=esteamplate.addDogs("esindex","dog",dog);
 return jsonObject.toString();
 }

 @ResponseBody
 @GetMapping("searchdog")
 public String serchdog(String detail) throws IOException {
 return esteamplate.searchdog("esindex","dog",detail).toString();
 }
}
-
这样你就可以在controller调用。但是如果你是返回给前端调用的话。要注意返回格式。如果你返回json格式给前端,返回类型不要public JSONobject xx(),因为你如果查看JSONarray或者JSONobject源码会发现他只是将list,map等封装到内部,而无法被序列化返回,所以一般有两个解决思路
-
进行测试
在浏览器输入http://localhost:8080/adddog?name=公众号&dogtype=bigsai&detail=bigsai等类似进行插入
然后进入查询:http://localhost:8080/searchdog?detail=舔狗 查询结果会根据相关性进行排序。其中score就是相关度的分数。

ok,get简单的整合算是完成,但是es的安装,还有kibana安装需要自行百度。windows比较简单,linux也不难。
8.写在后面的话
-
es的水依然很深。这只是最简单的整合和入门。
-
es常用的场景有搜索、elk日志处理、集群检测等等。
-
es必备的一些组合有kibana、head插件、ik分词插件
-
es很吃内存,如果服务器安装es要找个教程好好看看。
-
es的各种查询方法可在kibana执行,也可在head中执行,也可直接发送http请求给es执行。现在还有开源的es查询转sql语句很火。
-
如果对
后端、爬虫、数据结构算法等感性趣欢迎关注我的个人公众号交流:bigsai


