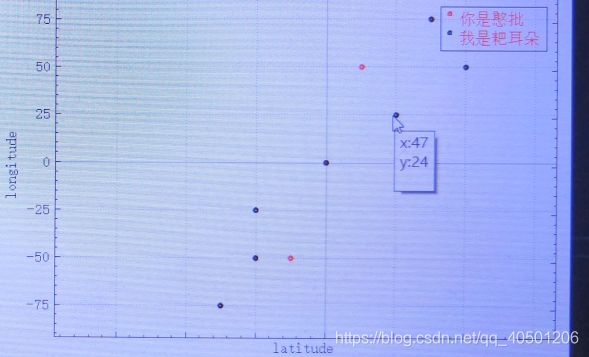
QCustomPlot 的使用 散点图 升级版(菜单、图例、鼠标显示值)
QCustomPlot 的使用 散点图
前沿:在自身不断的努力下,对散点图进行了优化
设计到的知识点
// 设置画笔风格
	QPen drawPen;
	drawPen.setColor(Qt::red);
	drawPen.setWidth(4);

	// 绘制散点
	QCPGraph * curGraph = customplot->graph(0);
	curGraph->setPen(drawPen);
	curGraph->setLineStyle(QCPGraph::lsNone);
	curGraph->setScatterStyle(QCPScatterStyle(QCPScatterStyle::ssCircle, 2));//点是空心的
	//ssDisc 点是实心的,需要改变参数即可
	customplot->graph(0)->setName(QString::fromLocal8Bit("你是憨批"));// 图例的名字

// 设置画笔风格
	QPen drawPen1;
	drawPen1.setColor(Qt::black);
	drawPen1.setWidth(4);

	// 绘制散点
	customplot->addGraph();
	QCPGraph * curGraph1 = customplot->graph(1);
	curGraph1->setPen(drawPen1);
	curGraph1->setLineStyle(QCPGraph::lsNone);//曲线样式
	curGraph1->setScatterStyle(QCPScatterStyle(QCPScatterStyle::ssCircle, 2));//点是空心的
	customplot->graph(1)->setName(QString::fromLocal8Bit("我是耙耳朵"));// 图例的名字
- 图例的添加
customplot->graph(1)->setName(QString::fromLocal8Bit(“我是耙耳朵”));// 设置图例的名字,我把这句代码放在前面了
	customplot->legend->setVisible(true); //设置图例是否可用
	QFont legendFont = font();
	legendFont.setPointSize(10);
	customplot->legend->setFont(legendFont);
	customplot->legend->setSelectedFont(legendFont);
	customplot->legend->setSelectableParts(QCPLegend::spItems); // legend box shall not be selectable, only legend items

//后面的为补充,可以不加
	//设置图例图标大小
	customplot->legend->setIconSize(5, 5);

	//设置图例文字颜色
	customplot->legend->setTextColor(Qt::red);//设置图例文字颜色

	//在图例中添加线
	customplot->axisRect()->setupFullAxesBox();

	//将图例矩形域放到右上角
	customplot->axisRect()->insetLayout()->setInsetAlignment(0, Qt::AlignTop | Qt::AlignRight);

	//设置图例背景色
	customplot->legend->setBrush(QColor(255, 255, 255, 0));//设置背景色
- 添加图的标题
	customplot->plotLayout()->insertRow(0);
	QCPTextElement *title = new QCPTextElement(customplot, "my love chart", QFont("sans", 17, QFont::Bold));
	customplot->plotLayout()->addElement(0, 0, title);
- 菜单的添加(实现的是对图例位置的设置) 如果想右键图出现菜单,则注释if语句
	customplot->setContextMenuPolicy(Qt::CustomContextMenu);
	connect(customplot, SIGNAL(customContextMenuRequested(QPoint)), this, SLOT(contextMenuRequest(QPoint)));

//槽函数的编写
//菜单的生成
void CustomPoltWidget::contextMenuRequest(QPoint pos)
{
	QMenu *menu = new QMenu(this);
	menu->setAttribute(Qt::WA_DeleteOnClose);
 	if (customplot->legend->selectTest(pos, false) >= 0) // context menu on legend requested
 	{
		menu->addAction("Move to top left", this, SLOT(moveLegend()))->setData((int)(Qt::AlignTop | Qt::AlignLeft));
		menu->addAction("Move to top center", this, SLOT(moveLegend()))->setData((int)(Qt::AlignTop | Qt::AlignHCenter));
		menu->addAction("Move to top right", this, SLOT(moveLegend()))->setData((int)(Qt::AlignTop | Qt::AlignRight));
		menu->addAction("Move to bottom right", this, SLOT(moveLegend()))->setData((int)(Qt::AlignBottom | Qt::AlignRight));
		menu->addAction("Move to bottom left", this, SLOT(moveLegend()))->setData((int)(Qt::AlignBottom | Qt::AlignLeft));
	}
	menu->popup(customplot->mapToGlobal(pos));
}
//图例的移动
void CustomPoltWidget::moveLegend()
{
	if (QAction* contextAction = qobject_cast(sender())) // make sure this slot is really called by a context menu action, so it carries the data we need
	{
		bool ok;
		int dataInt = contextAction->data().toInt(&ok);
		if (ok)
		{
			customplot->axisRect()->insetLayout()->setInsetAlignment(0, (Qt::Alignment)dataInt);
			customplot->replot();
		}
	}
}

