SpringCloud 2.x学习笔记:21、Nacos集群模式部署
1、Nacos集群模式部署
官方参考文档
https://nacos.io/zh-cn/docs/cluster-mode-quick-start.html
1.1 编辑集群配置文件
分别在三个节点上编辑集群配置文件
[root@elastic3 conf]# vi cluster.conf
[root@elastic3 conf]# cat cluster.conf
# ip:port
10.xx.xx.xx1:8848
10.xx.xx.xx2:8848
10.xx.xx.xx3:8848
- 1
- 2
- 3
- 4
- 5
- 6
1.2 启动集群节点
sh startup.sh
[root@elastic3 ~]# sh /app/nacos/bin/startup.sh
/opt/jdk1.8.0_161/bin/java  -server -Xms2g -Xmx2g -Xmn1g -XX:MetaspaceSize=128m -XX:MaxMetaspaceSize=320m -XX:-OmitStackTraceInFastThrow -XX:+HeapDumpOnOutOfMemoryError -XX:HeapDumpPath=/app/nacos/logs/java_heapdump.hprof -XX:-UseLargePages -Djava.ext.dirs=/opt/jdk1.8.0_161/jre/lib/ext:/opt/jdk1.8.0_161/lib/ext:/app/nacos/plugins/cmdb:/app/nacos/plugins/mysql -Xloggc:/app/nacos/logs/nacos_gc.log -verbose:gc -XX:+PrintGCDetails -XX:+PrintGCDateStamps -XX:+PrintGCTimeStamps -XX:+UseGCLogFileRotation -XX:NumberOfGCLogFiles=10 -XX:GCLogFileSize=100M -Dnacos.home=/app/nacos -Dloader.path=/app/nacos/plugins/health -jar /app/nacos/target/nacos-server.jar  --spring.config.location=classpath:/,classpath:/config/,file:./,file:./config/,file:/app/nacos/conf/ --logging.config=/app/nacos/conf/nacos-logback.xml --server.max-http-header-size=524288
nacos is starting,you can check the /app/nacos/logs/start.out
[root@elastic3 ~]# tailf /app/nacos/logs/start.out
2019-06-28 16:34:02,152 INFO Nacos is starting...

2019-06-28 16:34:02,771 INFO Nacos Log files: /app/nacos/logs/

2019-06-28 16:34:02,771 INFO Nacos Conf files: /app/nacos/conf/

2019-06-28 16:34:02,771 INFO Nacos Data files: /app/nacos/data/

2019-06-28 16:34:02,771 INFO Nacos started successfully in cluster mode.
- 1
- 2
- 3
- 4
- 5
- 6
- 7
- 8
- 9
- 10
- 11
- 12
- 13
- 14
[root@elastic2 ~]# sh /app/nacos/bin/startup.sh
/opt/jdk1.8.0_161/bin/java  -server -Xms2g -Xmx2g -Xmn1g -XX:MetaspaceSize=128m -XX:MaxMetaspaceSize=320m -XX:-OmitStackTraceInFastThrow -XX:+HeapDumpOnOutOfMemoryError -XX:HeapDumpPath=/app/nacos/logs/java_heapdump.hprof -XX:-UseLargePages -Djava.ext.dirs=/opt/jdk1.8.0_161/jre/lib/ext:/opt/jdk1.8.0_161/lib/ext:/app/nacos/plugins/cmdb:/app/nacos/plugins/mysql -Xloggc:/app/nacos/logs/nacos_gc.log -verbose:gc -XX:+PrintGCDetails -XX:+PrintGCDateStamps -XX:+PrintGCTimeStamps -XX:+UseGCLogFileRotation -XX:NumberOfGCLogFiles=10 -XX:GCLogFileSize=100M -Dnacos.home=/app/nacos -Dloader.path=/app/nacos/plugins/health -jar /app/nacos/target/nacos-server.jar  --spring.config.location=classpath:/,classpath:/config/,file:./,file:./config/,file:/app/nacos/conf/ --logging.config=/app/nacos/conf/nacos-logback.xml --server.max-http-header-size=524288
nacos is starting,you can check the /app/nacos/logs/start.out
[root@elastic2 ~]# tailf /app/nacos/logs/start.out
2019-06-28 16:34:39,363 INFO Nacos is starting...

2019-06-28 16:34:39,662 INFO Nacos Log files: /app/nacos/logs/

2019-06-28 16:34:39,662 INFO Nacos Conf files: /app/nacos/conf/

2019-06-28 16:34:39,662 INFO Nacos Data files: /app/nacos/data/

2019-06-28 16:34:39,663 INFO Nacos started successfully in cluster mode.
- 1
- 2
- 3
- 4
- 5
- 6
- 7
- 8
- 9
- 10
- 11
- 12
- 13
- 14
[root@elastic1 ~]# sh /app/nacos/bin/startup.sh
/opt/jdk1.8.0_161/bin/java  -server -Xms2g -Xmx2g -Xmn1g -XX:MetaspaceSize=128m -XX:MaxMetaspaceSize=320m -XX:-OmitStackTraceInFastThrow -XX:+HeapDumpOnOutOfMemoryError -XX:HeapDumpPath=/app/nacos/logs/java_heapdump.hprof -XX:-UseLargePages -Djava.ext.dirs=/opt/jdk1.8.0_161/jre/lib/ext:/opt/jdk1.8.0_161/lib/ext:/app/nacos/plugins/cmdb:/app/nacos/plugins/mysql -Xloggc:/app/nacos/logs/nacos_gc.log -verbose:gc -XX:+PrintGCDetails -XX:+PrintGCDateStamps -XX:+PrintGCTimeStamps -XX:+UseGCLogFileRotation -XX:NumberOfGCLogFiles=10 -XX:GCLogFileSize=100M -Dnacos.home=/app/nacos -Dloader.path=/app/nacos/plugins/health -jar /app/nacos/target/nacos-server.jar  --spring.config.location=classpath:/,classpath:/config/,file:./,file:./config/,file:/app/nacos/conf/ --logging.config=/app/nacos/conf/nacos-logback.xml --server.max-http-header-size=524288
nacos is starting,you can check the /app/nacos/logs/start.out
[root@elastic1 ~]# tailf /app/nacos/logs/start.out
2019-06-28 16:34:40,691 INFO Nacos is starting...

2019-06-28 16:34:41,697 INFO Nacos is starting...

2019-06-28 16:34:42,697 INFO Nacos is starting...

2019-06-28 16:34:43,698 INFO Nacos is starting...

2019-06-28 16:34:44,700 INFO Nacos is starting...

2019-06-28 16:34:45,702 INFO Nacos is starting...

2019-06-28 16:34:46,599 INFO Nacos Log files: /app/nacos/logs/

2019-06-28 16:34:46,600 INFO Nacos Conf files: /app/nacos/conf/

2019-06-28 16:34:46,600 INFO Nacos Data files: /app/nacos/data/

2019-06-28 16:34:46,600 INFO Nacos started successfully in cluster mode.
- 1
- 2
- 3
- 4
- 5
- 6
- 7
- 8
- 9
- 10
- 11
- 12
- 13
- 14
- 15
- 16
- 17
- 18
- 19
- 20
- 21
- 22
- 23
- 24
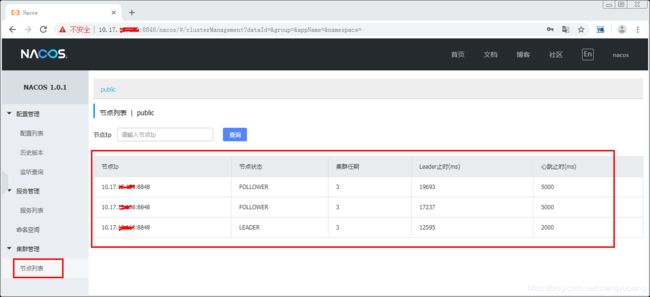
1.3 运行效果
http://10.17.xx.xxx:8848/nacos/
2、Proxy配置
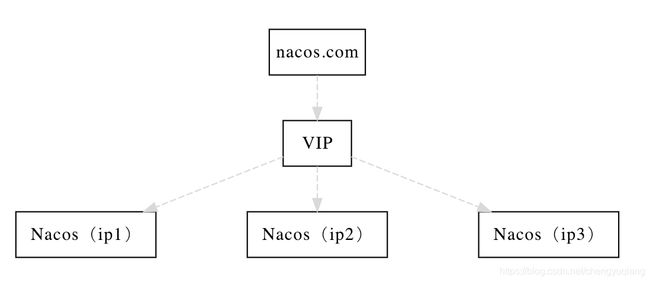
2.1 Nacos的集群架构
根据官方文档的介绍 https://nacos.io/zh-cn/docs/cluster-mode-quick-start.html,
Nacos的集群架构如下图
通过上面,我们已经成功启动了三个节点的Nacos集群。
根据架构图所示,我们还需要提供一个统一的入口给Spring Cloud应用访问,也即是需要为上面启动的的3个Nacos集群做一个负载均衡的访问层。
下面通过Nginx来实现。
2.2 Nginx编译与安装
参考之前的文章
https://blog.csdn.net/chengyuqiang/article/details/54587702
2.3 配置文件
[root@elastic3 nginx-1.16.0]# cd /usr/local/nginx/
[root@elastic3 nginx]# ll
total 36
drwx------ 2 nobody root 4096 Jun 28 17:28 client_body_temp
drwxr-xr-x 2 root   root 4096 Jun 28 17:28 conf
drwx------ 2 nobody root 4096 Jun 28 17:28 fastcgi_temp
drwxr-xr-x 2 root   root 4096 Jun 28 17:28 html
drwxr-xr-x 2 root   root 4096 Jun 28 17:28 logs
drwx------ 2 nobody root 4096 Jun 28 17:28 proxy_temp
drwxr-xr-x 2 root   root 4096 Jun 28 17:28 sbin
drwx------ 2 nobody root 4096 Jun 28 17:28 scgi_temp
drwx------ 2 nobody root 4096 Jun 28 17:28 uwsgi_temp
[root@elastic3 nginx]#
- 1
- 2
- 3
- 4
- 5
- 6
- 7
- 8
- 9
- 10
- 11
- 12
- 13
[root@elastic3 nginx]# vim conf/nginx.conf
- 1
#user  nobody;
worker_processes  1;

#error_log  logs/error.log;
#error_log  logs/error.log  notice;
#error_log  logs/error.log  info;

pid        logs/nginx.pid;

#工作模式及连接数上限
events {
    worker_connections  1024;
}

#设定http服务器,利用它的反向代理功能提供负载均衡支持
http {
    include       mime.types;
    default_type  application/octet-stream;

    #log_format  main  '$remote_addr - $remote_user [$time_local] "$request" '
    #                  '$status $body_bytes_sent "$http_referer" '
    #                  '"$http_user_agent" "$http_x_forwarded_for"';

    #access_log  logs/access.log  main;

    sendfile        on;
    #tcp_nopush     on;

    #keepalive_timeout  0;
    #连接超时时间
    keepalive_timeout  120;
    #gzip  on;
    #设定负载均衡的服务器列表
    upstream nacos{
        #weigth参数表示权值,权值越高被分配到的几率越大
        server 10.17.12.158:8848 weight=5;
        server 10.17.12.159:8848 weight=5;
        server 10.17.12.160:8848 weight=5;
    }
    server {
        listen       8080;
        server_name  localhost;

        #charset koi8-r;
        #编码格式
        charset utf-8;

        #access_log  logs/host.access.log  main;

        location / {
            root   html;
            index  index.html index.htm;
            #请求转向my_server1定义的服务器列表
            proxy_pass http://nacos;
        }
       #error_page  404              /404.html;

        # redirect server error pages to the static page /50x.html
        #
        error_page   500 502 503 504  /50x.html;
        location = /50x.html {
            root   html;
        }
    }
- 1
- 2
- 3
- 4
- 5
- 6
- 7
- 8
- 9
- 10
- 11
- 12
- 13
- 14
- 15
- 16
- 17
- 18
- 19
- 20
- 21
- 22
- 23
- 24
- 25
- 26
- 27
- 28
- 29
- 30
- 31
- 32
- 33
- 34
- 35
- 36
- 37
- 38
- 39
- 40
- 41
- 42
- 43
- 44
- 45
- 46
- 47
- 48
- 49
- 50
- 51
- 52
- 53
- 54
- 55
- 56
- 57
- 58
- 59
- 60
- 61
- 62
- 63
- 64
- 65
2.4 重新加载配置文件
[root@elastic3 nginx]# sbin/nginx -s reload
- 1

