持久化修改Android模拟器的system分区
对Android的模拟器,如果要修改其system分区里的文件,除了remount之外,还需要对数据进行持久化——因为默认情况下emulator会以只读的形式加载system.img,即便remount之后对其进行的修改也不会实际被保存下来。
下面介绍一种简单的方法对数据进行持久化:
1. 创建一个AVD,在这个例子里,我们用Android 4.3.1,命名为Android4.3.1。
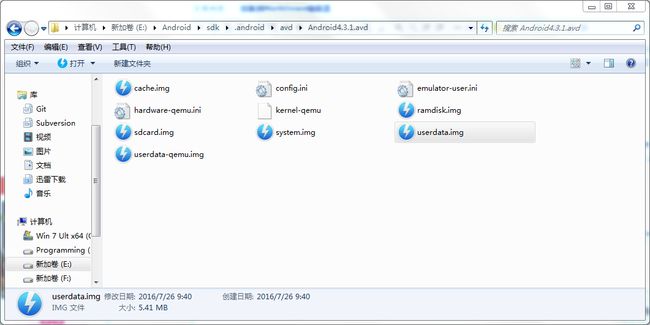
2. 将SDK(E:\Android\sdk\system-images\android-18\default\armeabi-v7a)下这个系统的system.img,kernel-qemu,ramdisk.img文件拷贝至emulator的目录下一份E:\Android\sdk\.android\avd\Android4.3.1.avd.目录结构如下:
3.修改hardware-qemu.ini文件的kernel.path,disk.ramdisk.path ,disk.systemPartition.initPath字段路径
hw.cpu.arch = arm
hw.cpu.model = cortex-a8
hw.cpu.ncore = 2
hw.ramSize = 500
hw.screen = touch
hw.mainKeys = true
hw.trackBall = false
hw.keyboard = true
hw.keyboard.lid = false
hw.keyboard.charmap = qwerty2
hw.dPad = false
hw.gsmModem = true
hw.gps = true
hw.battery = true
hw.accelerometer = true
hw.audioInput = true
hw.audioOutput = true
hw.sdCard = true
hw.sdCard.path = E:\Android\sdk\.android\avd\Android4.3.1.avd/sdcard.img
disk.cachePartition = true
disk.cachePartition.path = E:\Android\sdk\.android\avd\Android4.3.1.avd/cache.img
disk.cachePartition.size = 66m
hw.lcd.width = 480
hw.lcd.height = 800
hw.lcd.depth = 16
hw.lcd.density = 240
hw.lcd.backlight = true
hw.gpu.enabled = false
hw.gpu.mode = auto
hw.gpu.blacklisted = no
hw.initialOrientation = portrait
hw.camera.back = none
hw.camera.front = none
vm.heapSize = 32
hw.sensors.light = true
hw.sensors.pressure = true
hw.sensors.humidity = true
hw.sensors.proximity = true
hw.sensors.magnetic_field = true
hw.sensors.orientation = true
hw.sensors.temperature = true
hw.useext4 = true
kernel.path = E:\Android\sdk\.android\avd\Android4.3.1.avd\/kernel-qemu
kernel.parameters =  androidboot.hardware=goldfish android.checkjni=1
kernel.newDeviceNaming = no
kernel.supportsYaffs2 = yes
disk.ramdisk.path = E:\Android\sdk\.android\avd\Android4.3.1.avd\/ramdisk.img
disk.systemPartition.initPath = E:\Android\sdk\.android\avd\Android4.3.1.avd\/system.img
disk.systemPartition.size = 218m
disk.dataPartition.path = E:\Android\sdk\.android\avd\Android4.3.1.avd/userdata-qemu.img
disk.dataPartition.size = 500m
avd.name = Android4.3.1
4. 手工指定挂载参数地启动它:
C:\Users\Administrator>emulator -avd Android4.3.1 -qemu -nand system,size=0x1f400000,file=E:\Android\sdk\.android\avd\Android4.3.1.avd\system.img其中,0x1f400000是指给/system分区500MB的空间。
4. 系统启动后,adb remount一下,然后通过adb shell mount可以看到system分区已经变为rw了。
C:\Users\Administrator>adb shell mount
rootfs / rootfs ro 0 0
tmpfs /dev tmpfs rw,nosuid,mode=755 0 0
devpts /dev/pts devpts rw,mode=600 0 0
proc /proc proc rw 0 0
sysfs /sys sysfs rw 0 0
none /acct cgroup rw,cpuacct 0 0
tmpfs /mnt/secure tmpfs rw,mode=700 0 0
tmpfs /mnt/asec tmpfs rw,mode=755,gid=1000 0 0
tmpfs /mnt/obb tmpfs rw,mode=755,gid=1000 0 0
none /dev/cpuctl cgroup rw,cpu 0 0
/dev/block/mtdblock0 /system yaffs2 rw 0 0
/dev/block/mtdblock2 /data yaffs2 rw,nosuid,nodev 0 0
/dev/block/mtdblock3 /cache yaffs2 rw,nosuid,nodev 0 0
/dev/block/vold/179:0 /storage/sdcard vfat rw,dirsync,nosuid,nodev,noexec,uid=10
00,gid=1015,fmask=0702,dmask=0702,allow_utime=0020,codepage=cp437,iocharset=iso8
859-1,shortname=mixed,utf8,errors=remount-ro 0 0
/dev/block/vold/179:0 /mnt/secure/asec vfat rw,dirsync,nosuid,nodev,noexec,uid=1
000,gid=1015,fmask=0702,dmask=0702,allow_utime=0020,codepage=cp437,iocharset=iso
8859-1,shortname=mixed,utf8,errors=remount-ro 0 0
tmpfs /storage/sdcard/.android_secure tmpfs ro,size=0k,mode=000 0 0
5. 现在可以对/system分区做持久化修改。
6. 修改完成后,关掉模拟器。之后启动即可。
emulator说明如下:
C:\Users\Administrator>emulator -help-disk-images
The emulator needs several key image files to run appropriately.
Their exact location depends on whether you're using the emulator
from the Android SDK, or not (more details below).
The minimal required image files are the following:
kernel-qemu the emulator-specific Linux kernel image
ramdisk.img the ramdisk image used to boot the system
system.img the *initial* system image
userdata.img the *initial* data partition image
It will also use the following writable image files:
userdata-qemu.img the persistent data partition image
system-qemu.img an *optional* persistent system image
cache.img an *optional* cache partition image
sdcard.img an *optional* SD Card partition image
snapshots.img an *optional* state snapshots image
If you use a virtual device, its content directory should store
all writable images, and read-only ones will be found from the
corresponding platform/add-on directories. See -help-sdk-images
for more details.
If you are building from the Android build system, you should
have ANDROID_PRODUCT_OUT defined in your environment, and the
emulator shall be able to pick-up the right image files automatically.
See -help-build-images for more details.
If you're neither using the SDK or the Android build system, you
can still run the emulator by explicitely providing the paths to
*all* required disk images through a combination of the following
options: -sysdir, -datadir, -kernel, -ramdisk, -system, -data, -cache
-sdcard and -snapstorage.
The actual logic being that the emulator should be able to find all
images from the options you give it.
For more detail, see the corresponding -help-