版本记录
| 版本号 | 时间 |
|---|---|
| V1.0 | 2018.01.18 |
前言
在iOS中不管是画图或者动画,都需要指名路径,我们经常用的就是
UIBezierPath贝塞尔路径,接下来这几篇我们就详细的介绍下这个类和基本用法。感兴趣可以看上面写的几篇。
1. UIBezierPath类详细解析(一) —— 基本概览
UIBezierPath实例化
查看API文档,UIBezierPath主要使用下面几个方法进行实例化。下面我就挑几个重要的说一下。
+ (instancetype)bezierPath;
+ (instancetype)bezierPathWithRect:(CGRect)rect;
+ (instancetype)bezierPathWithOvalInRect:(CGRect)rect;
+ (instancetype)bezierPathWithRoundedRect:(CGRect)rect cornerRadius:(CGFloat)cornerRadius; // rounds all corners with the same horizontal and vertical radius
+ (instancetype)bezierPathWithRoundedRect:(CGRect)rect byRoundingCorners:(UIRectCorner)corners cornerRadii:(CGSize)cornerRadii;
+ (instancetype)bezierPathWithArcCenter:(CGPoint)center radius:(CGFloat)radius startAngle:(CGFloat)startAngle endAngle:(CGFloat)endAngle clockwise:(BOOL)clockwise;
+ (instancetype)bezierPathWithCGPath:(CGPathRef)CGPath;

- (instancetype)init NS_DESIGNATED_INITIALIZER;
- (nullable instancetype)initWithCoder:(NSCoder *)aDecoder NS_DESIGNATED_INITIALIZER;
1. + (instancetype)bezierPath;
这个类方法,直接返回一个实例化对象,是比较基本的初始化方法,这里就不多说了。
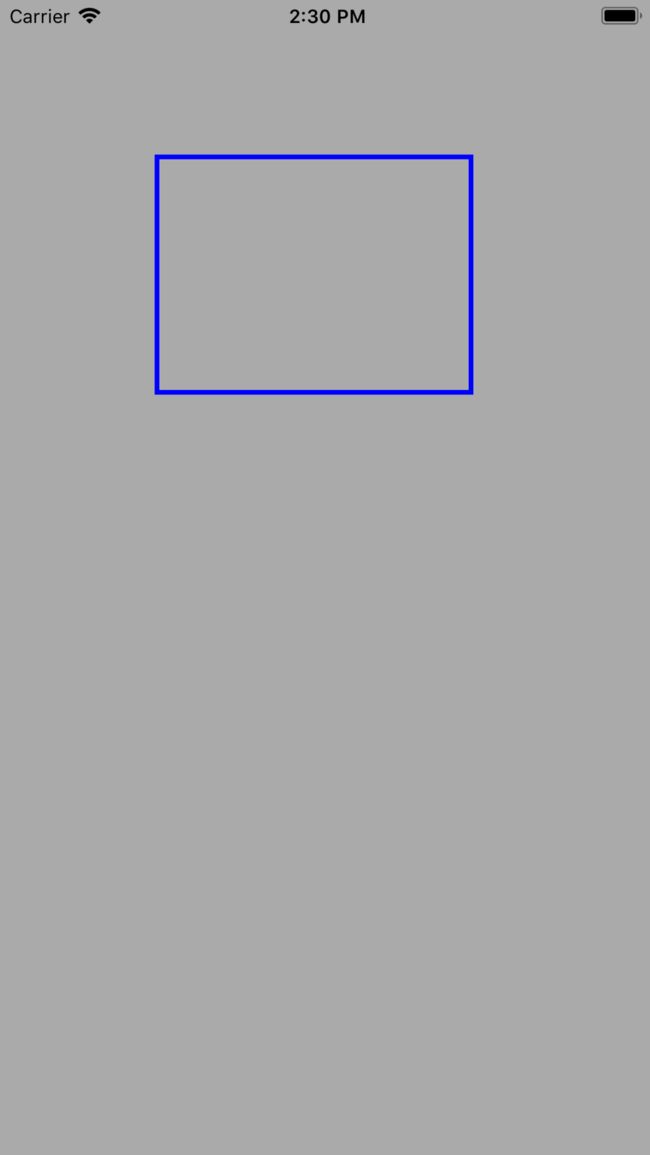
2. + (instancetype)bezierPathWithRect:(CGRect)rect;
这个是便捷的初始化方法,返回一个矩形的路径,需要传入一个CGRect类型的对象。
下面看一下简单的示例代码。
#import "ViewController.h"

@interface ViewController ()

@property (nonatomic, strong) CAShapeLayer *newlayer;

@end

@implementation ViewController

#pragma mark -  Override Base Function

- (void)viewDidLoad
{
    [super viewDidLoad];

    [self initUI];
}

#pragma mark -  Object Private Function

- (void)initUI
{
    [self drawRoundView:CGPointMake(200.0, 300.0) withStartAngle:0 withEndAngle:M_PI * 2 withRadius:100.0];
}

- (void)drawRoundView:(CGPoint)centerPoint withStartAngle:(CGFloat)startAngle withEndAngle:(CGFloat)endAngle withRadius:(CGFloat)radius
{
    UIBezierPath *path = [UIBezierPath bezierPathWithRect:CGRectMake(100.0, 100.0, 200.0, 150.0)];
    self.newlayer = [CAShapeLayer layer];
    self.newlayer.path = path.CGPath;
    self.newlayer.strokeColor = [UIColor blueColor].CGColor;
    self.newlayer.fillColor = [UIColor clearColor].CGColor;
    self.newlayer.lineWidth = 3;
    self.newlayer.frame = self.view.bounds;
    self.newlayer.backgroundColor = [[UIColor lightGrayColor] CGColor];
    [self.view.layer addSublayer:self.newlayer];

}
下面看一下实现效果。
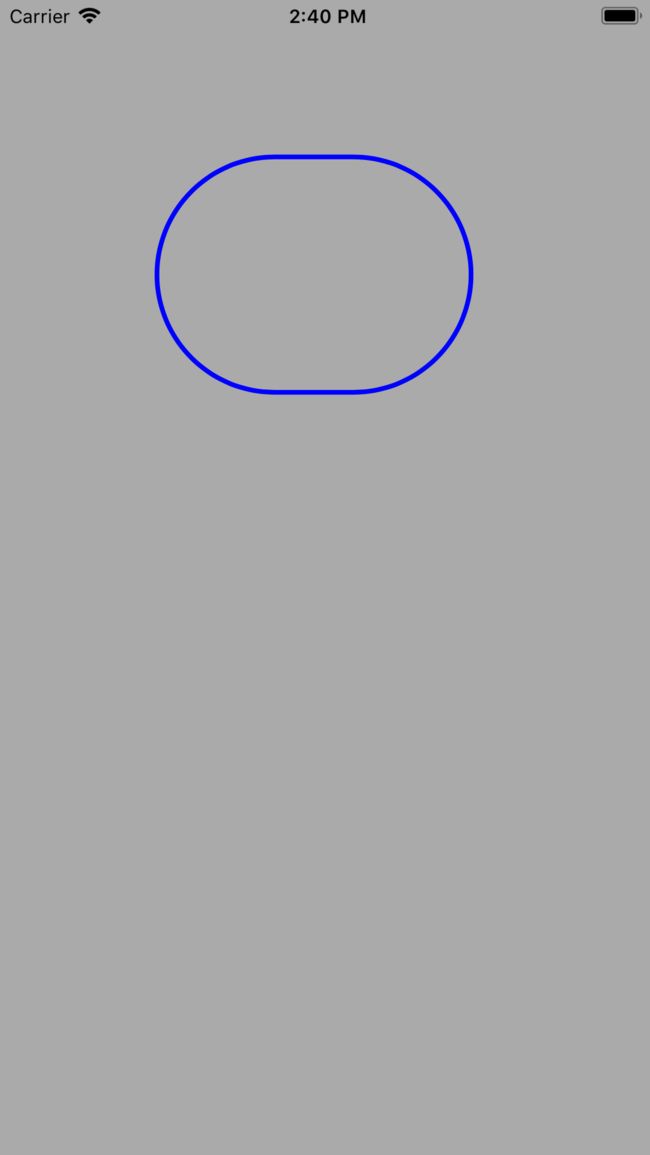
3. + (instancetype)bezierPathWithOvalInRect:(CGRect)rect;
这个方法返回的是椭圆路径,也是一种快速实例化的方法,还是先看代码。
UIBezierPath *path = [UIBezierPath bezierPathWithOvalInRect:CGRectMake(100.0, 100.0, 200.0, 150.0)];
其他的代码不变,下面看一下效果。

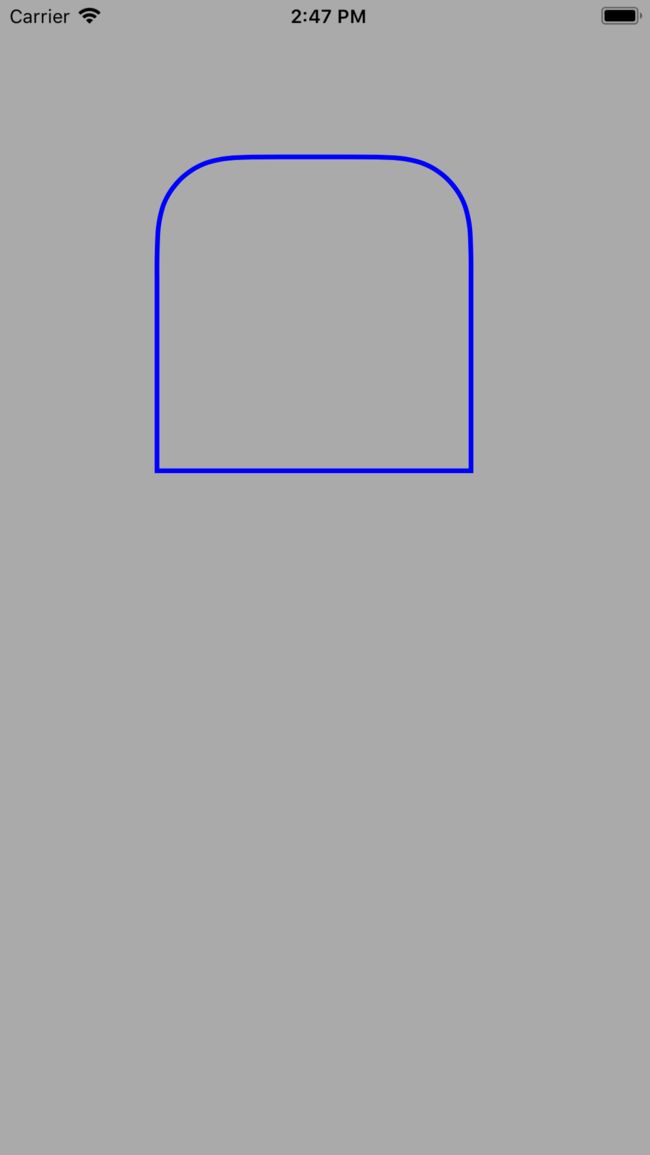
4. + (instancetype)bezierPathWithRoundedRect:(CGRect)rect cornerRadius:(CGFloat)cornerRadius;
这个也是便捷化的实例化方法,返回的是圆角路径,看下代码。
// rounds all corners with the same horizontal and vertical radius
UIBezierPath *path = [UIBezierPath bezierPathWithRoundedRect:CGRectMake(100.0, 100.0, 200.0, 150.0) cornerRadius:75.0];
这里圆角半径我设置为75.0,就是下面这个效果。
如果我这么设置那么就是一个圆圈了。
UIBezierPath *path = [UIBezierPath bezierPathWithRoundedRect:CGRectMake(100.0, 100.0, 200.0, 200.0) cornerRadius:100.0];

5. + (instancetype)bezierPathWithRoundedRect:(CGRect)rect byRoundingCorners:(UIRectCorner)corners cornerRadii:(CGSize)cornerRadii;
这个是自定义的圆角,可以单独设置顶部左边,顶部右边,下部左边,下部右边,全部等自定义圆角的个数和圆角半径,看一下代码。
UIBezierPath *path = [UIBezierPath bezierPathWithRoundedRect:CGRectMake(100.0, 100.0, 200.0, 200.0) byRoundingCorners:UIRectCornerTopLeft | UIRectCornerTopRight cornerRadii:CGSizeMake(50.0, 50.0)];
下面看一下实现效果
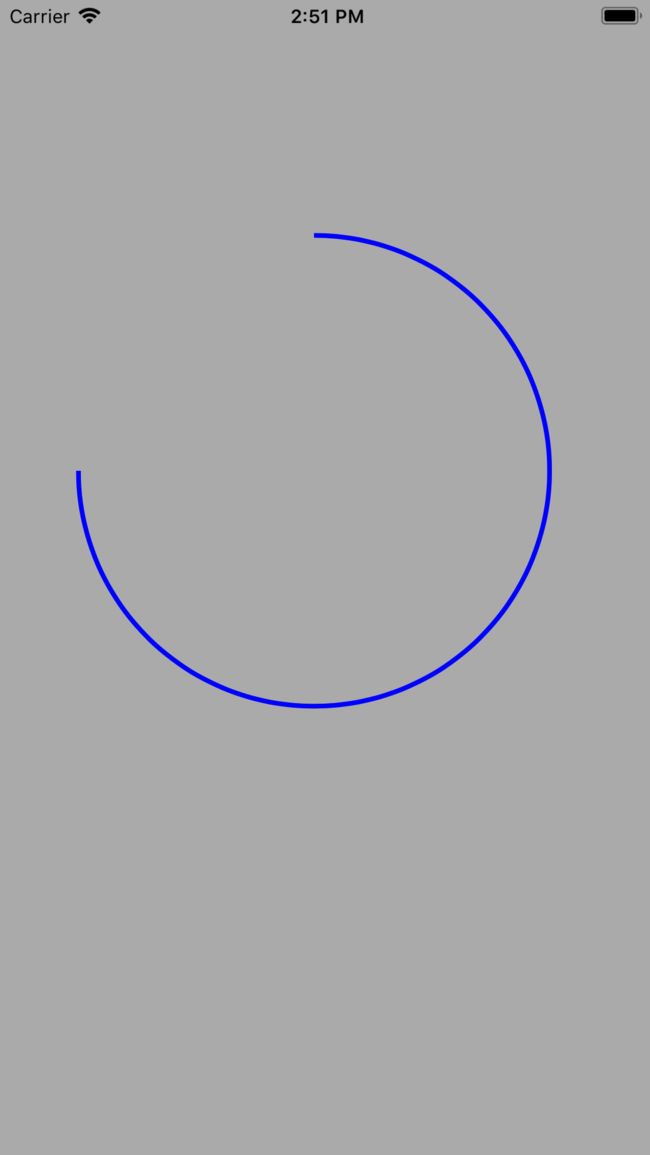
6. + (instancetype)bezierPathWithArcCenter:(CGPoint)center radius:(CGFloat)radius startAngle:(CGFloat)startAngle endAngle:(CGFloat)endAngle clockwise:(BOOL)clockwise;
这个是用来返回圆弧的实例化对象,下面先看一下代码。
UIBezierPath *path = [UIBezierPath bezierPathWithArcCenter:CGPointMake(200.0, 300.0) radius:150.0 startAngle:-M_PI * 0.5 endAngle:M_PI clockwise:YES];
这个圆弧就是从-90度,就是竖直方向,画到180度方向,默认的都是水平向右的是0度,下面看一下效果。
7. + (instancetype)bezierPathWithCGPath:(CGPathRef)CGPath;
这个是根据已有路径CGPath参数进行实例化对象。
- (void)drawRoundView:(CGPoint)centerPoint withStartAngle:(CGFloat)startAngle withEndAngle:(CGFloat)endAngle withRadius:(CGFloat)radius
{
    //创建用于转移坐标的Transform,这样我们不用按照实际显示做坐标计算
    CGAffineTransform transform = CGAffineTransformMakeTranslation(50, 50);
    //创建CGMutablePathRef
    CGMutablePathRef pathRef = CGPathCreateMutable();
    //半径为30
    CGFloat ra = 30;
    //初始点为(0, 0)
    CGPathMoveToPoint(pathRef, &transform, 0, 0);
    CGPathAddArcToPoint(pathRef, &transform, 100, 0, 100, 100, ra);

    UIBezierPath *path = [UIBezierPath bezierPathWithCGPath:pathRef];
    self.newlayer = [CAShapeLayer layer];
    self.newlayer.path = path.CGPath;
    self.newlayer.strokeColor = [UIColor blueColor].CGColor;
    self.newlayer.fillColor = [UIColor clearColor].CGColor;
    self.newlayer.lineWidth = 3;
    self.newlayer.frame = self.view.bounds;
    self.newlayer.backgroundColor = [[UIColor lightGrayColor] CGColor];
    [self.view.layer addSublayer:self.newlayer];

}
下面看一下效果展示。

路径的构建 - Path construction
有关路径的构建主要涉及到这几个方法。
- (void)moveToPoint:(CGPoint)point;
- (void)addLineToPoint:(CGPoint)point;
- (void)addCurveToPoint:(CGPoint)endPoint controlPoint1:(CGPoint)controlPoint1 controlPoint2:(CGPoint)controlPoint2;
- (void)addQuadCurveToPoint:(CGPoint)endPoint controlPoint:(CGPoint)controlPoint;
- (void)addArcWithCenter:(CGPoint)center radius:(CGFloat)radius startAngle:(CGFloat)startAngle endAngle:(CGFloat)endAngle clockwise:(BOOL)clockwise NS_AVAILABLE_IOS(4_0);
- (void)closePath;

- (void)removeAllPoints;
1. - (void)moveToPoint:(CGPoint)point;
移动到某一个点,这个很简单,就不举例了,会在后面和别的例子一起看一下。
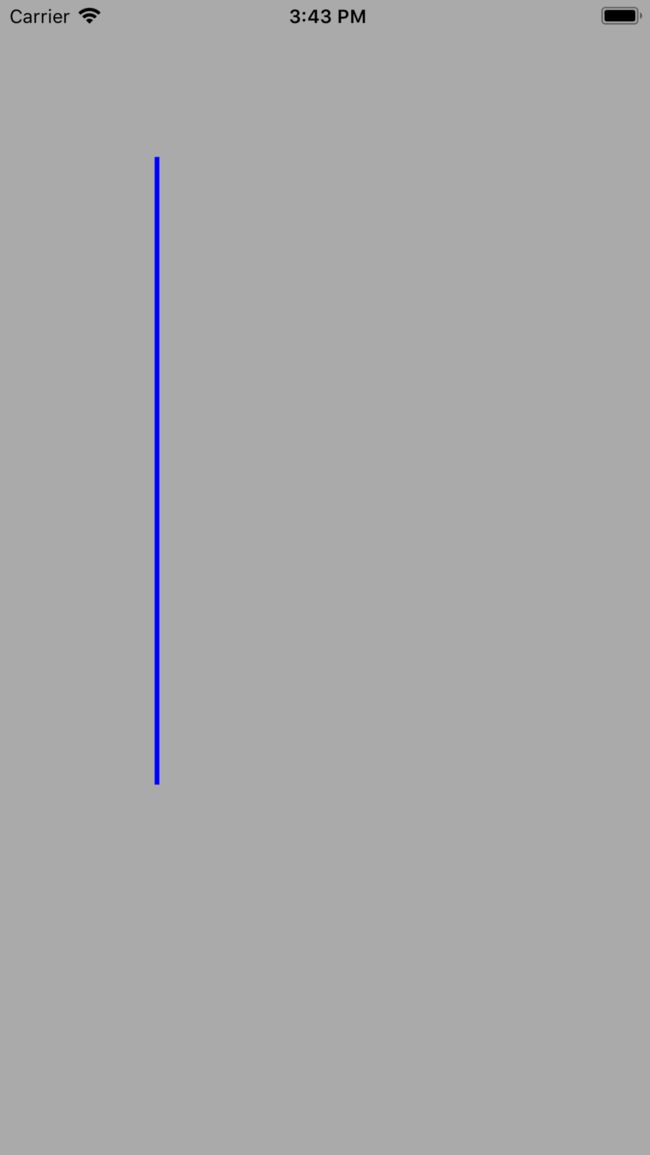
2. - (void)addLineToPoint:(CGPoint)point;
连接到某一点的线,下面我们就看一下简单例子。
- (void)drawRoundView:(CGPoint)centerPoint withStartAngle:(CGFloat)startAngle withEndAngle:(CGFloat)endAngle withRadius:(CGFloat)radius
{

    UIBezierPath *path = [UIBezierPath bezierPath];
    [path moveToPoint:CGPointMake(100.0, 100.0)];
    [path addLineToPoint:CGPointMake(100.0, 500.0)];
    self.newlayer = [CAShapeLayer layer];
    self.newlayer.path = path.CGPath;
    self.newlayer.strokeColor = [UIColor blueColor].CGColor;
    self.newlayer.fillColor = [UIColor clearColor].CGColor;
    self.newlayer.lineWidth = 3;
    self.newlayer.frame = self.view.bounds;
    self.newlayer.backgroundColor = [[UIColor lightGrayColor] CGColor];
    [self.view.layer addSublayer:self.newlayer];

}
看一下实现效果
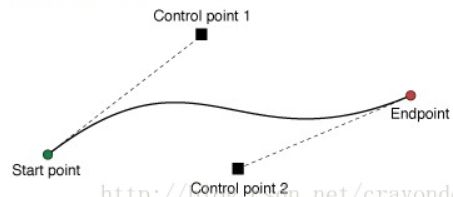
3. - (void)addCurveToPoint:(CGPoint)endPoint controlPoint1:(CGPoint)controlPoint1 controlPoint2:(CGPoint)controlPoint2;
这个方法用于绘制三次贝塞尔曲线,这里第一个参数是结束点,第二个参数是控制点1,第三个参数是控制点2。具体绘制时候的原理如下所示。
#import "ViewController.h"
@interface ViewController ()
@property (nonatomic, strong) CAShapeLayer *newlayer;
@end
@implementation ViewController
#pragma mark - Override Base Function
- (void)viewDidLoad
{
[super viewDidLoad];
[self initUI];
}
#pragma mark - Object Private Function
- (void)initUI
{
[self drawRoundView:CGPointMake(200.0, 300.0) withStartAngle:0 withEndAngle:M_PI * 2 withRadius:100.0];
}
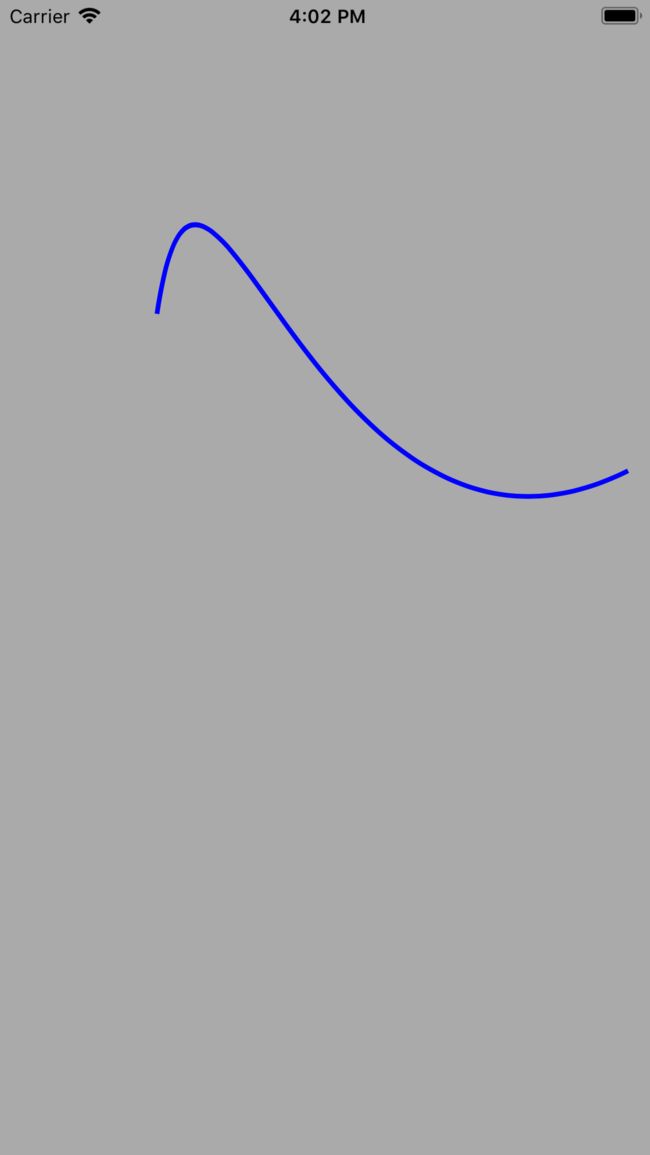
- (void)drawRoundView:(CGPoint)centerPoint withStartAngle:(CGFloat)startAngle withEndAngle:(CGFloat)endAngle withRadius:(CGFloat)radius
{
UIBezierPath *path = [UIBezierPath bezierPath];
[path moveToPoint:CGPointMake(100, 200)];
[path addCurveToPoint:CGPointMake(400, 300) controlPoint1:CGPointMake(130, 0) controlPoint2:CGPointMake(200, 400)];
self.newlayer = [CAShapeLayer layer];
self.newlayer.path = path.CGPath;
self.newlayer.strokeColor = [UIColor blueColor].CGColor;
self.newlayer.fillColor = [UIColor clearColor].CGColor;
self.newlayer.lineWidth = 3;
self.newlayer.frame = self.view.bounds;
self.newlayer.backgroundColor = [[UIColor lightGrayColor] CGColor];
[self.view.layer addSublayer:self.newlayer];
}
@end
下面看一下绘制效果
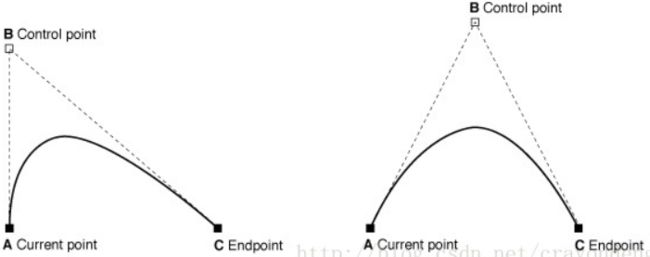
4. - (void)addQuadCurveToPoint:(CGPoint)endPoint controlPoint:(CGPoint)controlPoint;
这个方法用于绘制二次贝塞尔曲线,这里第一个参数是结束点,第二个参数是控制点。具体绘制时候的原理如下所示。
下面我们就看个示例。
UIBezierPath *path = [UIBezierPath bezierPath];
[path moveToPoint:CGPointMake(100, 200)];
[path addQuadCurveToPoint:CGPointMake(400, 400) controlPoint:CGPointMake(200, 10)];
下面看一下实现效果

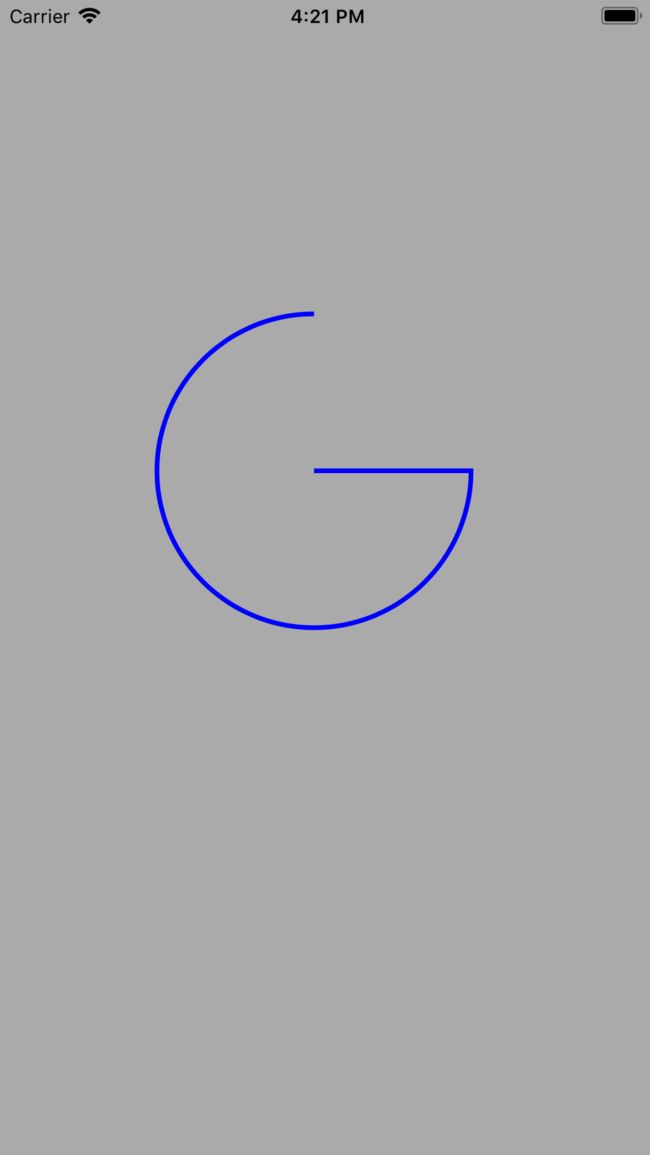
5. - (void)addArcWithCenter:(CGPoint)center radius:(CGFloat)radius startAngle:(CGFloat)startAngle endAngle:(CGFloat)endAngle clockwise:(BOOL)clockwise
这个用于绘制圆弧或者圆圈。
UIBezierPath *path = [UIBezierPath bezierPath];
[path moveToPoint:CGPointMake(200, 300)];
[path addArcWithCenter:CGPointMake(200, 300) radius:100.0 startAngle:0 endAngle:M_PI * 1.5 clockwise:YES];
下面看一下实现效果
6. - (void)closePath;
关闭路径,会自动的在起始点和结束点之间连线,下面还是借助上面的例子,看一下closePath的效果。
UIBezierPath *path = [UIBezierPath bezierPath];
[path moveToPoint:CGPointMake(200, 300)];
[path addArcWithCenter:CGPointMake(200, 300) radius:100.0 startAngle:0 endAngle:M_PI * 1.5 clockwise:YES];
[path closePath];
下面看一下实现效果。

7. - (void)removeAllPoints;
这个方法用于移除路径中所有的点,使用它就能抹除掉已经画出来的路径。
增加路径 - Appending paths
// Appending paths

- (void)appendPath:(UIBezierPath *)bezierPath;
改方法用于在原有的路径上添加路径,下面我们就看个简单的例子。
    UIBezierPath *path = [UIBezierPath bezierPath];
    [path moveToPoint:CGPointMake(200, 300)];
    [path addArcWithCenter:CGPointMake(200, 300) radius:100.0 startAngle:0 endAngle:M_PI * 1.5 clockwise:YES];

    UIBezierPath *path1 = [UIBezierPath bezierPath];
    [path1 moveToPoint:CGPointMake(0, 50.0)];
    [path1 addLineToPoint:CGPointMake(200.0, 50.0)];
    [path appendPath:path1];
看一下添加路径后的路径
,
 ,
 ,
 ,
 ,
 ,
下面我们就看一下效果

修改路径 - Modified paths
// Modified paths

- (UIBezierPath *)bezierPathByReversingPath NS_AVAILABLE_IOS(6_0);
该方法用于将已有的路径翻转,返回新的路径,一般做动画的时候我们可以明显的看出来反转路径绘制的效果,静态的绘制我们看不出差别,下面我们还是看代码。
    UIBezierPath *path = [UIBezierPath bezierPath];
    [path moveToPoint:CGPointMake(200, 300)];
    [path addArcWithCenter:CGPointMake(200, 300) radius:100.0 startAngle:0 endAngle:M_PI * 1.5 clockwise:YES];

    path = [path bezierPathByReversingPath];

路径的变换 - Transforming paths
主要是下面这个方法
// Transforming paths

- (void)applyTransform:(CGAffineTransform)transform;
对路径中的所有点进行二维形变, 该变化立即生效, 且为永久性改变所有点。
对于该移动的方法首先我们要看一下
/* Return a transform which translates by `(tx, ty)':
     t' = [ 1 0 0 1 tx ty ] */

CG_EXTERN CGAffineTransform CGAffineTransformMakeTranslation(CGFloat tx,
  CGFloat ty) CG_AVAILABLE_STARTING(__MAC_10_0, __IPHONE_2_0);
这里我们看一个简单的例子。
    UIBezierPath *path = [UIBezierPath bezierPath];
    [path moveToPoint:CGPointMake(200, 10)];
    [path addLineToPoint:CGPointMake(200, 400)];

    [path applyTransform:CGAffineTransformMakeTranslation(-150, 10)];
运行,就会发现,起始点的x值就会从200,变换到200 - 150说的位置,具体效果图如下所示。

后记
关于该类的使用,这里详细的说了一半,还有一半,放在下篇讲解。