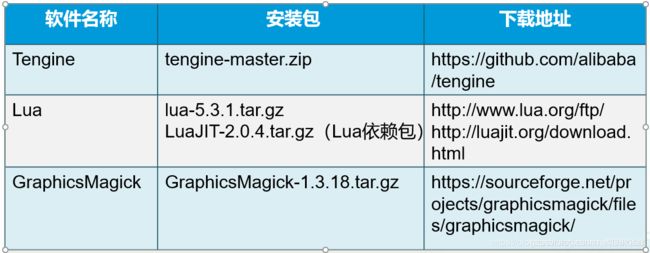
安装并使用Tengine+Lua+GM实现图片自动裁剪
使用版本:

1.把所需的安装包上传到服务器上并解压(/opt)
2.安装Lua
安装依赖(readline&readline-devel)
yum -y install readline

yum -y install readline-devel
安装Lua(源码编译安装)
make linux
make install
安装LuaJIT (源码编译安装)
make
make install
检查lua版本lua -v
3.安装Tengine
进入Tengine源码目录,使用configure配置安装路径以及需要安装的模块
1.使用configure配置安装路径
./configure --prefix=/usr/local/Tengine --dso-path=/usr/local/Tengine/modules --with-http_realip_module --with-http_gzip_static_module --with-http_stub_status_module --with-http_concat_module --with-http_lua_module --http-proxy-temp-path=/var/tmp/Tengine/proxy_temp --http-fastcgi-temp-path=/var/tmp/Tengine/fastcgi_temp --http-uwsgi-temp-path=/var/tmp/Tengine/uwsgi_temp --http-scgi-temp-path=/var/tmp/Tengine/cgi_temp --http-client-body-temp-path=/var/tmp/Tengine/client_body_temp --http-log-path=/var/log/Tengine/access.log --error-log-path=/var/log/Tengine/error.log
执行后报错-bash: ./configure: Permission denied(权限不够)
修改configure权限后再次执行:chmod 777 configure
如果报错:
./configure: error: SSL modules require the OpenSSL library.
You can either do not enable the modules, or install the OpenSSL library
into the system, or build the OpenSSL library statically from the source
with nginx by using --with-openssl= option.
SSL模块需要OpenSSL库。
执行:yum -y install openssl openssl-devel
再次执行configure
安装Tengine
make
make install
启动: /usr/local/Tengine/sbin/nginx
sbin/nginx: error while loading shared libraries: libluajit-5.1.so.2: cannot open shared object file: No such file or 		  directory
找不到 libluajit-5.1.so.2
解决方法:ln -s /usr/local/lib/libluajit-5.1.so.2 /lib64/libluajit-5.1.so.2
再次启动报错:nginx: [emerg] mkdir() "/var/tmp/Tengine/client_body_temp" failed (2: No such file or directory)
没有这个目录,手动创建:mkdir -p /var/tmp/Tengine/client_body_temp
再次启动后浏览器访问即可
GraphicsMagick
安装依赖
libjpeg & libjpeg-devel
libpng & libpng-devel
giflib & giflib-devel
freetype & freetype-devel
yum install -y libjpeg libjpeg-devel libpng libpng-devel giflib giflib-devel freetype freetype-devel
进入GM源码目录,使用configure配置安装路径以及需要安装的模块
./configure --prefix=/usr/local/GraphicsMagick --enable-shared
安装GM(源码编译安装)
make
make install
查看GM版本信息:/usr/local/GraphicsMagick/bin/gm version
配置
Lua脚本文件(ImageResizer.lua )
位置:/usr/local/Tengine/lua/ImageResizer.lua
创建目录
mkdir -p /usr/local/Tengine/lua/
创建文件
vi /usr/local/Tengine/lua/ImageResizer.lua
文件中添加以下信息
local command = "/usr/local/GraphicsMagick/bin/gm convert " … ngx.var.request_filepath … " -resize " … ngx.var.width … “x” … ngx.var.height … " +profile “*” " … ngx.var.request_filepath … “_” … ngx.var.width … “x” … ngx.var.height … “.” … ngx.var.ext;
os.execute(command);
ngx.exec(ngx.var.request_uri);
授予权限:可执行
chmod 777 /usr/local/Tengine/lua/ImageResizer.lua
Tengine配置(nginx.conf )
编辑 nginx.conf
2.修改servier_name 给定一个名字

3.创建图片路径并在配置文件中添加 : -p /data/itrip/uploadimg

4.location配置
expires 1h; # 缓存时间
add_header Cache-Control max-age=3600; # 缓存时间
access_log /var/log/Tengine/host_access.log;

5.图片裁剪过滤

#如果 url 格式如:xxxx.gif_数字x数字.gif
location ~* ^(.+.(jpg|jpeg|gif|png))_(\d+)x(\d+).(jpg|jpeg|gif|png)$ {
root /data/itrip/uploadimg; #这里必须设置,否则根目录,即 $document_root 会是 Nginx 默认的 Nginx Root/html,在 Lua 中会得不到期望的值
if (!-f $request_filename) { #如果文件不存在时才需要裁剪
set $request_filepath /data/itrip/uploadimg$1; #设置原始图片路径,如:/document_root/1.gif
set $width $3; # 设置裁剪/缩放的宽度
set $height $4; # 设置裁剪/缩放的高度
set $ext $5; # 图片文件格式后缀
content_by_lua_file /usr/local/Tengine/lua/ImageResizer.lua; #加载外部 Lua 文件
}
}
检查配置文件
重新启动Tengine即可
此外,在windows上测试的时候,需要将服务器ip配置到hosts上
在浏览器输入ip(或配置的server_name)/图片名可获取图片
图片后加上具体尺寸可进行裁剪:示例如下
192.168.0.123/1.jpg
192.168.0.123/1.jpg_100x100.jpg