Spring Cloud系列教程(三):实现高可用集群环境搭建Eureka(Finchley版本)
一、前言
在SpringCloud微服务项目中,注册中心是其中的一部分,注册中心充当了服务的注册和发现角色,更为核心的是解决了微服务项目中的一系列服务治理问题,如果一旦服务注册出现故障的时候,可能会导致整个微服务无法访问,在这时候就需要对注册中心实现高可用集群模式,Eureka集群的原理:其实就是两台或者多台Eureka server服务相互注册,将自己作为服务向其他服务注册中心注册自己,这样就可以形成一组相互注册的服务注册中心,从而实现服务清单的互相同步,达到高可用效果。
Eureka集群原理用爱情的语言描述就是: 你中有我,我中有你!!!
二、环境搭建
注意: 所有
eureka server的服务别名要相同,全部一致; spring.application.name
1. 实现效果
基于前面搭建eureka服务的方式: SpringCloud系列教程(一):服务的注册与发现(Eureka) ,搭建两台eureka-server服务,除了yml的配置不一样之外,其他都是一样的,集群采用相互注册方式;
因此一共建3个项目: springcloud-eureka-jq(父工程)、springcloud-eureka-server1(eureka服务1,端口为9000)、springcloud-eureka-server2(eureka服务2,端口为8000),具体建项目过程这里不再累赘,前面章节说过,这里只贴核心配置;
2. 搭建父工程
2.1、 引入pom依赖
<?xml version="1.0" encoding="UTF-8"?>
://maven.apache.org/POM/4.0.0" xmlns:xsi="http://www.w3.org/2001/XMLSchema-instance"
xsi:schemaLocation="http://maven.apache.org/POM/4.0.0 https://maven.apache.org/xsd/maven-4.0.0.xsd">
>4.0.0 >
>com.thinkingcao >
>springcloud-eureka-jq >
>0.0.1-SNAPSHOT >
>springcloud-eureka-jq >
>pom >
>基于SpringCloud搭建Eureka集群环境(高可用) >
>
3. 搭建第一台注册中心springcloud-eureka-server1
3.1、在父工程的基础上新建module,依赖信息如下:
  <groupId>com.thinkingcao</groupId>
    <artifactId>springcloud-eureka-server1</artifactId>
    <version>0.0.1-SNAPSHOT</version>
    <name>springcloud-eureka-server1</name>
    <description>Demo project for Spring Boot</description>
    <packaging>jar</packaging>

    <!--SpringBoot依赖版本-->
    <parent>
        <groupId>org.springframework.boot</groupId>
        <artifactId>spring-boot-starter-parent</artifactId>
        <version>2.0.3.RELEASE</version>
        <relativePath/>
    </parent>

    <!--项目编码、jdk版本、SpringCloud版本定义-->
    <properties>
        <project.build.sourceEncoding>UTF-8</project.build.sourceEncoding>
        <project.reporting.outputEncoding>UTF-8</project.reporting.outputEncoding>
        <java.version>1.8</java.version>
        <spring-cloud.version>Finchley.RELEASE</spring-cloud.version>
    </properties>

    <!--声明管理SpringCloud版本依赖信息-->
    <dependencyManagement>
        <dependencies>
            <dependency>
                <groupId>org.springframework.cloud</groupId>
                <artifactId>spring-cloud-dependencies</artifactId>
                <version>${spring-cloud.version}</version>
                <type>pom</type>
                <scope>import</scope>
            </dependency>
        </dependencies>
    </dependencyManagement>

    <!--依赖信息-->
    <dependencies>
        <!--springcloud整合eureka服务端组件-->
        <dependency>
            <groupId>org.springframework.cloud</groupId>
            <artifactId>spring-cloud-starter-netflix-eureka-server</artifactId>
        </dependency>
    </dependencies>

    <!--maven插件-->
    <build>
        <plugins>
            <plugin>
                <groupId>org.springframework.boot</groupId>
                <artifactId>spring-boot-maven-plugin</artifactId>
            </plugin>
        </plugins>
    </build>
3.2 、配置application.yml
注意: 集群环境的时候,服务名称需要统一一致,defaultZone为另外一台eureka server的地址,如果有3台或者多台注册中心,集群注册地址用逗号隔开;
- application.yml
#服务端口号
server:
  port: 8000
#定义服务名称(服务注册到eureka名称)
spring:
  application:
    name: app-thinkingcao-eureka
eureka:
  instance:
    #Eureka注册中心ip地址
    hostname: 127.0.0.1
  client:
    serviceUrl:
      #注册地址
      defaultZone: http://${eureka.instance.hostname}:9000/eureka/
    #表示是否需要将自己注册给自己的注册中心,因为自己是注册中心,单机版本时不需要,设置为false(集群的时候需要是为true)
    register-with-eureka: true
    #因为自己是注册中心,不需要去检索服务信息,单机版本时不需要,设置为false(集群的时候需要是为true)
    fetch-registry: true
3.3 、启动类开启注册eureka服务
开启Eureka服务端只需要在启动类上使用注解 @EnableEurekaServer即可;
- SpringcloudEurekaServer1Application.java
package com.thinkingcao.api;

import org.springframework.boot.SpringApplication;
import org.springframework.boot.autoconfigure.SpringBootApplication;
import org.springframework.cloud.netflix.eureka.server.EnableEurekaServer;

@SpringBootApplication
@EnableEurekaServer
public class SpringcloudEurekaServer1Application {

    public static void main(String[] args) {
        SpringApplication.run(SpringcloudEurekaServer1Application.class, args);
    }

}
4. 搭建第二台注册中心springcloud-eureka-server2
4.1、在父工程的基础上新建module,依赖信息如下:
<!--SpringBoot依赖版本-->
    <parent>
        <groupId>org.springframework.boot</groupId>
        <artifactId>spring-boot-starter-parent</artifactId>
        <version>2.0.3.RELEASE</version>
        <relativePath/>
    </parent>

    <!--项目编码、jdk版本、SpringCloud版本定义-->
    <properties>
        <project.build.sourceEncoding>UTF-8</project.build.sourceEncoding>
        <project.reporting.outputEncoding>UTF-8</project.reporting.outputEncoding>
        <java.version>1.8</java.version>
        <spring-cloud.version>Finchley.RELEASE</spring-cloud.version>
    </properties>

    <!--声明管理SpringCloud版本依赖信息-->
    <dependencyManagement>
        <dependencies>
            <dependency>
                <groupId>org.springframework.cloud</groupId>
                <artifactId>spring-cloud-dependencies</artifactId>
                <version>${spring-cloud.version}</version>
                <type>pom</type>
                <scope>import</scope>
            </dependency>
        </dependencies>
    </dependencyManagement>

    <!--依赖信息-->
    <dependencies>
        <!--springcloud整合eureka服务端组件-->
        <dependency>
            <groupId>org.springframework.cloud</groupId>
            <artifactId>spring-cloud-starter-netflix-eureka-server</artifactId>
        </dependency>
    </dependencies>

    <!--maven插件-->
    <build>
        <plugins>
            <plugin>
                <groupId>org.springframework.boot</groupId>
                <artifactId>spring-boot-maven-plugin</artifactId>
            </plugin>
        </plugins>
    </build>
4.2 、配置application.yml
- application.yml
#服务端口号
server:
  port: 9000
#定义服务名称(服务注册到eureka名称)
spring:
  application:
    name: app-thinkingcao-eureka
eureka:
  instance:
    #Eureka注册中心ip地址
    hostname: 127.0.0.1
  client:
    serviceUrl:
      #注册地址
      defaultZone: http://${eureka.instance.hostname}:8000/eureka/
    #表示是否需要将自己注册给自己的注册中心,因为自己是注册中心,单机版本时不需要,设置为false(集群的时候需要是为true)
    register-with-eureka: true
    #因为自己是注册中心,不需要去检索服务信息,单机版本时不需要,设置为false(集群的时候需要是为true)
    fetch-registry: true
4.3、启动类
- SpringcloudEurekaServer2Application.java
package com.thinkingcao.api;

import org.springframework.boot.SpringApplication;
import org.springframework.boot.autoconfigure.SpringBootApplication;
import org.springframework.cloud.netflix.eureka.server.EnableEurekaServer;

@SpringBootApplication
@EnableEurekaServer
public class SpringcloudEurekaServer2Application {

    public static void main(String[] args) {
        SpringApplication.run(SpringcloudEurekaServer2Application.class, args);
    }

}
三、启动测试
注意:当启动第一台eureka服务的时候报错,这是正常的! 因为集群是多台eureka服务端相互注册,在启动第一台的时候就会开始互相注册,但是启动有先后顺序 不会同时启动成功的;一般第一台启动报错了,继续将其他都启动完毕后,第一台会自动注册链接。恢复正常;
1、启动Eureka服务
先启动SpringcloudEurekaServer1Application
报错: Cannot execute request on any known server
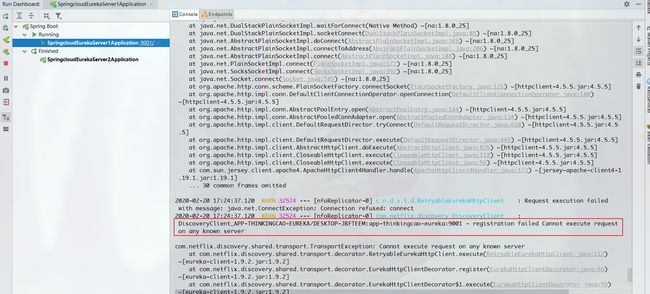
继续启动SpringcloudEurekaServer2Application,稍等片刻查看SpringcloudEurekaServer1Application的控制台会发现服务已经恢复成功了;
2、访问Eureka服务
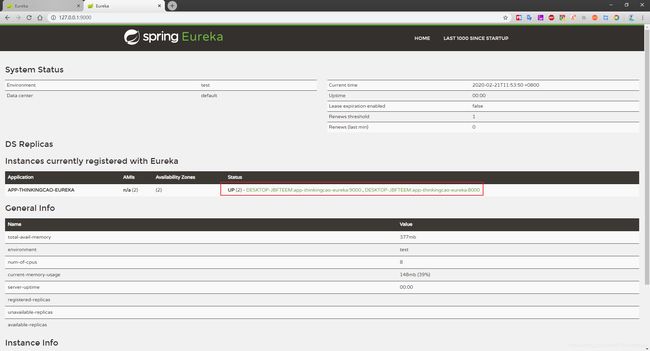
第一步: 先访问URL:http://127.0.0.1:9000/,9000这台Eureka服务的效果如下:
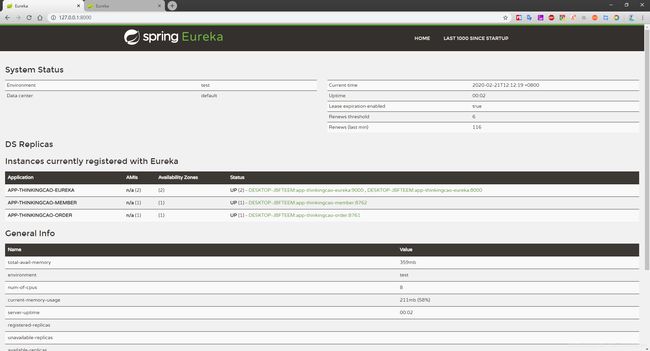
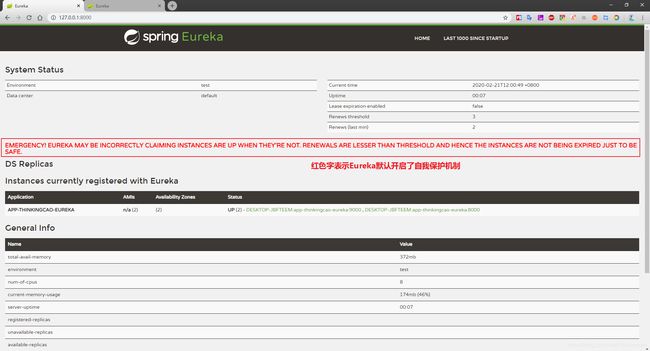
第二步: 再访问URL: http://127.0.0.1:8000/ ,8000这台Eureka服务效果如下:
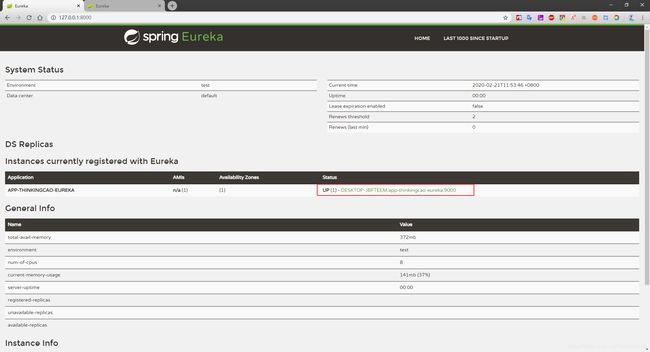
观察8000和9000这两台Eureka访问的结果,9000Eureka注册中心服务列表上有9000和8000,这时候会发现8000注册中心上只有9000这一个服务,而上面访问 http://127.0.0.1:9000/ 时,注册中心服务列表显示了9000和8000,出现这个原因是因为在启动两台Eureka注册中心时不会立刻相互注册,两台Eureka服务相互注册同步需要时间,一般先启动的会后同步过来,稍等片刻之后再查看发现已经实现了集群模式,以对方为注册中心相互注册了;
四、集群环境如何注册和发现服务
以前一个章节的订单服务调用会员服务为例,在
Eureka集群环境下时,如果将会员服务注册到Eureka,此时Eureka服务为多台的,会员服务配置Eureka注册地址时,多个地址之间需要使用逗号隔开,并且服务提供者和服务消费者都要进行多个地址注册;
1. 注册订单服务到集群地址配置如下:
###订单服务的端口号
server:
  port: 8761
###服务别名----服务注册到注册中心名称
spring:
  application:
    name: app-itmayiedu-order
eureka:
  client:
    service-url:
    ##### 当前会员服务注册到eureka服务地址
      defaultZone: http://localhost:8000/eureka,http://localhost:9000/eureka
    ### 需要将我的服务注册到eureka上
    register-with-eureka: true
    ####需要检索服务
    fetch-registry: true
2. 注册会员服务到集群地址配置如下:
###会员项目的端口号
server:
  port: 8765
###服务别名----服务注册到注册中心名称
spring:
  application:
    name: app-itmayiedu-member
eureka:
  client:
    service-url:
    ##### 当前会员服务注册到eureka服务地址
      defaultZone: http://localhost:8000/eureka,http://localhost:9000/eureka
    ### 需要将我的服务注册到eureka上
    register-with-eureka: true
    ####需要检索服务
    fetch-registry: true
到这里,配置方式就像上面一样,多个注册中心地址用逗号隔开,具体可以自己去测试;
五、源码
1. 项目源码: https://github.com/Thinkingcao/SpringCloudLearning/tree/master/springcloud-eureka-jq
六、SpringCloud系列教程
1. SpringCloud系列教程(四) : Spring Cloud系列教程(四) - Eureka自我保护机制(Finchley版本)
