【锁】【JUC】可重入锁/AQS队列--ReentrantLock源码分析
1.可重入锁/AQS队列
- 之前有写过一篇关于锁的笔记:【锁】公平锁/非公平锁/可重入锁/递归锁/自旋锁/独占锁/共享锁/读写锁
- 里面关于重入锁,特别AQS队列并没有提到,故借学习ReentrantLock源码几下这篇笔记。
2. ReentrantLock源码分析
2.1 类图
今天啰嗦一些,我们一步一步看:
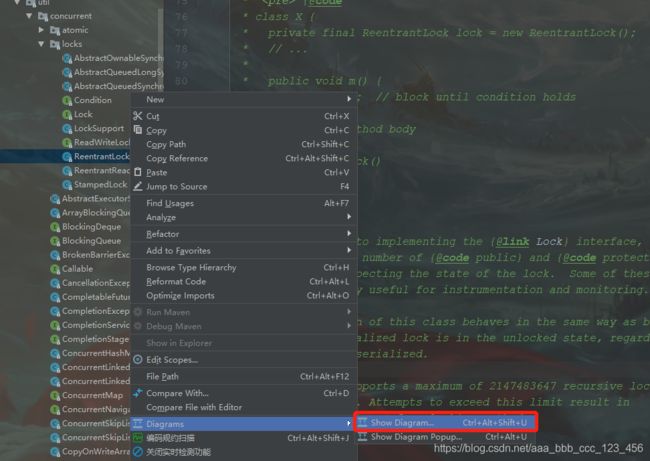
- idea找到JUC包里面的ReentrantLock,右键如图:

-打开类图:

- 我们可以看到ReentrantLock里面有一个Sync抽象类,两个内部静态类NonfairSync和FairSync
- 其中NonfairSync和FairSync是ReentrantLock公平锁和非公平锁的实现
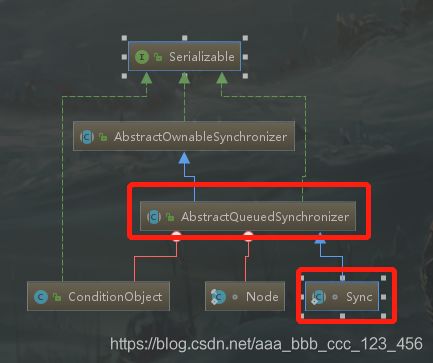
- 而Sync我们右键打开它的类图:

- Sync继承于AbstractQueuedSynchronizer
- 而AbstractQueuedSynchronizer里面维护了一个以Node为节点的AQS队列。
- AQS队列,就是是ReentrantLock的核心。
2.2 AQS队列
- 追根溯源,AQS队列是由AbstractQueuedSynchronizer维护
- 而AbstractQueuedSynchronizer由继承于AbstractOwnableSynchronizer
- 我们先看AbstractOwnableSynchronizer源码:
public abstract class AbstractOwnableSynchronizer
    implements java.io.Serializable {

    protected AbstractOwnableSynchronizer() { }
    private transient Thread exclusiveOwnerThread;

    protected final void setExclusiveOwnerThread(Thread thread) {
        exclusiveOwnerThread = thread;
    }
    protected final Thread getExclusiveOwnerThread() {
        return exclusiveOwnerThread;
    }
}
- exclusiveOwnerThread从名字就能看出来独家拥有线程,也就是独占模式锁的拥有者。
- 而AQS定义两种资源共享方式:
1,Exclusive(独占,只有一个线程能执行,ReentrantLock使用该模式)
2,Share(共享,多个线程可同时执行,Semaphore/CountDownLatch使用该模式)。
- AQS队列底层其实就是链表,而在AbstractQueuedSynchronizer中链表节点是有内部类Node来充当,在Node里有这么两行代码:
        /** Marker to indicate a node is waiting in shared mode */
        static final Node SHARED = new Node();
        /** Marker to indicate a node is waiting in exclusive mode */
        static final Node EXCLUSIVE = null;
- exclusiveMarker to indicate a node is waiting in shared mode
共享模式:CountDownLatch使用该模式,详细可见:【JUC】CountDownLatch源码分析 - Marker to indicate a node is waiting in exclusive mode
独占模式:ReentrantLock使用该模式,今天我们聊的就是这个 - 再看一下AbstractQueuedSynchronizer的核心成员:
public abstract class AbstractQueuedSynchronizer
    extends AbstractOwnableSynchronizer
    implements java.io.Serializable {

    private static final long serialVersionUID = 7373984972572414691L;

    protected AbstractQueuedSynchronizer() { }

   //队列节点
    static final class Node {
        /** Marker to indicate a node is waiting in shared mode */
        static final Node SHARED = new Node();
        /** Marker to indicate a node is waiting in exclusive mode */
        static final Node EXCLUSIVE = null;

        /** waitStatus value to indicate thread has cancelled */ 线程已经被取消,该状态的节点不会再次阻塞。
		static final int CANCELLED =  1;
		/** waitStatus value to indicate successor's thread needs unparking */ 线程需要去被唤醒
		static final int SIGNAL    = -1;
		/** waitStatus value to indicate thread is waiting on condition */ 线程正在唤醒等待条件
		static final int CONDITION = -2;
		/**
		 * waitStatus value to indicate the next acquireShared should //线程的共享锁应该被无条件传播
		 * unconditionally propagate
		 */
		static final int PROPAGATE = -3;

        //上面四个值就是下面变量waitStatus的值
        volatile int waitStatus;
        //前一个节点
        volatile Node prev;
        //下一个节点
        volatile Node next;
        //当前节点代表的线程
        volatile Thread thread;
        /**
        *等待节点的后继节点。如果当前节点是共享的,那么这个字段是一个SHARED常量,也就是说节点类型(独占和共享)和
        *等待队列中的后继节点共用一个字段。(注:比如说当前节点A是共享的,那么它的这个字段是shared,也就是说在这个等
        *待队列中,A节点的后继节点也是shared。如果A节点不是共享的,那么它的nextWaiter就不是一个SHARED常量,即是独
        *占的。
        */
        Node nextWaiter;
}
    //头结点
    private transient volatile Node head;
     //尾节点
    private transient volatile Node tail;
    //状态值
    private volatile int state;
- 如果了解CLH队列的话你会感觉眼熟,因为AQS队列就是它的一个变体,至于CLH队列是什么,看这里:【锁】自旋锁-MCS/CLH队列
- AbstractQueuedSynchronizer的这些成员中,volatile修饰的state是重点,volatile关键字保证了线程间可见性。具体可见:【JUC】volatile关键字相关整理
- ReentrantLock加锁记录就保存在state中,state默认为0,表示没有被加锁,每当线程请求一个锁,state加1,state=1表示加锁成功,state>1表示锁重入,详细后面看源码聊。
- 在多线程并发请求锁时,采用CAS修改state的值,修改成功则获取锁成功,修改失败则加入到AQS等待队列尾部,至于什么是CAS,可见:【JUC】 Java中的CAS。
- 另一个要注意的AbstractQueuedSynchronizer里Node中的状态属性waitStatus,它默认为零,还有四个值见上面Node代码,它的值会被后置结点在获取锁失败后阻塞前修改,用于提醒你在释放锁后去唤醒它,具体详细情况后面源码聊。
- AQS结构图

- AQS队列的头结点并不关联任何线程,他是一个默认的Node节点。
2.3 开始撸代码
- 先看构造函数:
public ReentrantLock() {
    sync = new NonfairSync();
}

public ReentrantLock(boolean fair) {
    sync = fair ? new FairSync() : new NonfairSync();
}
- 当参数fair=true时,创建的是公平锁fair=false时,创建的是非公平锁,啥也不填默认创建的是非公平锁,至于啥是公平和非公平,见:【锁】公平锁/非公平锁/可重入锁/递归锁/自旋锁/独占锁/共享锁/读写锁。
2.3.1先搞默认的非公平锁,NonfairSync类的lock方法:
static final class NonfairSync extends Sync {
        final void lock() {
            if (compareAndSetState(0, 1))      //1
                setExclusiveOwnerThread(Thread.currentThread());  //2
            else
                acquire(1);  //3
        }

        protected final boolean tryAcquire(int acquires) {
            return nonfairTryAcquire(acquires);   //4
        }
    }

public final void acquire(int arg) {//5
        if (!tryAcquire(arg) &&  //6
            acquireQueued(addWaiter(Node.EXCLUSIVE), arg))   //7
            selfInterrupt();   //8
    }
- 总体流程如下:
1,CAS原子性的修改AbstractQueuedSynchronizer#state的值,由0改为1,成功则说明当前线程加锁成功.
2,设置AbstractOwnableSynchronizer#exclusiveOwnerThread的值为当前线程,表示当前锁的拥有者是当前线程。
3,如果1中修改失败,则进入acquire(1)。申请1个state,acquire方法中首先尝试获取锁tryAcquire(),如果获取失败,则将当前线程以独占模式Node.EXCLUSIVE加入等待队列尾部(addWaiter方法)。
4,acquireQueued():以独占无中断模式获取锁,这个方法会一直无限循环,直到获取到资源或者被中断才返回。如果等待过程中被中断则返回true。这里有自旋锁的意思,加入队列中的线程,不断的重试检测是否可以执行任务。
- 接下来一个一个方法撸源码:
tryAcquire
- tryAcquire的具体实现是在NonfairSync类中,然后调用其父类Sync 中的nonfairTryAcquire()方法。
static final class NonfairSync extends Sync {
    protected final boolean tryAcquire(int acquires) {
        return nonfairTryAcquire(acquires);
    }
}

final boolean nonfairTryAcquire(int acquires) {
    final Thread current = Thread.currentThread();
    int c = getState();//:1、获取volatile int state的值
    if (c == 0) {//2:state=0表示当前可以加锁
        if (compareAndSetState(0, acquires)) {//CAS将state设置为acquires的值
            setExclusiveOwnerThread(current);//设置当前拥有锁的线程
            return true;
        }
    }
    else if (current == getExclusiveOwnerThread()) {//当前锁的拥有者线程是currentThread
        int nextc = c + acquires;//将state累加上acquires
        if (nextc < 0) // overflow
            throw new Error("Maximum lock count exceeded");
        setState(nextc);//设置state的值。由于这里只有获取锁的线程才能执行,所以不会出现并发,不需要额外的加锁处理
        //这也是ReentrantLock为什么是可重入锁的原因,同一个线程加多次锁(lock.lock)也就是给state的值累加而已。
        return true;
    }
    return false;//当前锁的拥有者线程不是currentThread,直接返回false,也就是获取锁失败
}
- nonfairTryAcquire的实现:如果当前没有锁,那么加锁。如果已经有了锁,那么看看当前锁的拥有者线程是不是currentThread,是则累加state的值,不是则返回失败。
- 所以,使用ReentrantLock时,线程获得锁的标记是在state上的,state=0表示没有被加锁,state=1表示加锁成功,state>1表示锁重入。
addWaiter和enq
- 按照指定模式(独占还是共享)将节点添加到等待队列。
private Node addWaiter(Node mode) {
    Node node = new Node(Thread.currentThread(), mode);
    //1、首先尝试以快速方式添加到队列末尾
    Node pred = tail;//pred指向现有tail末尾节点
    if (pred != null) {
    //新加入节点的前一个节点是现有AQS队列的tail节点
        node.prev = pred;
      	//CAS原子性的修改tail节点
        if (compareAndSetTail(pred, node)) {
            //修改成功,新节点成功加入AQS队列,pred节点的next节点指向新的节点
            pred.next = node;
            return node;
        }
    }
    //2、pred为空,或者修改tail节点失败,
    //则走enq方法将节点插入队列
    enq(node);
    return node;
}
private Node enq(final Node node) {
    for(;;) {//CAS
        Node t = tail;
        if (t == null) {
        // 必须初始化。这里是AQS队列为空的情况。
        //通过CAS的方式创建head节点,并且tail和head都指向
        //同一个节点。
            if (compareAndSetHead(new Node()))
            //注意这里初始化head节点,并不关联任何线程!!
                tail = head;
        } else {
        //这里变更node节点的prev指针,并且移动tail指针指向node,
        //前一个节点的next指向新插入的node
            node.prev = t;
            if (compareAndSetTail(t, node)) {
                t.next = node;
                return t;
            }
        }
    }
}
- 上面addWaiter方法的第一行代码new Node(Thread.currentThread(), mode);,会创建一个node对象,该对象的重要属性值初始化为:
nextWaiter = Node.EXCLUSIVE; // Node.EXCLUSIVE值为null
thread = Thread.currentThread();
waitStatus = 0;// 默认是0
- addWaiter首先会以快速方式将node添加到队尾,如果失败则走enq方法。失败有两种可能,一个是tail为空,也就是AQS为空的情况下。另一是compareAndSetTail失败,也就是多线程并发添加到队尾,此时会出现CAS失败。
- 注意enq方法,在t==null时,首先创建空的头节点,不关联任何的线程,nextWaiter和thread变量都是null。
acquireQueued
- tryAcquire失败没有获取到锁,addWaiter加入了AQS等待队列,进入acquireQueued方法中,acquireQueued方法以独占无中断模式获取锁,这个方法会一直无限循环,直到获取到资源或者被中断才返回。
final boolean acquireQueued(final Node node, int arg) {
    boolean failed = true;//是否获取到资源
    try {
        boolean interrupted = false;//是否中断
        for (;;) {
            //获取前一个节点
            final Node p = node.predecessor();

			//如果当前node节点是第二个节点,紧跟在head后面,
			//那么tryAcquire尝试获取资源
            if (p == head && tryAcquire(arg)) {
                setHead(node);//获取锁成功,当前节点成为head节点
                p.next = null; // 目的:辅助GC
                failed = false;
                return interrupted;//返回是否中断过
            }

            //当shouldParkAfterFailedAcquire返回成功,
            //也就是前驱节点是Node.SIGNAL状态时,
            //进行真正的park将当前线程挂起,并且检查中断标记,
            //如果是已经中断,则设置interrupted =true。
            //如果shouldParkAfterFailedAcquire返回false,
            //则重复上述过程,直到获取到资源或者被park。
            if (shouldParkAfterFailedAcquire(p, node) &&
                parkAndCheckInterrupt())
                interrupted = true;
        }
    } finally {
        if (failed)
            cancelAcquire(node);//添加AQS失败,取消任务
    }
}

//前面讲过,head节点不与任何线程关联,他的thread是null,
//当然head节点的prev肯定也是null
private void setHead(Node node) {
    head = node;
    node.thread = null;
    node.prev = null;
}

//在Acquire失败后,是否要park中断
private static boolean shouldParkAfterFailedAcquire(Node pred, Node node) {
    int ws= pred.waitStatus;//获取到上一个节点的waitStatus
    if (ws == Node.SIGNAL)//前面讲到当一个节点状态时SIGNAL时,
    //他有责任唤醒后面的节点。所以这里判断前驱节点是SIGNAL状态,
    //则可以安心的park中断了。
        return true;
    if (ws > 0) {
        /*
         * 过滤掉中间cancel状态的节点
         * 前驱节点被取消的情况(线程允许被取消哦)。向前遍历,
         * 直到找到一个waitStatus大于0的(不是取消状态或初始状态)
         * 的节点,该节点设置为当前node的前驱节点。
         */
        do {
            node.prev = pred = pred.prev;
        } while (pred.waitStatus > 0);
        pred.next = node;
    } else {
        /*
         * 修改前驱节点的WaitStatus为Node.SIGNAL。
         * 明确前驱节点必须为Node.SIGNAL,当前节点才可以park
         * 注意,这个CAS也可能会失败,因为前驱节点的WaitStatus状态
         * 可能会发生变化
         */
        compareAndSetWaitStatus(pred, ws, Node.SIGNAL);
    }
    return false;
}

//阻塞当前线程
//park并且检查是否被中断过
private final boolean parkAndCheckInterrupt() {
    LockSupport.park(this);
    return Thread.interrupted();
}
cancelAcquire
- acquireQueued方法在出现异常时,会执行cancelAcquire方法取消当前node的acquire操作。
private void cancelAcquire(Node node) {
    if (node == null)
        return;

    node.thread = null;

    // 跳过中间CANCELLED状态的节点
    Node pred = node.prev;
    while (pred.waitStatus > 0)
        node.prev = pred = pred.prev;

    Node predNext = pred.next;

    // 将node设置为CANCELLED状态
    node.waitStatus = Node.CANCELLED;

    // 如果当前节点是tail节点,则直接移除
    if (node == tail && compareAndSetTail(node, pred)) {
        compareAndSetNext(pred, predNext, null);
    } else {
        int ws;
        if (pred != head &&
            ((ws = pred.waitStatus) == Node.SIGNAL ||
             (ws <= 0 && compareAndSetWaitStatus(pred, ws, Node.SIGNAL))) &&
            pred.thread != null) {//如果pred不是head节点并且是SIGNAL 状态,
            //或者可以设置为SIGNAL 状态,
            //那么将pred的next设置为node.next,也就是移除当前节点
            Node next = node.next;
            if (next != null && next.waitStatus <= 0)
                compareAndSetNext(pred, predNext, next);
        } else {
            unparkSuccessor(node);//唤醒node的后继节点
        }

        node.next = node; // help GC
    }
}
private void unparkSuccessor(Node node) {
    //如果waitStatus为负数,则将其设置为0(允许失败)
    int ws = node.waitStatus;
    if (ws < 0)
        compareAndSetWaitStatus(node, ws, 0);

    //唤醒当前节点后面的节点。通常是紧随的next节点,
    //但是当next被取消或者为空,则从tail到node之间的所有节点,
    //往后往前查找直到找到一个waitStatus <=0的节点,将其唤醒unpark
    Node s = node.next;
    if (s == null || s.waitStatus > 0) {
        s = null;
        for (Node t = tail; t != null && t != node; t = t.prev)
            if (t.waitStatus <= 0)
                s = t;
    }
    if (s != null)
        LockSupport.unpark(s.thread);
}
- 总结一下:
1、设置thread变量为空,并且设置状态为canceled
2、跳过中间的已经被取消的节点
3、如果当前节点是tail节点,则直接移除。否则:
4、如果其前驱节点不是head节点并且(前驱节点是SIGNAL状态,或者可以被设置为SIGNAL状态),那么将当前节点移除。否则通过LockSupport.unpark()唤醒node的后继节点
- 公平锁与非公平锁的区别就在于这里,在tryAcquire方法中,首先会检查是否有任何线程等待获取的时间长于当前线程。
protected final boolean tryAcquire(int acquires) {
            final Thread current = Thread.currentThread();
            int c = getState();
            if (c == 0) {
              //这里,先会检查是否有任何线程等待获取的时间长于当前线程。
                if (!hasQueuedPredecessors() &&
                    compareAndSetState(0, acquires)) {
                    setExclusiveOwnerThread(current);
                    return true;
                }
            }
            else if (current == getExclusiveOwnerThread()) {
                int nextc = c + acquires;
                if (nextc < 0)
                    throw new Error("Maximum lock count exceeded");
                setState(nextc);
                return true;
            }
            return false;
        }
public final boolean hasQueuedPredecessors() {
        // The correctness of this depends on head being initialized
        // before tail and on head.next being accurate if the current
        // thread is first in queue.
        Node t = tail; // Read fields in reverse initialization order
        Node h = head;
        Node s;
        return h != t &&
            ((s = h.next) == null || s.thread != Thread.currentThread());
    }
- 就是看看AQS队列是否为空,如果不为空,那么head的下一个节点是否为当前请求的线程,如果不是,说明前面有其他线程排队,当前线程应该加入等待队列中。
2.4 最后,释放锁
 public void unlock() {
        sync.release(1);
    }

public final boolean release(int arg) {
    if (tryRelease(arg)) {//尝试释放资源  state
        Node h = head;
        if (h != null && h.waitStatus != 0)//如果AQS不为空,并且头节点的waitStatus不是0,之前在shouldParkAfterFailedAcquire方法内设置成了-1
            unparkSuccessor(h);//unpark后继节点
        return true;
    }
    return false;
}

//这里不需要加锁,因为只有获取锁的线程才会来释放锁,
//所以这里直接将state减去releases即可
protected final boolean tryRelease(int releases) {
    int c = getState() - releases;
    if (Thread.currentThread() != getExclusiveOwnerThread())
        throw new IllegalMonitorStateException();
    boolean free = false;
    if (c == 0) {
        free = true;
        setExclusiveOwnerThread(null);
    }
    setState(c);
    return free;
}

private void unparkSuccessor(Node node) {
    int ws = node.waitStatus;
    if (ws < 0)
        compareAndSetWaitStatus(node, ws, 0);

    //
    Node s = node.next;
    if (s == null || s.waitStatus > 0) {
        s = null;
        for (Node t = tail; t != null && t != node; t = t.prev)//注意这里是从AQS队列的尾节点开始查找的,
        //找到最后一个 waitStatus<=0 的那个节点,将其唤醒。
            if (t.waitStatus <= 0)
                s = t;
    }
    if (s != null)
        LockSupport.unpark(s.thread);
}
- 彻底释放完资源(state=0)后,会去唤醒AQS队列中的一个等待节点,该节点查找顺序为从AQS队列的尾节点开始查找的,找到最后一个 waitStatus<=0 的那个节点,通过LockSupport.unpark将其唤醒。
【完】
