8道链表常考题-复杂链表的深度拷贝


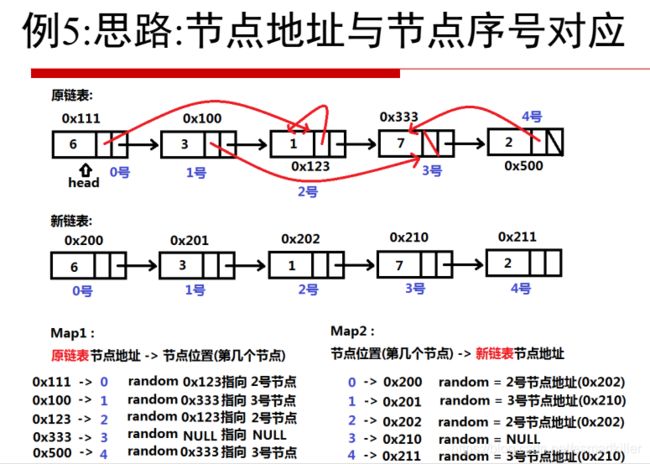
通过map来保存原链表节点之间的关系,协助创建新链表-》方法一
通过map来保存新旧地址的映射,遍历原链表(next或random和next)来创建新的链表-》方法二三
leetcode官方解法:
https://leetcode-cn.com/problems/copy-list-with-random-pointer/solution/fu-zhi-dai-sui-ji-zhi-zhen-de-lian-biao-by-leetcod/
首先,我们来看一下有向链表:
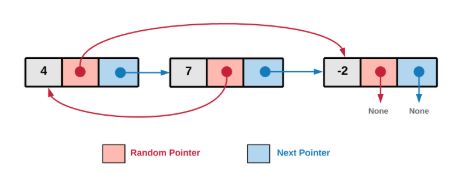
在上图中,对于一个节点,它的 next 指针指向链表中的下一个节点。 next 指针是通常有向链表中有的部分且将所有节点 链接 起来。图中有趣的一点,也是这题有趣的一点在于 random 指针,正如名字所示,它可以指向链表中的任一节点也可以为空。
方法 1:回溯
回溯算法的第一想法是将链表想象成一张图。链表中每个节点都有 2 个指针(图中的边)。因为随机指针给图结构添加了随机性,所以我们可能会访问相同的节点多次,这样就形成了环。
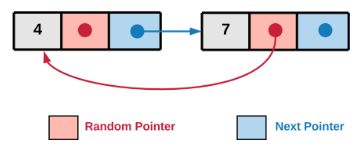
上图中,我们可以看到随机指针指向了前一个节点,因此成环。我们需要考虑这种环的实现。
此方法中,我们只需要遍历整个图并拷贝它。拷贝的意思是每当遇到一个新的未访问过的节点,你都需要创造一个新的节点。遍历按照深度优先进行。我们需要在回溯的过程中记录已经访问过的节点,否则因为随机指针的存在我们可能会产生死循环。
1.从 头 指针开始遍历整个图。将链表看做一张图。下图对应的是上面的有向链表的例子,Head 是图的出发节点。
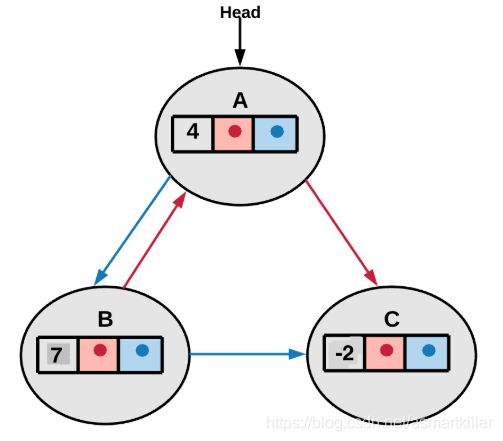
2.当我们遍历到某个点时,如果我们已经有了当前节点的一个拷贝,我们不需要重复进行拷贝。
3.如果我们还没拷贝过当前节点,我们创造一个新的节点,并把该节点放到已访问字典中,即: visited_dictionary[current_node] = cloned_node_for_current_node.
4.我们针对两种情况进行回溯调用:一个顺着 random 指针调用,另一个沿着 next 指针调用。步骤 1 中将 random 和 next 指针分别红红色和蓝色标注。然后我们分别对两个指针进行函数递归调用:
cloned_node_for_current_node.next = copyRandomList(current_node.next);
cloned_node_for_current_node.random = copyRandomList(current_node.random);
/*
// Definition for a Node.
class Node {
    public int val;
    public Node next;
    public Node random;

    public Node() {}

    public Node(int _val,Node _next,Node _random) {
        val = _val;
        next = _next;
        random = _random;
    }
};
*/
public class Solution {
  // HashMap which holds old nodes as keys and new nodes as its values.
  HashMap visitedHash = new HashMap();

  public Node copyRandomList(Node head) {

    if (head == null) {
      return null;
    }

    // If we have already processed the current node, then we simply return the cloned version of
    // it.
    if (this.visitedHash.containsKey(head)) {
      return this.visitedHash.get(head);
    }

    // Create a new node with the value same as old node. (i.e. copy the node)
    Node node = new Node(head.val, null, null);

    // Save this value in the hash map. This is needed since there might be
    // loops during traversal due to randomness of random pointers and this would help us avoid
    // them.
    this.visitedHash.put(head, node);

    // Recursively copy the remaining linked list starting once from the next pointer and then from
    // the random pointer.
    // Thus we have two independent recursive calls.
    // Finally we update the next and random pointers for the new node created.
    node.next = this.copyRandomList(head.next);
    node.random = this.copyRandomList(head.random);

    return node;
  }
}
C++实现:需要map存放旧节点和新节点的映射,通过遍历旧节点之间的链接关系来创建新节点之间的链接关系。当map中不存在映射关系时,需要新建新节点,并保存旧节点和新节点之间的关系。
/*
// Definition for a Node.
class Node {
public:
    int val;
    Node* next;
    Node* random;

    Node() {}

    Node(int _val, Node* _next, Node* _random) {
        val = _val;
        next = _next;
        random = _random;
    }
};
*/
class Solution {
public:
    std::map visited_node;
    Node* copyRandomList(Node* head) {

        if(head == NULL) //截止条件
        {
            return NULL;
        }

        if(visited_node.find(head) != visited_node.end())
        {
            return visited_node[head];
        }

        Node * newnode = new Node(head->val,NULL,NULL);
        visited_node[head] = newnode;

        newnode->next = copyRandomList(head->next);
        newnode->random = copyRandomList(head->random);
        return newnode;
    }
};
方法 2: O(N)O(N) 空间的迭代
迭代算法不需要将链表视为一个图。当我们在迭代链表时,我们只需要为 random 指针和 next 指针指向的未访问过节点创造新的节点并赋值即可。
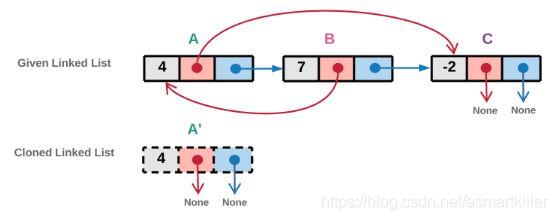
1.从 head 节点开始遍历链表。下图中,我们首先创造新的 head 拷贝节点。拷贝的节点如下图虚线所示。实现中,我们将该新建节点的引用也放入已访问字典中。
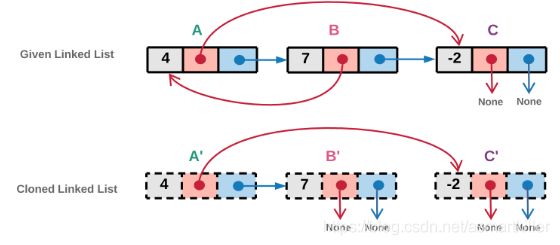
2.random 指针:如果当前节点 ii 的 random 指针只想一个节点 jj 且节点 jj 已经被拷贝过,我们将直接使用已访问字典中该节点的引用而不会新建节点。如果当前节点 ii 的 random 指针只想的节点 jj 还没有被拷贝过,我们就对 jj 节点创建对应的新节点,并把它放入已访问节点字典中。
下图中, A 的 random 指针指向的节点 C 。前图中可以看出,节点 CC 还没有被访问过,所以我们创造一个拷贝的 C′节点与之对应,并将它添加到已访问字典中。

3.next 指针:如果当前节点 ii 的 next 指针指向的节点 jj 在已访问字典中已有拷贝,我们直接使用它的拷贝节点。如果当前节点 ii 的next 指针指向的节点 jj 还没有被访问过,我们创建一个对应节点的拷贝,并放入已访问字典。下图中,A 节点的 next 指针指向节点 B 。节点 B 在前面的图中还没有被访问过,因此我们创造一个新的拷贝 B’节点,并放入已访问字典中。
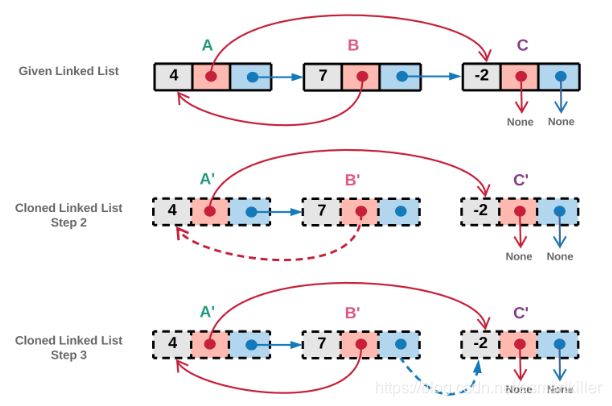
4.我们重复步骤 2 和步骤 3 ,直到我们到达链表的结尾。
下图中, 节点 B 的 random 指针指向的节点 A 已经被访问过了,因此在步骤 2 中,我们不会创建新的拷贝,只将节点 B’ 的 random 指针指向克隆节点 A’ 。同样的, 节点 B 的 next 指针指向的节点 C 已经访问过,因此在步骤 3 中,我们不会创建新的拷贝,而直接将 B’的 next 指针指向已经存在的拷贝节点 C’。
/*
// Definition for a Node.
class Node {
    public int val;
    public Node next;
    public Node random;

    public Node() {}

    public Node(int _val,Node _next,Node _random) {
        val = _val;
        next = _next;
        random = _random;
    }
};
*/
public class Solution {
  // Visited dictionary to hold old node reference as "key" and new node reference as the "value"
  HashMap visited = new HashMap();

  public Node getClonedNode(Node node) {
    // If the node exists then
    if (node != null) {
      // Check if the node is in the visited dictionary
      if (this.visited.containsKey(node)) {
        // If its in the visited dictionary then return the new node reference from the dictionary
        return this.visited.get(node);
      } else {
        // Otherwise create a new node, add to the dictionary and return it
        this.visited.put(node, new Node(node.val, null, null));
        return this.visited.get(node);
      }
    }
    return null;
  }

  public Node copyRandomList(Node head) {

    if (head == null) {
      return null;
    }

    Node oldNode = head;

    // Creating the new head node.
    Node newNode = new Node(oldNode.val);
    this.visited.put(oldNode, newNode);

    // Iterate on the linked list until all nodes are cloned.
    while (oldNode != null) {
      // Get the clones of the nodes referenced by random and next pointers.
      newNode.random = this.getClonedNode(oldNode.random);
      newNode.next = this.getClonedNode(oldNode.next);

      // Move one step ahead in the linked list.
      oldNode = oldNode.next;
      newNode = newNode.next;
    }
    return this.visited.get(head);
  }
}
方法 3:O(1) 空间的迭代
与上面提到的维护一个旧节点和新节点对应的字典不同,我们通过扭曲原来的链表,并将每个拷贝节点都放在原来对应节点的旁边。这种旧节点和新节点交错的方法让我们可以在不需要额外空间的情况下解决这个问题。
1.遍历原来的链表并拷贝每一个节点,将拷贝节点放在原来节点的旁边,创造出一个旧节点和新节点交错的链表。
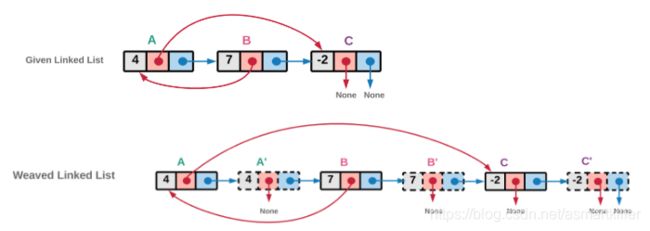
如你所见,我们只是用了原来节点的值拷贝出新的节点。原节点 next 指向的都是新创造出来的节点
cloned_node.next = original_node.next
original_node.next = cloned_node
2.迭代这个新旧节点交错的链表,并用旧节点的 random 指针去更新对应新节点的 random 指针。比方说, B 的 random 指针指向 A ,意味着 B’ 的 random 指针指向 A’ 。

3.现在 random 指针已经被赋值给正确的节点, next 指针也需要被正确赋值,以便将新的节点正确链接同时将旧节点重新正确链接。
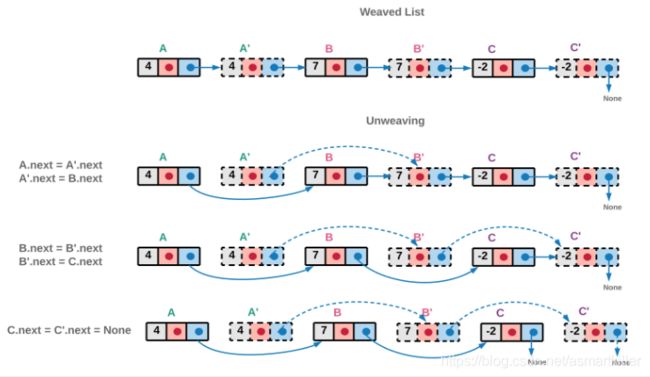
/*
// Definition for a Node.
class Node {
    public int val;
    public Node next;
    public Node random;

    public Node() {}

    public Node(int _val,Node _next,Node _random) {
        val = _val;
        next = _next;
        random = _random;
    }
};
*/
public class Solution {
  public Node copyRandomList(Node head) {

    if (head == null) {
      return null;
    }

    // Creating a new weaved list of original and copied nodes.
    Node ptr = head;
    while (ptr != null) {

      // Cloned node
      Node newNode = new Node(ptr.val);

      // Inserting the cloned node just next to the original node.
      // If A->B->C is the original linked list,
      // Linked list after weaving cloned nodes would be A->A'->B->B'->C->C'
      newNode.next = ptr.next;
      ptr.next = newNode;
      ptr = newNode.next;
    }

    ptr = head;

    // Now link the random pointers of the new nodes created.
    // Iterate the newly created list and use the original nodes' random pointers,
    // to assign references to random pointers for cloned nodes.
    while (ptr != null) {
      ptr.next.random = (ptr.random != null) ? ptr.random.next : null;
      ptr = ptr.next.next;
    }

    // Unweave the linked list to get back the original linked list and the cloned list.
    // i.e. A->A'->B->B'->C->C' would be broken to A->B->C and A'->B'->C'
    Node ptr_old_list = head; // A->B->C
    Node ptr_new_list = head.next; // A'->B'->C'
    Node head_old = head.next;
    while (ptr_old_list != null) {
      ptr_old_list.next = ptr_old_list.next.next;
      ptr_new_list.next = (ptr_new_list.next != null) ? ptr_new_list.next.next : null;
      ptr_old_list = ptr_old_list.next;
      ptr_new_list = ptr_new_list.next;
    }
    return head_old;
  }
}
/*
// Definition for a Node.
class Node {
public:
    int val;
    Node* next;
    Node* random;

    Node() {}

    Node(int _val, Node* _next, Node* _random) {
        val = _val;
        next = _next;
        random = _random;
    }
};
*/
class Solution {
public:
    Node* copyRandomList(Node* head) {

        if(head == NULL) return NULL; //用于排除空链表
        //创建旧新节点交替的链表
        Node* oldptr = head;
        while(oldptr)
        {
            oldptr->next = new Node(oldptr->val,oldptr->next,NULL);
            oldptr = oldptr->next->next;
        }
        //为新节点填充random域
        oldptr = head;
        while(oldptr){
            if(oldptr->random != NULL){
                oldptr->next->random = oldptr->random->next;
            }
            oldptr = oldptr->next->next;
        }

        //拆分链表
        Node* newhead = head->next;
        Node* newptr = newhead; //A`->B`->C`
        oldptr = head;          //A->B->C
        while(oldptr)
        {
            oldptr->next = oldptr->next->next;
            newptr->next = (newptr->next == NULL? NULL : newptr->next->next);
            oldptr = oldptr->next;
            newptr = newptr->next;
        }
        return newhead;
    }
};
