30_多易教育之《yiee数据运营系统》附录:扩展知识点汇总总结篇
目录
一、Sqoop教程
1、概述
2、工作机制
3、安装
1)、前提概述
2)、软件下载
3)、安装步骤
4、Sqoop的基本命令
1)、基本操作
2)、Sqoop的数据导入import
3)、关于空值的处理
4)、模板命令手册(下钻)
二、图计算基本概念
1、什么是图
2、核心术语
1)、顶点和边
2)、有向图和无向图
3)、有环图和无环图
4)、度、出边、入边、出度、入度
5)、超步
6)、图数据库和Spark GraphX(图算法库)
3、Graphx核心api介绍
4、POM文件
5、图的构造
6、图的属性操作
7、图计算入门案例—求连通子图
1)、案例需求
2)、实现思路
3)、代码实现
一、Sqoop教程
1、概述
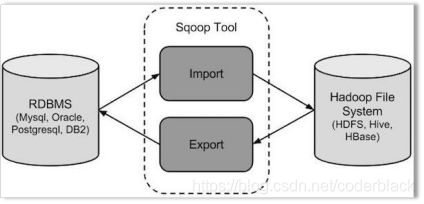
sqoop 是 apache 旗下一款“Hadoop中的各种存储系统(HDFS、HIVE、HBASE) 和关系数据库(mysql、oracle、sqlserver等)服务器之间传送数据”的工具。
核心的功能有两个:
导入(迁入)
导出(迁出)
导入数据:MySQL,Oracle 导入数据到 Hadoop 的 HDFS、HIVE、HBASE 等数据存储系统
导出数据:从 Hadoop 的文件系统中导出数据到关系数据库 mysql 等 Sqoop 的本质还是一个命令行工具,和 HDFS,Hive 相比,并没有什么高深的理论。
sqoop:
工具:本质就是迁移数据
迁移的方式:就是把sqoop的迁移命令转换成MR程序,而且没有reduce task任务
2、工作机制
将导入或导出命令翻译成 MapReduce 程序来实现
在翻译出的 MapReduce 中主要是对InputFormat 和 OutputFormat 进行定制
3、安装
1)、前提概述
将来sqoop在使用的时候有可能会跟那些系统或者组件打交道?
HDFS, MapReduce, YARN, ZooKeeper, Hive, HBase, MySQL
sqoop就是一个工具, 只需要在一个节点上进行安装即可。
补充一点: 如果你的sqoop工具将来要进行hive或者hbase等等的系统和MySQL之间的交互
你安装的SQOOP软件的节点一定要包含以上你要使用的集群或者软件系统的安装包
补充一点: 将来要使用的azakban这个软件 除了会调度 hadoop的任务或者hbase或者hive的任务之外, 还会调度sqoop的任务
azkaban这个软件的安装节点也必须包含以上这些软件系统的客户端
2)、软件下载
下载地址
- http://mirrors.hust.edu.cn/apache/

sqoop版本说明
绝大部分企业所使用的sqoop的版本都是 sqoop1
sqoop-1.4.6 或者 sqoop-1.4.7 它是 sqoop1
sqoop-1.99.4----都是 sqoop2(偏向服务化)
此处使用sqoop-1.4.6版本sqoop-1.4.6.bin__hadoop-2.0.4-alpha.tar.gz
3)、安装步骤
(1)上传解压缩安装包到指定目录
因为之前hive只是安装在hadoop3机器上,所以sqoop也同样安装在hadoop3机器上
[hadoop@hadoop3 ~]$ tar -zxvf sqoop-1.4.6.bin__hadoop-2.0.4-alpha.tar.gz -C apps/
(2)进入到 conf 文件夹,找到 sqoop-env-template.sh,修改其名称为 sqoop-env.sh
[hadoop@hadoop3 ~]$ cd apps/
[hadoop@hadoop3 apps]$ ls
apache-hive-2.3.3-bin hadoop-2.7.5 hbase-1.2.6 sqoop-1.4.6.bin__hadoop-2.0.4-alpha zookeeper-3.4.10
[hadoop@hadoop3 apps]$ mv sqoop-1.4.6.bin__hadoop-2.0.4-alpha/ sqoop-1.4.6
[hadoop@hadoop3 apps]$ cd sqoop-1.4.6/conf/
[hadoop@hadoop3 conf]$ ls
oraoop-site-template.xml sqoop-env-template.sh sqoop-site.xml
sqoop-env-template.cmd sqoop-site-template.xml
[hadoop@hadoop3 conf]$ mv sqoop-env-template.sh sqoop-env.sh
(3)修改 sqoop-env.sh
[hadoop@hadoop3 conf]$ vi sqoop-env.sh
export HADOOP_COMMON_HOME=/home/hadoop/apps/hadoop-2.7.5
#Set path to where hadoop-*-core.jar is availableexport HADOOP_MAPRED_HOME=/home/hadoop/apps/hadoop-2.7.5
#set the path to where bin/hbase is availableexport HBASE_HOME=/home/hadoop/apps/hbase-1.2.6
#Set the path to where bin/hive is availableexport HIVE_HOME=/home/hadoop/apps/apache-hive-2.3.3-bin
#Set the path for where zookeper config dir isexport ZOOCFGDIR=/home/hadoop/apps/zookeeper-3.4.10/conf
#Set path to where bin/hadoop is available
export HADOOP_COMMON_HOME=/opt/app/hadoop-2.8.5/

#Set path to where hadoop-*-core.jar is available
export HADOOP_MAPRED_HOME=/opt/app/hadoop-2.8.5/share/hadoop/mapreduce

#set the path to where bin/hbase is available
#export HBASE_HOME=

#Set the path to where bin/hive is available
export HIVE_HOME=/opt/app/hive-2.1.0/

#Set the path for where zookeper config dir is
#export ZOOCFGDIR=
为什么在sqoop-env.sh 文件中会要求分别进行 common和mapreduce的配置呢???
在apache的hadoop的安装中;四大组件都是安装在同一个hadoop_home中的
但是在CDH(cloudera公司), HDP(Hortonworks)中, 这些组件都是可选的。
在安装hadoop的时候,可以选择性的只安装HDFS或者YARN,
CDH,HDP在安装hadoop的时候,会把HDFS和MapReduce有可能分别安装在不同的地方。
(4)加入 mysql 驱动包到 sqoop1.4.7/lib 目录下
[hadoop@hadoop3 ~]$ cp mysql-connector-java-5.1.40-bin.jar apps/sqoop-1.4.6/lib/

(5)配置系统环境变量
[hadoop@hadoop3 ~]$ vi .bashrc
#Sqoop
export SQOOP_HOME=/home/hadoop/apps/sqoop-1.4.6
export PATH= P A T H : PATH: PATH:SQOOP_HOME/bin

保存退出使其立即生效
[hadoop@hadoop3 ~]$ source .bashrc
回到顶部
4、Sqoop的基本命令
1)、基本操作
首先,我们可以使用 sqoop help 来查看,sqoop 支持哪些命令
[hadoop@hadoop3 ~]$ sqoop help
Warning: /home/hadoop/apps/sqoop-1.4.6/../hcatalog does not exist! HCatalog jobs will fail.
Please set $HCAT_HOME to the root of your HCatalog installation.
Warning: /home/hadoop/apps/sqoop-1.4.6/../accumulo does not exist! Accumulo imports will fail.
Please set $ACCUMULO_HOME to the root of your Accumulo installation.
18/04/12 13:37:19 INFO sqoop.Sqoop: Running Sqoop version: 1.4.6
usage: sqoop COMMAND [ARGS]

Available commands:
  codegen            生成代码
  create-hive-table     导入一个表的结构到hive,就是根据mysql中的表定义在hive中建一个同结构的表
  eval               测试一个sql语句并展示查询结果
  export             将一个hdfs目录中的数据导出到一个mysql的表中
  help               List available commands
  import             从一个数据库中导入一个表的数据到hdfs
  import-all-tables     将一个数据库中的所有表导入到 HDFS
  import-mainframe    Import datasets from a mainframe server to HDFS
  job                Work with saved jobs
  list-databases        List available databases on a server
  list-tables           List available tables in a database
  merge              Merge results of incremental imports
  metastore          Run a standalone Sqoop metastore
  version            Display version information

See 'sqoop help COMMAND' for information on a specific command.
[hadoop@hadoop3 ~]$
然后得到这些支持了的命令之后,如果不知道使用方式,可以使用 sqoop command 的方式 来查看某条具体命令的使用方式,比如:
示例:
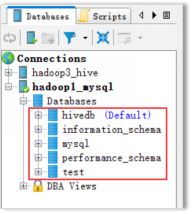
列出MySQL数据有哪些数据库
[hadoop@hadoop3 ~]$ sqoop list-databases \
> --connect jdbc:mysql://hadoop1:3306/ \
> --username root \
> --password root
Warning: /home/hadoop/apps/sqoop-1.4.6/../hcatalog does not exist! HCatalog jobs will fail.
Please set $HCAT_HOME to the root of your HCatalog installation.
Warning: /home/hadoop/apps/sqoop-1.4.6/../accumulo does not exist! Accumulo imports will fail.
Please set $ACCUMULO_HOME to the root of your Accumulo installation.
18/04/12 13:43:51 INFO sqoop.Sqoop: Running Sqoop version: 1.4.6
18/04/12 13:43:51 WARN tool.BaseSqoopTool: Setting your password on the command-line is insecure. Consider using -P instead.
18/04/12 13:43:51 INFO manager.MySQLManager: Preparing to use a MySQL streaming resultset.information_schema
hivedb
mysql
performance_schema
test
[hadoop@hadoop3 ~]$
[hadoop@hadoop3 ~]$ sqoop list-tables \
> --connect jdbc:mysql://hadoop1:3306/mysql \
> --username root \
> --password root
创建一张跟mysql中的help_keyword表一样的hive表hk:
sqoop create-hive-table \
--connect jdbc:mysql://hadoop1:3306/mysql \
--username root \
--password root \
--table help_keyword \
--hive-table hk
2)、Sqoop的数据导入import
“导入工具”导入单个表从 RDBMS 到 HDFS。表中的每一行被视为 HDFS 的一条记录。所有记录 都存储为文本文件的文本数据(或者 Avro、sequence 、parquet文件等二进制数据)
1、从RDBMS导入到HDFS中
语法格式
sqoop import (generic-args) (import-args)
常用参数
--connect <jdbc-uri> jdbc 数据库连接地址 jdbc:mysql
--connection-manager <class-name> 连接管理者DriverManager,都是用默认的
--driver <class-name> 驱动类,都是用默认的
--hadoop-mapred-home <dir>    如果指定,则会覆盖掉sqoop-env.sh中的参数$HADOOP_MAPRED_HOME
--help   帮助信息
-P 从命令行输入msyql的密码
--password <password> mysql密码
--username <username> mysql账号
--verbose 打印流程信息
--connection-param-file <filename> 可选参数,比如数据库超时时间等
--table    所要导入的表名
完整参数列表,可以用如下命令来获取:
sqoop import --help
示例
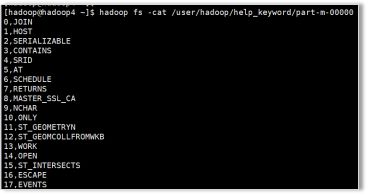
普通导入:导入mysql库中的help_keyword的数据到HDFS上
导入的默认路径:/user/hadoop/help_keyword/
sqoop import   \
--connect jdbc:mysql://hadoop1:3306/mysql   \
--username root  \
--password root   \
--table help_keyword   \
-m 1
[hadoop@hadoop4 ~]$ hadoop fs -cat /user/hadoop/help_keyword/part-m-00000
 sqoop import   \
--connect jdbc:mysql://hadoop1:3306/mysql   \
--username root  \
--password root   \
--table help_keyword   \
--target-dir /user/hadoop11/my_help_keyword1  \
--fields-terminated-by '\t'  \
--split-by help_keyword_id \
-m 2
导入数据:带where条件
sqoop import   \
--connect jdbc:mysql://hadoop1:3306/mysql   \
--username root  \
--password root   \
--where "name='STRING' " \
--table help_keyword   \
--target-dir /sqoop/hadoop11/myoutport1  \
-m 1
查询指定列
sqoop import   \
--connect jdbc:mysql://hadoop1:3306/mysql   \
--username root  \
--password root   \
--columns "name id age" \
--where "name='STRING' " \
--table help_keyword  \
--target-dir /sqoop/hadoop11/myoutport22  \
-m 1
导入:指定自定义查询SQL
sqoop import   \
--connect jdbc:mysql://hadoop1:3306/  \
--username root  \
--password root   \
--target-dir /user/hadoop/myimport33_1  \
--query 'select help_keyword_id,name from mysql.help_keyword where name = "STRING"' and  $CONDITIONS \
--split-by  help_keyword_id \
--fields-terminated-by '\t'  \
-m 4
在以上需要按照自定义SQL语句导出数据到HDFS的情况下:
1、引号问题,要么外层使用单引号,内层使用双引号, C O N D I T I O N S 的 CONDITIONS的 CONDITIONS的符号不用转义, 要么外层使用双引号,那么内层使用单引号,然后 C O N D I T I O N S 的 CONDITIONS的 CONDITIONS的符号需要转义
2、自定义的SQL语句中必须带有WHERE $CONDITIONS
2、把MySQL数据库中的表数据导入到Hive中
Sqoop 导入关系型数据到 hive 的过程是先导入到 hdfs,然后再 load 进入 hive
普通导入:数据存储在默认的default hive库中,表名就是对应的mysql的表名:
sqoop import   \
--connect jdbc:mysql://hadoop1:3306/mysql   \
--username root  \
--password root   \
--table help_keyword   \
--hive-import \
--m 1
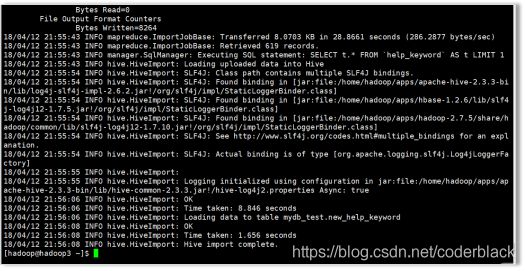
导入过程
第一步:导入mysql.help_keyword的数据到hdfs的默认路径
第二步:自动仿造mysql.help_keyword去创建一张hive表, 创建在默认的default库中
第三步:把临时目录中的数据导入到hive表中

查看数据
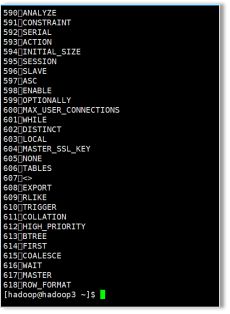
[hadoop@hadoop3 ~]$ hadoop fs -cat /user/hive/warehouse/help_keyword/part-m-00000
指定行分隔符和列分隔符,指定hive-import,指定覆盖导入,指定自动创建hive表,指定表名,指定删除中间结果数据目录
sqoop import  \--connect jdbc:mysql://hadoop1:3306/mysql  \
--username root  \
--password root  \
--table help_keyword  \
--fields-terminated-by "\t"  \
--lines-terminated-by "\n"  \
--hive-import  \
--hive-overwrite  \
--create-hive-table  \
--delete-target-dir \
--hive-database  mydb_test \
--hive-table new_help_keyword
报错原因是hive-import 当前这个导入命令。 sqoop会自动给创建hive的表。 但是不会自动创建不存在的库

手动创建mydb_test数据块
hive> create database mydb_test;
OK
Time taken: 6.147 seconds
hive>
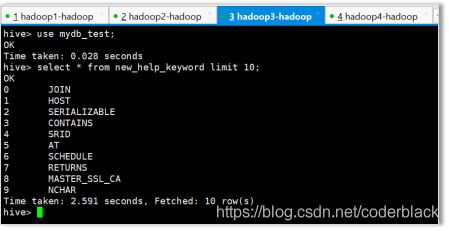
select * from new_help_keyword limit 10;
sqoop import  \
--connect jdbc:mysql://hadoop1:3306/mysql  \
--username root  \
--password root  \
--table help_keyword  \
--fields-terminated-by "\t"  \
--lines-terminated-by "\n"  \
--hive-import  \
--hive-overwrite  \
--create-hive-table  \
--hive-table  mydb_test.new_help_keyword  \
--delete-target-dir
增量导入
执行增量导入之前,先清空hive数据库中的help_keyword表中的数据
truncate table help_keyword;
sqoop import   \
--connect jdbc:mysql://hadoop1:3306/mysql   \
--username root  \
--password root   \
--table help_keyword  \
--target-dir /user/hadoop/myimport_add  \
--incremental  append  \
--check-column  help_keyword_id \
--last-value 500  \
--m 1
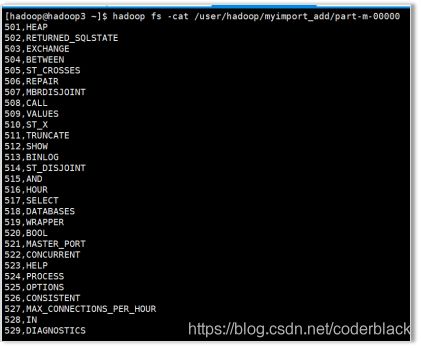
语句执行成功
查看结果
3、把MySQL数据库中的表数据导入到hbase
普通导入
sqoop import \
--connect jdbc:mysql://hadoop1:3306/mysql \
--username root \
--password root \
--table help_keyword \
--hbase-table new_help_keyword \
--column-family person \
--hbase-row-key help_keyword_id
此时会报错,因为需要先创建Hbase里面的表,再执行导入的语句
hbase(main):001:0> create 'new_help_keyword', 'base_info'0 row(s) in 3.6280 seconds
=> Hbase::Table - new_help_keyword
hbase(main):002:0>
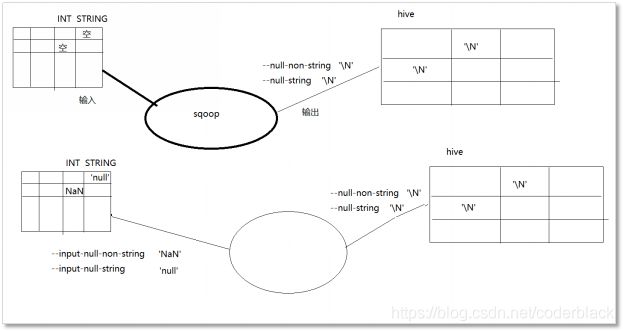
3)、关于空值的处理
sqoop是一个数据迁移工具,一次导入或导出,都涉及到读、写两个数据流向
不管读,还是写,都需要对空进行处理
读: 什么样的东西应该视为空
–input-null-non-string
–input-null-string
写: 空应该写成什么样的东西
–null-non-string ‘\N’
–null-string \N’
4)、模板命令手册(下钻)
## 测试命令:列出mysql中所有的库、表
sqoop list-databases \
--connect jdbc:mysql://doit03:3306 \
--username root \
--password root
sqoop list-tables \
--connect jdbc:mysql://doit03:3306/doit_mall \
--username root \
--password root
## 测试命令:从mysql中导入数据到hdfs的指定目录
## 并行度的问题补充:一个maptask从mysql中获取数据的速度约为4-5m/s,而mysql服务器的吞吐量40-50M/s
## 那么,在mysql中的数据量很大的场景下,可以考虑增加maptask的并行度来提高数据迁移速度
## -m就是用来指定maptask的并行度
## 思考:maptask一旦有多个,那么它是怎么划分处理任务?
## 确保sqoop把目标目录视作hdfs中的路径,需要参数配置正确:
# core-site.xml
# fs.defaultFS
# hdfs://h1:8020/
#
## 确保sqoop把mr任务提交到yarn上运行,需要参数配置正确:
# mapred-site.xml
# mapreduce.framework.name
# yarn
#
sqoop import \
--connect jdbc:mysql://h3:3306/ry \
--username root \
--password haitao.211123 \
--table doit_jw_stu_base \
--target-dir /sqoopdata/doit_jw_stu_base \
--fields-terminated-by ',' \
#如果目标路径已存在则删除
--delete-target-dir \
--split-by stu_id \
-m 2
# 可以指定要生成的文件的类型
--as-avrodatafile
--as-parquetfile
--as-sequencefile
--as-textfile
## 如果需要压缩
--compression-codec gzip
## 空值处理
# 输入方向:
--input-null-non-string <null-str>
--input-null-string <null-str>
# 输出方向:
--null-non-string <null-str>
--null-string <null-str>
## 如果没有数字主键,也可以使用文本列来作为切分task的参照,但是需要增加一个-D参数,如下
sqoop import -Dorg.apache.sqoop.splitter.allow_text_splitter=true \
--connect jdbc:mysql://h3:3306/ry \
--username root \
--password root \
--table noid \
--target-dir /sqooptest3 \
--fields-terminated-by ',' \
--split-by name \
-m 2
## 导入mysql数据到hive
## 它的实质: 是先将数据从mysql导入hdfs,然后利用hive的元数据操作jar包,去hive的元数据库中生成相应的元数据,并将数据文件导入hive表目录
sqoop import \
--connect jdbc:mysql://h3:3306/ry \
--username root \
--password haitao.211123 \
--table doit_jw_stu_base \
--hive-import \
--hive-table yiee_dw.doit_jw_stu_base \
--delete-target-dir \
--as-textfile \
--fields-terminated-by ',' \
--compress \
--compression-codec gzip \
--split-by stu_id \
--null-string '\\N' \
--null-non-string '\\N' \
--hive-overwrite \
-m 2
# --hive-database xdb
## 条件导入: --where
sqoop import \
--connect jdbc:mysql://h3:3306/ry \
--username root \
--password haitao.211123 \
--table doit_jw_stu_base \
--hive-import \
--hive-table yiee_dw.doit_jw_stu_base2 \
--delete-target-dir \
--as-textfile \
--fields-terminated-by ',' \
--compress \
--compression-codec gzip \
--split-by stu_id \
--null-string '\\N' \
--null-non-string '\\N' \
--hive-overwrite \
--where "stu_age>25" \
-m 2
## 条件导入: --columns 指定要导的字段
sqoop import \
--connect jdbc:mysql://h3:3306/ry \
--username root \
--password haitao.211123 \
--table doit_jw_stu_base \
--hive-import \
--hive-table yiee_dw.doit_jw_stu_base3 \
--delete-target-dir \
--as-textfile \
--fields-terminated-by ',' \
--compress \
--compression-codec gzip \
--split-by stu_id \
--null-string '\\N' \
--null-non-string '\\N' \
--hive-overwrite \
--where "stu_age>25" \
--columns "stu_id,stu_name,stu_phone" \
-m 2
## 查询导入: --query
# 有了--query,就不要有--table了,也不要有--where了,也不要有--columns了
## query自由查询导入时,sql语句中必须带 $CONDITIONS条件 : where $CONDITIONS ,要么 where id>20 and $CONDITIONS
## 为什么呢?因为sqoop要将你的sql语句交给多个不同的maptask执行,每个maptask执行sql时肯定要按任务规划加范围条件,
## 所以就提供了这个$CONDITIONS作为将来拼接条件的占位符
sqoop import \
--connect jdbc:mysql://h3:3306/ry \
--username root \
--password haitao.211123 \
--hive-import \
--hive-table yiee_dw.doit_jw_stu_base4 \
--as-textfile \
--fields-terminated-by ',' \
--compress \
--compression-codec gzip \
--split-by stu_id \
--null-string '\\N' \
--null-non-string '\\N' \
--hive-overwrite \
--query 'select stu_id,stu_name,stu_age,stu_term from doit_jw_stu_base where stu_createtime>"2019-09-24 23:59:59" and stu_sex="1" and $CONDITIONS' \
--target-dir '/user/root/tmp' \
-m 2
## --query可以支持复杂查询(包含join、子查询、分组查询)但是,一定要去深入思考你的sql的预期运算逻辑和maptask并行分任务的事实!
# --query "select id,member_id,order_sn,receiver_province from doit_mall.oms_order where id>20 and \$CONDITIONS"
# --query 'select id,member_id,order_sn,receiver_province from doit_mall.oms_order where id>20 and $CONDITIONS'
sqoop import \
--connect jdbc:mysql://h3:3306/ry \
--username root \
--password haitao.211123 \
--hive-import \
--hive-table yiee_dw.doit_jw_stu_base6 \
--as-textfile \
--fields-terminated-by ',' \
--compress \
--compression-codec gzip \
--split-by id \
--null-string '\\N' \
--null-non-string '\\N' \
--hive-overwrite \
--query 'select b.id,a.stu_id,a.stu_name,a.stu_phone,a.stu_sex,b.stu_zsroom from doit_jw_stu_base a join doit_jw_stu_zsgl b on a.stu_id=b.stu_id where $CONDITIONS' \
--target-dir '/user/root/tmp' \
-m 2
## --增量导入 1 --根据一个递增字段来界定增量数据
sqoop import \
--connect jdbc:mysql://h3:3306/ry \
--username root \
--password haitao.211123 \
--table doit_jw_stu_zsgl \
--hive-import \
--hive-table yiee_dw.doit_jw_stu_zsgl \
--split-by id \
--incremental append \
--check-column id \
--last-value 40 \
-m 2
## --增量导入 2 --根据修改时间来界定增量数据, 要求必须有一个时间字段,且该字段会跟随数据的修改而修改
## lastmodified 模式下的增量导入,不支持hive导入
sqoop import \
--connect jdbc:mysql://h3:3306/ry \
--username root \
--password haitao.211123 \
--table doit_jw_stu_zsgl \
--target-dir '/sqoopdata/doit_jw_stu_zsgl' \
--incremental lastmodified \
--check-column stu_updatetime \
--last-value '2019-09-30 23:59:59' \
--fields-terminated-by ',' \
--merge-key id \
-m 1
# 导入后的数据是直接追加,还是进行新旧合并,两个选择:
--append # 导入的增量数据直接以追加的方式进入目标存储
--merge-key id \ #导入的增量数据不会简单地追加到目标存储,还会将新旧数据进行合并
## 附录: 数据导入参数大全!
Table 3. Import control arguments:
Argument Description
--append Append data to an existing dataset in HDFS
--as-avrodatafile Imports data to Avro Data Files
--as-sequencefile Imports data to SequenceFiles
--as-textfile Imports data as plain text (default)
--as-parquetfile Imports data to Parquet Files
--boundary-query <statement> Boundary query to use for creating splits
--columns <col,col,col…> Columns to import from table
--delete-target-dir Delete the import target directory if it exists
--direct Use direct connector if exists for the database
--fetch-size <n> Number of entries to read from database at once.
--inline-lob-limit <n> Set the maximum size for an inline LOB
-m,--num-mappers <n> Use n map tasks to import in parallel
-e,--query <statement> Import the results of statement.
--split-by <column-name> Column of the table used to split work units. Cannot be used with --autoreset-to-one-mapper option.
--split-limit <n> Upper Limit for each split size. This only applies to Integer and Date columns. For date or timestamp fields it is calculated in seconds.
--autoreset-to-one-mapper Import should use one mapper if a table has no primary key and no split-by column is provided. Cannot be used with --split-by <col> option.
--table <table-name> Table to read
--target-dir <dir> HDFS destination dir
--temporary-rootdir <dir> HDFS directory for temporary files created during import (overrides default "_sqoop")
--warehouse-dir <dir> HDFS parent for table destination
--where <where clause> WHERE clause to use during import
-z,--compress Enable compression
--compression-codec <c> Use Hadoop codec (default gzip)
--null-string <null-string> The string to be written for a null value for string columns
--null-non-string <null-string> The string to be written for a null value for non-string columns
## sqoop导出数据
sqoop export \
--connect jdbc:mysql://h3:3306/dicts \
--username root \
--password haitao.211123 \
--table dau_t \
--export-dir '/user/hive/warehouse/dau_t' \
--batch # 以batch模式去执行sql
## 控制新旧数据导到mysql时,选择更新模式
sqoop export \
--connect jdbc:mysql://h3:3306/doit_mall \
--username root \
--password root \
--table person \
--export-dir '/export3/' \
--input-null-string 'NaN' \
--input-null-non-string 'NaN' \
--update-mode allowinsert \
--update-key id \
--batch
## 附录:export控制参数列表
Table 29. Export control arguments:
Argument Description
--columns <col,col,col…> Columns to export to table
--direct Use direct export fast path
--export-dir <dir> HDFS source path for the export
-m,--num-mappers <n> Use n map tasks to export in parallel
--table <table-name> Table to populate
--call <stored-proc-name> Stored Procedure to call
--update-key <col-name> Anchor column to use for updates. Use a comma separated list of columns if there are more than one column.
--update-mode <mode> Specify how updates are performed when new rows are found with non-matching keys in database.
Legal values for mode include updateonly (default) and allowinsert.
--input-null-string <null-string> The string to be interpreted as null for string columns
--input-null-non-string <null-string> The string to be interpreted as null for non-string columns
--staging-table <staging-table-name> The table in which data will be staged before being inserted into the destination table.
--clear-staging-table Indicates that any data present in the staging table can be deleted.
--batch Use batch mode for underlying statement execution.
## 附录:
-- mysql修改库、表编码
修改库的编码:
mysql> alter database db_name character set utf8;
修改表的编码:
mysql> ALTER TABLE table_name CONVERT TO CHARACTER SET utf8 COLLATE utf8_general_ci;
二、图计算基本概念
1、什么是图
图是由顶点和边组成的一个数据模型。
图可以对事物以及事物之间的关系建模,图可以用来表示自然发生的连接数据,如:
a)社交网络
b)互联网web页面
c)常用的应用有:
d)在地图应用中找到最短路径
e)基于与他人的相似度图,推荐产品、服务、人际关系或媒体
2、核心术语
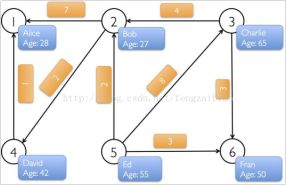
1)、顶点和边
2)、有向图和无向图
在有向图中,一条边的两个顶点一般扮演者不同的角色,比如父子关系、页面A连接向页面B;
在一个无向图中,边没有方向,即关系都是对等的,比如qq中的好友。
GraphX中有一个重要概念,所有的边都有一个方向,那么图就是有向图,如果忽略边的方向,就是无向图。

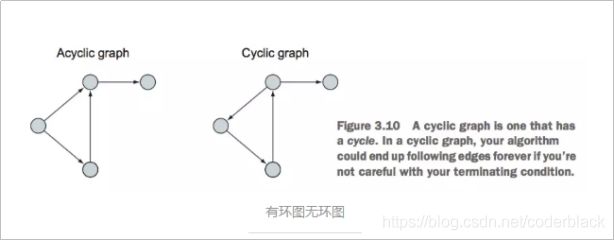
3)、有环图和无环图
有环图是包含循环的,一系列顶点连接成一个环。无环图没有环。
在有环图中,如果不关心终止条件,算法可能永远在环上执行,无法退出。
4)、度、出边、入边、出度、入度
度表示一个顶点的所有边的数量
出边是指从当前顶点指向其他顶点的边
入边表示其他顶点指向当前顶点的边
出度是一个顶点出边的数量
入度是一个顶点入边的数量
5)、超步
图进行迭代计算时,每一轮的迭代叫做一个超步
6)、图数据库和Spark GraphX(图算法库)
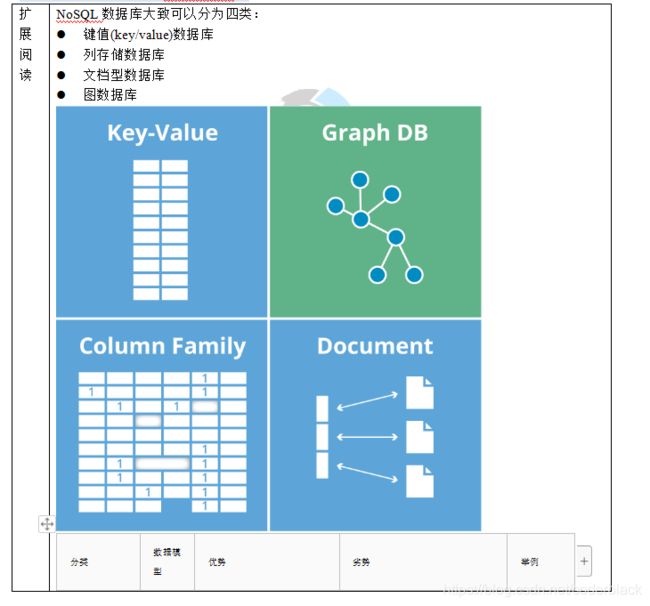
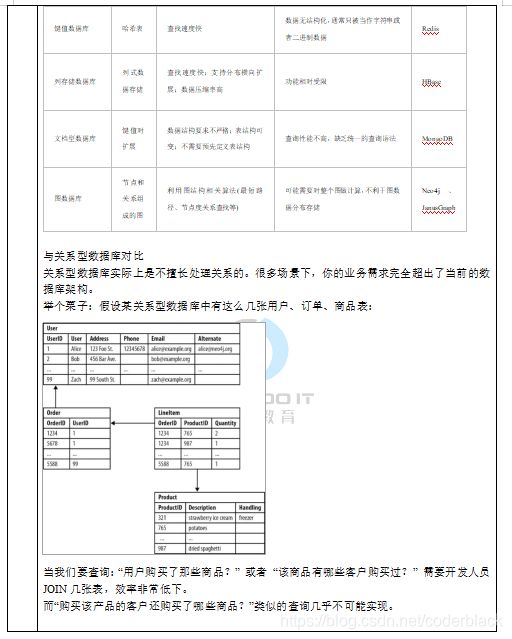
图形数据库:是NoSQL数据库的一种类型,它应用图形理论存储实体之间的关系信息,有自己的查询语言,现在有几十种图查询语言,数据库的接口比较弱,只支持简单的查询。
流行图数据库:Neo4j、JanusGraph等
Spark GraphX:是一个图计算算法库,提供了强大的计算接口,可以很方便的处理复杂的图计算业务逻辑。
流行图计算引擎:如Pregel、Graph、GraphLab等
3、Graphx核心api介绍
Spark GraphX是一个分布式的图计算框架。
spark graphx图计算算法库的使用

4、POM文件
在项目的pom文件中加上Spark GraphX的包:
    org.apache.spark
    spark-graphx_2.11
    2.2.0
5、图的构造
图是由若干顶点和边构成的;
Spark GraphX里面的图也是一样的,所以在初始图之前,先要定义若干的顶点和边:
// 顶点
val vertexArray = Array(
  (1L,("Alice", 38)),
  (2L,("Henry", 27)),
  (3L,("Charlie", 55)),
  (4L,("Peter", 32)),
  (5L,("Mike", 35)),
  (6L,("Kate", 23))
)

// 边
val edgeArray = Array(
  Edge(2L, 1L, 5),
  Edge(2L, 4L, 2),
  Edge(3L, 2L, 7),
  Edge(3L, 6L, 3),
  Edge(4L, 1L, 1),
  Edge(5L, 2L, 3),
  Edge(5L, 3L, 8),
  Edge(5L, 6L, 8)
)
然后再利用点和边生成各自的RDD:
//构造vertexRDD和edgeRDD
val vertexRDD:RDD[(Long,(String,Int))] = sc.parallelize(vertexArray)
val edgeRDD:RDD[Edge[Int]] = sc.parallelize(edgeArray)
最后利用两个RDD生成图:
// 构造图
val graph:Graph[(String,Int),Int] = Graph(vertexRDD, edgeRDD)
6、图的属性操作
Spark GraphX图的属性包括:
(1) Graph.vertices:图中的所有顶点;
(2) Graph.edges:图中所有的边;
(3) Graph.triplets:由三部分组成,源顶点,目的顶点,以及两个顶点之间的边;
(4) Graph.degrees:图中所有顶点的度;
(5) Graph.inDegrees:图中所有顶点的入度;
(6) Graph.outDegrees:图中所有顶点的出度;
对这些属性的操作,直接上代码:
 //图的属性操作
    println("*************************************************************")
    println("属性演示")
    println("*************************************************************")
    // 方法一
    println("找出图中年龄大于20的顶点方法之一:")
    graph.vertices.filter{case(id,(name,age)) => age>20}.collect.foreach {
      case(id,(name,age)) => println(s"$name is $age")
    }

    // 方法二
    println("找出图中年龄大于20的顶点方法之二:")
    graph.vertices.filter(v => v._2._2>20).collect.foreach {
      v => println(s"${v._2._1} is ${v._2._2}")
    }

    // 边的操作
    println("找出图中属性大于3的边:")
    graph.edges.filter(e => e.attr>3).collect.foreach(e => println(s"${e.srcId} to ${e.dstId} att ${e.attr}"))
    println

    // Triplet操作
    println("列出所有的Triples:")
    for(triplet <- graph.triplets.collect){
      println(s"${triplet.srcAttr._1} likes ${triplet.dstAttr._1}")
    }
    println

    println("列出边属性>3的Triples:")
    for(triplet <- graph.triplets.filter(t => t.attr > 3).collect){
      println(s"${triplet.srcAttr._1} likes ${triplet.dstAttr._1}")
    }
    println

    // Degree操作
    println("找出图中最大的出度,入度,度数:")
    def max(a:(VertexId,Int), b:(VertexId,Int)):(VertexId,Int) = {
      if (a._2>b._2) a else b
    }
    println("Max of OutDegrees:" + graph.outDegrees.reduce(max))
    println("Max of InDegrees:" + graph.inDegrees.reduce(max))
    println("Max of Degrees:" + graph.degrees.reduce(max))
    println
运行结果:
Using Spark's default log4j profile: org/apache/spark/log4j-defaults.properties
17/05/22 20:45:35 INFO Slf4jLogger: Slf4jLogger started
17/05/22 20:45:35 INFO Remoting: Starting remoting
17/05/22 20:45:35 INFO Remoting: Remoting started; listening on addresses :[akka.tcp://[email protected]:53375]
*************************************************************
属性演示
*************************************************************
找出图中年龄大于20的顶点方法之一:
Peter is 32
Alice is 38
Charlie is 55
Mike is 35
找出图中年龄大于20的顶点方法之二:
Peter is 32
Alice is 38
Charlie is 55
Mike is 35
找出图中属性大于3的边:
3 to 2 att 7
5 to 3 att 8
5 to 6 att 8

列出所有的Triples:
Henry likes Alice
Henry likes Peter
Charlie likes Henry
Charlie likes Kate
Peter likes Alice
Mike likes Henry
Mike likes Charlie
Mike likes Kate

列出边属性>3的Triples:
Charlie likes Henry
Mike likes Charlie
Mike likes Kate

找出图中最大的出度,入度,度数:
Max of OutDegrees:(5,3)
Max of InDegrees:(1,2)
Max of Degrees:(2,4)
7、图计算入门案例—求连通子图
1)、案例需求
有如下数据:
手机号,名称,微信号,消费额
13866778899,刘德华,wx_hz,2000
13877669988,华仔,wx_hz,3000
,刘德华,wx_ldh,5000
13912344321,马德华,wx_mdh,12000
13912344321,二师兄,wx_bj,3500
13912664321,猪八戒,wx_bj,5600
请找出,哪些消费记录属于同一个人,以及这个人都有哪些标识(手机号,名称,微信号)
2)、实现思路
在同一行数据中,显然,出现的所有id标识都属于同一个人,而不同行之间,可能由于某个共同id而能产生关联关系;
产生关联,如果将此种情况视为
具体步骤:
1)map每一行,将该行中所有id标识映射成graph中的“点”,得到“点集合”
2)map每一行,将该行中所有id标识映射成两两之间的graph“边”,得到“边集合”
2)用点集合和边集合构造图graph
3)利用graphx的连通子图api求大图中的各个连通子图
4)通过连通子图计算结果,即可获知哪些标识属于同一个人
3)、代码实现
/**
  * Created by hunter.coder 涛哥
  * 2019/5/23 10:42
  * 交流qq:657270652
  * Version: 1.0
  * 更多学习资料:https://blog.csdn.net/coderblack/
  * Description:  图计算demo例子
  **/
object GraphDemo {

  Logger.getLogger("org.apache.spark").setLevel(Level.WARN)

  def main(args: Array[String]): Unit = {

    /**
      * 1,13811,wx_a,刘德华
      * 2,13812,wx_a,华仔
      * 3,13812,wx_b,华华
      * 4,13821,wx_d,angelababy
      * 5,13821,wx_c,杨颖
      * 6,13823,wx_c,天宝
      */
    // 先读取原始数据
    val spark = SparkSession.builder().master("local[*]").appName("").getOrCreate()
    import spark.implicits._

    val ds: Dataset[String] = spark.read.textFile("user_profile/data/graphdemo/a.dat")


    // 将数据构造出 点集合 : 思路--》 将每行数据中的 每一个 标识  变换成一个  点(id,描述)
    val vertics: RDD[(Long, String)] = ds.flatMap(line => {

      val splits: Array[String] = line.split(",")
      splits.tail.map(id => {
        (id.hashCode.toLong, id)
      })

    }).rdd.distinct()


    println("----------点集合--------------")
    vertics.take(20).foreach(println)


    // 将数据构造出 边集合
    val edges: RDD[Edge[String]] = ds.flatMap(line => {

      val splits: Array[String] = line.split(",")
      val phone = splits(1)


      val lst = new collection.mutable.ListBuffer[Edge[String]]()

      for (i <- 2 until splits.size) {
        lst += Edge(phone.hashCode.toLong, splits(i).hashCode.toLong, "")
      }

      lst

    }).rdd.distinct()

    // 将数据构造成图模型
    val graph = Graph(vertics,edges)

    // 调用图模型上的算法api——连通子图算法
    println("----------分组结果(连通子图结果)--------------")
    val conn = graph.connectedComponents().vertices
    conn.take(20).foreach(println)


    println("----------分组结果 join  点集合 --------------")
    // 解析算法结果,成为我们所需要的形式
    val result = conn.join(vertics).map(tp=>tp._2).groupByKey().map(tp=>(tp._1,tp._2.toList))
    result.take(20).foreach(println)
    spark.close()
  }
}

