muduo框架内核剖析
muduo 网络框架分析:
首先我们要分析的肯定是能撑起muduo框架的核心骨架,moduo reactor的核心骨架是三个类,channel、Eventpool和Poller
首先看Channel,channel是用来让事件可以在reactor之中自由穿梭的,由于多线程各个线程之间都能共享内存,所以线程之间的通讯一般采用内存复制作为主要的通讯手段,muduo多线程采用的是one thread per loop,意思就是每一个线程都有一个main loop。
muduo源码简单易懂,设计小巧,先从使用来看这整个代码的运行过程,muduo代码的使用:
int main()
{
    //初始化mqtt全局容器
    ::signal(SIGPIPE, SIG_IGN);
    MQTTContainer.globalInit();
    //LOG_INFO << "pid = " << getpid() << ", tid = " << CurrentThread::tid();
    muduo::net::EventLoop loop;
    muduo::net::InetAddress listenAddr(9500);
    DeviceServer::MQTTServer server(&loop, listenAddr);
    server.start();
    loop.loop();
    return 0;
}
这里有两个很核心的类,EventLoop和 muduo::net::TcpServer ,顺着这个线索,继续看TcpServer,start做了什么?看到这里其实我会思考两个地方,TcpServer构造函数做了什么?start又做了什么?
直接上代码
TcpServer::TcpServer(EventLoop* loop,
                     const InetAddress& listenAddr,
                     const string& nameArg,
                     Option option)
  : loop_(CHECK_NOTNULL(loop)),
    ipPort_(listenAddr.toIpPort()),
    name_(nameArg),
    acceptor_(new Acceptor(loop, listenAddr, option == kReusePort)),
    threadPool_(new EventLoopThreadPool(loop, name_)),
    connectionCallback_(defaultConnectionCallback),
    messageCallback_(defaultMessageCallback),
    nextConnId_(1)
{
  acceptor_->setNewConnectionCallback(
      std::bind(&TcpServer::newConnection, this, _1, _2));
}
核心的几个步骤
初始化了Eventloop.
loop_(CHECK_NOTNULL(loop))
初始化了线程池
threadPool_(new EventLoopThreadPool(loop, name_))
初始化了Tcp接收器
acceptor_(new Acceptor(loop, listenAddr, option == kReusePort))
好我们继续看下一步start做了什么
void TcpServer::start()
{
  if (started_.getAndSet(1) == 0)
  {
    threadPool_->start(threadInitCallback_);

    assert(!acceptor_->listenning());
    loop_->runInLoop(
        std::bind(&Acceptor::listen, get_pointer(acceptor_)));
  }
}
start之后做了一件重要的事情,就是启动了线程池,我们继续顺着思路思考?线程池构造器做了什么?线程池start做了什么?
首先看线程池构造器
EventLoopThreadPool::EventLoopThreadPool(EventLoop* baseLoop, const string& nameArg)
  : baseLoop_(baseLoop),
    name_(nameArg),
    started_(false),
    numThreads_(0),
    next_(0)
{
}
核心的功能是初始化了baseLoop ,另外一个重要的属性是numThreads线程数目
好继续看start
void EventLoopThreadPool::start(const ThreadInitCallback& cb)
{
  assert(!started_);
  baseLoop_->assertInLoopThread();

  started_ = true;

  for (int i = 0; i < numThreads_; ++i)
  {
    char buf[name_.size() + 32];
    snprintf(buf, sizeof buf, "%s%d", name_.c_str(), i);
    EventLoopThread* t = new EventLoopThread(cb, buf);
    threads_.push_back(std::unique_ptr(t));
    loops_.push_back(t->startLoop());
  }
  if (numThreads_ == 0 && cb)
  {
    cb(baseLoop_);
  }
}
看到了这段代码很容易理解,muduo启动了numThreads个线程,对象保存在了线程池threads中
注意看一下cb 是什么,cb
const ThreadInitCallback& cb
是线程初始化函数,也就是muduo中的setThreadInitCallback的回调地址
EventLoopThreadPool->start中还有一个非常核心的操作就是EventLoopThread,我们依然需要关注他初始化了什么,以及startLoop做了什么,我们可以看出如果线程数目是0,在
  if (numThreads_ == 0 && cb)
  {
    cb(baseLoop_);
  }
会直接运行线程初始化函数,如果不是则会初始化的时候进入EventLoopThread中,我们看一下EventLoopThread这个函数的构造器代码
EventLoopThread::EventLoopThread(const ThreadInitCallback& cb,
                                 const string& name)
  : loop_(NULL),
    exiting_(false),
    thread_(std::bind(&EventLoopThread::threadFunc, this), name),
    mutex_(),
    cond_(mutex_),
    callback_(cb)
{
}
初始化了 thread_ mutex_ cond_ callback_(线程初始化回调),初始化了一些线程的重要组件和线程实例,然后我们直接看startLoop
EventLoop* EventLoopThread::startLoop()
{
  assert(!thread_.started());
  thread_.start();

  EventLoop* loop = NULL;
  {
    MutexLockGuard lock(mutex_);
    while (loop_ == NULL)
    {
      cond_.wait();
    }
    loop = loop_;
  }

  return loop;
}
这里真的是一段十分有趣的代码了在start里启动了线程,然后使用条件变量在外面等候一直到线程里初始化完成EventLoop后再赋值给loop,这段代码十分巧妙运用了glibc的条件变量,再次说明了条件变量是多线程编程中的利器,start里调用了pthread_create,不信?继续看Thread->start里的代码!
void Thread::start()
{
  assert(!started_);
  started_ = true;
  // FIXME: move(func_)
  detail::ThreadData* data = new detail::ThreadData(func_, name_, &tid_, &latch_);
  if (pthread_create(&pthreadId_, NULL, &detail::startThread, data))
  {
    started_ = false;
    delete data; // or no delete?
    LOG_SYSFATAL << "Failed in pthread_create";
  }
  else
  {
    latch_.wait();
    assert(tid_ > 0);
  }
}
创建线程后,线程的启动代码再startThread里,我们继续去思考startThread里做了什么?,在这里不得不说muduo,Thread类设计的有他的精巧的地方
int Thread::join()
{
  assert(started_);
  assert(!joined_);
  joined_ = true;
  return pthread_join(pthreadId_, NULL);
}

Thread::~Thread()
{
  if (started_ && !joined_)
  {
    pthread_detach(pthreadId_);
  }
}
可以用join做同步监控,当然你不这么做也没有问题,如果Thread析构函数发现你再销毁Thread的时候线程并没有关闭,会调用pthread_detach防止你的线程泄漏,设计的是不是很巧妙啊!
好了我们再来思考startThread里做了什么!
void* startThread(void* obj)
{
  ThreadData* data = static_cast(obj);
  data->runInThread();
  delete data;
  return NULL;
}
线程里其实调用了
thread_(std::bind(&EventLoopThread::threadFunc, this), name),
threadFunc
void EventLoopThread::threadFunc()
{
  EventLoop loop;

  if (callback_)
  {
    callback_(&loop);
  }

  {
    MutexLockGuard lock(mutex_);
    loop_ = &loop;
    cond_.notify();
  }

  loop.loop();
  //assert(exiting_);
  MutexLockGuard lock(mutex_);
  loop_ = NULL;
}
触发线程初始化函数,初始化loop,通知主线程初始化完了cond.notify();
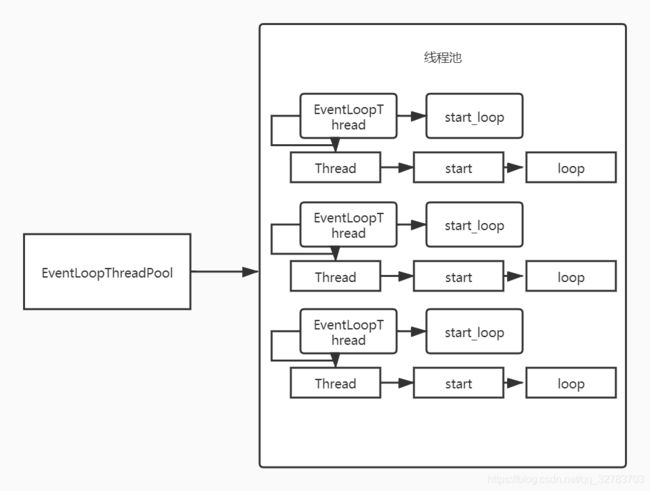
一个很巧妙的作用域缩小了锁的范围,然后开始了事件循环,好了我们用一张图分析这整个流程,注意重点在各个线程初始化完成后会把每个线程中的EventLoop统一存放到线程池的std::vector _loops里,好暴漏给TcpServer,方便TcpServer和线程池多线程间的通信
线程池池里每一个线程里做了什么,Tcpserver里做了什么?线程之间如何进行事件通讯的才是应该思考的问题!
Acceptor具有Channel和sockfd两个重要属性,在Acceptor初始化的时候把sockfd给了acceptChannel_
Acceptor::Acceptor(EventLoop* loop, const InetAddress& listenAddr, bool reuseport)
  : loop_(loop),
    acceptSocket_(sockets::createNonblockingOrDie(listenAddr.family())),
    acceptChannel_(loop, acceptSocket_.fd()),
    listenning_(false),
    idleFd_(::open("/dev/null", O_RDONLY | O_CLOEXEC))
{
  assert(idleFd_ >= 0);
  acceptSocket_.setReuseAddr(true);
  acceptSocket_.setReusePort(reuseport);
  acceptSocket_.bindAddress(listenAddr);
  acceptChannel_.setReadCallback(
      std::bind(&Acceptor::handleRead, this));
}
我们看到当管道接受到可读事件的时候调用handleRead,我们再看一下handleRead
void Acceptor::handleRead()
{
  loop_->assertInLoopThread();
  InetAddress peerAddr;
  //FIXME loop until no more
  int connfd = acceptSocket_.accept(&peerAddr);
  if (connfd >= 0)
  {
    // string hostport = peerAddr.toIpPort();
    // LOG_TRACE << "Accepts of " << hostport;
    if (newConnectionCallback_)
    {
      newConnectionCallback_(connfd, peerAddr);
    }
    else
    {
      sockets::close(connfd);
    }
  }
  else
  {
    LOG_SYSERR << "in Acceptor::handleRead";
    // Read the section named "The special problem of
    // accept()ing when you can't" in libev's doc.
    // By Marc Lehmann, author of libev.
    if (errno == EMFILE)
    {
      ::close(idleFd_);
      idleFd_ = ::accept(acceptSocket_.fd(), NULL, NULL);
      ::close(idleFd_);
      idleFd_ = ::open("/dev/null", O_RDONLY | O_CLOEXEC);
    }
  }
}
如果说有新连接进来则调用 newConnectionCallback,那newConnectionCallback是什么呢?原来是在TcpServer里绑定的回调
acceptor_->setNewConnectionCallback(
      std::bind(&TcpServer::newConnection, this, _1, _2));
进一步查看newConnection做了什么
void TcpServer::newConnection(int sockfd, const InetAddress& peerAddr)
{
  loop_->assertInLoopThread();
  EventLoop* ioLoop = threadPool_->getNextLoop();
  char buf[64];
  snprintf(buf, sizeof buf, "-%s#%d", ipPort_.c_str(), nextConnId_);
  ++nextConnId_;
  string connName = name_ + buf;

  LOG_INFO << "TcpServer::newConnection [" << name_
           << "] - new connection [" << connName
           << "] from " << peerAddr.toIpPort();
  InetAddress localAddr(sockets::getLocalAddr(sockfd));
  // FIXME poll with zero timeout to double confirm the new connection
  // FIXME use make_shared if necessary
  TcpConnectionPtr conn(new TcpConnection(ioLoop,
                                          connName,
                                          sockfd,
                                          localAddr,
                                          peerAddr));
  connections_[connName] = conn;
  conn->setConnectionCallback(connectionCallback_);
  conn->setMessageCallback(messageCallback_);
  conn->setWriteCompleteCallback(writeCompleteCallback_);
  conn-setCloseCallback(
      std::bind(&TcpServer::removeConnection, this, _1)); // FIXME: unsafe
  ioLoop->runInLoop(std::bind(&TcpConnection::connectEstablished, conn));
}
抽象产生一个TcpConnectionPtr,然后调用runInLoop,继续观察代码runInLoop
void EventLoop::runInLoop(Functor cb)
{
  if (isInLoopThread())
  {
    cb();
  }
  else
  {
    queueInLoop(std::move(cb));
  }
}
继续查看queueInLoop
void EventLoop::queueInLoop(Functor cb)
{
  {
  MutexLockGuard lock(mutex_);
  pendingFunctors_.push_back(std::move(cb));
  }

  if (!isInLoopThread() || callingPendingFunctors_)
  {
    wakeup();
  }
}
将要出发的函数挂起到pendingFunctors_,然后调用wakeup唤醒对应的线程
void EventLoop::wakeup()
{
  uint64_t one = 1;
  ssize_t n = sockets::write(wakeupFd_, &one, sizeof one);
  if (n != sizeof one)
  {
    LOG_ERROR << "EventLoop::wakeup() writes " << n << " bytes instead of 8";
  }
}
思考一些问题点 连接发生的时候怎么找的到对应的线程,看这里
EventLoop* ioLoop = threadPool_->getNextLoop();
结合看EventPool的初始化
EventLoop::EventLoop()
  : looping_(false),
    quit_(false),
    eventHandling_(false),
    callingPendingFunctors_(false),
    iteration_(0),
    threadId_(CurrentThread::tid()),
    poller_(Poller::newDefaultPoller(this)),
    timerQueue_(new TimerQueue(this)),
    wakeupFd_(createEventfd()),
    wakeupChannel_(new Channel(this, wakeupFd_)),
    currentActiveChannel_(NULL)
{
  LOG_DEBUG << "EventLoop created " << this << " in thread " << threadId_;
  if (t_loopInThisThread)
  {
    LOG_FATAL << "Another EventLoop " << t_loopInThisThread
              << " exists in this thread " << threadId_;
  }
  else
  {
    t_loopInThisThread = this;
  }
  wakeupChannel_->setReadCallback(
      std::bind(&EventLoop::handleRead, this));
  // we are always reading the wakeupfd
  wakeupChannel_->enableReading();
}
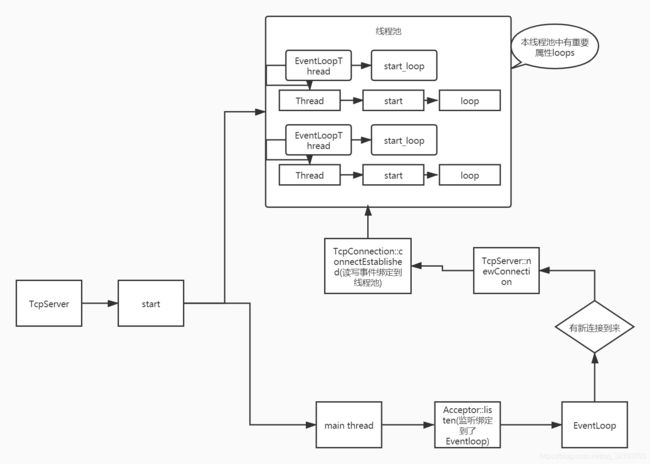
好了这样基本就已经都清楚了,最后用一张总结性的流程图
最后说一点管道之间的相互唤醒是通过eventfd,每个管道都是用Eventloop中的wakefd 就是 eventfd来相互唤醒

