由于最近公司用到了ecos操作系统,所以简单的了解了一下这个RTOS,其相关的社区资源较少,国内基本不用,这里结合手册整理了一部分的内容。本文章主要两部分,一是建立基本的测试进程,而是枚举所有进程并查看相关信息。
如下代码是在原来的基础上增加的进程信息获取,其中堆栈使用的查看需要在ecos系统配置时启用测量堆栈使用,实际上就是启用一个宏定义。图形化配置如下,也可以直接配置宏(不推荐)。
启用堆栈测量2:
#ifdef CYGFUN_KERNEL_THREADS_STACK_MEASUREMENT
info->stack_used = thread->measure_stack_usage();
#else
#include
#include
#include
#include
#include
/* now declare (and allocate space for) some kernel objects,
like the two threads we will use */
cyg_thread thread_s[3]; /* space for two thread objects */
char stack[3][4096]; /* space for two 4K stacks */
/* now the handles for the threads */
cyg_handle_t simple_threadA, simple_threadB, calcpuHandle, cpuloadHandle,
thread_handle;
/* and now variables for the procedure which is the thread */
cyg_thread_entry_t simple_program, calcpu, getTaskInfo;
/* and now a mutex to protect calls to the C library */
cyg_mutex_t cliblock;
cyg_uint32 calibrate;
cyg_cpuload_t cpuload;
cyg_uint32 time_100,time_1000, time_10000;
/* we install our own startup routine which sets up threads */
void cyg_user_start(void)
{
printf("Entering twothreads' cyg_user_start() function,version is 0x01\n");
cyg_mutex_init(&cliblock);
//cyg_thread_create(1,calcpu, 0,"Thread1",stack[2],4096,&calcpuHandle,&thread_s[2]);
cyg_thread_create(4, simple_program, (cyg_addrword_t) 0,
"Thread A", (void *) stack[0], 4096,
&simple_threadA, &thread_s[0]);
cyg_thread_create(4, simple_program, (cyg_addrword_t) 1,
"Thread B", (void *) stack[1], 4096,
&simple_threadB, &thread_s[1]);
cyg_thread_create(3, getTaskInfo, 0,"getTaskInfo", stack[2], 4096,
&thread_handle, &thread_s[2]);
cyg_thread_resume(simple_threadA);
cyg_thread_resume(simple_threadB);
cyg_thread_resume(thread_handle);
cyg_thread_delay(10);
cyg_scheduler_start();
}
void getTaskInfo(cyg_addrword_t data)
{
cyg_thread_info info;
cyg_handle_t info_handler;
cyg_uint16 id = 0;
while(1)
{
while(cyg_thread_get_next(&info_handler, &id))
{
cyg_thread_get_info(info_handler,id,&info);
printf("id:%d\n name:%s\n state:%d\n set_pri:%d\n cur_pri:%d\n stack_used:%d\n",info.id,info.name,info.state,info.set_pri, info.cur_pri,info.stack_used);
}
cyg_thread_delay(2000);
}
}
/* this is a simple program which runs in a thread */
void simple_program(cyg_addrword_t data)
{
int message = (int) data;
int delay;
printf("Beginning execution; thread data is %d\n", message);
cyg_thread_delay(200);
for (;;) {
delay = 200 + (rand() % 50);
/* note: printf() must be protected by a
call to cyg_mutex_lock() */
cyg_mutex_lock(&cliblock);
printf("Thread %d: and now a delay of %d clock ticks\n",
message, delay);
cyg_mutex_unlock(&cliblock);
cyg_thread_delay(delay);
}
}
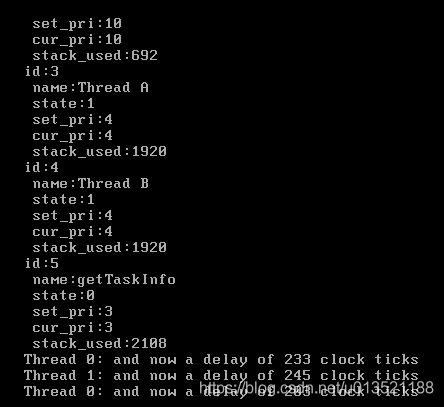
使用如上的工程,重新编译后,将生成的文件扔给redboot加载即可。本人暂时没有arm芯片,使用vmware虚拟机运行ecos,可以看到打印的线程名称,当前状态,设定的优先级和线程当前的优先级以及堆栈的使用情况,当然我这里没有全部显示,所有的线程信息都在cyg_thread_info结构体中,代码和运行结果如图所示:
typedef struct
{
cyg_handle_t handle;
cyg_uint16 id;
cyg_uint32 state;
char *name;
cyg_priority_t set_pri;
cyg_priority_t cur_pri;
cyg_addrword_t stack_base;
cyg_uint32 stack_size;
cyg_uint32 stack_used;
} cyg_thread_info;
另外我会写两篇文章介绍Ecos系统的结构,主要和freertos很不相同,以及在Vmware中运行ecos操作系统,权当普及一下。