认证授权-Spring-Cloud Security
1. 基础概念
1.1 用户认证与授权
什么是用户身份认证?
用户身份认证即用户去访问系统资源时系统要求验证用户的身份信息,身份合法方可继续访问。常见的用户身份认证表现形式有:用户名密码登录,指纹打卡等方式。
什么是用户授权?
用户认证通过后去访问系统的资源,系统会判断用户是否拥有访问资源的权限,只允许访问有权限的系统资源,没有权限的资源将无法访问,这个过程叫用户授权。
1.2 单点登录
单点登录(Single Sign On),简称为 SSO,含义是在多个应用系统中,用户只需要登录一次就可以访问所有相互信任的应用系统。单点登录的特点是:认证系统为独立的系统;各子系统通过Http或其它协议与认证系统通信,完成用户认证;用户身份信息存储在Redis集群。Java中有很多用户认证的框架都可以实现单点登录:Apache Shiro;CAS;Spring security CAS。
1.3 第三方认证
当需要访问第三方系统的资源时需要首先通过第三方系统的认证(例如:微信认证),由第三方系统对用户认证通过,并授权资源的访问权限。这样用户可以不直接注册我们的业务系统,直接通过第三方账号登录,完成授权访问我们的业务系统。
1.4 Oauth2
OAuth(开放授权)是一个关于授权的开放标准,允许用户让第三方应用访问该用户在某一网站上存储的私密的资源(如照片,视频,联系人列表),而无需将用户名和密码提供给第三方应用。
OAuth2分为四个角色:
- Client:客户端(第三方应用);
- Resource Owner:资源所有者即用户;
- Authorization server:授权(认证)服务器;
Resource server:资源服务器,即服务提供商存放用户生成的资源的服务器。它与认证服务器,可以是同一台服务器,也可以是不同的服务器。
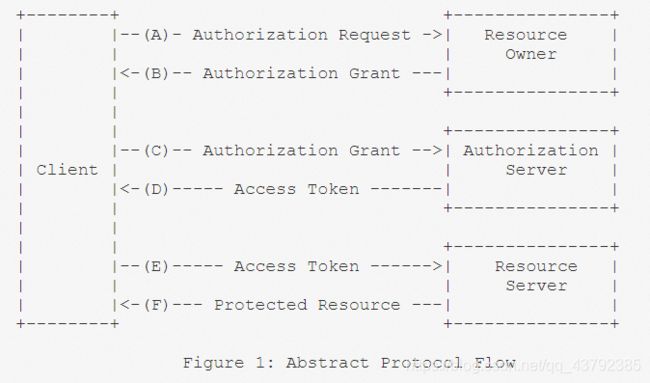
2. Spring Security Oauth2
Spring security 是一个强大的和高度可定制的身份验证和访问控制框架,Spring security 框架集成了Oauth2协议。本次任务是基于Spring Security Oauth2作了一些扩展,采用JWT令牌机制,并自定义了用户身份信息的内容。
2.1创建工程
2.1.1 引入关键依赖
			org.springframework.cloud
			spring-cloud-starter-security
2.1.2 创建授权所需的表
/*主要使用到这张表 */
CREATE TABLE `oauth_client_details` (
  `client_id` varchar(48) NOT NULL COMMENT '客户端id',
  `resource_ids` varchar(256) DEFAULT NULL COMMENT '资源id',
  `client_secret` varchar(256) DEFAULT NULL COMMENT '客户端密码',
  `scope` varchar(256) DEFAULT NULL COMMENT '范围',
  `authorized_grant_types` varchar(256) DEFAULT NULL COMMENT '授权类型,authorization_code,password,refresh_token,client_credentials',
  `web_server_redirect_uri` varchar(256) DEFAULT NULL COMMENT 'Web服务器重定向URI',
  `authorities` varchar(256) DEFAULT NULL,
  `access_token_validity` int(11) DEFAULT NULL COMMENT '访问token的有效期(秒)',
  `refresh_token_validity` int(11) DEFAULT NULL COMMENT '刷新token的有效期(秒)',
  `additional_information` varchar(4096) DEFAULT NULL,
  `autoapprove` varchar(256) DEFAULT NULL,
  PRIMARY KEY (`client_id`)
) ENGINE=InnoDB DEFAULT CHARSET=utf8;
insert  into `oauth_client_details`(`client_id`,`resource_ids`,`client_secret`,`scope`,`authorized_grant_types`,`web_server_redirect_uri`,`authorities`,`access_token_validity`,`refresh_token_validity`,`additional_information`,`autoapprove`) values ('WebApp',NULL,'$2a$10$/Ioy0GnUIiU5wFSG0OES8uVJfk0sIyQ6rp9eHf0NcWkaZPlPhiCWq','app','authorization_code,password,refresh_token,client_credentials','http://localhost',NULL,43200,43200,NULL,NULL);

DROP TABLE IF EXISTS `oauth_access_token`;
CREATE TABLE `oauth_access_token` (
  `token_id` varchar(256) DEFAULT NULL,
  `token` blob,
  `authentication_id` varchar(48) NOT NULL,
  `user_name` varchar(256) DEFAULT NULL,
  `client_id` varchar(256) DEFAULT NULL,
  `authentication` blob,
  `refresh_token` varchar(256) DEFAULT NULL,
  PRIMARY KEY (`authentication_id`)
) ENGINE=InnoDB DEFAULT CHARSET=utf8;

DROP TABLE IF EXISTS `oauth_approvals`;
CREATE TABLE `oauth_approvals` (
  `userId` varchar(256) DEFAULT NULL,
  `clientId` varchar(256) DEFAULT NULL,
  `scope` varchar(256) DEFAULT NULL,
  `status` varchar(10) DEFAULT NULL,
  `expiresAt` timestamp NOT NULL DEFAULT CURRENT_TIMESTAMP ON UPDATE CURRENT_TIMESTAMP,
  `lastModifiedAt` timestamp NOT NULL DEFAULT '0000-00-00 00:00:00'
) ENGINE=InnoDB DEFAULT CHARSET=utf8;

DROP TABLE IF EXISTS `oauth_client_token`;
CREATE TABLE `oauth_client_token` (
  `token_id` varchar(256) DEFAULT NULL,
  `token` blob,
  `authentication_id` varchar(48) NOT NULL,
  `user_name` varchar(256) DEFAULT NULL,
  `client_id` varchar(256) DEFAULT NULL,
  PRIMARY KEY (`authentication_id`)
) ENGINE=InnoDB DEFAULT CHARSET=utf8;

DROP TABLE IF EXISTS `oauth_code`;
CREATE TABLE `oauth_code` (
  `code` varchar(256) DEFAULT NULL,
  `authentication` blob
) ENGINE=InnoDB DEFAULT CHARSET=utf8;

DROP TABLE IF EXISTS `oauth_refresh_token`;
CREATE TABLE `oauth_refresh_token` (
  `token_id` varchar(256) DEFAULT NULL,
  `token` blob,
  `authentication` blob
) ENGINE=InnoDB DEFAULT CHARSET=utf8;
2.2 Oauth2 授权码模式
2.2.1 Oauth2授权模式
Oauth2有以下授权模式:
授权码模式(Authorization Code) 隐式授权模式(Implicit) 密码模式(Resource Owner Password Credentials) 客户端模式(Client Credentials)
其中授权码模式和密码模式应用较多,本小节介绍授权码模式。
2.2.2 授权码授权流程
授权码模式,流程如下:
1、客户端请求第三方授权
2、用户(资源拥有者)同意给客户端授权
3、客户端获取到授权码,请求认证服务器申请令牌
4、认证服务器向客户端响应令牌
5、客户端请求资源服务器的资源,资源服务校验令牌合法性,完成授权
6、资源服务器返回受保护资源
2.2.3 申请授权码
请求认证服务获取授权码:client_id和redirect_uri要与数据库中的记录一致
http://localhost:8084/oauth/authorize?client_id=WebApp&response_type=code&scop=app&redirect_uri=http://localhsot

输入上面第一张表中添加的记录用户名是client_id,密码是client_secret。上面给出的用户名密码都是WebApp,密码生成方式如下:
String password = "WebApp";
password = new BCryptPasswordEncoder().encode(password);
询问是否授权这个应用

点击授权,将会跳转到redirect_uri并携带code
![]()
2.2.4 申请令牌
拿到授权码后,申请令牌。
Post请求:http://localhost:8084/oauth/token
参数如下:
grant_type:授权类型,填写authorization_code,表示授权码模式
code:授权码,就是刚刚获取的授权码,注意:授权码只使用一次就无效了,需要重新申请。
redirect_uri:申请授权码时的跳转url,一定和申请授权码时用的redirect_uri一致。
此链接需要使用 http Basic认证。
什么是http Basic认证?
http协议定义的一种认证方式,将客户端id和客户端密码按照“客户端ID:客户端密码”的格式拼接,并用base64编码,放在header中请求服务端,一个例子:
Authorization:Basic WGNXZWJBcHAlM0ElMjQyYSUyNDEwJTI0OWJFcFovaFdSUXh5cjVobjV3SFVqLmp4RnBJcm5PbUJjV2xFL2cvMFpwM3VOeHQ5UVRoL1M=
Basic 后面是 是client_id:client_secret的base64编码。


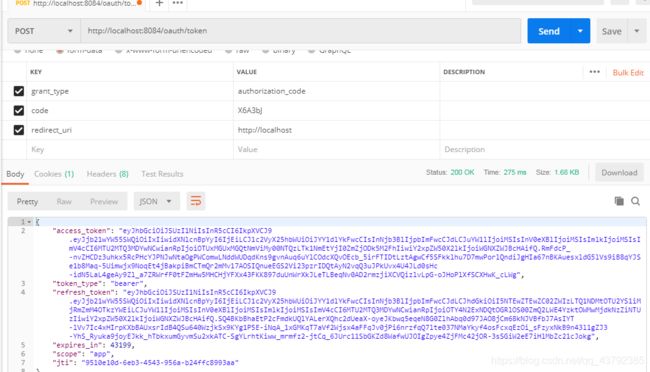
access_token:访问令牌,携带此令牌访问资源
token_type:有MAC Token与Bearer Token两种类型,两种的校验算法不同,RFC 6750建议Oauth2采用 Bearer Token(http://www.rfcreader.com/#rfc6750)。
refresh_token:刷新令牌,使用此令牌可以延长访问令牌的过期时间。
expires_in:过期时间,单位为秒。
scope:范围,与定义的客户端范围一致。
2.2.5 资源服务授权
2.2.5.1 资源服务授权流程
资源服务拥有要访问的受保护资源,客户端携带令牌访问资源服务,如果令牌合法则可成功访问资源服务中的资源,如下图:
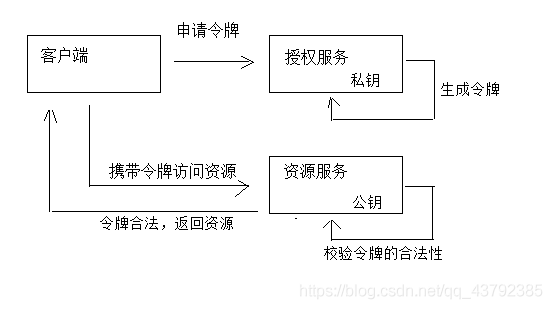
1 、客户端请求认证服务申请令牌
2、认证服务生成令牌
认证服务采用非对称加密算法,使用私钥生成令牌。
3、客户端携带令牌访问资源服务
客户端在Http header 中添加: Authorization:Bearer 令牌。
4、资源服务请求认证服务校验令牌的有效性
资源服务接收到令牌,使用公钥校验令牌的合法性。
5、令牌有效,资源服务向客户端响应资源信息
2.2.5.2 资源服务授权配置
基本上所有微服务都是资源服务,当配置了授权控制后如要访问微服务接口则必须提供令牌。
1、配置公钥
认证服务生成令牌采用非对称加密算法,认证服务采用私钥加密生成令牌,对外向资源服务提供公钥,资源服务使用公钥 来校验令牌的合法性。
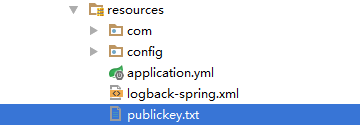
将公钥拷贝到 publickey.txt文件中,将此文件拷贝到资源服务工程的classpath下
2、添加依赖
org.springframework.cloud
spring‐cloud‐starter‐oauth2
3、在config包下创建ResourceServerConfig类
@Configuration
@EnableResourceServer
@EnableGlobalMethodSecurity(prePostEnabled = true, securedEnabled = true)//激活方法上的
PreAuthorize注解
public class ResourceServerConfig extends ResourceServerConfigurerAdapter {
    //公钥
    private static final String PUBLIC_KEY = "publickey.txt";
    //定义JwtTokenStore,使用jwt令牌
    @Bean
    public TokenStore tokenStore(JwtAccessTokenConverter jwtAccessTokenConverter) {
        return new JwtTokenStore(jwtAccessTokenConverter);
    }
    //定义JJwtAccessTokenConverter,使用jwt令牌
    @Bean
    public JwtAccessTokenConverter jwtAccessTokenConverter() {
        JwtAccessTokenConverter converter = new JwtAccessTokenConverter();
        converter.setVerifierKey(getPubKey());
        return converter;
    }
    /**
     * 获取非对称加密公钥 Key
     * @return 公钥 Key
     */
    private String getPubKey() {
        Resource resource = new ClassPathResource(PUBLIC_KEY);
        try {
            InputStreamReader inputStreamReader = new
InputStreamReader(resource.getInputStream());
            BufferedReader br = new BufferedReader(inputStreamReader);
            return br.lines().collect(Collectors.joining("\n"));
        } catch (IOException ioe) {
            return null;
        }
    }
    //Http安全配置,对每个到达系统的http请求链接进行校验
    @Override
    public void configure(HttpSecurity http) throws Exception {
                //所有请求必须认证通过
                http.authorizeRequests().anyRequest().authenticated();
    }
}
此时不携带或者携带错误的令牌访问微服务资源将会返回如下信息
{
    "error": "unauthorized",
    "error_description": "Full authentication is required to access this resource"
}
当你需要对某些请求放行的时候,可以修改配置如下:放行swagger-ui
//Http安全配置,对每个到达系统的http请求链接进行校验
@Override
public void configure(HttpSecurity http) throws Exception {
    //所有请求必须认证通过
    http.authorizeRequests()
            //下边的路径放行
    .antMatchers("/v2/api‐docs", "/swagger‐resources/configuration/ui",
            "/swagger‐resources","/swagger‐resources/configuration/security",
            "/swagger‐ui.html","/webjars/**").permitAll()
    .anyRequest().authenticated();
}
2.3 Oauth2 密码模式授权
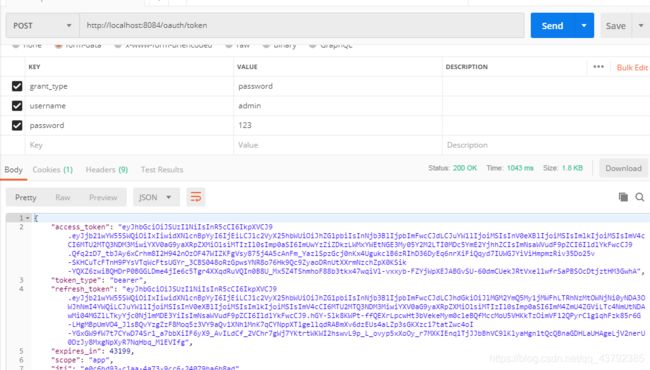
密码模式(Resource Owner Password Credentials)与授权码模式的区别是申请令牌不再使用授权码,而是直接通过用户名和密码即可申请令牌。
测试如下:
Post请求:http://localhost:8084/oauth/token
参数:
grant_type:密码模式授权填写password
username:账号
password:密码
并且此链接需要使用 http Basic认证。

2.4 校验令牌
Spring Security Oauth2提供校验令牌的端点,如下:
Get: http://localhost:8084/oauth/check_token
参数:
token:令牌
使用postman测试如下:
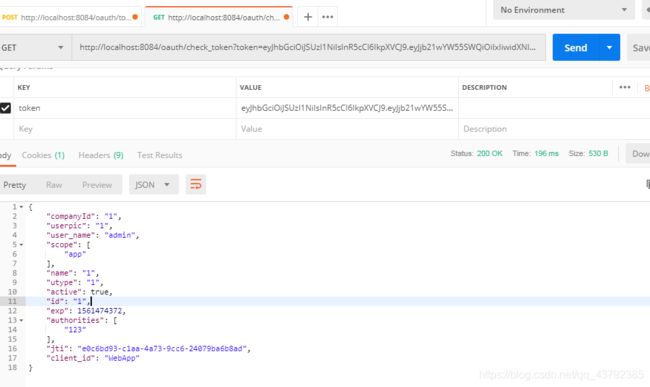
exp:过期时间,long类型,距离1970年的秒数(new Date().getTime()可得到当前时间距离1970年的毫秒数)
user_name: 用户名
client_id:客户端Id,在oauth_client_details中配置
scope:客户端范围,在oauth_client_details表中配置
jti:与令牌对应的唯一标识
companyId、userpic、name、utype、id:这些字段是本认证服务在Spring Security基础上扩展的用户身份信息
2.5 刷新令牌
刷新令牌是当令牌快过期时重新生成一个令牌,它于授权码授权和密码授权生成令牌不同,刷新令牌不需要授权码也不需要账号和密码,只需要一个刷新令牌、客户端id和客户端密码。
测试如下:
Post:http://localhost:8084/oauth/token
参数:
grant_type : 固定为 refresh_token
refresh_token:刷新令牌(注意不是access_token,而是refresh_token)

2.6 JWT 令牌
3.6.1 JWT介绍
在介绍JWT之前先看一下传统校验令牌的方法,如下图:
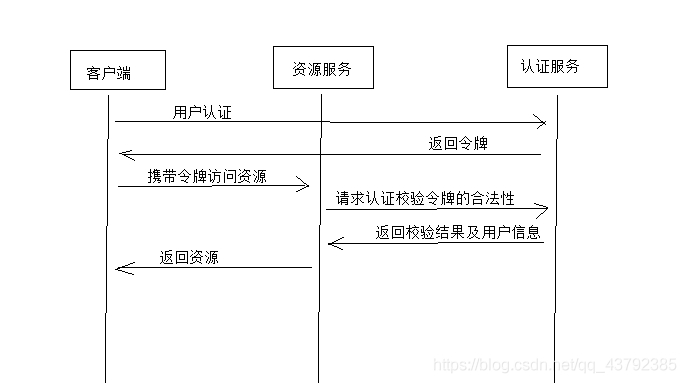
传统授权方法的问题是用户每次请求资源服务,资源服务都需要携带令牌访问认证服务去校验令牌的合法性,并根据令牌获取用户的相关信息,性能低下。
解决:
使用JWT的思路是,用户认证通过会得到一个JWT令牌,JWT令牌中已经包括了用户相关的信息,客户端只需要携带JWT访问资源服务,资源服务根据事先约定的算法自行完成令牌校验,无需每次都请求认证服务完成授权。JWT令牌授权过程如下图:

什么是JWT?
JSON Web Token(JWT)是一个开放的行业标准(RFC 7519),它定义了一种简介的、自包含的协议格式,用于
在通信双方传递json对象,传递的信息经过数字签名可以被验证和信任。JWT可以使用HMAC算法或使用RSA的公
钥/私钥对来签名,防止被篡改。
官网:https://jwt.io/
标准: https://tools.ietf.org/html/rfc7519
JWT令牌的优点:
1、jwt基于json,非常方便解析。
2、可以在令牌中自定义丰富的内容,易扩展。
3、通过非对称加密算法及数字签名技术,JWT防止篡改,安全性高。
4、资源服务使用JWT可不依赖认证服务即可完成授权。
缺点:
1、JWT令牌较长,占存储空间比较大。
2.6.1.1 令牌结构
通过学习JWT令牌结构为自定义jwt令牌打好基础。
JWT令牌由三部分组成,每部分中间使用点(.)分隔,比如:aa.bb.cc
- Header
头部包括令牌的类型(即JWT)及使用的哈希算法(如HMAC SHA256或RSA)
{
  "alg": "HS256",
  "typ": "JWT"
}
将上边的内容使用Base64Url编码,得到一个字符串就是JWT令牌的第一部分(aa)。
- Payload
第二部分是负载,内容也是一个json对象,它是存放有效信息的地方,它可以存放jwt提供的现成字段,比如:iss(签发者),exp(过期时间戳), sub(面向的用户)等,也可自定义字段。此部分不建议存放敏感信息,因为此部分可以解码还原原始内容。
最后将第二部分负载使用Base64Url编码,得到一个字符串就是JWT令牌的第二部分(bb)。
{
  "sub": "1234567890",
  "name": "456",
  "admin": true
}
- Signature
第三部分是签名,此部分用于防止jwt内容被篡改。
这个部分使用base64url将前两部分进行编码,编码后使用点(.)连接组成字符串,最后使用header中声明签名算法进行签名。
HMACSHA256(aa+ “.” +bb, secret)其中secret签名所使用的密钥或者说盐。
2.6.2 JWT入门
Spring Security 提供对JWT的支持,本节我们使用Spring Security 提供的JwtHelper来创建JWT令牌,校验JWT令牌等操作。
2.6.2.1 生成私钥和公钥
JWT令牌生成采用非对称加密算法
1、生成密钥证书
下边命令生成密钥证书,采用RSA 算法每个证书包含公钥和私钥
keytool -genkeypair -alias jwt -keyalg RSA -keypass jwtpwd -keystore jwt.keystore -storepass jwtkeystore
Keytool 是一个java提供的证书管理工具
-alias:密钥的别名
-keyalg:使用的hash算法
-keypass:密钥的访问密码
-keystore:密钥库文件名,jwt.keystore保存了生成的证书
-storepass:密钥库的访问密码
查询证书信息:
keytool -list -keystore jwt.keystore
删除别名
keytool -delete -alias jwt -keystore jwt.keystore
2、导出公钥
openssl是一个加解密工具包,这里使用openssl来导出公钥信息。
安装 openssl:http://slproweb.com/products/Win32OpenSSL.html
配置openssl的path环境变量bin目录下,cmd进入jwt.keystore文件所在目录执行如下命令:
keytool -list -rfc --keystore jwt.keystore | openssl x509 -inform pem -pubkey
2.6.2.2 生成JWT
public void testCreateJwt(){
    //证书文件
    String key_location = "jwt.keystore";
    //密钥库密码
    String keystore_password = "jwtkeystore";
    //访问证书路径
    ClassPathResource resource = new ClassPathResource(key_location);
    //密钥工厂
    KeyStoreKeyFactory keyStoreKeyFactory = new KeyStoreKeyFactory(resource,
keystore_password.toCharArray());
    //密钥的密码,此密码和别名要匹配
    String keypassword = " jwtpwd";
    //密钥别名
    String alias = "jwt";
    //密钥对(密钥和公钥)
    KeyPair keyPair = keyStoreKeyFactory.getKeyPair(alias,keypassword.toCharArray());
    //私钥
    RSAPrivateKey aPrivate = (RSAPrivateKey) keyPair.getPrivate();
    //定义payload信息
    Map<String, Object> tokenMap = new HashMap<>();
    tokenMap.put("id", "123");
    tokenMap.put("name", "admin");
    tokenMap.put("roles", "admin,editor");
    tokenMap.put("ext", "1");
    //生成jwt令牌
    Jwt jwt = JwtHelper.encode(JSON.toJSONString(tokenMap), new RsaSigner(aPrivate));
    //取出jwt令牌
    String token = jwt.getEncoded();
    System.out.println("token="+token);
}
2.6.2.3 校验JWT
//资源服务使用公钥验证jwt的合法性,并对jwt解码
    @Test
    public void testVerify(){
        String token = "jwt令牌 ";
        String publickey = "公钥";
        //校验jwt
        Jwt jwt = JwtHelper.decodeAndVerify(token, new RsaVerifier(publickey));
        //获取jwt原始内容
        String claims = jwt.getClaims();
        //jwt令牌
        String encoded = jwt.getEncoded();
        System.out.println(encoded);
    }
3. 实现登录退出
3.1 登录退出流程
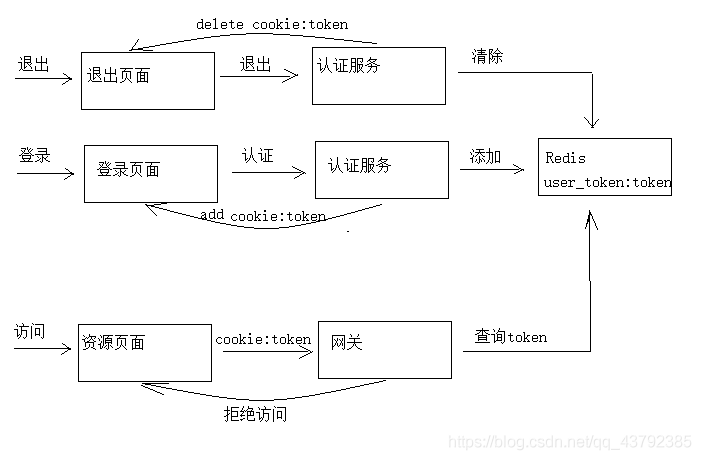
执行流程:
1、用户登录,请求认证服务
2、认证服务认证通过,生成jwt令牌,将jwt令牌及相关信息写入Redis,并且将身份令牌写入cookie
3、用户访问资源页面,带着cookie到网关
4、网关从cookie获取token,并查询Redis校验token,如果token不存在则拒绝访问,否则放行
5、用户退出,请求认证服务,清除redis中的token,并且删除cookie中的token
使用redis存储用户的身份令牌有以下作用:
1、实现用户退出注销功能,服务端清除令牌后,即使客户端请求携带token也是无效的。
2、由于jwt令牌过长,不宜存储在cookie中,所以将jwt令牌存储在redis,由客户端请求服务端获取并在客户端存储。
3.2 修改配置
application.yml
server:
  port: 8084
  servlet:
    context-path: /auth
spring:
  application:
    name: service-provider-auth
  redis:
    host: ${REDIS_HOST:127.0.0.1}
    port: ${REDIS_PORT:6379}
    timeout: 5000 #连接超时 毫秒
    jedis:
      pool:
        maxActive: 3
        maxIdle: 3
        minIdle: 1
        maxWait: -1 #连接池最大等行时间 -1没有限制
  datasource:
    druid:
      url: ${MYSQL_URL:jdbc:mysql://localhost:3306/demo?characterEncoding=utf-8}
      username: root
      password: root
      driverClassName: com.mysql.jdbc.Driver
      initialSize: 5  #初始建立连接数量
      minIdle: 5  #最小连接数量
      maxActive: 20 #最大连接数量
      maxWait: 10000  #获取连接最大等待时间,毫秒
      testOnBorrow: true #申请连接时检测连接是否有效
      testOnReturn: false #归还连接时检测连接是否有效
      timeBetweenEvictionRunsMillis: 60000 #配置间隔检测连接是否有效的时间(单位是毫秒)
      minEvictableIdleTimeMillis: 300000  #连接在连接池的最小生存时间(毫秒)
mybatis-plus:
  check-config-location: true
  configuration:
    map-underscore-to-camel-case: true
  mapper-locations: xml/*.xml
security:
  basic:
    enabled: true
auth:
  tokenValiditySeconds: 1200  #token存储到redis的过期时间
  clientId: WebApp
  clientSecret: WebApp
  cookieDomain: qqxhb.com
  cookieMaxAge: -1
encrypt:
  key-store:
    location: classpath:/jwt.keystore
    secret: jwtkeystore
    alias: jwt
    password: jwtpwd
eureka:
  client:
    registerWithEureka: true #服务注册开关
    fetchRegistry: true #服务发现开关
    serviceUrl: #Eureka客户端与Eureka服务端进行交互的地址,多个中间用逗号分隔
        defaultZone: ${EUREKA_SERVER:http://localhost:8761/eureka/,http://localhost:8762/eureka/}
  instance:
    prefer-ip-address:  true  #将自己的ip地址注册到Eureka服务中
    ip-address: ${IP_ADDRESS:127.0.0.1}
    instance-id: ${spring.application.name}:${server.port} #指定实例id
ribbon:
  MaxAutoRetries: 2 #最大重试次数,当Eureka中可以找到服务,但是服务连不上时将会重试
  MaxAutoRetriesNextServer: 3 #切换实例的重试次数
  OkToRetryOnAllOperations: false  #对所有操作请求都进行重试,如果是get则可以,如果是post,put等操作没有实现幂等的情况下是很危险的,所以设置为false
  ConnectTimeout: 5000  #请求连接的超时时间
  ReadTimeout: 6000 #请求处理的超时时间
3.3 接口开发
AuthController
package com.qqxhb.server.auth.controller;

import java.util.Map;

import javax.servlet.http.HttpServletRequest;
import javax.servlet.http.HttpServletResponse;

import org.apache.commons.lang3.StringUtils;
import org.springframework.beans.factory.annotation.Autowired;
import org.springframework.beans.factory.annotation.Value;
import org.springframework.web.bind.annotation.PostMapping;
import org.springframework.web.bind.annotation.RequestMapping;
import org.springframework.web.bind.annotation.RestController;
import org.springframework.web.context.request.RequestContextHolder;
import org.springframework.web.context.request.ServletRequestAttributes;

import com.qqxhb.server.auth.service.AuthService;
import com.qqxhb.springcloud.api.auth.AuthControllerApi;
import com.qqxhb.springcloud.domain.auth.AuthCode;
import com.qqxhb.springcloud.domain.auth.AuthToken;
import com.qqxhb.springcloud.domain.auth.LoginRequest;
import com.qqxhb.springcloud.domain.auth.LoginResult;
import com.qqxhb.springcloud.exception.ExceptionCast;
import com.qqxhb.springcloud.model.response.CommonCode;
import com.qqxhb.springcloud.model.response.ResponseResult;
import com.qqxhb.springcloud.utils.CookieUtil;

/**
 * @author Administrator
 * @version 1.0
 **/
@RestController
@RequestMapping("/")
public class AuthController implements AuthControllerApi {

	@Value("${auth.clientId}")
	String clientId;
	@Value("${auth.clientSecret}")
	String clientSecret;
	@Value("${auth.cookieDomain}")
	String cookieDomain;
	@Value("${auth.cookieMaxAge}")
	int cookieMaxAge;

	@Autowired
	AuthService authService;

	@Override
	@PostMapping("/userlogin")
	public LoginResult login(LoginRequest loginRequest) {
		if (loginRequest == null || StringUtils.isEmpty(loginRequest.getUsername())) {
			ExceptionCast.cast(AuthCode.AUTH_USERNAME_NONE);
		}
		if (loginRequest == null || StringUtils.isEmpty(loginRequest.getPassword())) {
			ExceptionCast.cast(AuthCode.AUTH_PASSWORD_NONE);
		}
		// 账号
		String username = loginRequest.getUsername();
		// 密码
		String password = loginRequest.getPassword();

		// 申请令牌
		AuthToken authToken = authService.login(username, password, clientId, clientSecret);

		// 用户身份令牌
		String access_token = authToken.getAccess_token();
		// 将令牌存储到cookie
		this.saveCookie(access_token);

		return new LoginResult(CommonCode.SUCCESS, access_token);
	}

	// 将令牌存储到cookie
	private void saveCookie(String token) {

		HttpServletResponse response = ((ServletRequestAttributes) RequestContextHolder.getRequestAttributes())
				.getResponse();
		CookieUtil.addCookie(response, cookieDomain, "/", "uid", token, cookieMaxAge, false);

	}

	@Override
	@PostMapping("/userlogout")
	public ResponseResult logout() {
		// 取出身份令牌
		String uid = getTokenFormCookie();
		// 删除redis中token
		authService.logout(uid);
		// 清除cookie
		clearCookie(uid);
		return new ResponseResult(CommonCode.SUCCESS);
	}

	// 从cookie中读取访问令牌
	private String getTokenFormCookie() {
		HttpServletRequest request = ((ServletRequestAttributes) RequestContextHolder.getRequestAttributes())
				.getRequest();
		Map<String, String> cookieMap = CookieUtil.readCookie(request, "uid");
		String access_token = cookieMap.get("uid");
		return access_token;
	}

	// 清除cookie
	private void clearCookie(String token) {
		HttpServletResponse response = ((ServletRequestAttributes) RequestContextHolder.getRequestAttributes())
				.getResponse();
		CookieUtil.addCookie(response, cookieDomain, "/", "uid", token, 0, false);
	}
}
AuthService
package com.qqxhb.server.auth.service;

import java.io.IOException;
import java.net.URI;
import java.util.Map;
import java.util.concurrent.TimeUnit;

import org.springframework.beans.factory.annotation.Autowired;
import org.springframework.beans.factory.annotation.Value;
import org.springframework.cloud.client.ServiceInstance;
import org.springframework.cloud.client.loadbalancer.LoadBalancerClient;
import org.springframework.data.redis.core.StringRedisTemplate;
import org.springframework.http.HttpEntity;
import org.springframework.http.HttpMethod;
import org.springframework.http.ResponseEntity;
import org.springframework.http.client.ClientHttpResponse;
import org.springframework.stereotype.Service;
import org.springframework.util.Base64Utils;
import org.springframework.util.LinkedMultiValueMap;
import org.springframework.util.MultiValueMap;
import org.springframework.web.client.DefaultResponseErrorHandler;
import org.springframework.web.client.RestTemplate;

import com.alibaba.fastjson.JSON;
import com.qqxhb.springcloud.client.ServiceList;
import com.qqxhb.springcloud.domain.auth.AuthCode;
import com.qqxhb.springcloud.domain.auth.AuthToken;
import com.qqxhb.springcloud.exception.ExceptionCast;

/**
 * @author Administrator
 * @version 1.0
 **/
@Service
public class AuthService {

	// Token存储Redis中前缀
	private static final String TOKEN_PREF = "user_token:";

	@Value("${auth.tokenValiditySeconds}")
	int tokenValiditySeconds;
	@Autowired
	LoadBalancerClient loadBalancerClient;

	@Autowired
	StringRedisTemplate stringRedisTemplate;

	@Autowired
	RestTemplate restTemplate;

	// 用户认证申请令牌,将令牌存储到redis
	public AuthToken login(String username, String password, String clientId, String clientSecret) {

		// 请求spring security申请令牌
		AuthToken authToken = this.applyToken(username, password, clientId, clientSecret);
		if (authToken == null) {
			ExceptionCast.cast(AuthCode.AUTH_LOGIN_APPLYTOKEN_FAIL);
		}
		// 用户身份令牌
		String access_token = authToken.getAccess_token();
		// 存储到redis中的内容
		String jsonString = JSON.toJSONString(authToken);
		// 将令牌存储到redis
		boolean result = this.saveToken(access_token, jsonString, tokenValiditySeconds);
		if (!result) {
			ExceptionCast.cast(AuthCode.AUTH_LOGIN_TOKEN_SAVEFAIL);
		}
		return authToken;

	}
	// 存储到令牌到redis

	/**
	 *
	 * @param access_token 用户身份令牌
	 * @param content      内容就是AuthToken对象的内容
	 * @param ttl          过期时间
	 * @return
	 */
	private boolean saveToken(String access_token, String content, long ttl) {
		String key = TOKEN_PREF + access_token;
		stringRedisTemplate.boundValueOps(key).set(content, ttl, TimeUnit.SECONDS);
		Long expire = stringRedisTemplate.getExpire(key, TimeUnit.SECONDS);
		return expire > 0;
	}

	// 申请令牌
	private AuthToken applyToken(String username, String password, String clientId, String clientSecret) {
		// 从eureka中获取认证服务的地址(因为spring security在认证服务中)
		// 从eureka中获取认证服务的一个实例的地址
		ServiceInstance serviceInstance = loadBalancerClient.choose(ServiceList.SERVICE_PROVIDER_AUTH);
		// 此地址就是http://ip:port
		URI uri = serviceInstance.getUri();
		// 令牌申请的地址
		String authUrl = uri + "/auth/oauth/token";
		// 定义header
		LinkedMultiValueMap<String, String> header = new LinkedMultiValueMap<>();
		String httpBasic = getHttpBasic(clientId, clientSecret);
		header.add("Authorization", httpBasic);

		// 定义body
		LinkedMultiValueMap<String, String> body = new LinkedMultiValueMap<>();
		body.add("grant_type", "password");
		body.add("username", username);
		body.add("password", password);

		HttpEntity<MultiValueMap<String, String>> httpEntity = new HttpEntity<>(body, header);
		// String url, HttpMethod method, @Nullable HttpEntity requestEntity,
		// Class responseType, Object... uriVariables

		// 设置restTemplate远程调用时候,对400和401不让报错,正确返回数据
		restTemplate.setErrorHandler(new DefaultResponseErrorHandler() {
			@Override
			public void handleError(ClientHttpResponse response) throws IOException {
				if (response.getRawStatusCode() != 400 && response.getRawStatusCode() != 401) {
					super.handleError(response);
				}
			}
		});

		ResponseEntity<Map> exchange = restTemplate.exchange(authUrl, HttpMethod.POST, httpEntity, Map.class);

		// 申请令牌信息
		Map bodyMap = exchange.getBody();
		if (bodyMap == null || bodyMap.get("access_token") == null || bodyMap.get("refresh_token") == null
				|| bodyMap.get("jti") == null) {
			return null;
		}
		AuthToken authToken = new AuthToken();
		authToken.setAccess_token((String) bodyMap.get("jti"));// 用户身份令牌
		authToken.setRefresh_token((String) bodyMap.get("refresh_token"));// 刷新令牌
		authToken.setJwt_token((String) bodyMap.get("access_token"));// jwt令牌
		return authToken;
	}

	// 获取httpbasic的串
	private String getHttpBasic(String clientId, String clientSecret) {
		String clientInfo = clientId + ":" + clientSecret;
		// 将串进行base64编码
		byte[] encode = Base64Utils.encode(clientInfo.getBytes());
		return "Basic " + new String(encode);
	}

	public boolean logout(String accessToken) {
		return stringRedisTemplate.delete(TOKEN_PREF + accessToken);
	}
}
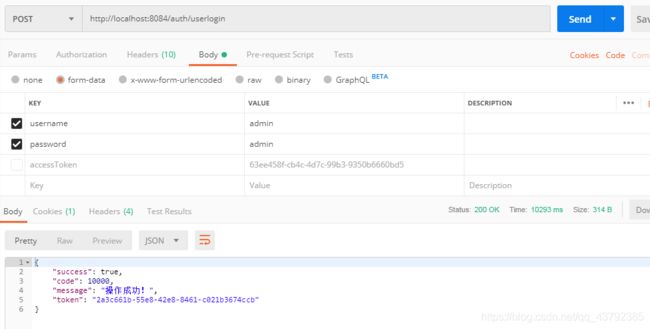
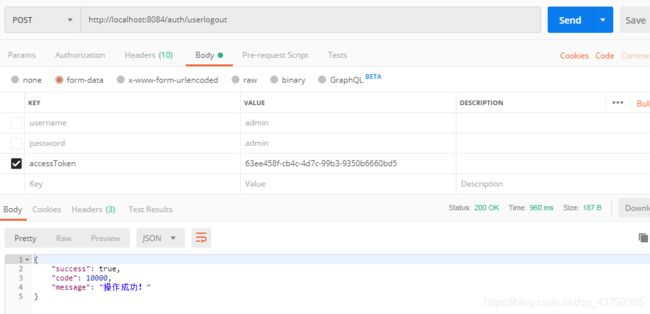
3.4 测试
登录
退出
本文是基于上篇博文撰写 Spring Cloud——Eureka和Feign
源码地址:https://github.com/qqxhb/springcloud-demo