照相机姿态估计及增强现实
对于一幅包含平面状的标记物体的图像,并且已经对照相机进行了标定,那么我们可以计算出图像照相机的姿态(旋转及平移),并且将一个三维立体的对象放置在标记物上,使其看起来属于该场景。
1.以平面和标记物进行姿态估计
在这里,我们同样使用sift算子和ransac算法提取图像特征及估计单应性矩阵。
实现代码如下:
from pylab import *
from PIL import Image

# If you have PCV installed, these imports should work
from PCV.geometry import homography, camera
from PCV.localdescriptors import sift

"""
This is the augmented reality and pose estimation cube example from Section 4.3.
"""


def cube_points(c, wid):
    """ Creates a list of points for plotting
        a cube with plot. (the first 5 points are
        the bottom square, some sides repeated). """
    p = []
    # bottom
    p.append([c[0]-wid, c[1]-wid, c[2]-wid])
    p.append([c[0]-wid, c[1]+wid, c[2]-wid])
    p.append([c[0]+wid, c[1]+wid, c[2]-wid])
    p.append([c[0]+wid, c[1]-wid, c[2]-wid])
    p.append([c[0]-wid, c[1]-wid, c[2]-wid]) #same as first to close plot

    # top
    p.append([c[0]-wid, c[1]-wid, c[2]+wid])
    p.append([c[0]-wid, c[1]+wid, c[2]+wid])
    p.append([c[0]+wid, c[1]+wid, c[2]+wid])
    p.append([c[0]+wid, c[1]-wid, c[2]+wid])
    p.append([c[0]-wid, c[1]-wid, c[2]+wid]) #same as first to close plot

    # vertical sides
    p.append([c[0]-wid, c[1]-wid, c[2]+wid])
    p.append([c[0]-wid, c[1]+wid, c[2]+wid])
    p.append([c[0]-wid, c[1]+wid, c[2]-wid])
    p.append([c[0]+wid, c[1]+wid, c[2]-wid])
    p.append([c[0]+wid, c[1]+wid, c[2]+wid])
    p.append([c[0]+wid, c[1]-wid, c[2]+wid])
    p.append([c[0]+wid, c[1]-wid, c[2]-wid])

    return array(p).T


def my_calibration(sz):
    """
    Calibration function for the camera (iPhone4) used in this example.
    """
    row, col = sz
    fx = 2555*col/2592
    fy = 2586*row/1936
    K = diag([fx, fy, 1])
    K[0, 2] = 0.5*col
    K[1, 2] = 0.5*row
    return K


# compute features
sift.process_image('D:/林琦玉/pcv-book-code-master/ch04/book_frontal.JPG', 'im0.sift')
l0, d0 = sift.read_features_from_file('im0.sift')

sift.process_image('D:/林琦玉/pcv-book-code-master/ch04/book_perspective.JPG', 'im1.sift')
l1, d1 = sift.read_features_from_file('im1.sift')


# match features and estimate homography
matches = sift.match_twosided(d0, d1)
ndx = matches.nonzero()[0]
fp = homography.make_homog(l0[ndx, :2].T)
ndx2 = [int(matches[i]) for i in ndx]
tp = homography.make_homog(l1[ndx2, :2].T)

model = homography.RansacModel()
H, inliers = homography.H_from_ransac(fp, tp, model)

# camera calibration
K = my_calibration((747, 1000))

# 3D points at plane z=0 with sides of length 0.2
box = cube_points([0, 0, 0.1], 0.1)

# project bottom square in first image
cam1 = camera.Camera(hstack((K, dot(K, array([[0], [0], [-1]])))))
# first points are the bottom square
box_cam1 = cam1.project(homography.make_homog(box[:, :5]))


# use H to transfer points to the second image
box_trans = homography.normalize(dot(H,box_cam1))

# compute second camera matrix from cam1 and H
cam2 = camera.Camera(dot(H, cam1.P))
A = dot(linalg.inv(K), cam2.P[:, :3])
A = array([A[:, 0], A[:, 1], cross(A[:, 0], A[:, 1])]).T
cam2.P[:, :3] = dot(K, A)

# project with the second camera
box_cam2 = cam2.project(homography.make_homog(box))


# plotting
im0 = array(Image.open('book_frontal.JPG'))
im1 = array(Image.open('book_perspective.JPG'))

figure()
imshow(im0)
plot(box_cam1[0, :], box_cam1[1, :], linewidth=3)
title('2D projection of bottom square')
axis('off')

figure()
imshow(im1)
plot(box_trans[0, :], box_trans[1, :], linewidth=3)
title('2D projection transfered with H')
axis('off')

figure()
imshow(im1)
plot(box_cam2[0, :], box_cam2[1, :], linewidth=3)
title('3D points projected in second image')
axis('off')

show()
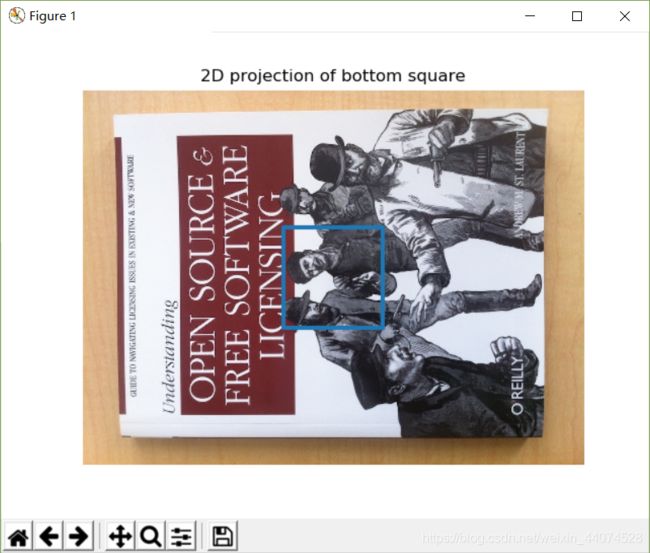
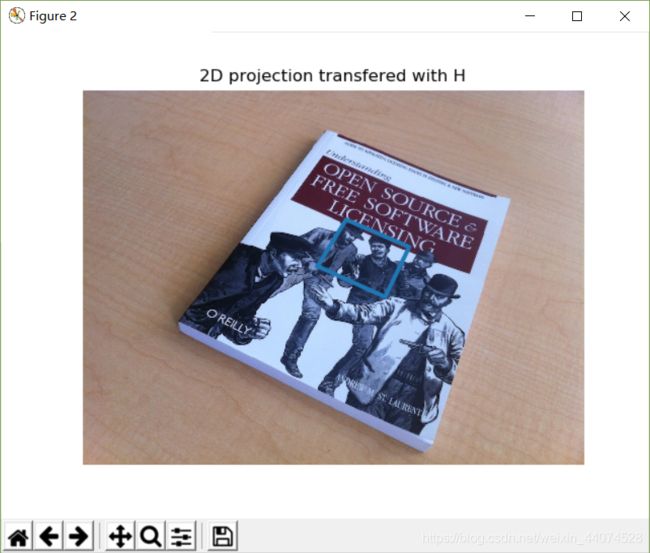
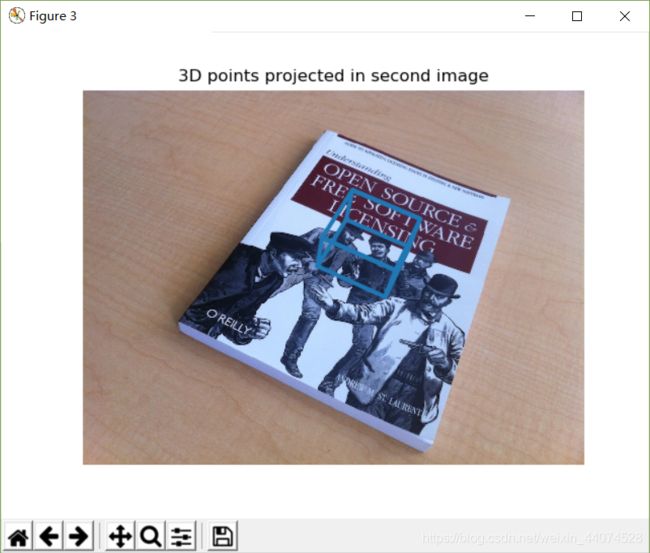
我们将一些简单的三维物体放置在标记物上,以验证单应性矩阵结果的正确性。接下来,我们将想要放置进去的物体进行替换。
2.进行PyOpenGL及pygame工具包的安装。
我们首先会想到pip install PyOpenGL,然后系统会提醒我们

这个时候我们以为已经装好了,但是当我们进入到IDLE中进行代码测试,会出现如下情况:

这是因为通过pip install opengl 安装的版本默认为32位的,但是我们的系统是64位的。
因此,我们通过安装包来安装符合机器版本的工具包。下载地址:https://www.lfd.uci.edu/~gohlke/pythonlibs/#pyopengl
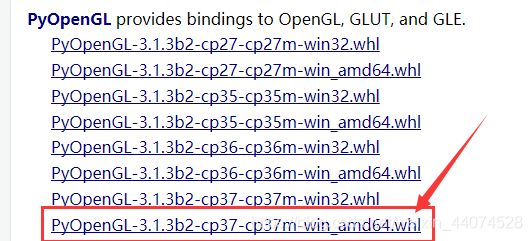
要注意的是,下载的时候要注意自己python的版本,如我的python3.7.2,相对应的就是cp37,如果下载的版本和python版本不同,将出现如下错误:

命令行输入:pip install PyOpenGL-3.1.3b2-cp37-cp37m-win_amd64.whl 进行重装即可。
3.对照相机焦距进行计算
计算公式为:
fx=dx/dX∗dZ
fy=dy/dY∗dZ
因为我们测定标定矩阵的时候需要拍照物品的边长dX和dY(也就是书的宽和长);
然后镜头和物体要平行,在测量照相机到物体的镜头的距离dZ;
最后还需要用像素测量标定物体图像的宽度和高度(dx和dy)
前两个可以用尺子直接测量出来,后一个可以用Windows自带的画图工具,然后打开图片
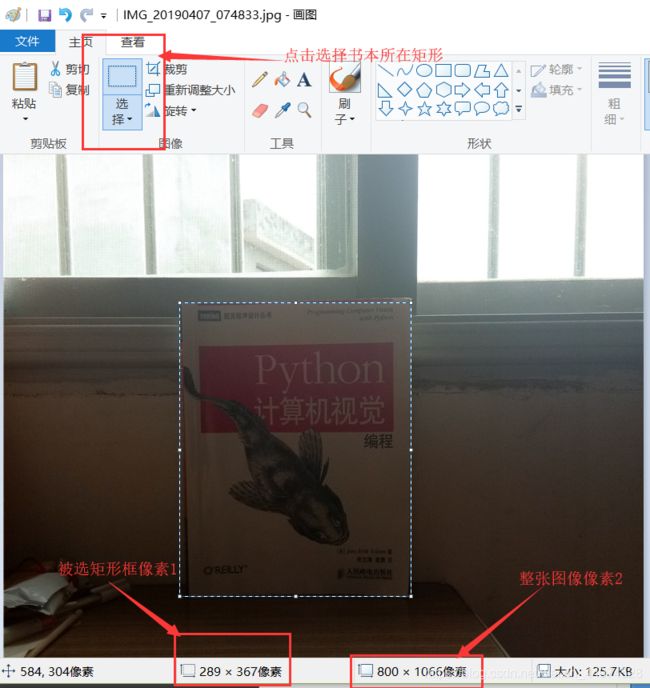
计算得dX=179,dY=233,dz=545,dx=289,dy=367
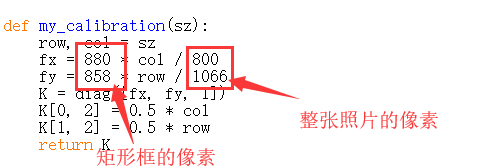
fx=880,fy=858
将其代入到代码中:
4.代码及增强现实(AR实现)
所用代码为原书代码,将其中数据替换成自己的即可
# -*- coding: utf-8 -*-
import math
import pickle
import sys
from pylab import *
from OpenGL.GL import *
from OpenGL.GLU import *
from OpenGL.GLUT import *
import pygame, pygame.image
from pygame.locals import *
from PCV.geometry import homography, camera
from PCV.localdescriptors import sift

def cube_points(c, wid):   # 绘制立方体的一各点列表
    """ Creates a list of points for plotting
        a cube with plot. (the first 5 points are
        the bottom square, some sides repeated). """
    p = []
    # 底部
    p.append([c[0] - wid, c[1] - wid, c[2] - wid])
    p.append([c[0] - wid, c[1] + wid, c[2] - wid])
    p.append([c[0] + wid, c[1] + wid, c[2] - wid])
    p.append([c[0] + wid, c[1] - wid, c[2] - wid])
    p.append([c[0] - wid, c[1] - wid, c[2] - wid])  # 和第一个相同

    # 顶部
    p.append([c[0] - wid, c[1] - wid, c[2] + wid])
    p.append([c[0] - wid, c[1] + wid, c[2] + wid])
    p.append([c[0] + wid, c[1] + wid, c[2] + wid])
    p.append([c[0] + wid, c[1] - wid, c[2] + wid])
    p.append([c[0] - wid, c[1] - wid, c[2] + wid])  # 和第一个相同

    # 竖直边
    p.append([c[0] - wid, c[1] - wid, c[2] + wid])
    p.append([c[0] - wid, c[1] + wid, c[2] + wid])
    p.append([c[0] - wid, c[1] + wid, c[2] - wid])
    p.append([c[0] + wid, c[1] + wid, c[2] - wid])
    p.append([c[0] + wid, c[1] + wid, c[2] + wid])
    p.append([c[0] + wid, c[1] - wid, c[2] + wid])
    p.append([c[0] + wid, c[1] - wid, c[2] - wid])

    return array(p).T

def my_calibration(sz):
    row, col = sz
    fx = 880 * col / 800
    fy = 858 * row / 1066
    K = diag([fx, fy, 1])
    K[0, 2] = 0.5 * col
    K[1, 2] = 0.5 * row
    return K

def set_projection_from_camera(K):  # 获取视图
    glMatrixMode(GL_PROJECTION)
    glLoadIdentity()
    fx = K[0, 0]
    fy = K[1, 1]
    fovy = 2 * math.atan(0.5 * height / fy) * 180 / math.pi
    aspect = (width * fy) / (height * fx)
    # 定义近和远的剪裁平面
    near = 0.1
    far = 100.0
    # 设定透视
    gluPerspective(fovy, aspect, near, far)
    glViewport(0, 0, width, height)

def set_modelview_from_camera(Rt):  # 获取矩阵
    glMatrixMode(GL_MODELVIEW)
    glLoadIdentity()
    # 围绕x轴将茶壶旋转90度,使z轴向上
    Rx = np.array([[1, 0, 0], [0, 0, -1], [0, 1, 0]])
    # 获得旋转的最佳逼近
    R = Rt[:, :3]
    U, S, V = np.linalg.svd(R)
    R = np.dot(U, V)
    R[0, :] = -R[0, :]  # 改变x轴的符号
    # 获得平移量
    t = Rt[:, 3]
    # 获得4*4的的模拟视图矩阵
    M = np.eye(4)
    M[:3, :3] = np.dot(R, Rx)
    M[:3, 3] = t
    # 转置并压平以获取列序数值
    M = M.T
    m = M.flatten()
    # 将模拟视图矩阵替换成新的矩阵
    glLoadMatrixf(m)

def draw_background(imname):
    # 载入背景图像
    bg_image = pygame.image.load(imname).convert()
    bg_data = pygame.image.tostring(bg_image, "RGBX", 1)  # 将图像转为字符串描述
    glMatrixMode(GL_MODELVIEW)  # 将当前矩阵指定为投影矩阵
    glLoadIdentity()  # 把矩阵设为单位矩阵

    glClear(GL_COLOR_BUFFER_BIT | GL_DEPTH_BUFFER_BIT)  # 清楚颜色、深度缓冲
    glEnable(GL_TEXTURE_2D)  # 纹理映射
    glBindTexture(GL_TEXTURE_2D, glGenTextures(1))
    glTexImage2D(GL_TEXTURE_2D, 0, GL_RGBA, width, height, 0, GL_RGBA, GL_UNSIGNED_BYTE, bg_data)
    glTexParameterf(GL_TEXTURE_2D, GL_TEXTURE_MAG_FILTER, GL_NEAREST)
    glTexParameterf(GL_TEXTURE_2D, GL_TEXTURE_MIN_FILTER, GL_NEAREST)
    # 绑定纹理
    glBegin(GL_QUADS)
    glTexCoord2f(0.0, 0.0); glVertex3f(-1.0, -1.0, -1.0)
    glTexCoord2f(1.0, 0.0); glVertex3f(1.0, -1.0, -1.0)
    glTexCoord2f(1.0, 1.0); glVertex3f(1.0, 1.0, -1.0)
    glTexCoord2f(0.0, 1.0); glVertex3f(-1.0, 1.0, -1.0)
    glEnd()
    glDeleteTextures(1)  # 清除纹理

def draw_teapot(size):  # 红色茶壶
    glEnable(GL_LIGHTING)
    glEnable(GL_LIGHT0)
    glEnable(GL_DEPTH_TEST)
    glClear(GL_DEPTH_BUFFER_BIT)
    # 绘制红色茶壶
    glMaterialfv(GL_FRONT, GL_AMBIENT, [0, 0, 0, 0])
    glMaterialfv(GL_FRONT, GL_DIFFUSE, [0.5, 0.0, 0.0, 0.0])
    glMaterialfv(GL_FRONT, GL_SPECULAR, [0.7, 0.6, 0.6, 0.0])
    glMaterialf(GL_FRONT, GL_SHININESS, 0.25 * 128.0)
    glutSolidTeapot(size)

def drawFunc(size):  # 白色茶壶
    glRotatef(0.5, 5, 5, 0)  # (角度,x,y,z)
    glutWireTeapot(size)
    # 刷新显示
    glFlush()
width, height = 800, 600


def setup():  # 设置窗口和pygame环境
    pygame.init()
    pygame.display.set_mode((width, height), OPENGL | DOUBLEBUF)
    pygame.display.set_caption("OpenGL AR demo")

# 计算特征
sift.process_image('mybook1.jpg', 'im0.sift')
l0, d0 = sift.read_features_from_file('im0.sift')

sift.process_image('mybook.jpg', 'im1.sift')
l1, d1 = sift.read_features_from_file('im1.sift')

# 匹配特征,计算单应性矩阵
matches = sift.match_twosided(d0, d1)
ndx = matches.nonzero()[0]
fp = homography.make_homog(l0[ndx, :2].T)
ndx2 = [int(matches[i]) for i in ndx]
tp = homography.make_homog(l1[ndx2, :2].T)

model = homography.RansacModel()
H, inliers = homography.H_from_ransac(fp, tp, model)

# 计算照相机标定矩阵
K = my_calibration((747, 1000))
# 位于边长为0.2,z=0平面上的三维点
box = cube_points([0, 0, 0.1], 0.1)

# 投影第一幅图下个上底部的正方形
cam1 = camera.Camera(hstack((K, dot(K, array([[0], [0], [-1]])))))
# 底部正方形上的点
box_cam1 = cam1.project(homography.make_homog(box[:, :5]))

# 使用H将点变换到第二幅图像中
box_trans = homography.normalize(dot(H, box_cam1))

# 从cam1和H中计算第二个照相机矩阵
cam2 = camera.Camera(dot(H, cam1.P))
A = dot(linalg.inv(K), cam2.P[:, :3])
A = array([A[:, 0], A[:, 1], cross(A[:, 0], A[:, 1])]).T
cam2.P[:, :3] = dot(K, A)
# 使用第二个照相机矩阵投影
box_cam2 = cam2.project(homography.make_homog(box))

Rt = dot(linalg.inv(K), cam2.P)
# ******************************************************************
# 以下是显示正方体在图像上(实现以平面和标记物进行姿态估计)
# # plotting
# im0 = array(Image.open('book_frontal.JPG'))
# im1 = array(Image.open('book_perspective.JPG'))
#
# figure()
# imshow(im0)
# plot(box_cam1[0, :], box_cam1[1, :], linewidth=3)
# title('2D projection of bottom square')
# axis('off')
#
# figure()
# imshow(im1)
# plot(box_trans[0, :], box_trans[1, :], linewidth=3)
# title('2D projection transfered with H')
# axis('off')
#
# figure()
# imshow(im1)
# plot(box_cam2[0, :], box_cam2[1, :], linewidth=3)
# title('3D points projected in second image')
# axis('off')
#
# show()
# ********************************************************************
setup()
draw_background("mybook1.bmp")
set_projection_from_camera(K)
set_modelview_from_camera(Rt)

draw_teapot(0.05)  # 显示红色茶壶
#drawFunc(0.05)  # 显示白色空心茶壶
pygame.display.flip()
while True:
    for event in pygame.event.get():
        if event.type == pygame.QUIT:
            sys.exit()
可以看到一个水壶立在书上并且随着书的角度变换而变换,仿佛如同是一个现实水壶立在书上。