【Flutter】动画学习(一)Canvas绘制
文章目录
- 1 CustomPainter介绍
- 1.1 paint方法
- 1.2 shouldRepaint方法
- 1.3 Paint
- 1.4 CustomPainter
- 1.5 创建项目
- 2 api介绍
- 2.1 drawColor 绘制背景色
- 2.2 drawPoints 绘制点/线
- 2.3 drawLine 绘制线
- 2.4 drawArc 绘制弧/饼
- 2.5 drawRect 绘制矩形
- 2.6 drawRRect 绘制圆角矩形
- 2.7 drawDRRect 绘制嵌套矩形
- 2.8 drawCircle 绘制圆形
- 2.9 drawOval 绘制椭圆
- 2.10 drawPath 绘制路径
- 2.11 drawShadow 绘制阴影
- 2.12 drawImage 绘制图片
- 2.13 drawImageRect 绘制矩形图片
- 2.14 drawImageNine 绘制九图
- 2.15 drawParagraph 绘制文字段落
- 2.15 clipRect 裁剪矩形
- 2.16 clipRRect 裁剪圆角矩形
- 2.17 clipPath 裁剪由线围成区域
1 CustomPainter介绍
CustomerPainter是真实绘制的基础类,需要绘制的图形和画笔都是在此类中实现,一般会自定义一个类继承此基类,然后重写两个方法:
1.1 paint方法
  // 这个方法就是实现具体绘制的方法
  @override
  void paint(Canvas canvas, Size size) {

  }
1.2 shouldRepaint方法
  // 这个方法控制的是是否需要重绘
  @override
  bool shouldRepaint(CustomPainter oldDelegate) {
    return true;
  }
1.3 Paint
Paint是画笔,画笔有多个属性,可以设置颜色,线宽,填充等样式.
    Paint()
      ..color = Colors.orange // 颜色
      ..strokeWidth = 3.0 // 线宽
      ..style = PaintingStyle.stroke); // 填充样式
1.4 CustomPainter
CustomerPaint可以理解为绘制的封装类,其内部成员变量就包含CustomerPainter,其构造函数:
const CustomPaint({
  Key key,
  this.painter,
  this.foregroundPainter,
  this.size = Size.zero,
  this.isComplex = false,
  this.willChange = false,
  Widget child,
})
1.5 创建项目
import 'package:flutter/material.dart';

class CanvasStudy extends StatefulWidget {
  CanvasStudy({Key key}) : super(key: key);

  @override
  _CanvasStudyState createState() => _CanvasStudyState();
}

class _CanvasStudyState extends State<CanvasStudy> {
  @override
  Widget build(BuildContext context) {
    var winH = MediaQuery.of(context).size.height;
    var winW = MediaQuery.of(context).size.width;

    return Scaffold(
      appBar: AppBar(),
      body: ListView(children: [
        CustomPaint(
          size: Size(winW, winH),
          painter: LCPainter(),
        )
      ]),
    );
  }
}
class LCPainter extends CustomPainter {

  @override
  void paint(Canvas canvas, Size size) {
	// 绘制
  }

  @override
  bool shouldRepaint(CustomPainter oldDelegate) {
    return true;
  }
}
2 api介绍
2.1 drawColor 绘制背景色
drawColor 需要传入两个参数,第一个为色值,第二个为混合模式,有众多混合模式供选择,但注意使用混合模式后会与绘制其上的其他 View 颜色混合像素。
canvas.drawColor(Colors.orange, BlendMode.srcIn);
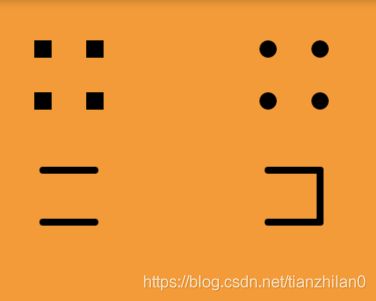
2.2 drawPoints 绘制点/线
drawPoints 不仅可以绘制点,还可以绘制点与点的连线;PointMode 包括 points 点 / lines 线 / polygon 多边形;注意 lines 为每两点之间的连线,若为奇数个点,最后一个没有与之相连的点。
    // 绘制点
    canvas.drawPoints(
        PointMode.points,
        [
          Offset(30.0, 30.0),
          Offset(60.0, 30.0),
          Offset(60.0, 60.0),
          Offset(30.0, 60.0)
        ],
        Paint()..strokeWidth = 10.0);
    canvas.drawPoints(
        PointMode.points,
        [
          Offset(160.0, 30.0),
          Offset(190.0, 30.0),
          Offset(190.0, 60.0),
          Offset(160.0, 60.0)
        ],
        Paint()
          ..strokeWidth = 10.0
          ..strokeCap = StrokeCap.round);
   // 绘制线
    canvas.drawPoints(
        PointMode.lines,
        [
          Offset(30.0, 100.0),
          Offset(60.0, 100.0),
          Offset(60.0, 130.0),
          Offset(30.0, 130.0)
        ],
        Paint()
          ..strokeWidth = 4.0
          ..strokeCap = StrokeCap.round);
    // 绘制多边形
    canvas.drawPoints(
        PointMode.polygon,
        [
          Offset(160.0, 100.0),
          Offset(190.0, 100.0),
          Offset(190.0, 130.0),
          Offset(160.0, 130.0)
        ],
        Paint()
          ..strokeWidth = 4.0
          ..strokeCap = StrokeCap.round);
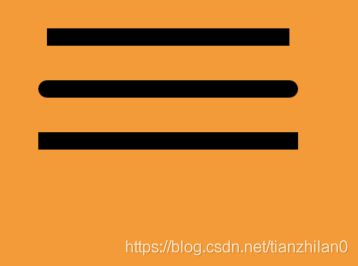
2.3 drawLine 绘制线
    canvas.drawLine(
        Offset(30.0, 30.0),
        Offset(200 - 30.0, 30.0),
        Paint()
          ..strokeWidth = 10.0
          ..strokeCap = StrokeCap.butt);
    canvas.drawLine(
        Offset(30.0, 60.0),
        Offset(200 - 30.0, 60.0),
        Paint()
          ..strokeWidth = 10.0
          ..strokeCap = StrokeCap.round);
    canvas.drawLine(
        Offset(30.0, 90.0),
        Offset(200 - 30.0, 90.0),
        Paint()
          ..strokeWidth = 10.0
          ..strokeCap = StrokeCap.square);
2.4 drawArc 绘制弧/饼
drawArc 可以用来绘制圆弧甚至配合 Paint 绘制饼状图;drawArc 的第一个参数为矩形范围,即圆弧所在的圆的范围,若非正方形则圆弧所在的圆会拉伸;第二个参数为起始角度,0.0 为坐标系 x 轴正向方形;第三个参数为终止角度,若超过 2PI,则为一个圆;第四个参数为是否由中心出发,false* 时只绘制圆弧,true 时绘制圆饼;第五个参数即 Paint 画笔,可通过 PaintingStyle 属性绘制是否填充等;
    canvas.drawArc(
        Rect.fromCircle(center: Offset(50.0, 50.0), radius: 50.0),
        0.0,
        pi / 2,
        false,
        Paint()
          ..color = Colors.white
          ..strokeCap = StrokeCap.round
          ..strokeWidth = 6.0
          ..style = PaintingStyle.stroke);
    canvas.drawArc(
        Rect.fromCircle(center: Offset(150.0, 50.0), radius: 50.0),
        0.0,
        pi / 2,
        false,
        Paint()
          ..color = Colors.white
          ..strokeWidth = 6.0
          ..style = PaintingStyle.fill);
    canvas.drawArc(
        Rect.fromCircle(center: Offset(300.0, 100.0), radius: 50.0),
        -pi,
        pi / 2,
        true,
        Paint()
          ..color = Colors.white
          ..strokeWidth = 6.0
          ..style = PaintingStyle.stroke);
    canvas.drawArc(
        Rect.fromCircle(center: Offset(400.0, 100.0), radius: 50.0),
        -pi,
        pi / 3,
        true,
        Paint()
          ..color = Colors.white
          ..strokeWidth = 6.0
          ..style = PaintingStyle.fill);
    canvas.drawArc(
        Rect.fromLTWH(30.0, 150.0, 80.0, 50.0),
        0.0,
        pi * 2 * 2 / 3,
        true,
        Paint()
          ..color = Colors.white
          ..style = PaintingStyle.fill);
    canvas.drawArc(
        Rect.fromLTWH(150.0, 150.0, 80.0, 50.0),
        0.0,
        pi * 2 * 2 / 3,
        true,
        Paint()
          ..color = Colors.white
          ..strokeWidth = 6.0
          ..style = PaintingStyle.stroke);
    canvas.drawArc(
        Rect.fromPoints(Offset(250.0, 150.0), Offset(300.0, 200.0)),
        0.0,
        5.0,
        true,
        Paint()
          ..color = Colors.white
          ..style = PaintingStyle.fill);
    canvas.drawArc(
        Rect.fromPoints(Offset(350.0, 150.0), Offset(400.0, 200.0)),
        0.0,
        5.0,
        true,
        Paint()
          ..color = Colors.white
          ..strokeWidth = 6.0
          ..style = PaintingStyle.stroke);

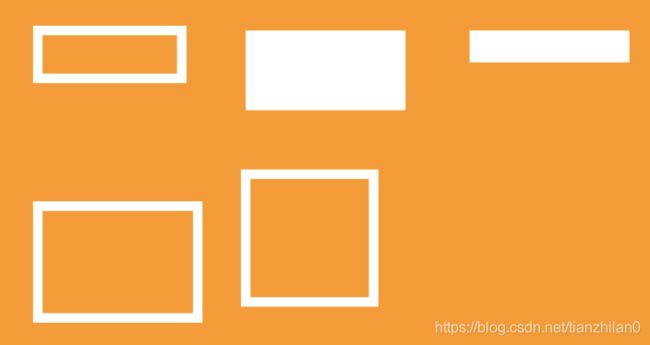
2.5 drawRect 绘制矩形
drawRect 用来绘制矩形,Flutter 提供了多种绘制矩形方法:
- Rect.fromPoints 根据两个点(左上角点/右下角点)来绘制;
- Rect.fromLTRB 根据以屏幕左上角为坐标系圆点,分别设置上下左右四个方向距离;
- Rect.fromLTWH 根据设置左上角的点与矩形宽高来绘制;
- Rect.fromCircle 最特殊,根据圆形绘制正方形
    canvas.drawRect(
        Rect.fromPoints(Offset(30.0, 30.0), Offset(120.0, 60.0)),
        Paint()
          ..color = Colors.white
          ..strokeWidth = 6.0
          ..style = PaintingStyle.stroke);
    canvas.drawRect(
        Rect.fromPoints(Offset(160.0, 30.0), Offset(260.0, 80.0)),
        Paint()
          ..color = Colors.white
          ..style = PaintingStyle.fill);
    canvas.drawRect(
        Rect.fromLTRB(300.0, 30.0, 400.0, 50.0),
        Paint()
          ..color = Colors.white
          ..style = PaintingStyle.fill);
    canvas.drawRect(
        Rect.fromLTWH(30.0, 140.0, 100.0, 70.0),
        Paint()
          ..color = Colors.white
          ..strokeWidth = 6.0
          ..style = PaintingStyle.stroke);
    canvas.drawRect(
        Rect.fromCircle(center: Offset(200.0, 160.0), radius: 40.0),
        Paint()
          ..color = Colors.white
          ..strokeWidth = 6.0
          ..style = PaintingStyle.stroke);
2.6 drawRRect 绘制圆角矩形
drawRRect 绘制圆角矩形,Flutter 提供了多种绘制方法:
- RRect.fromLTRBXY 前四个参数用来绘制矩形位置,剩余两个参数绘制固定 x/y 弧度;
- RRect.fromLTRBR 前四个参数用来绘制矩形位置,最后一个参数绘制 Radius 弧度;
- RRect.fromLTRBAndCorners 前四个参数用来绘制矩形位置,剩余四个可选择参数,根据需求设置四个角 Radius 弧度,可不同;
- RRect.fromRectXY 第一个参数绘制矩形,可以用上面介绍的多种矩形绘制方式,剩余两个参数绘制固定 x/y 弧度;
- RRect.fromRectAndRadius 第一个参数绘制矩形,可以用上面介绍的多种矩形绘制方式,最后一个参数绘制 Radius 弧度;
- RRect.fromRectAndCorners第一个参数绘制矩形,可以用上面介绍的多种矩形绘制方式,剩余四个可选择参数,根据需求设置四个角 Radius 弧度,最为灵活。
    // RRect.fromLTRBXY 方式
    canvas.drawRRect(
        RRect.fromLTRBXY(30.0, 30.0, 100.0, 80.0, 8.0, 8.0),
        Paint()
          ..color = Colors.white
          ..strokeWidth = 4.0
          ..style = PaintingStyle.stroke);
    canvas.drawRRect(
        RRect.fromLTRBXY(120.0, 30.0, 220.0, 80.0, 8.0, 18.0),
        Paint()
          ..color = Colors.white
          ..style = PaintingStyle.fill);
    // RRect.fromLTRBR 方式
    canvas.drawRRect(
        RRect.fromLTRBR(240.0, 30.0, 340.0, 80.0, Radius.circular(8.0)),
        Paint()
          ..color = Colors.white
          ..strokeWidth = 4.0
          ..style = PaintingStyle.stroke);
    // RRect.fromLTRBAndCorners 方式
    canvas.drawRRect(
        RRect.fromLTRBAndCorners(30.0, 120.0, 110.0, 160.0,
            topLeft: Radius.circular(20.0),
            topRight: Radius.circular(20.0),
            bottomRight: Radius.circular(5.0),
            bottomLeft: Radius.circular(5.0)),
        Paint()
          ..color = Colors.white
          ..strokeWidth = 4.0
          ..style = PaintingStyle.stroke);
    // RRect.fromRectAndCorners 方式
    canvas.drawRRect(
        RRect.fromRectAndCorners(Rect.fromLTWH(120.0, 120.0, 100.0, 70.0),
            topLeft: Radius.circular(20.0),
            topRight: Radius.circular(5.0),
            bottomRight: Radius.circular(5.0),
            bottomLeft: Radius.circular(20.0)),
        Paint()
          ..color = Colors.white
          ..strokeWidth = 4.0
          ..style = PaintingStyle.stroke);
    // RRect.fromRectAndRadius 方式
    canvas.drawRRect(
        RRect.fromRectAndRadius(Rect.fromLTWH(240.0, 120.0, 100.0, 80.0),
            Radius.elliptical(20.0, 18.0)),
        Paint()
          ..color = Colors.white
          ..strokeWidth = 4.0
          ..style = PaintingStyle.stroke);
    // RRect.fromRectXY 方式
    canvas.drawRRect(
        RRect.fromRectXY(
            Rect.fromCircle(center: Offset(70.0, 240.0), radius: 40.0),
            8.0,
            8.0),
        Paint()
          ..color = Colors.white
          ..strokeWidth = 4.0
          ..style = PaintingStyle.stroke);

2.7 drawDRRect 绘制嵌套矩形
drawDRRect 绘制嵌套矩形,第一个参数为外部矩形,第二个参数为内部矩形,可用上述多种设置圆角矩形方式;最后一个参数为 Paint 画笔,且 PaintingStyle 为 fill 时填充的是两个矩形之间的范围。
    canvas.drawDRRect(
        RRect.fromRectXY(
            Rect.fromCircle(center: Offset(90.0, 120.0), radius: 60.0),
            8.0,
            8.0),
        RRect.fromRectXY(
            Rect.fromCircle(center: Offset(90.0, 120.0), radius: 50.0),
            8.0,
            8.0),
        Paint()
          ..color = Colors.white
          ..strokeWidth = 4.0
          ..style = PaintingStyle.stroke);
    canvas.drawDRRect(
        RRect.fromRectXY(
            Rect.fromCircle(center: Offset(270.0, 120.0), radius: 60.0),
            8.0,
            8.0),
        RRect.fromRectXY(
            Rect.fromCircle(center: Offset(270.0, 120.0), radius: 50.0),
            8.0,
            8.0),
        Paint()
          ..color = Colors.white
          ..strokeWidth = 4.0
          ..style = PaintingStyle.fill);

2.8 drawCircle 绘制圆形
drawCircle 绘制圆形,仅需设置原点及半径即可;
    canvas.drawCircle(
        Offset(90.0, 120.0),
        60.0,
        Paint()
          ..color = Colors.white
          ..strokeWidth = 4.0
          ..style = PaintingStyle.stroke);
    canvas.drawCircle(
        Offset(270.0, 120.0),
        60.0,
        Paint()
          ..color = Colors.white
          ..style = PaintingStyle.fill);

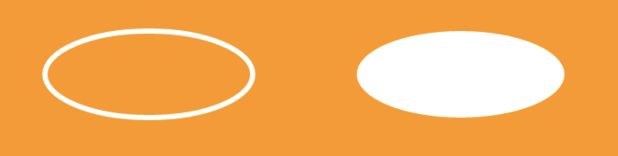
2.9 drawOval 绘制椭圆
drawOval 绘制椭圆方式很简单,主要绘制一个矩形即可;
    canvas.drawOval(
        Rect.fromLTRB(30.0, 30.0, 150.0, 80.0),
        Paint()
          ..color = Colors.white
          ..strokeWidth = 3.0
          ..style = PaintingStyle.stroke);
    canvas.drawOval(
        Rect.fromLTRB(210.0, 30.0, 330.0, 80.0),
        Paint()
          ..color = Colors.white
          ..strokeWidth = 3.0
          ..style = PaintingStyle.fill);
2.10 drawPath 绘制路径
drawPath 用来绘制路径,Flutter 提供了众多路径方法,小菜尝试几种常用的方法:
- moveTo() 即从当前坐标点开始,不设置时默认为屏幕左上角位置;
- lineTo() 即从起点绘制到设置的新的点位;
- close() 即最后的点到起始点连接,但对于中间绘制矩形/弧等时最后不会相连;
- reset() 即清空连线;
- addRect() 添加矩形连线;
- addOval() 添加弧线,即贝塞尔(二阶)曲线;
- cubicTo() 添加弧线,即贝塞尔(三阶)曲线;
- relativeMoveTo() 相对于移动到当前点位,小菜认为与 moveTo 相比整个坐标系移动;
- relativeLineTo() 相对连接到当前点位,并将坐标系移动到当前点位;
    canvas.drawPath(
        Path()
          ..moveTo(30.0, 30.0)
          ..lineTo(80.0, 30.0)
          ..lineTo(80.0, 80.0)
          ..lineTo(30.0, 80.0)
          ..close(),
        Paint()
          ..color = Colors.white
          ..strokeWidth = 3.0
          ..style = PaintingStyle.stroke);

    canvas.drawPath(
        Path()
          ..moveTo(100.0, 30.0)
          ..lineTo(100.0, 80.0)
          ..lineTo(150.0, 80.0)
          ..close(),
        Paint()
          ..color = Colors.white
          ..style = PaintingStyle.fill);
    canvas.drawPath(
        Path()
          ..moveTo(170.0, 30.0)
          ..lineTo(220.0, 30.0)
          ..lineTo(170.0, 80.0)
          ..lineTo(220.0, 80.0)
          ..close(),
        Paint()
          ..color = Colors.white
          ..strokeWidth = 3.0
          ..style = PaintingStyle.stroke);

    canvas.drawPath(
        Path()
          ..moveTo(240.0, 80.0)
          ..lineTo(290.0, 80.0)
          ..lineTo(265.0, 30.0)
          ..close(),
        Paint()
          ..color = Colors.white
          ..strokeWidth = 3.0
          ..style = PaintingStyle.stroke);

    canvas.drawPath(
        Path()
          ..moveTo(30.0, 120.0)
          ..lineTo(120.0, 120.0)
          ..lineTo(30.0, 160.0)
          ..lineTo(120.0, 160.0)
          ..addRect(Rect.fromLTWH(180.0, 130.0, 120.0, 70.0))
          ..addOval(Rect.fromLTWH(190.0, 140.0, 100.0, 50.0))
          ..moveTo(30.0, 230.0)
          ..lineTo(160.0, 230.0)
          ..close(),
        Paint()
          ..color = Colors.white
          ..strokeWidth = 3.0
          ..style = PaintingStyle.stroke);
    canvas.drawPath(
        Path()
          ..arcTo(Rect.fromCircle(center: Offset(70, 270), radius: 50), 0.0, pi,
              false),
        Paint()
          ..color = Colors.white
          ..strokeWidth = 3.0
          ..style = PaintingStyle.stroke);
    canvas.drawPath(
        Path()
          ..moveTo(210.0, 260.0)
          ..cubicTo(210.0, 330.0, 270.0, 300.0, 330.0, 250.0),
        Paint()
          ..color = Colors.red
          ..strokeWidth = 3.0
          ..style = PaintingStyle.stroke);

2.11 drawShadow 绘制阴影
drawShadow 用于绘制阴影,第一个参数时绘制一个图形 Path,第二个是设置阴影颜色,第三个为阴影范围,最后一个阴影范围是否填充满;
    canvas.drawShadow(
        Path()
          ..moveTo(30.0, 30.0)
          ..lineTo(120.0, 30.0)
          ..lineTo(120.0, 60.0)
          ..lineTo(30.0, 60.0)
          ..close(),
        Colors.red,
        4,
        false);
    canvas.drawShadow(
        Path()
          ..moveTo(150.0, 30.0)
          ..lineTo(250.0, 30.0)
          ..lineTo(250.0, 60.0)
          ..lineTo(150.0, 60.0),
        Colors.red,
        10,
        false);
    canvas.drawShadow(
        Path()
          ..moveTo(280.0, 30.0)
          ..lineTo(380.0, 30.0)
          ..lineTo(380.0, 60.0)
          ..lineTo(280.0, 60.0)
          ..close(),
        Colors.red,
        4,
        true);

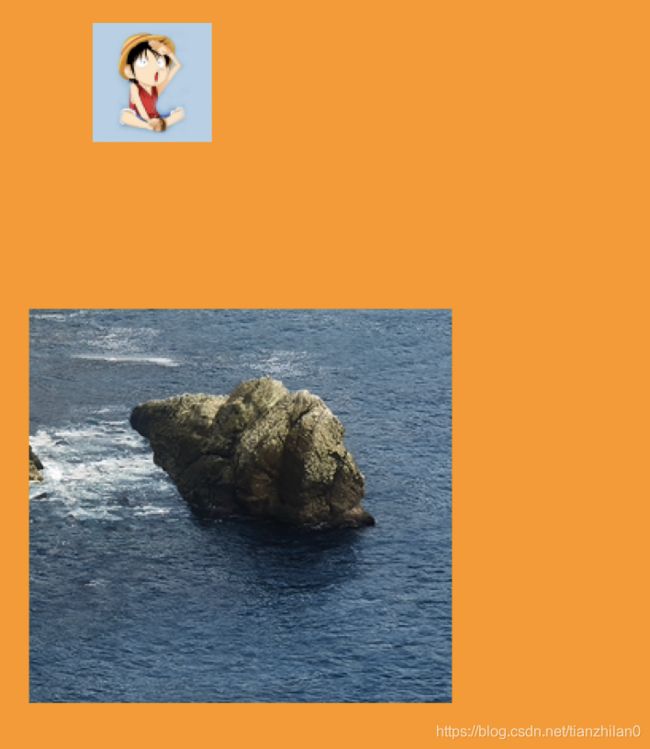
2.12 drawImage 绘制图片
drawImage 用于绘制图片,绘制图片是重点,此时的 Image 并非日常所用的图片加载,而是用的 dart.ui 类中的 ui.Image 并转换成字节流 ImageStream 方式传递,包括本地图片或网络图片
import 'dart:async';
import 'dart:ui' as ui;
import 'package:flutter/material.dart';
import 'package:flutter/services.dart';

class DrawImagePage extends StatefulWidget {
  DrawImagePage({Key key}) : super(key: key);

  @override
  _DrawImagePageState createState() => _DrawImagePageState();
}

class _DrawImagePageState extends State<DrawImagePage> {
  ui.Image _image1;
  ui.Image _image2;

  @override
  void initState() {
    super.initState();
    _prepareImg();
  }

  @override
  Widget build(BuildContext context) {
    var winH = MediaQuery.of(context).size.height;
    var winW = MediaQuery.of(context).size.width;

    return Scaffold(
      appBar: AppBar(),
      body: CustomPaint(
        size: Size(winW, winH),
        painter: LCPainter(_image1, _image2),
      ),
    );
  }

  Future<ui.Image> load(String asset) async {
    ByteData data = await rootBundle.load(asset);
    ui.Codec codec = await ui.instantiateImageCodec(data.buffer.asUint8List());
    ui.FrameInfo fi = await codec.getNextFrame();
    return fi.image;
  }

  // 获取图片 本地为false 网络为true
  Future<ui.Image> _loadImage(var path, bool isUrl) async {
    ImageStream stream;
    if (isUrl) {
      stream = NetworkImage(path).resolve(ImageConfiguration.empty);
    } else {
      stream = AssetImage(path, bundle: rootBundle)
          .resolve(ImageConfiguration.empty);
    }
    Completer<ui.Image> completer = Completer<ui.Image>();
    var listener = ImageStreamListener((ImageInfo info, bool syncCall) {
      final ui.Image image = info.image;
      completer.complete(image);
      // stream.removeListener(listener);
    });

    stream.addListener(listener);
    return completer.future;
  }

// 加载图片
  _prepareImg() {
    _loadImage('images/test.png', false).then((image1) {
      _image1 = image1;
    }).whenComplete(() {
      _loadImage('https://profile.csdnimg.cn/B/F/F/3_tianzhilan0', true)
          .then((image2) {
        _image2 = image2;
      }).whenComplete(() {
        if (this.mounted) {
          setState(() {});
        }
      });
    });
  }
}

class LCPainter extends CustomPainter {
  final ui.Image image1;
  final ui.Image image2;
  LCPainter(this.image1, this.image2);
  @override
  void paint(Canvas canvas, Size size) {
    canvas.drawColor(Colors.orange, BlendMode.srcIn);

    canvas.drawImage(image1, Offset(20.0, 240.0), Paint());
    canvas.drawImage(image2, Offset(60.0, 60.0), Paint());
  }

  @override
  bool shouldRepaint(CustomPainter oldDelegate) {
    return true;
  }
}
2.13 drawImageRect 绘制矩形图片
drawImageRect 除了可以正常绘制图片之外,还可以绘制图片部分内容,如下:第一个参数为 ui.Image,第二个参数为需要原图绘制矩形范围,第三个参数为本次绘制矩形范围,最后一个为画笔;
    canvas.drawImageRect(
        this.image1,
        Rect.fromLTWH(0, 0, 150, 150),
        Rect.fromLTWH(
            60, 60, image1.width.toDouble(), image1.height.toDouble()),
        Paint());

2.14 drawImageNine 绘制九图
drawImageNine 同样用来绘制图片,与原图绘制方式不同在于,drawImageNine 中第二个参数矩形变长延伸将原图分割为九部分,划为中心区域,第三个参数矩形即绘制整体矩形范围,包括四个顶点位置;小菜绘制原图与部分图进行对比,drawImageNine 绘制的原图绿色圈出的范围
    canvas.drawImageNine(
        this.image1,
        Rect.fromLTWH(0, 0, 150, 150),
        Rect.fromLTWH(
            60, 60, image1.width.toDouble(), image1.height.toDouble()),
        Paint());
2.15 drawParagraph 绘制文字段落
文字段落 Paragraph 是 dart.ui 中的类,用构造器方式进行内容绑定;ParagraphStyle 用来设置文字的样式属性,包括文字位置/方向/字体粗细/文字样式/行数等;其中 ellipsis 用来设置内容超出范围截取时最后展示内容,可随意编辑;
    ParagraphBuilder pb = ParagraphBuilder(ParagraphStyle(
      textAlign: TextAlign.center,
      fontWeight: FontWeight.w600,
      fontStyle: FontStyle.normal,
      fontSize: 18,
    ))
      ..pushStyle(ui.TextStyle(color: Colors.blue))
      ..addText(
          "Flutter 是 Google 开源的 UI 工具包,帮助开发者通过一套代码库高效构建多平台精美应用,支持移动、Web、桌面和嵌入式平台。Flutter 开源、免费,拥有宽松的开源协议,适合商业项目。");
    ParagraphConstraints pc = ParagraphConstraints(width: 320);
    Paragraph paragraph = pb.build()..layout(pc);
    canvas.drawParagraph(paragraph, Offset(30, 30));

    pb = ParagraphBuilder(ParagraphStyle(
      fontStyle: FontStyle.normal,
      fontWeight: FontWeight.w300,
      fontSize: 18,
    ))
      ..pushStyle(ui.TextStyle(color: Colors.red))
      ..addText(
          "Flutter 是 Google 开源的 UI 工具包,帮助开发者通过一套代码库高效构建多平台精美应用,支持移动、Web、桌面和嵌入式平台。Flutter 开源、免费,拥有宽松的开源协议,适合商业项目。");
    pc = ParagraphConstraints(width: 320);
    paragraph = pb.build()..layout(pc);
    canvas.drawParagraph(paragraph, Offset(30, 180));

    pb = ParagraphBuilder(ParagraphStyle(
      fontStyle: FontStyle.normal,
      fontSize: 18,
      maxLines: 3,
      ellipsis: '...',
    ))
      ..pushStyle(ui.TextStyle(color: Colors.green))
      ..addText(
          "Flutter 是 Google 开源的 UI 工具包,帮助开发者通过一套代码库高效构建多平台精美应用,支持移动、Web、桌面和嵌入式平台。Flutter 开源、免费,拥有宽松的开源协议,适合商业项目。");
    pc = ParagraphConstraints(width: 320);
    paragraph = pb.build()..layout(pc);
    canvas.drawParagraph(paragraph, Offset(30, 340));

2.15 clipRect 裁剪矩形
clipRect 可以在规定的矩形内进行绘制,超出范围不绘制;
    canvas.clipRect(Rect.fromLTWH(30, 100, 400, 300), doAntiAlias: false);

    canvas.drawImage(this.image1, ui.Offset(60, 30), Paint());
    canvas.drawImage(this.image1, ui.Offset(60, 300), Paint());

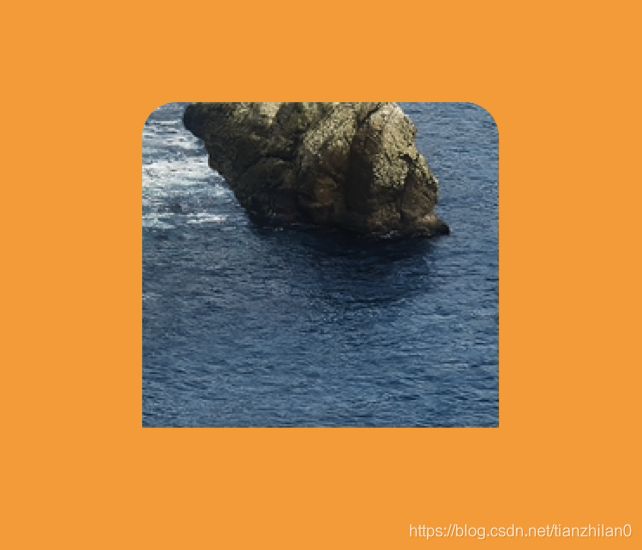
2.16 clipRRect 裁剪圆角矩形
clipRRect 可以在规定的圆角矩形内进行绘制,超出范围不绘制;
    canvas.clipRRect(
        RRect.fromRectXY(
            Rect.fromLTWH(100, 100, image1.width - 60.0, 300), 20, 20),
        doAntiAlias: false);
    canvas.drawImage(this.image1, ui.Offset(60, 40), Paint());
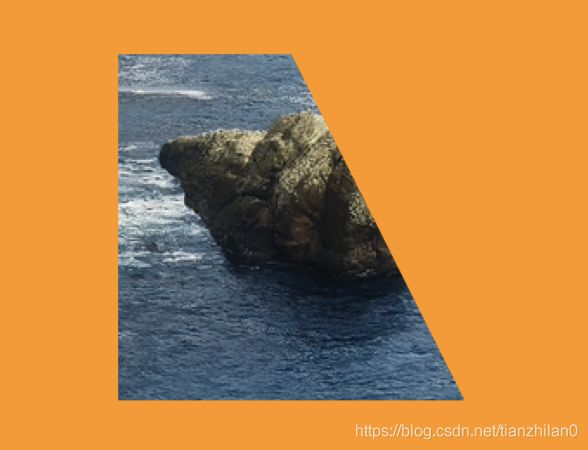
2.17 clipPath 裁剪由线围成区域
clipPath 可以在规定的点连线范围内进行绘制,默认终点与始点连接,当然可以绘制圆或贝塞尔曲线等,超出范围不绘制;
    canvas.clipPath(Path()
      ..moveTo(100, 100)
      ..lineTo(200, 100)
      ..lineTo(300, 300)
      ..lineTo(100, 300));
    canvas.drawImage(this.image1, ui.Offset(60, 90), Paint());