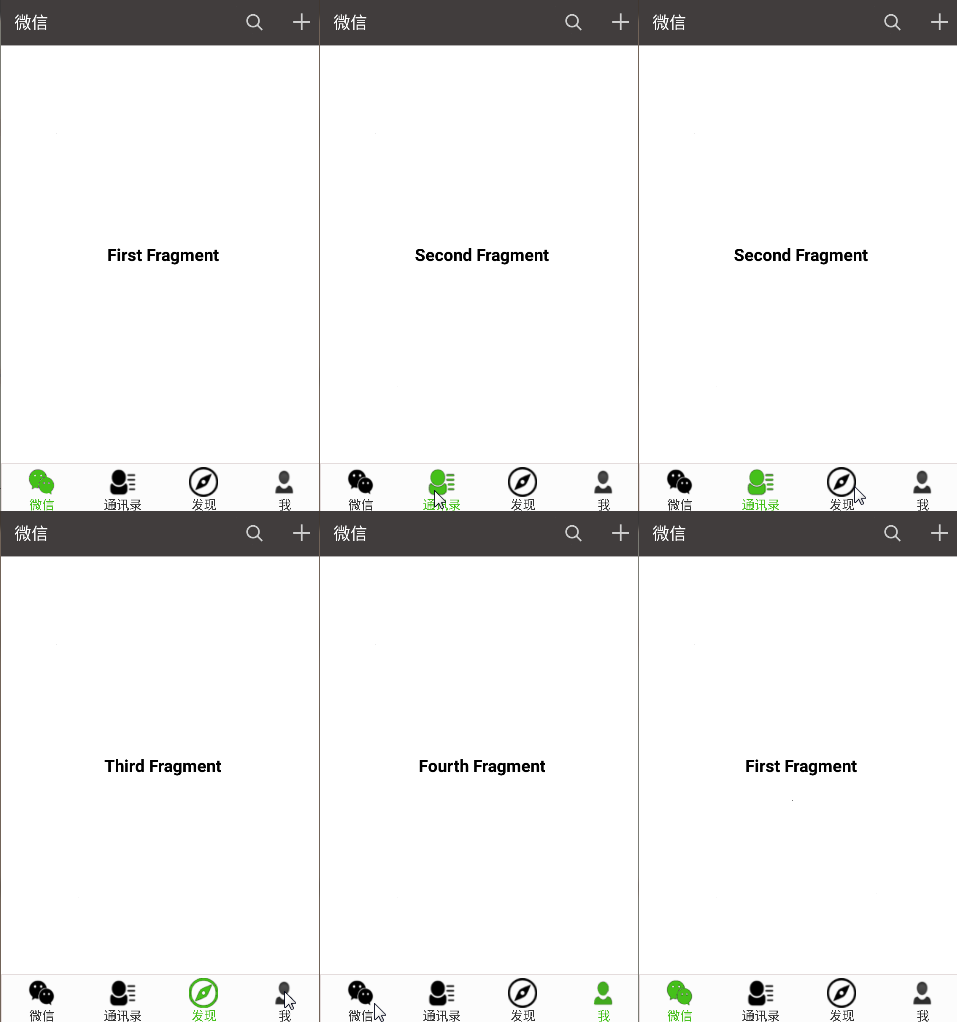
Android小例子--实现微信界面
大家都用过微信,相信都对那种页面在手指滑动间自由切换的效果十分惊奇吧,这篇博客就介绍如何用 ViewPager + Fragment 来实现自由切换页面。ViewPager 和 Fragment 的基本介绍我在以前的博客中都有介绍,有兴趣的朋友可以去看看。
1、TitleBar的实现
一般都是认为从上而下,所以首先是来实现 TitleBar。我这里是使用 ToolBar 来实现,首先是布局文件中 ToolBar 的引用:
"http://schemas.android.com/apk/res/android"
    xmlns:app="http://schemas.android.com/apk/res-auto"
    android:layout_width="match_parent"
    android:layout_height="match_parent"
    android:orientation="vertical">

    .support.v7.widget.Toolbar
        app:subtitleTextColor="?android:attr/textColorPrimary"
        android:id="@+id/id_toolbar"
        android:background="?attr/colorPrimary"
        android:layout_width="match_parent"
        android:layout_height="wrap_content" >

        "微信"
            android:textSize="20sp"
            android:textColor="?android:attr/textColorPrimary"
            android:layout_width="wrap_content"
            android:layout_height="wrap_content" />

    .support.v7.widget.Toolbar>
还有对样式的修改,style.xml:
<resources>
<style name="AppTheme" parent="Theme.AppCompat.NoActionBar">
<item name="android:windowBackground">@color/windowBackground
- "colorPrimary"
>#413d3d
- "colorPrimaryDark"
>#000000
style>
resources>在 Menu 中为 ToolBar 增加两个 item,menu_main.xml:
<menu xmlns:android="http://schemas.android.com/apk/res/android"
    xmlns:app="http://schemas.android.com/apk/res-auto"
    xmlns:tools="http://schemas.android.com/tools"
    tools:context=".MainActivity">

    <item android:id="@+id/tool_search"
        app:actionViewClass="android.support.v7.widget.SearchView"
        android:icon="@mipmap/toolbar_search_icon"
        app:showAsAction="ifRoom|collapseActionView"
        android:title="search" />

    <item android:id="@+id/tool_overflow"
        android:icon="@mipmap/toolbar_add_icon"
        app:showAsAction="always"
        android:title="overflow" />

menu>
在这里我用 PopUpWindow 替代系统提供的弹出框,PopUpWindow 的布局文件 action_overflow_popupwindow.xml:
<LinearLayout xmlns:android="http://schemas.android.com/apk/res/android"
    android:layout_width="wrap_content"
    android:layout_height="wrap_content"
    android:background="#2a2c2e"
    android:orientation="vertical"
    android:padding="10dp">

    <LinearLayout
        android:paddingBottom="10dp"
        android:id="@+id/ll_item1"
        android:layout_width="match_parent"
        android:layout_height="wrap_content"
        android:gravity="center">

        <ImageView
            android:layout_width="wrap_content"
            android:layout_height="wrap_content"
            android:src="@mipmap/groupchat" />

        <TextView
            android:layout_width="wrap_content"
            android:layout_height="wrap_content"
            android:layout_marginLeft="18dp"
            android:layout_marginRight="50dp"
            android:text="发起群聊"
            android:textColor="#ffffff"
            android:textSize="18sp" />
    LinearLayout>

    <LinearLayout
        android:paddingBottom="10dp"
        android:id="@+id/ll_item2"
        android:layout_width="match_parent"
        android:layout_height="wrap_content"
        android:gravity="center">

        <ImageView
            android:layout_width="wrap_content"
            android:layout_height="wrap_content"
            android:src="@mipmap/menu_add_icon" />

        <TextView
            android:layout_width="wrap_content"
            android:layout_height="wrap_content"
            android:layout_marginLeft="18dp"
            android:layout_marginRight="50dp"
            android:text="添加朋友"
            android:textColor="#ffffff"
            android:textSize="18sp" />
    LinearLayout>

    <LinearLayout
        android:paddingBottom="10dp"
        android:id="@+id/ll_item3"
        android:layout_width="match_parent"
        android:layout_height="wrap_content"
        android:gravity="center">

        <ImageView
            android:layout_width="wrap_content"
            android:layout_height="wrap_content"
            android:src="@mipmap/men_scan_icon" />

        <TextView
            android:layout_width="wrap_content"
            android:layout_height="wrap_content"
            android:layout_marginLeft="20dp"
            android:layout_marginRight="70dp"
            android:text="扫一扫"
            android:textColor="#ffffff"
            android:textSize="18sp" />
    LinearLayout>

    <LinearLayout
        android:paddingBottom="10dp"
        android:id="@+id/ll_item4"
        android:layout_width="match_parent"
        android:layout_height="wrap_content"
        android:gravity="center">

        <ImageView
            android:layout_width="wrap_content"
            android:layout_height="wrap_content"
            android:src="@drawable/pay" />

        <TextView
            android:layout_width="wrap_content"
            android:layout_height="wrap_content"
            android:layout_marginLeft="20dp"
            android:layout_marginRight="70dp"
            android:text="收付款"
            android:textColor="#ffffff"
            android:textSize="18sp" />
    LinearLayout>

    <LinearLayout
        android:id="@+id/ll_item5"
        android:layout_width="match_parent"
        android:layout_height="wrap_content"
        android:gravity="center">

        <ImageView
            android:layout_width="wrap_content"
            android:layout_height="wrap_content"
            android:src="@mipmap/menu_feedback_icon" />

        <TextView
            android:layout_width="wrap_content"
            android:layout_height="wrap_content"
            android:layout_marginLeft="18dp"
            android:layout_marginRight="35dp"
            android:text="帮助和反馈"
            android:textColor="#ffffff"
            android:textSize="18sp" />
    LinearLayout>

LinearLayout>
这个 PopUpWindow 布局的细节大家根据自己的需要修改即可。
然后在代码中设置 menu,用 ToolBar 代替 ActionBar,设置 PopUpWindow 的位置:
public class MainActivity extends AppCompatActivity implements View.OnClickListener{

    private Toolbar mToolBar;
    private PopupWindow mPopupWindow;

    @Override
    protected void onCreate(Bundle savedInstanceState) {
        super.onCreate(savedInstanceState);
        setContentView(R.layout.activity_main);
        mToolBar = (Toolbar) findViewById(R.id.id_toolbar);

        setSupportActionBar(mToolBar);
        getSupportActionBar().setDisplayShowTitleEnabled(false);

        mToolBar.setOnMenuItemClickListener(new Toolbar.OnMenuItemClickListener() {
            @Override
            public boolean onMenuItemClick(MenuItem item) {

                switch (item.getItemId()) {
                    case R.id.tool_overflow :
                        popUpMyOverflow();
                        break;
                }

                return true;
            }
        });
    }

    @Override
    public boolean onCreateOptionsMenu(Menu menu) {
        getMenuInflater().inflate(R.menu.menu_main, menu);
        MenuItem item = menu.findItem(R.id.tool_search);
        SearchView mSearchView = (SearchView) MenuItemCompat.getActionView(item);

        mSearchView.setIconifiedByDefault(false);
        return true;
    }

    /**
     * 弹出自定义的popWindow
     */
    public void popUpMyOverflow() {
        //获取状态栏高度
        Rect frame = new Rect();
        getWindow().getDecorView().getWindowVisibleDisplayFrame(frame);
        //状态栏高度+toolbar的高度
        int yOffset = frame.top + mToolBar.getHeight();
        if (null == mPopupWindow) {
            //初始化PopupWindow的布局
            View popView = getLayoutInflater().inflate(R.layout.action_overflow_popwindow, null);
            //popView即popupWindow的布局,ture设置focusable.
            mPopupWindow = new PopupWindow(popView,
                    ViewGroup.LayoutParams.WRAP_CONTENT,
                    ViewGroup.LayoutParams.WRAP_CONTENT, true);
            //必须设置BackgroundDrawable后setOutsideTouchable(true)才会有效
            mPopupWindow.setBackgroundDrawable(new ColorDrawable());
            //点击外部关闭。
            mPopupWindow.setOutsideTouchable(true);
            //设置一个动画。
            mPopupWindow.setAnimationStyle(android.R.style.Animation_Dialog);
            //设置Gravity,让它显示在右上角。
            mPopupWindow.showAtLocation(mToolBar, Gravity.RIGHT | Gravity.TOP, 0, yOffset);
            //设置item的点击监听
            popView.findViewById(R.id.ll_item1).setOnClickListener(this);
            popView.findViewById(R.id.ll_item2).setOnClickListener(this);
            popView.findViewById(R.id.ll_item3).setOnClickListener(this);
            popView.findViewById(R.id.ll_item4).setOnClickListener(this);
            popView.findViewById(R.id.ll_item5).setOnClickListener(this);
        } else {
            mPopupWindow.showAtLocation(mToolBar, Gravity.RIGHT | Gravity.TOP, 0, yOffset);
        }

    }

    @Override
    public void onClick(View v) {

        //点击PopWindow的item后,关闭此PopWindow
        if (null != mPopupWindow && mPopupWindow.isShowing()) {
            mPopupWindow.dismiss();
        }
    }
}
关于 ToolBar 的介绍和以上例子的解释我在我的博客Android–ToolBar基本介绍都有详细的说明,所以这里就不注重这里啦。
2、ViewPager+Fragment
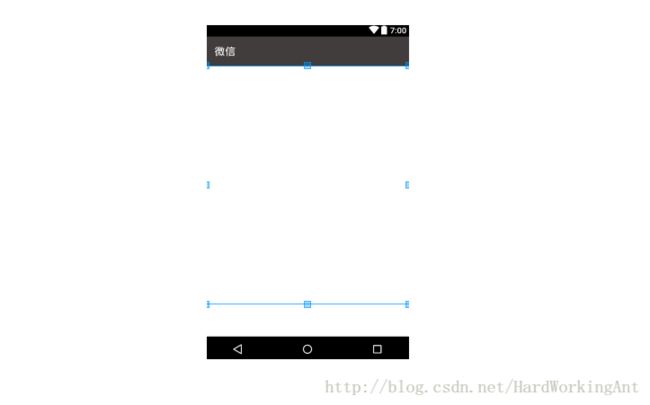
上面说过我们的滑动切换页面用的是 ViewPager+Fragment,大家都知道微信主页面分为三部分,除了已经实现的 ToolBar,还有页面和底部的四个 Item,所以我们在设计 ViewPager 的时候也要考虑它们的布局,我们来看看:
.support.v4.view.ViewPager
    android:id="@+id/id_viewpager"
    android:layout_width="match_parent"
    android:layout_height="0dp"
    android:layout_weight="1"/>

"match_parent"
    android:layout_height="60dp">
大家应该都清楚 weight 的作用,我们为底部的 LinearLayout 设置了高度,剩下的就都分配给 ViewPager 了。
大家在用微信时看到底部的背景并不是白色的,不仅颜色不同还有一条分隔线,我们先给 LinearLayout 加上这个背景好区别它和 ViewPager,就用 Drawable 来实现:
<shape xmlns:android="http://schemas.android.com/apk/res/android">

    <stroke android:width="1dp"
        android:color="#e4dcdc">stroke>

    <solid android:color="#fcfcfc">solid>

shape><LinearLayout
android:background="@drawable/shape"
android:layout_width="match_parent"
android:layout_height="60dp">
LinearLayout>对 Drawable 标签不了解的朋友可以看我的博客Android–Drawable标签介绍。
我们写个 Fragment:
public class TabFragment extends Fragment {

    private String title = "";

    @Nullable
    @Override
    public View onCreateView(LayoutInflater inflater, @Nullable ViewGroup container,
                             Bundle savedInstanceState) {

        View view = inflater.inflate(R.layout.action_fragment, container, false);
        TextView textView = (TextView) view.findViewById(R.id.id_textView);

        if (getArguments() != null) {
            title = getArguments().getString("title").toString();
            textView.setText(title);
        }
        return view;
    }
}
布局就是一个居中的 TextView,我们有 Activity 给 Fragment 传值决定它的 TextView 显示什么值。
在 Activity 中为 ViewPager 设置好 Fragment:
private ViewPager mViewPager;
private List mTabList = new ArrayList();
private String[] mTitles = new String[] {
    "First Fragment", "Second Fragment", "Third Fragment", "Fourth Fragment"
};

private void initMyViewPager() {

    mViewPager = (ViewPager) findViewById(R.id.id_viewpager);
    for (int i = 0; i < mTitles.length; i++) {
        TabFragment fragment = new TabFragment();
        Bundle bundle = new Bundle();
        bundle.putString("title", mTitles[i]);
        fragment.setArguments(bundle);
        mTabList.add(fragment);
    }
}
四个 Fragment 已经初始化好了,我们需要把它设置给 ViewPager。我在博客ViewPager的基础使用介绍介绍了 PagerAdapter,而 ViewPager 有个专门为 Fragment 设计的适配器——FragmentPagerAdapter,我先来介绍一下:
FragmentPagerAdapter
FragmentPagerAdapter 继承自 PagerAdapter,它是用来呈现 Fragment 页面的,这些 Fragment 会一直保存在fragment manager中,以便用户可以随时取用。
如果要处理大量的页面切换,建议使用FragmentStatePagerAdapter.
对于FragmentPagerAdapter的派生类,只需要重写 getItem(int) 和 getCount() 就可以了。
private FragmentPagerAdapter mAdapter;

private void initMyViewPager() {

    mViewPager = (ViewPager) findViewById(R.id.id_viewpager);
    for (int i = 0; i < mTitles.length; i++) {
        TabFragment fragment = new TabFragment();
        Bundle bundle = new Bundle();
        bundle.putString("title", mTitles[i]);
        fragment.setArguments(bundle);
        mTabList.add(fragment);
    }

    FragmentManager fm = getSupportFragmentManager();

    mAdapter = new FragmentPagerAdapter(fm) {
        @Override
        public Fragment getItem(int position) {
            return mTabList.get(position);
        }

        @Override
        public int getCount() {
            return mTabList.size();
        }
    };
    mViewPager.setAdapter(mAdapter);
}
这里就要注意的就是我们所用的关于 ViewPager 和 Fragment 的类都是 Support_V4 下的,在导包的时候要注意。
3、自定义底部View
1、自定义属性
我们这个底部的 Item 要实现设置 Icon,变化颜色,文字内容,字体大小,这些靠系统给我们的控件实现不了,所用我们要自定义 View。设置这些可以用自定义属性,res/values/attrs.xml:
<resources>

    <attr name="icon" format="reference"/>
    <attr name="color" format="color"/>
    <attr name="text" format="string"/>
    <attr name="text_size" format="dimension"/>

    <declare-styleable name="IconWithTextView">
        <attr name="icon"/>
        <attr name="color"/>
        <attr name="text"/>
        <attr name="text_size"/>
    declare-styleable>

resources>
不了解自定义属性的朋友可以看看我的博客Android–自定义控件解析(一),这里注意字体的大小是有单位 sp 的,所以它的格式是 dimension。
public class IconWithTextView extends View {

    private int color;
    private Bitmap iconBitmap;
    private String text = "";
    private float textSize;

    public IconWithTextView(Context context) {
        this(context, null);
    }

    public IconWithTextView(Context context, @Nullable AttributeSet attrs) {
        this(context, attrs, 0);
    }

    public IconWithTextView(Context context, @Nullable AttributeSet attrs, int defStyleAttr) {
        super(context, attrs, defStyleAttr);
        init(context, attrs);
    }

    private void init(Context context, AttributeSet attrs) {
        TypedArray ta = context.obtainStyledAttributes(attrs, R.styleable.IconWithTextView);

        BitmapDrawable bd = (BitmapDrawable) ta.getDrawable(R.styleable.IconWithTextView_icon);
        iconBitmap = bd.getBitmap();

        color = ta.getColor(R.styleable.IconWithTextView_color, 0);

        text = (String) ta.getText(R.styleable.IconWithTextView_text);

        textSize = ta.getDimension(R.styleable.IconWithTextView_text_size, 0);

        ta.recycle();
    }
}<com.ht.weixintest.IconWithTextView
android:id="@+id/id_indicator_one"
android:layout_width="0dp"
app:text_size="15sp"
app:text="微信"
app:icon="@drawable/chat"
app:color="FF45C01A"
android:layout_height="match_parent"
android:layout_weight="1"/>我们在布局的 xml 文件中设置这几个自定义属性的值,由代码获取去绘制图像。
2、绘制图像
我们可以知道底部 Item 的重点在图片在切换 Fragment 的时候会变色,将图像的颜色覆盖就要用到 PorterDuff.Mode 了,我在博客Android图形处理–PorterDuff.Mode那些事儿,详细的介绍了 PorterDuff.Mode 各种模式的作用,不了解的朋友可以看看。
我们要把画布上的颜色作为图片的,所以这里我们要使用的是 DST_IN。
在绘制的时候需要 Paint、Canvas、Rect,所以我们在绘制前先要对它们初始化:
private Canvas mCanvas;
private Bitmap mBitmap;
private Paint mPaint;

private int mAlpha;

private Rect mIconRect;
private Rect mTextBound;

private Paint mTextPaint;

private void init(Context context, AttributeSet attrs) {

    ...

    mTextPaint = new Paint();
    mTextBound = new Rect();
    mTextPaint.setTextSize(textSize);
    mTextPaint.setColor(0xFF333333);
    mTextPaint.getTextBounds(text, 0, text.length(), mTextBound);
}
文本的绘制要相对简单一些,它的范围和字体的大小和文字长度有关,我们可以比较得到它绘制的大小范围,绘制 Icon 的 Paint 和 Rect 就要在 onMeasure() 中一步步获取了:
@Override
protected void onMeasure(int widthMeasureSpec, int heightMeasureSpec) {
    super.onMeasure(widthMeasureSpec, heightMeasureSpec);

    int iconWidth = Math.min(getMeasuredWidth() - getPaddingLeft() - getPaddingRight(),
                             getMeasuredHeight() - getPaddingTop() - mTextBound.height() - getPaddingBottom());

    int left = getMeasuredWidth() / 2 - iconWidth / 2;
    int top = getMeasuredHeight() / 2 - (iconWidth + mTextBound.height()) / 2;

    mIconRect = new Rect();
    mIconRect.set(left, top, left + iconWidth, top + iconWidth);
}
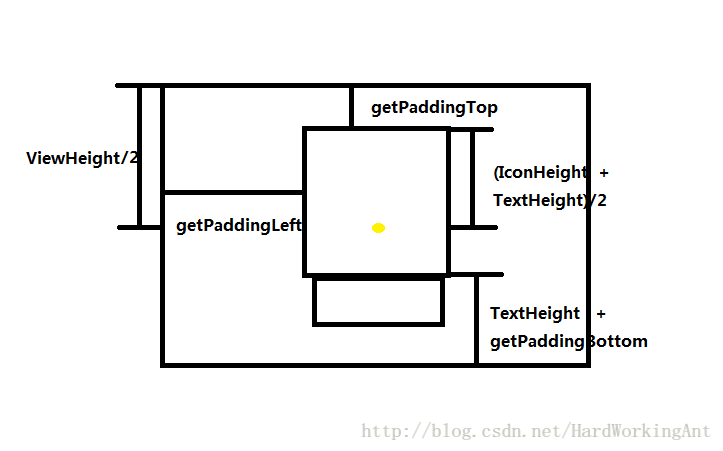
在 onMeasure() 中测量的就是我们的 Icon 要绘制在 View 的什么位置,计算方法看下图:
我们可以把 icon 和 文本看作一个整体,它们的中心就是 View 的中心,我们先获得 Icon 的宽高,再由此一一得到 Icon 上下左右的坐标。
为 mIconRect 赋好值以后就可以开始绘制 Icon 了,关于绘制 View 都要在 onDraw() 中进行:
@Override
protected void onDraw(Canvas canvas) {

    canvas.drawBitmap(iconBitmap, null, mIconRect, null);
    super.onDraw(canvas);
}
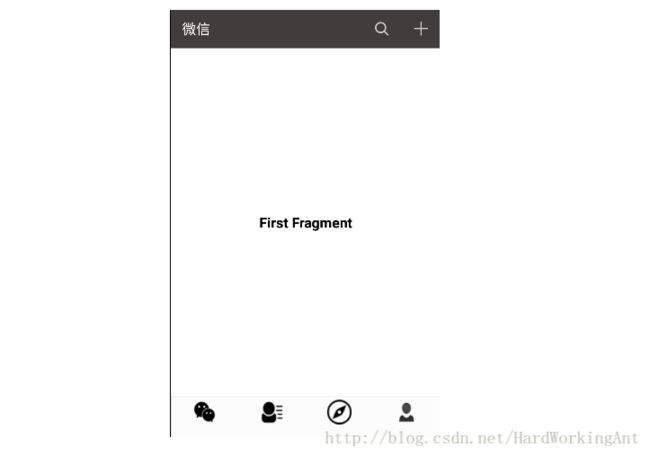
我选的图片不是很好,不过也可以使用。
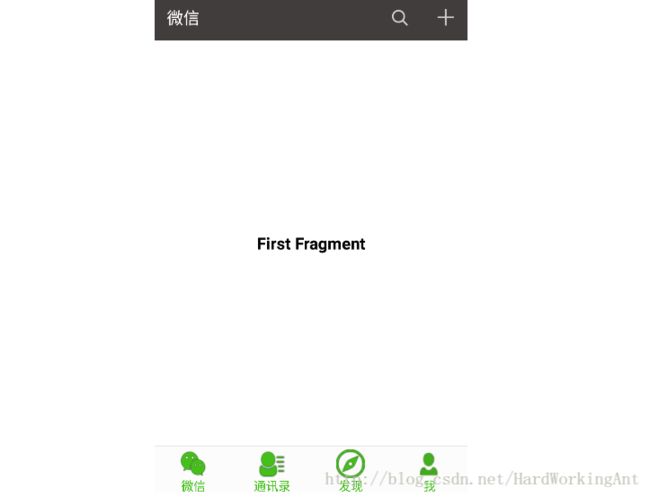
接下来就是将 Icon 的颜色变换为绿色,原理是创建一张绿色的画布,然后用一个 Bitmap 在画布上利用 PorterDuff.Mode 绘制出 Icon 的样子,最后在 View 的 Canvas 上重新绘制这个设置好的 Bitmap:
@Override
protected void onDraw(Canvas canvas) {

    canvas.drawBitmap(iconBitmap, null, mIconRect, null);

    int alpha = (int) Math.ceil(255 * mAlpha);

    setUpTargetBitmap(alpha);

    canvas.drawBitmap(mBitmap, 0, 0, null);

    super.onDraw(canvas);
}
public void setUpTargetBitmap(int alpha) {
mBitmap = Bitmap.createBitmap(getMeasuredWidth(), getMeasuredHeight(),
Bitmap.Config.ARGB_8888);
mCanvas = new Canvas(mBitmap);
mPaint = new Paint();
mPaint.setColor(color);
mPaint.setAntiAlias(true);
mPaint.setDither(true);
mPaint.setAlpha(alpha);
mCanvas.drawRect(mIconRect, mPaint);
mPaint.setXfermode(new PorterDuffXfermode(PorterDuff.Mode.DST_IN));
mPaint.setAlpha(255);
mCanvas.drawBitmap(iconBitmap, null, mIconRect, mPaint);
}最后得到一个绿色的 Icon 图标的 mBitmap,在 canvas 上再绘制 mBitmap。
绘制文字就相对容易多了,因为我们只要改变画笔的颜色,绘制不同颜色的文字即可。
@Override
protected void onDraw(Canvas canvas) {

    canvas.drawBitmap(iconBitmap, null, mIconRect, null);

    int alpha = (int) Math.ceil(255 * mAlpha);

    setUpTargetBitmap(alpha);

    canvas.drawBitmap(mBitmap, 0, 0, null);

    drawSourceText(canvas, alpha);

    drawTargetText(canvas, alpha);

    super.onDraw(canvas);
}

private void drawTargetText(Canvas canvas, int alpha) {
    mTextPaint.setColor(color);
    mTextPaint.setAlpha(alpha);

    int x = getMeasuredWidth() / 2 - mTextBound.width() / 2;
    int y = mIconRect.bottom + mTextBound.height();

    canvas.drawText(text, x, y, mTextPaint);
}

private void drawSourceText(Canvas canvas, int alpha) {
    mTextPaint.setColor(0xFF333333);
    mTextPaint.setAlpha(255 - alpha);

    int x = getMeasuredWidth() / 2 - mTextBound.width() / 2;
    int y = mIconRect.bottom + mTextBound.height();

    canvas.drawText(text, x, y, mTextPaint);
}
我们要绘制两种不同颜色的文字,当颜色变换的时候只要改变文字的透明度即可,要呈现黑色文字时就设置黑色画笔的透明度为255,绿色画笔为0,它们两个的透明度总是相对的,图片的颜色变化也是透明度的变化。
因为重新绘制可能会修改画笔的颜色,所以在绘制文字的时候还得重新配置一下颜色。
public void setViewAlpha(float alpha) {
    this.mAlpha = alpha;
    invalidateView();
}

private void invalidateView() {
    if (Looper.getMainLooper() == Looper.myLooper()) {
        invalidate();
    } else {
        postInvalidate();
    }
}
setViewAlpha() 就是让我们在外界可以通过 View 的实例化对象改变它的绘制的透明度,既然改变了当然就要重新绘制,这里我们就要调用 invalidate() 或者 postInvalidate(),前者是在UI线程自身中使用,而后者在非UI线程中使用。Looper.myLooper() 返回当前的message线程,如果是主线程,就用 invalidate() 重新绘制,非UI线程则调用postInvalidate()。
4、与自定义View交互
到这里我们自定义View的绘制差不多就结束了,接下来就可以在 Activity 里实例化自定义的view,去处理每个 View 的点击变化和 Fragment 的切换变化。
private List mIndicators = new ArrayList();

private void initIndicators() {

    IconWithTextView first = (IconWithTextView) findViewById(R.id.id_indicator_one);
    IconWithTextView twice = (IconWithTextView) findViewById(R.id.id_indicator_two);
    IconWithTextView third = (IconWithTextView) findViewById(R.id.id_indicator_three);
    IconWithTextView fourth = (IconWithTextView) findViewById(R.id.id_indicator_four);

    first.setOnClickListener(this);
    twice.setOnClickListener(this);
    third.setOnClickListener(this);
    fourth.setOnClickListener(this);

    first.setViewAlpha(1.0f);
    mIndicators.add(first);
    mIndicators.add(twice);
    mIndicators.add(third);
    mIndicators.add(fourth);
}


@Override
public void onClick(View v) {

    resetViews();

    switch (v.getId()) {
        case R.id.id_indicator_one :
            mIndicators.get(0).setViewAlpha(1.0f);
            mViewPager.setCurrentItem(0, false);
            break;
        case R.id.id_indicator_two :
            mIndicators.get(1).setViewAlpha(1.0f);
            mViewPager.setCurrentItem(1, false);
            break;
        case R.id.id_indicator_three :
            mIndicators.get(2).setViewAlpha(1.0f);
            mViewPager.setCurrentItem(2, false);
            break;
        case R.id.id_indicator_four :
            mIndicators.get(3).setViewAlpha(1.0f);
            mViewPager.setCurrentItem(3, false);
            break;
    }

    //点击PopWindow的item后,关闭此PopWindow
    if (null != mPopupWindow && mPopupWindow.isShowing()) {
        mPopupWindow.dismiss();
    }
}

private void resetViews() {
    for (int i = 0; i < mIndicators.size(); i++) {
        mIndicators.get(i).setViewAlpha(0);
    }
}
我们自定义View的点击事件就是在点击图标后,view的颜色变化,其它图标的颜色重置并切换到对应的 Fragment。
还有一种要实现的就是在我们滑动切换 Fragment 的时候,图标也会随之发生变化,这就要监听 ViewPager 的事件发生啦。
mViewPager.addOnPageChangeListener(new ViewPager.OnPageChangeListener() {
    @Override
    public void onPageScrolled(int position, float positionOffset, int positionOffsetPixels) {

    }

    @Override
    public void onPageSelected(int position) {

    }

    @Override
    public void onPageScrollStateChanged(int state) {

    }
});
我们在 initViewPager() 里设置监听器就可以监听它的滑动事件了,这里的要点就是在滑动的过程中无论是 Icon 还是 Text 的颜色都是渐变的。这个变化自然是根据 ViewPager 的切换,这要看到 position 和 positionOffset 啦。
position 对应当前 Fragment 在 ViewPager 的下标,在滑动的过程中,position 永远是左边 Fragment 的下标。
positionOffset 是 0 到 1 的值([0,1)),从左往右滑动是从0变化到1,从右往左滑动是从1变化到0。
@Override
public void onPageScrolled(int position, float positionOffset, int positionOffsetPixels) {
    if (positionOffset >= 0) {

        IconWithTextView left, right;

        if (positionOffset == 0 && position != 0) {
            left = mIndicators.get(position - 1);
            right = mIndicators.get(position);
            left.setViewAlpha(positionOffset);
            right.setViewAlpha(1 - positionOffset);
        } else {
            left = mIndicators.get(position);
            right = mIndicators.get(position + 1);
            left.setViewAlpha(1 - positionOffset);
            right.setViewAlpha(positionOffset);
        }
    }
}
因为在完全切换到另一个 Fragment 时,positionOffset 会变成0,position 也会变成这个 Fragment 的下标,于是要考虑的情况就变化了。但如果不考虑 positionOffset 等于0的情况,就不能完全透明,那就不美啦。
5、Activity销毁
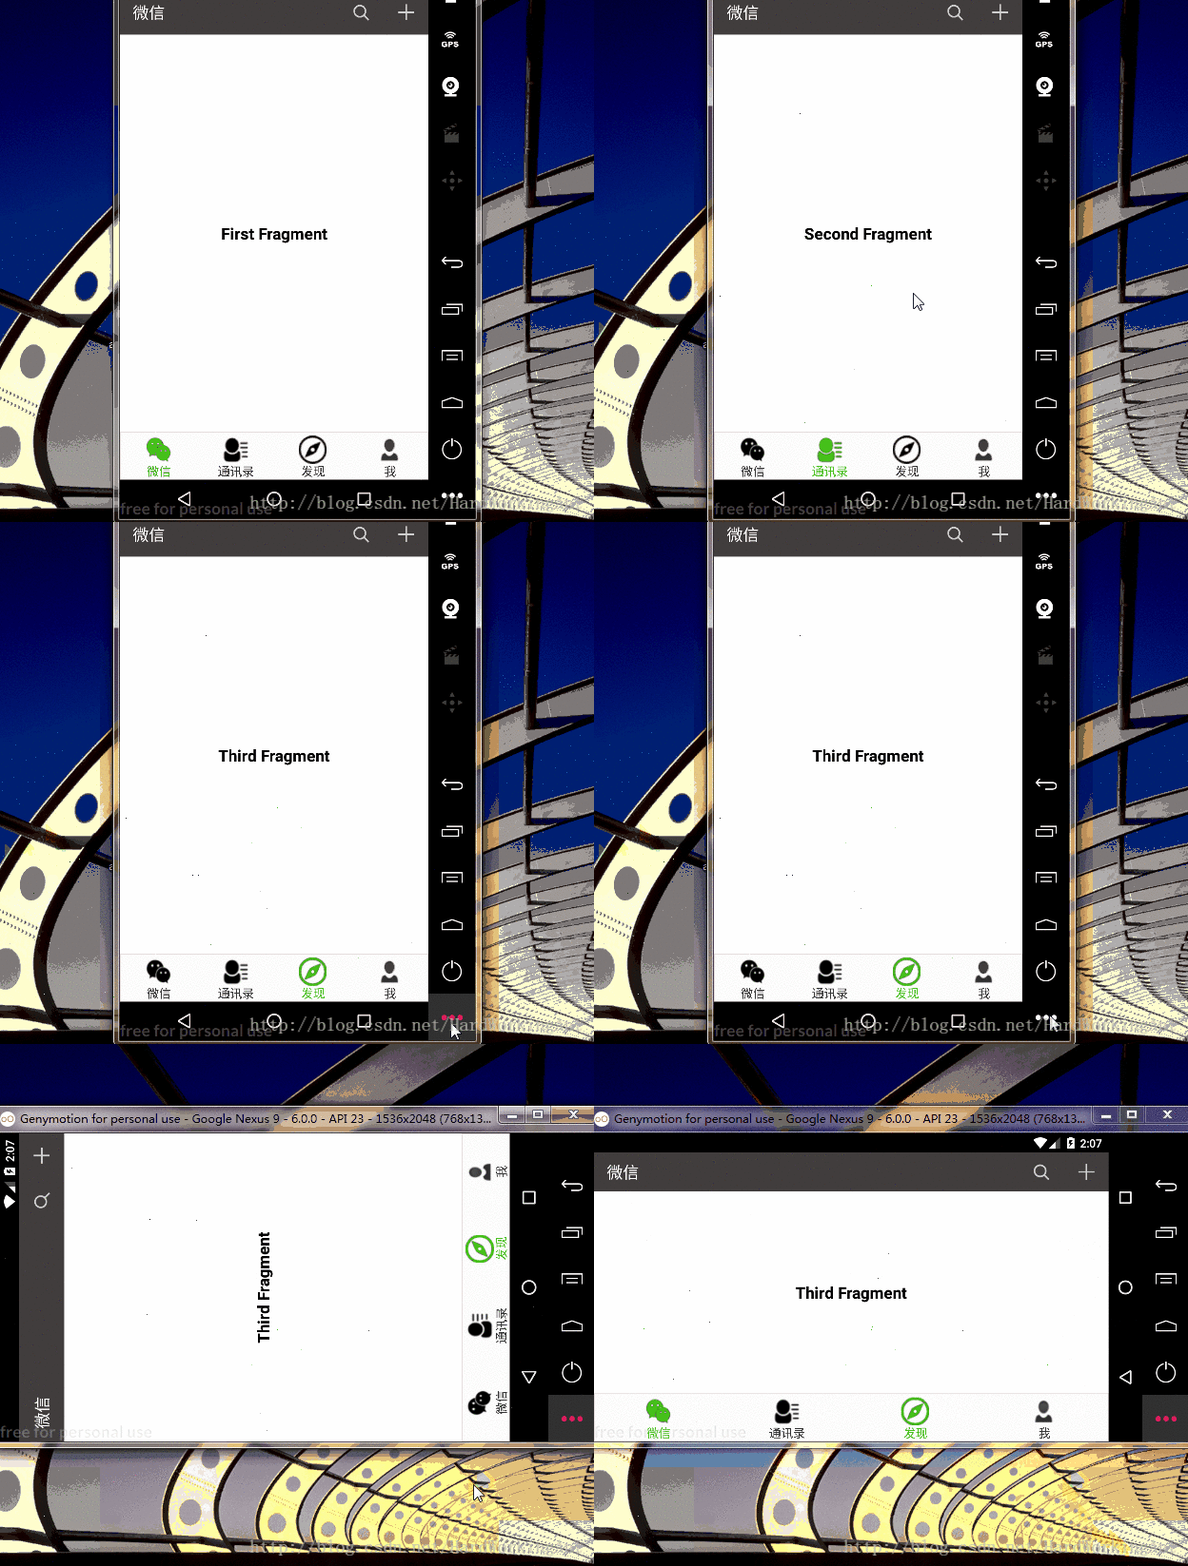
我们已经把微信界面的功能基本实现了,这里还有个要提及的就是,我们的自定义View是在 onCreate() 中调用方法,实例化对象进行绘制的,所以如果 Activity 被销毁了那么就会重新绘制,我们这个程序是让第一个View初始时是绿色,但我们 ViewPager 中已经实现了销毁 Activity 也会保存数据,所以如果销毁前当前 Fragment 是第三个销毁后仍是第三个,只是我们的自定义View并不是这样:
切换横竖屏时 Activity 就会被销毁重建,但因为我们这里对 positionOffset 判断了其等于0的情况,所以只要把上面的 first.setViewAlpha(1.0f) 注释掉,也可以实现对对应的 Fragment 绘制对应的颜色,不过这里是要讲一种方法来保存我们自定义View的数据。
@Override
protected Parcelable onSaveInstanceState() {

    return super.onSaveInstanceState();
}

@Override
protected void onRestoreInstanceState(Parcelable state) {

    super.onRestoreInstanceState(state);
}
在 View 中也有这两个方法,我们来修改它们就可以实现数据的保存。
private static final String INSTANCE_STATUS = "instance_status";
private static final String STATUS_ALPHA = "status_alpha";

@Override
protected Parcelable onSaveInstanceState() {
    Bundle bundle = new Bundle();
    bundle.putParcelable(INSTANCE_STATUS, super.onSaveInstanceState());
    bundle.putFloat(STATUS_ALPHA, mAlpha);
    return bundle;
}

@Override
protected void onRestoreInstanceState(Parcelable state) {

    if (state instanceof Bundle) {
        Bundle bundle = (Bundle) state;
        mAlpha = bundle.getFloat(STATUS_ALPHA);
        super.onRestoreInstanceState(bundle.getParcelable(INSTANCE_STATUS));
    }
}
这里要保存我们的数据,也别忘了对系统做的操作也做保存,这样我们就能在不变化设置的情况也能保存数据了。
这个例子我是参考鸿洋大神在慕课上的视频微信6.0主界面,大家可以看看。
结束语:本文仅用来学习记录,参考查阅。
