CocoaPods制作包含测试工程的动态库
之前在写App时,使用CocoaPods直接引入工程,非常简单方便。最近要做一个Framwork给其他团队使用,也想来使用CocoaPods来管理Framework库,但是苦于之前只是简单使用CocoaPods,而没有仔细看过。在这个创建Framework库和对应测试工程师,遇到了一些小问题,于是把CocoaPods中的一些用法又重新看了一遍。记录一下:
一、Pod自动创建动态库
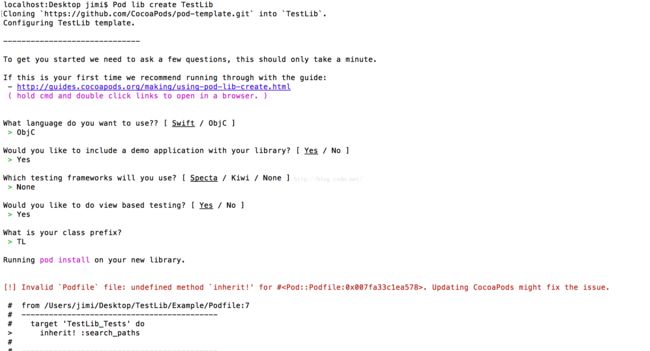
1、 CocoaPods本身自带lib参数命令,可以自动完成动态库的创建工作,本文以创建TestLib为例,讲解基本的创建过程。输入命令"Pod lib create TestLib"
按顺序回答几个问题后即可自动创建基于Pod管理的Lib,并可根据情况自动带demo测试工程。
2、工程目录结构介绍
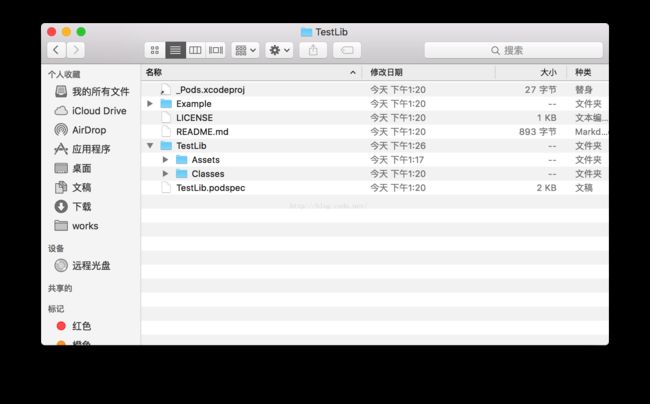
自动创建的工程目录结构如下:
其中:
Example是我们附带创建的demo工程,可以用于测试我们的TestLib动态库
TestLib下有Assets和Classes两个目录,
Assets: 存放资源文件(如图片等),依据配置的bundle信息,自动被打包到TestLib.bundle中,后面再介绍;
Classes:存放源码,依据配置会被打包至TestLib.framework库中。
3、TestLib.podspec介绍
#
# Be sure to run `pod lib lint TestLib.podspec' to ensure this is a
# valid spec before submitting.
#
# Any lines starting with a # are optional, but their use is encouraged
# To learn more about a Podspec see http://guides.cocoapods.org/syntax/podspec.html
#

Pod::Spec.new do |s|
  s.name             = 'TestLib'
  s.version          = '0.1.0'
  s.summary          = 'A short description of TestLib.'

# This description is used to generate tags and improve search results.
#   * Think: What does it do? Why did you write it? What is the focus?
#   * Try to keep it short, snappy and to the point.
#   * Write the description between the DESC delimiters below.
#   * Finally, don't worry about the indent, CocoaPods strips it!

  s.description      = <<-DESC
TODO: Add long description of the pod here.
                       DESC

  s.homepage         = 'https://github.com//TestLib'
  # s.screenshots     = 'www.example.com/screenshots_1', 'www.example.com/screenshots_2'
  s.license          = { :type => 'MIT', :file => 'LICENSE' }
  s.author           = { 'jimi-yuan' => '[email protected]' }
  s.source           = { :git => 'https://github.com//TestLib.git', :tag => s.version.to_s }
  # s.social_media_url = 'https://twitter.com/'

  s.ios.deployment_target = '8.0'

  s.source_files = 'TestLib/Classes/**/*'

  # s.resource_bundles = {
  #   'TestLib' => ['TestLib/Assets/*.png']
  # }

  # s.public_header_files = 'Pod/Classes/**/*.h'
  # s.frameworks = 'UIKit', 'MapKit'
  # s.dependency 'AFNetworking', '~> 2.3'
end s.source_files即前面提到的源码存放位置,默认一般无需修改;
s.resource_bundles即动态库所使用的资源文件存放位置
s.frameworks即TestLib动态库所依赖的系统库
s.dependency即TestLib动态库所依赖的第三方库,当需要依赖多个库时,需要分别添加,如:
s.dependency 'AFNetworking'
s.dependency 'CocoaAsyncSocket'3.1 进入Example目录,并运行pod install
不加任何修改时,默认创建的Example目录下的Podfile文件存在问题,打开Podfile文件,直接修改成如下即可:
use_frameworks!

target 'TestLib_Example' do
  pod 'TestLib', :path => '../'

  target 'TestLib_Tests' do
    pod 'TestLib', :path => '../'
  end
end二、TestLib库在Example中的引用
作为例子,我们仅仅实现非常简单的"Hello world"输出,使用Xcode打开TestLib.xcworkspace工程文件
2.1、在TestLib库中创建HelloWorld类,简单输出HelloWorld,如图所示:
2.2、引用"HelloWorld.h"头文件
在TLViewController.m中#import "HelloWorld.h",会发现HelloWorld.h这个头文件找不到,即关联不上。这是因为采用pod管理,在TestLib库中任何的更新,都需要同步至Example工程中,进入Example目录之行"pod update"即可。
    HelloWorld *hello = [[HelloWorld alloc] init];
    [hello output];
三、TestLib库资源文件使用
3.1 pod中的resources
resources的用法为:
s.resources = ["Image/*.png", "src/*.xib"]
这种写法会在工程打包App时,直接将所有的资源文件copy到App的mainBundle下,可能会存在重名问题,存在冲突的隐患,不建议使用此种方式。
3.2 pod中的resource_bundles
基于3.1中方法存在的隐患,pod提供了resource_bundles方式来尽量避免重名问题
resource_bundles的用法为:
s.resource_bundles = {
'TestLib' => ['TestLib/Assets/*.png']
}
即将工程目录下TestLib/Assets目录下所有以png后缀的文件打包成TestLib.bundles资源包
3.3 使用资源文件
1、直接被copy到App的mainBundle下的,当然可以用最常见的方式去获取,如:
[[NSBundle mainBundle] pathForResources...]
    NSBundle *bundleClass = [NSBundle bundleForClass:[self class]];                        //获取当前库对象运行的bundle路径
    NSURL *bundleURL = [bundleClass URLForResource:@"TestLib" withExtension:@"bundle"];    //得到TestLib.bundle资源库路径
    NSBundle *bundle = [NSBundle bundleWithURL:bundleURL];
    NSString *filename = @"checked@2x";
    CGFloat scale = 2.0;
    if (self.frame.size.width > 375.0) {//plus
        filename = @"checked@3x";
        scale = 3.0;
    }

    NSData *imageData = [NSData dataWithContentsOfFile:[bundle pathForResource:filename ofType:@"png"]];
    UIImage *image = [UIImage imageWithData:imageData];
    self.image = image;
四、TestLib库打包
4.1 Xcode打包
这种方式没得什么好说的。
4.2 pod插件打包
4.2.1 安装pod打包插件
sudo gem install cocoapods-packager
4.2.2 执行打包命令
pod package TestLib.podspec


