关于约束布局Constraintlayout
ConstraintLayout
约束布局,说是对RelativeLayout的提升版
http://blog.csdn.net/lmj623565791/article/details/78011599?utm_source=tuicool&utm_medium=referral
http://blog.csdn.net/fallfollowernolisten/article/details/61195236
http://www.jianshu.com/p/38ee0aa654a8
http://www.jianshu.com/p/c60f787817ad
https://segmentfault.com/a/1190000009536640
官方文档:
相对定位
相对于布局中的某个模块定位
水平轴:left,right,start,end
竖直轴:顶部,底部,文本基线
· layout_constraintLeft_toLeftOf
· layout_constraintLeft_toRightOf
· layout_constraintRight_toLeftOf
· layout_constraintRight_toRightOf
· layout_constraintTop_toTopOf
· layout_constraintTop_toBottomOf
· layout_constraintBottom_toTopOf
· layout_constraintBottom_toBottomOf
· layout_constraintBaseline_toBaselineOf
· layout_constraintStart_toEndOf
· layout_constraintStart_toStartOf
· layout_constraintEnd_toStartOf
· layout_constraintEnd_toEndOf
我们发现,上面差不多和RelativeLayout相似,多了一个BaselineOf
Margin
注意,这里也是相对的意思,相对左右的距离,那么我们要先指定View约束点的位置,比如在谁左边或者右边
· android:layout_marginStart
· android:layout_marginEnd
· android:layout_marginLeft
· android:layout_marginTop
· android:layout_marginRight
· android:layout_marginBottom
Gone Margin
当View是Gone的时候,设置的Margin,一般也就是在Visiable和Gone的Margin不同的时候使用
· layout_goneMarginStart
· layout_goneMarginEnd
· layout_goneMarginLeft
· layout_goneMarginTop
· layout_goneMarginRight
· layout_goneMarginBottom
bias偏差
· layout_constraintHorizontal_bias值是小数,0-1之间,表示控件中心点在横向方向,左边和右边距离比例
· layout_constraintVertical_bias
这种属性的使用是在设置约束点后,设置这个控件中心相对于约束点的偏差比例
圆定位:
以一个控件中心为圆心,通过半径和角度定位另一个控件的位置
· layout_constraintCircle : references another widget id(这个控件要以谁的中心为圆心)
· layout_constraintCircleRadius : the distance to the other widget center(半径)
· layout_constraintCircleAngle : which angle the widget should be at (in degrees, from 0 to 360)
MATCH_CONSTRAINT
相当于0dp
没看到这个属性的使用
看到有:
比如控件宽度设置0dp,在约束范围内,默认是充满宽度的,比如左右约束点是相对于parent的,那么宽度就会充满parent
· layout_constraintWidth_min 意思和width_min应该一样
· layout_constraintWidth_max
· layout_constraintWidth_default有两个选项值,wrap和spread,包含和充满,在width=0的时候有效
Guide Line
在属性中输入percent的时候,只有一个GuidePercent属性提示,是用于Guide line的,称为引导线,可以看做辅助线一样
我们可以在约束布局中创建引导线,然后在需要的组件中声明约束是相对于这条引导线的,比如
android:id="@+id/guide_line"
android:layout_width="wrap_content"
android:layout_height="wrap_content"
android:orientation="vertical"
app:layout_constraintGuide_percent="0.3"/>
android:layout_width="100dp"
android:layout_height="30dp"
android:background="@color/blue"
app:layout_constraintLeft_toRightOf="@id/guide_line"/>
Ratio
比率
属性是:
layout_constraintDimensionRatio,表示宽高比
使用的时候可以将宽或者高设置为0dp
比如:
android:layout_width="0dp"
android:layout_height="100dp"
android:background="@color/blue"
app:layout_constraintDimensionRatio="1:5"
app:layout_constraintTop_toTopOf="parent"
app:layout_constraintBottom_toBottomOf="parent"/>
这里设置高为100,宽高比为1:5,那么结果得到的就是宽度为100/5=20dp
第二种设置:
android:layout_width="0dp"
android:layout_height="0dp"
android:background="@color/blue"
app:layout_constraintDimensionRatio="v,1:5"
app:layout_constraintTop_toTopOf="parent"
app:layout_constraintBottom_toBottomOf="parent"/>
值有两部分,v,1:5,前面用v表示竖直方向,h就表示横向
Chains
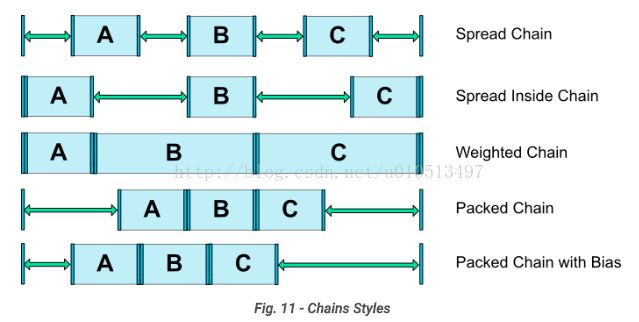
链表模式,在图中的显示是链条的样子,
一个控件设置了链表属性:
layout_constraintHorizontal_chainStyle or layout_constraintVertical_chainStyle
值有三种模式:
Spread:
Spread inside:
Packed:
权重weight:
对特定的组件设置 spread 权重,首先得选择这个 View 组件,假设该 View 是在一个水平的 Chain 链中,那么需要在属性视图(properties 视图)中设置 android:layout_width="0dp" 然后修改 app:layout_constraintHorizontal_weight="1"
同时要注意的是,在 packed Chain 链模式下设置权重 weight 并没有作用
Xml中的使用
要在xml中创建链条,那么需要先指定链条中第一个组件的约束点和链条模式;
然后需要指定链条中两个组件之间的关系,比如两个组件A和B是横向链条中的相邻的组件,A在左边,那么需要指定A的右边约束点在B的左边,B的左边约束点在A的右边,简而言之就是指定相邻的组件之间相互约束
注意:我自己的测试中,第一个一定要指定约束点,否则后面的设置margin没看到效果
android:id="@+id/tv_chain_0"
android:layout_width="100dp"
android:layout_height="40dp"
android:background="@color/blue"
app:layout_constraintTop_toTopOf="parent"
app:layout_constraintBottom_toBottomOf="parent"
app:layout_constraintVertical_bias="0.3"
app:layout_constraintStart_toStartOf="parent"
app:layout_constraintHorizontal_chainStyle="spread"
app:layout_constraintEnd_toStartOf="@id/tv_chain_1"/>
android:id="@+id/tv_chain_1"
android:layout_width="100dp"
android:layout_height="40dp"
android:background="@color/blue"
app:layout_constraintStart_toEndOf="@id/tv_chain_0"
app:layout_constraintTop_toTopOf="parent"
android:layout_marginLeft="10dp"
app:layout_constraintBottom_toBottomOf="parent"
app:layout_constraintVertical_bias="0.3"/>
最后,建议使用的时候先指定View的四个约束点


