Android图形图像处理技术
一、常用户绘图类
1 Paint类
Paint类代表画笔,用来描述图形的颜色和风格,如线宽、颜色、透明度和填充效果等信息。使用Paint类时,需要先创建该类的对象,这可以通过该类提供的构造方法来实现。通常情况下,只需要使用无参数的构造方法来创建一个使用默认设置的Paint对象,具体代码如下:
Paint paint=new Paint();Paint类的常用方法
| 方法 |
描述 |
| setARGB(int a, int r, int g, int b) |
用于设置颜色,各参数值均为0~255之间的整数,分别用于表示透明度、红色、绿色和蓝色值 |
| setColor(int color) |
用于设置颜色,参数color可以通过Color类提供的颜色常量指定,也可以通过Color.rgb(int red,int green,int blue)方法指定 |
| setAlpha(int a) |
用于设置透明度,值为0~255之间的整数 |
| setAntiAlias(boolean aa) |
用于指定是否使用抗锯齿功能,如果使用会使绘图速度变慢 |
| setDither(boolean dither) |
用于指定是否使用图像抖动处理,如果使用会使图像颜色更加平滑和饱满,更加清晰 |
| setPathEffect(PathEffect effect) |
用于设置绘制路径时的路径效果,例如点画线 |
| setShader(Shader shader) |
用于设置渐变,可以使用LinearGradient(线性渐变)、RadialGradient(径向渐变)或者SweepGradient(角度渐变) |
| setShadowLayer(float radius, float dx, float dy, int color) |
用于设置阴影,参数radius为阴影的角度,dx和dy为阴影在x轴和y轴上的距离,color为阴影的颜色。如果参数radius的值为0,那么将没有阴影 |
| setStrokeCap(Paint.Cap cap) |
用于当画笔的填充样式为STROKE或FILL_AND_STROKE时,设置笔刷的图形样式,参数值可以是Cap.BUTT、Cap.ROUND或Cap.SQUARE。主要体现在线的端点上 |
| setStrokeJoin(Paint.Join join) |
用于设置画笔转弯处的连接风格,参数值为Join.BEVEL、Join.MITER或Join.ROUND |
| setStrokeWidth(float width) |
用于设置笔触的宽度 |
| setStyle(Paint.Style style) |
用于设置填充风格,参数值为Style.FILL、Style.FILL_AND_STROKE或Style.STROKE |
| setTextAlign(Paint.Align align) |
用于设置绘制文本时的文字对齐方式,参数值为Align.CENTER、Align.LEFT或Align.RIGHT |
| setTextSize(float textSize) |
用于设置绘制文本时的文字的大小 |
| setFakeBoldText(boolean fakeBoldText) |
用于设置是否为粗体文字 |
| setXfermode(Xfermode xfermode) |
用于设置图形重叠时的处理方式,例如合并、取交集或并集,经常用来制作橡皮的擦除效果 |
2 Canvas类
Canvas类代表画布,通过该类提供的方法,我们可以绘制各种图形(例如,矩形、圆形和线条等)。通常情况下,要在Android中绘图,需要先创建一个继承自View类的视图,并且在该类中重写它的onDraw(Canvas canvas)方法,然后在显示绘图的Activity中添加该视图。
创建自定义类绘图
(1)创建一个名称为DrawView的类,并添加构造方法、重写onDraw方法
public class DrawView extends View {

	/**
	 * 功能:构造方法
	 */
	public DrawView(Context context, AttributeSet attrs) {
		super(context, attrs);
	}


	/*
	 * 功能:重写onDraw()方法
	 */
	@Override
	protected void onDraw(Canvas canvas) {
		Paint paint=new Paint();	//定义一个采用默认设置的画笔
		paint.setColor(Color.RED);	//设置颜色为红色
		paint.setShadowLayer(2, 3, 3, Color.rgb(180, 180, 180));	//设置阴影
		canvas.drawRect(40, 40, 200, 100, paint);		//绘制矩形
		super.onDraw(canvas);
	}

}
(2)在布局文件中添加自定义的DrawView视图
3 Bitmap类
Bitmap类代表位图,它是Android系统中图像处理的最重要类之一。使用它不仅可以获取图像文件信息,进行图像剪切、旋转、缩放等操作,而且还可以指定格式保存图像文件。Bitmap类提供的常用方法如下表所示。
| 方法 |
描述 |
| compress(Bitmap.CompressFormat format, int quality, OutputStream stream) |
用于将Bitmap对象压缩为指定格式并保存到指定的文件输出流中,其中format参数值可以是Bitmap.CompressFormat.PNG、Bitmap.CompressFormat. JPEG和Bitmap.CompressFormat.WEBP |
| createBitmap(Bitmap source, int x, int y, int width, int height, Matrix m, boolean filter) |
用于从源位图的指定坐标点开始,“挖取”指定宽度和高度的一块图像来创建新的Bitmap对象,并按Matrix指定规则进行变换 |
| createBitmap(int width, int height, Bitmap.Config config) |
用于创建一个指定宽度和高度的新的Bitmap对象 |
| createBitmap(Bitmap source, int x, int y, int width, int height) |
用于从源位图的指定坐标点开始,“挖取”指定宽度、和高度的一块图像来创建新的Bitmap对象 |
| createBitmap(int[] colors, int width, int height, Bitmap.Config config) |
使用颜色数组创建一个指定宽度和高度的新Bitimap对象,其中,数组元素的个数为width*height |
| createBitmap(Bitmap src) |
用于使用源位图创建一个新的Bitmap对象 |
| createScaledBitmap(Bitmap src, int dstWidth, int dstHeight, boolean filter) |
用于将源位图缩放为指定宽度和高度的新的Bitmap对象 |
| isRecycled() |
用于判断Bitmap对象是否被回收 |
| recycle() |
强制回收Bitmap对象 |
创建一个包括4个像素的Bitmap对象
Bitmap bitmap=Bitmap.createBitmap(new int[]{Color.RED,Color.GREEN,Color.BLUE,Color.MAGENTA}, 4, 1, Config.RGB_565);
4 BitmapFactory类
在Android中,还提供了一个BitmapFactory类,该类为一个工具类,用于从不同的数据源来解析、创建Bitmap对象。BitmapFactory类提供的创建Bitmap对象的常用方法如下表所示。
| 方法 |
描述 |
| decodeFile(String pathName) |
用于从给定的路径所指定的文件中解析、创建Bitmap对象 |
| decodeFileDescriptor(FileDescriptor fd) |
用于从FileDescriptor对应的文件中解析、创建Bitmap对象 |
| decodeResource(Resources res, int id) |
用于根据给定的资源ID从指定的资源中解析、创建Bitmap对象 |
| decodeStream(InputStream is) |
用于从指定的输入流中解析、创建Bitmap对象 |
实例1:解析SD卡上的图片文件img01.jpg,并创建对应的Bitmap对象
String path="/sdcard/pictures/bccd/img01.jpg";
Bitmap bm=BitmapFactory.decodeFile(path);
实例2:解析Drawable资源中保存的图片文件img02.jpg,并创建对应的Bitmap对象
Bitmap bm=BitmapFactory.decodeResource(MainActivity.this.getResources(), R.drawable.img02);
二、绘制2D图像
1 绘制几何图形
在Android中,Canvas类提供了丰富的绘制几何图形的方法。
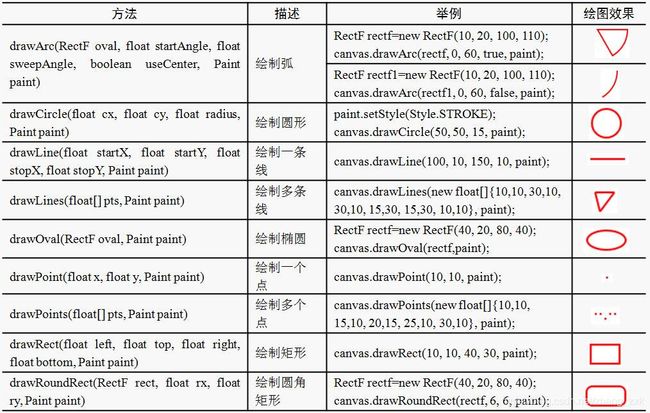
上面绘图效果使用的画笔代码如下:
Paint paint=new Paint();
paint.setAntiAlias(true);//使用抗锯齿功能
paint.setColor(Color.RED);
paint.setStrokeWidth(2);
paint.setStyle(Style.STROKE);//填充样式为描边
2 绘制文本
2.1 drawText()方法:用于在画布的指定位置绘制文字。语法格式如下:
drawText(String text, float x, float y, Paint paint)
Paint paint=new Paint();
paint.setTextSize(16);
canvas.drawText("Hello world!",100,50,paint);
2.2 drawPosText()方法:也是在画布上绘制文字,与drawText()方法不同的是,使用该方法绘制字符串时,需要为每个字符串制定一个位置。语法格式如下:
drawPosText(String text, float[] pos, Paint paint)
Paint paint=new Paint();
paint.setTextSize(24);
float[] pos=new float[]{80,215,105,215,130,215};
canvas.drawPosText("你好啊",pos,paint);
3 绘制路径
3.1 创建路径:使用android.graphics.Path类来实现。Path类的常用绘图方法如下:
| 方法 |
描述 |
| addArc(RectF oval, float startAngle, float sweepAngle) |
添加弧形路径 |
| addCircle(float x, float y, float radius, Path.Direction dir) |
添加圆形路径 |
| addOval(RectF oval, Path.Direction dir) |
添加椭圆形路径 |
| addRect(RectF rect, Path.Direction dir) |
添加矩形路径 |
| addRoundRect(RectF rect, float rx, float ry, Path.Direction dir) |
添加圆角矩形路径 |
| moveTo(float x, float y) |
设置开始绘制直线的起始点 |
| lineTo(float x, float y) |
在moveTo()方法设置的起始点与该方法指定的结束点之间画一条直线,如果在调用该方法之前没使用moveTo()方法设置起始点,那么将从(0,0)点开始绘制直线 |
| quadTo(float x1, float y1, float x2, float y2) |
用于根据指定的的参数绘制一条线段轨迹 |
| close() |
闭合路径 |
3.1 将定义好的路径绘制在画布上
使用Canvas类提供的drawPath()方法可以将定义好的路径绘制在画布上。
            Paint paint=new Paint();	//创建一个画笔
			paint.setAntiAlias(true);	//设置使用抗锯齿功能
			paint.setColor(0xFFFF6600);	//设置画笔颜色
			paint.setTextSize(18);	//设置文字大小
			paint.setStyle(Style.STROKE);	//设置填充方式为描边
			//绘制圆形路径
			Path pathCircle=new Path();//创建并实例化一个path对象
			pathCircle.addCircle(70, 70, 40, Path.Direction.CCW);	//添加逆时针的圆形路径
			canvas.drawPath(pathCircle, paint);	//绘制路径
			//绘制折线路径
			Path pathLine=new Path();		//创建并实例化一个Path对象
			pathLine.moveTo(150, 100);		//设置起始点
			pathLine.lineTo(200, 45);		//设置第一段直线的结束点
			pathLine.lineTo(250, 100);		//设置第二段直线的结束点
			pathLine.lineTo(300, 80);		//设置第3段直线的结束点
			canvas.drawPath(pathLine, paint);	//绘制路径
			//绘制三角形路径
			Path pathTr=new Path();	//创建并实例化一个path对象
			pathTr.moveTo(350,80);	//设置起始点
			pathTr.lineTo(400, 30);	//设置第一条边的结束点,也是第二条边的起始点
			pathTr.lineTo(450, 80);	//设置第二条边的结束点,也是第3条边的起始点
			pathTr.close();			//闭合路径
			canvas.drawPath(pathTr, paint);	//绘制路径
			//绘制绕路径的环形文字
			String str="风萧萧兮易水寒,壮士一去兮不复还";
			Path path=new Path();		//创建并实例化一个path对象
			path.addCircle(550, 100, 48, Path.Direction.CW);		//添加顺时针的圆形路径
			paint.setStyle(Style.FILL);//设置画笔的填充方式
			canvas.drawTextOnPath(str, path,0, -18, paint);	//绘制绕路径文字
效果:

4 绘制图片
使用Canvas类绘制图片,只需要使用Canvas类提供的如下表所示的方法来将Bitmap对象中保存的图片绘制到画布上就可以了。
| 方法 |
描述 |
| drawBitmap(Bitmap bitmap, Rect src, RectF dst, Paint paint) |
用于从指定点绘制从源位图中“挖取”的一块 |
| drawBitmap(Bitmap bitmap, float left, float top, Paint paint) |
用于在指定点绘制位图 |
| drawBitmap(Bitmap bitmap, Rect src, Rect dst, Paint paint) |
用于从指定点绘制从源位图中“挖取”的一块 |
三、为图形添加特效
1 旋转图像
使用Android提供的android.graphics.Matrix类的setRotate()、postRotate()和preRotate()方法,可以对图像进行旋转。
setRotate(float degrees)
setRotate(float degrees, float px, float py)
                        Paint paint=new Paint();							// 定义一个画笔
			paint.setAntiAlias(true);
			Bitmap bitmap_bg=BitmapFactory.decodeResource(MainActivity.this.getResources(), R.drawable.background);
			canvas.drawBitmap(bitmap_bg, 0, 0, paint);			//绘制背景图像
			Bitmap bitmap_rabbit=BitmapFactory.decodeResource(MainActivity.this.getResources(), R.drawable.rabbit);
			canvas.drawBitmap(bitmap_rabbit, 0, 0, paint);		// 绘制原图
			//应用setRotate(float degrees)方法旋转图像
			Matrix matrix=new Matrix();
			matrix.setRotate(30);						// 以(0,0)点为轴心转换30度
			canvas.drawBitmap(bitmap_rabbit, matrix, paint);	// 绘制图像并应用matrix的变换
			//应用setRotate(float degrees, float px, float py)方法旋转图像
			Matrix m=new Matrix();
			m.setRotate(90,87,87);						// 以(87,87)点为轴心转换90度
			canvas.drawBitmap(bitmap_rabbit, m, paint);		// 绘制图像并应用matrix的变换
2 缩放图像
使用Android提供的android.graphics.Matrix类的setScale()、postScale()和、preScale()方法,可对图像进行缩放。由于这3个方法除了方法名不同外,语法格式等均相同,下面以setScale()为例介绍。
setScale(float sx, float sy)
setScale(float sx, float sy, float px, float py)
Paint paint=new Paint();							// 定义一个画笔
			paint.setAntiAlias(true);
			Bitmap bitmap_bg=BitmapFactory.decodeResource(MainActivity.this.getResources(), R.drawable.background);
			canvas.drawBitmap(bitmap_bg, 0, 0, paint);		// 绘制背景

			Bitmap bitmap_rabbit=BitmapFactory.decodeResource(MainActivity.this.getResources(), R.drawable.rabbit);
			//应用setScale(float sx, float sy)方法缩放图像
			Matrix matrix=new Matrix();
			matrix.setScale(2f, 2f);						// 以(0,0)点为轴心将图像在X轴和Y轴均缩放200%
			canvas.drawBitmap(bitmap_rabbit, matrix, paint);	// 绘制图像并应用matrix的变换
//			应用setScale(float sx, float sy, float px, float py) 方法缩放图像
			Matrix m=new Matrix();
			m.setScale(0.8f,0.8f,156,156);						// 以(156,156)点为轴心将图像在X轴和Y轴均缩放80%
			canvas.drawBitmap(bitmap_rabbit, m, paint);		// 绘制图像并应用matrix的变换
			canvas.drawBitmap(bitmap_rabbit, 0, 0, paint);		// 绘制原图
3 倾斜图像
使用Android提供的android.graphics.Matrix类的setSkew()、postSkew()和、preSkew()方法,可对图像进行倾斜。
setSkew(float kx, float ky)
setSkew(float kx, float ky, float px, float py)
Paint paint=new Paint();							// 定义一个画笔
			paint.setAntiAlias(true);
			Bitmap bitmap_bg=BitmapFactory.decodeResource(MainActivity.this.getResources(), R.drawable.background);
			canvas.drawBitmap(bitmap_bg, 0, 0, paint);		// 绘制背景

			Bitmap bitmap_rabbit=BitmapFactory.decodeResource(MainActivity.this.getResources(), R.drawable.rabbit);
			//应用setSkew(float sx, float sy)方法倾斜图像
			Matrix matrix=new Matrix();
			matrix.setSkew(2f, 1f);			// 以(0,0)点为轴心将图像在X轴上倾斜2,在Y轴上倾斜1
			canvas.drawBitmap(bitmap_rabbit, matrix, paint);	// 绘制图像并应用matrix的变换
			//应用setSkew(float sx, float sy, float px, float py) 方法倾斜图像
			Matrix m=new Matrix();
			m.setSkew(-0.5f, 0f,78,69);			// 以(78,69)点为轴心将图像在X轴上倾斜-0.5
			canvas.drawBitmap(bitmap_rabbit, m, paint);		// 绘制图像并应用matrix的变换
			canvas.drawBitmap(bitmap_rabbit, 0, 0, paint);		// 绘制原图
4 平移图像
使用Android提供的android.graphics.Matrix类的setTranslate()、postTranslate()和、preTranslate()方法,可对图像进行平移。
setTranslate (float dx, float dy)
Paint paint=new Paint();							// 定义一个画笔
			paint.setAntiAlias(true);	//使用抗锯齿功能
			Bitmap bitmap_bg=BitmapFactory.decodeResource(MainActivity.this.getResources(), R.drawable.background);
			canvas.drawBitmap(bitmap_bg, 0, 0, paint);		// 绘制背景

			Bitmap bitmap_rabbit=BitmapFactory.decodeResource(MainActivity.this.getResources(), R.drawable.rabbit);
			canvas.drawBitmap(bitmap_rabbit, 0, 0, paint);		// 绘制原图
			Matrix matrix=new Matrix();				// 创建一个Matrix的对象
			matrix.setRotate(30);					// 将matrix旋转30度
			matrix.postTranslate(100,50);			// 将matrix平移到(100,50)的位置
			canvas.drawBitmap(bitmap_rabbit, matrix, paint);	// 绘制图像并应用matrix的变换
5 使用BitmapShader渲染图像
(1)创建BitmapShader类的对象,可以通过以下的构造方法进行创建。
BitmapShader(Bitmap bitmap, Shader.TileMode tileX, Shader.TileMode tileY)
(2)通过Paint的setShader()方法来设置渲染对象。
(3)在绘制图像时,使用已经设置了setShader()方法的画笔。
            Paint paint=new Paint();							// 定义一个画笔
			paint.setAntiAlias(true);	//使用抗锯齿功能
			Bitmap bitmap_bg=BitmapFactory.decodeResource(MainActivity.this.getResources(), R.drawable.android);
			//创建一个在水平和垂直方向都重复的BitmapShader对象
			BitmapShader bitmapshader= new BitmapShader(bitmap_bg,TileMode.REPEAT,TileMode.REPEAT);
			paint.setShader(bitmapshader);	//设置渲染对象
			canvas.drawRect(0, 0, view_width, view_height, paint);		//绘制一个使用BitmapShader渲染的矩形

			Bitmap bm=BitmapFactory.decodeResource(MainActivity.this.getResources(), R.drawable.img02);
			//创建一个在水平方向上重复,在垂直方向上镜像的BitmapShader对象
			BitmapShader bs= new BitmapShader(bm,TileMode.REPEAT,TileMode.MIRROR);
			paint.setShader(bs);	//设置渲染对象
			RectF oval=new RectF(0,0,280,180);
			canvas.translate(40, 20);		//将画面在X轴上平移40像素,在Y轴上平移20像素
			canvas.drawOval(oval, paint);	//绘制一个使用BitmapShader渲染的椭圆形