easyexcel使用
一、简单的固定表头单一表格
首先是在maven中添加依赖
    com.alibaba
    easyexcel
    {latestVersion}
话不多说直接上代码
导出实体类Car
import com.alibaba.excel.annotation.ExcelProperty;
import com.alibaba.excel.metadata.BaseRowModel;
import lombok.Data;

/**
 * @ClassName: Car
 * @Author: tanp
 * @Date: 2020/3/31 11:34
 */
@Data
public class Car extends BaseRowModel {
    @ExcelProperty(value = "名字", index = 0)
    private String name;
    @ExcelProperty(value = "价格", index = 1)
    private String price;
    @ExcelProperty(value = "类型", index = 2)
    private String type;
    @ExcelProperty(value = "地区", index = 3)
    private String region;

}
import com.alibaba.excel.EasyExcelFactory;
import com.alibaba.excel.ExcelWriter;
import com.alibaba.excel.metadata.Sheet;
import com.montnets.RmsServiceApplication;
import org.junit.Test;
import org.junit.runner.RunWith;
import org.springframework.boot.test.context.SpringBootTest;
import org.springframework.test.context.junit4.SpringRunner;

import java.io.*;
import java.util.ArrayList;
import java.util.List;

/**
 * @ClassName: ExcellTest
 * @Author: tanp
 * @Date: 2020/4/1 10:26
 */
@SpringBootTest(classes = Application.class)  //服务启动类
@RunWith(SpringRunner.class)
public class ExcellTest {

    File file = new File("E:\\idea_work_space\\file\\testExcell.xlsx");

    //造数据的方法
    private List createList(){
        Car car;
        List list = new ArrayList<>();
        for(int i=0; i<10; i++){
            car = new Car();
            car.setName(i+"");
            car.setType("carTpe"+i);
            car.setPrice("1000"+i);
            car.setRegion("carRegion"+i);
            list.add(car);
        }
        return list;
    }

    //简单单一表格实现
    @Test
    public void downExcell1(){
        try {
            OutputStream out = new FileOutputStream(file);
            ExcelWriter writer = EasyExcelFactory.getWriter(out);
            Sheet sheet = new Sheet(1,0,Car.class);
            sheet.setSheetName("test1");
            List list = createList();
            list.parallelStream().forEach( car -> {
                switch(car.getName()){
                    case "0":
                        car.setName("Tom");
                        break;
                    case "1" :
                        car.setName("JACK");
                        break;
                    default:
                        car.setName(car.getName());
                }
            });
            writer.write(list,sheet);
            writer.finish();
            out.close();
        } catch (FileNotFoundException e) {
            e.printStackTrace();
        } catch (IOException e) {
            e.printStackTrace();
        }
    }
}
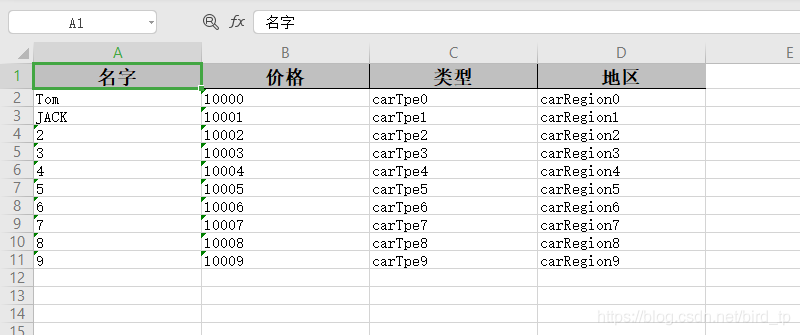
展示结果:
知识点分析
1.导出的实体类必须继承BaseRowModel
2.实体中的单个字段属性,必须用@ExcelProperty(value = "名字", index = 0)注解,value表示表头,index表示第几列
3.然后通过简简单单几行代码即可实现excell表格的下载
二、表头固定复杂表格
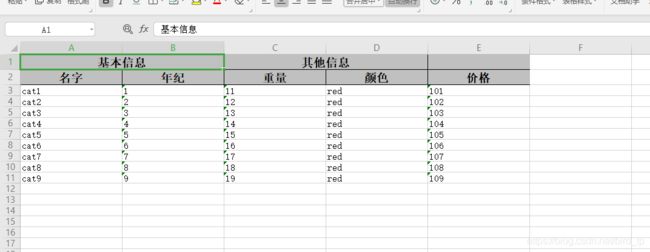
表格展示
下面直接展示代码
实体类
import com.alibaba.excel.annotation.ExcelProperty;
import com.alibaba.excel.metadata.BaseRowModel;
import lombok.Data;

/**
 * @ClassName: Cat
 * @Author: tanp
 * @Date: 2020/4/1 14:43
 */
@Data
public class Cat extends BaseRowModel {

    @ExcelProperty(value = {"基本信息", "名字"}, index = 0)
    private String name;
    @ExcelProperty(value = {"基本信息", "年纪"}, index = 1)
    private String age;
    @ExcelProperty(value = {"其他信息", "重量"}, index = 2)
    private String weight;
    @ExcelProperty(value = {"其他信息", "颜色"}, index = 3)
    private String colour;
    @ExcelProperty(value = {"", "价格"}, index = 4)
    private String price;
}
//构建数据的集合
private List createCatList(){
Cat cat;
List catList = new ArrayList<>();
for(int i=1; i<10; i++){
cat = new Cat();
cat.setName("cat"+i);
cat.setAge(i+"");
cat.setColour("red");
cat.setPrice("10"+i);
cat.setWeight("1"+i);
catList.add(cat);
}
return catList;
}
@Test
public void downExcell2(){
try {
OutputStream out = new FileOutputStream(file);
ExcelWriter writer = EasyExcelFactory.getWriter(out);
Sheet sheet = new Sheet(1,0,Cat.class);
writer.write(createCatList(),sheet);
writer.finish();
out.close();
} catch (FileNotFoundException e) {
e.printStackTrace();
} catch (IOException e) {
e.printStackTrace();
}
} 知识点分析
通过和第一个的表格相比,内容没变,变得只是表头,所以代码里变动的也只是实体类,可以看到实体类中
@ExcelProperty(value = {"基本信息", "名字"}, index = 0)注解的字段,value含有两个值了,而不展示的则是

@ExcelProperty(value = {"", "价格"}, index = 4)
衍生展示
public class MultiLineHeadExcelModel extends BaseRowModel {

    @ExcelProperty(value = {"表头1","表头1","表头31"},index = 0)
    private String p1;

    @ExcelProperty(value = {"表头1","表头1","表头32"},index = 1)
    private String p2;

    @ExcelProperty(value = {"表头3","表头3","表头3"},index = 2)
    private int p3;

    @ExcelProperty(value = {"表头4","表头4","表头4"},index = 3)
    private long p4;

    @ExcelProperty(value = {"表头5","表头51","表头52"},index = 4)
    private String p5;

    @ExcelProperty(value = {"表头6","表头61","表头611"},index = 5)
    private String p6;

    @ExcelProperty(value = {"表头6","表头61","表头612"},index = 6)
    private String p7;

    @ExcelProperty(value = {"表头6","表头62","表头621"},index = 7)
    private String p8;

    @ExcelProperty(value = {"表头6","表头62","表头622"},index = 8)
    private String p9;
}
衍生表头展示
三、动态内容表格
在前面的表格实现中,都已经把表格的需要的实体,也就是表格的模板通过实体定义好了,有没有方法,可以不通过注解直接动态生成表头呢,答案是有的。
直接看代码
//创建表头
private List> createHeads(){
    List> heads = new ArrayList>();
    List head = new ArrayList();
    head.add("姓名");
    heads.add(head);
    List head1 = new ArrayList();
    head1.add("年龄");
    heads.add(head1);
    List head2 = new ArrayList();
    head2.add("班级");
    heads.add(head2);
    return heads;
}

//创建内容
private List> creatBodysValue(){
    List> values = new ArrayList>();
    for(int i=0; i<5; i++){
        List list = new ArrayList();
        list.add("tom"+i);
        list.add("1"+i);
        list.add("00"+i);
        values.add(list);
    }
    return values;
}

@Test
public void downExcell3(){
    try {
        OutputStream out = new FileOutputStream(file);
        ExcelWriter writer = EasyExcelFactory.getWriter(out);
        Sheet sheet = new Sheet(1,0);
        Table table = new Table(1);
        table.setHead(createHeads());
        writer.write1(creatBodysValue(),sheet,table);
        writer.finish();
        out.close();
    } catch (FileNotFoundException e) {
        e.printStackTrace();
    } catch (IOException e) {
        e.printStackTrace();
    }
}
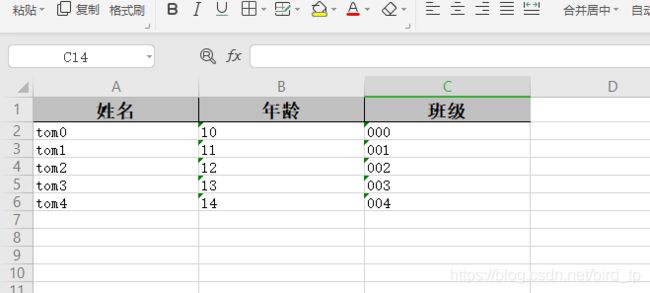
表格展示
注意点
通过与前面的代码比较可以发现,其实代码中就是新建了一个table,然后给table设置了head,然后调用 writer方法时,将table也作为参数传入了进去
在创建表格头和,表格内容的时候,格式的要求均为List
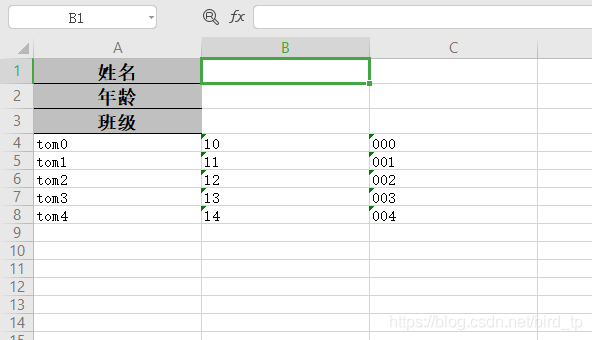
错误展示
代码如下
比较代码可以发现,上面的代码虽然返回的格式List
四、复杂动态表格
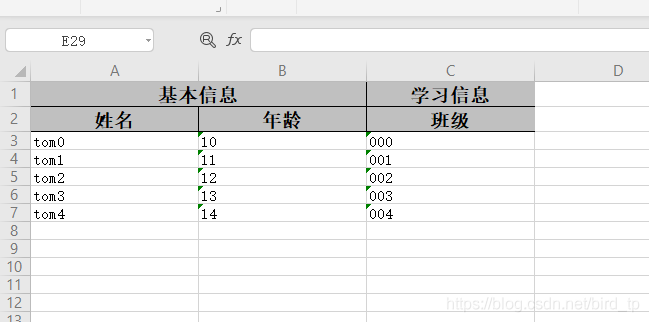
表格展示
实现上面的表格表头,代码和第三个差不躲是一样,唯一改动的地方就是创建表头的地方,代码如下
//创建表头
private List> createHeads() {
    List> heads = new ArrayList>();
    List head = new ArrayList();
    head.add("基本信息");
    head.add("姓名");
    heads.add(head);
    List head1 = new ArrayList();
    head1.add("基本信息");
    head1.add("年龄");
    heads.add(head1);
    List head2 = new ArrayList();
    head2.add("学习信息");
    head2.add("班级");
    heads.add(head2);
    return heads;
}
五、自定义设置表格样式,以及合并单元格
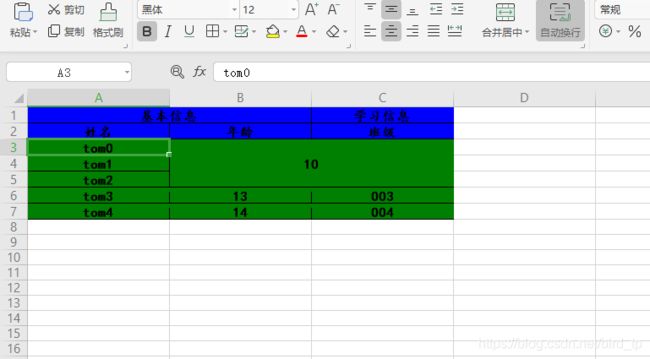
表格展示
代码展示
//自定义表格样式
public TableStyle createTableStyle() {
    TableStyle tableStyle = new TableStyle();
    // 设置表头样式
    Font headFont = new Font();
    // 字体是否加粗
    headFont.setBold(true);
    // 字体大小
    headFont.setFontHeightInPoints((short) 12);
    // 字体
    headFont.setFontName("楷体");
    tableStyle.setTableHeadFont(headFont);
    // 背景色
    tableStyle.setTableHeadBackGroundColor(IndexedColors.BLUE);


    // 设置表格主体样式
    Font contentFont = new Font();
    contentFont.setBold(true);
    contentFont.setFontHeightInPoints((short) 12);
    contentFont.setFontName("黑体");
    tableStyle.setTableContentFont(contentFont);
    tableStyle.setTableContentBackGroundColor(IndexedColors.GREEN);
    return tableStyle;
}


@Test
public void downExcell4(){
    try {
        OutputStream out = new FileOutputStream(file);
        ExcelWriter writer = EasyExcelFactory.getWriter(out);
        Sheet sheet = new Sheet(1,0);
        Table table = new Table(1);
        //设置表格格式
        table.setTableStyle(createTableStyle());
        //设置表头
        table.setHead(createHeads());
        //写表格
        writer.write1(creatBodysValue(),sheet,table);
        //合并单元格
        writer.merge(2,4,1,2);
        writer.finish();
        out.close();
    } catch (FileNotFoundException e) {
        e.printStackTrace();
    } catch (IOException e) {
        e.printStackTrace();
    }

}
知识讲解
1. table.setTableStyle设置表格样式
2. writer.merge实现单元合并
六、一个Excell写多个sheet
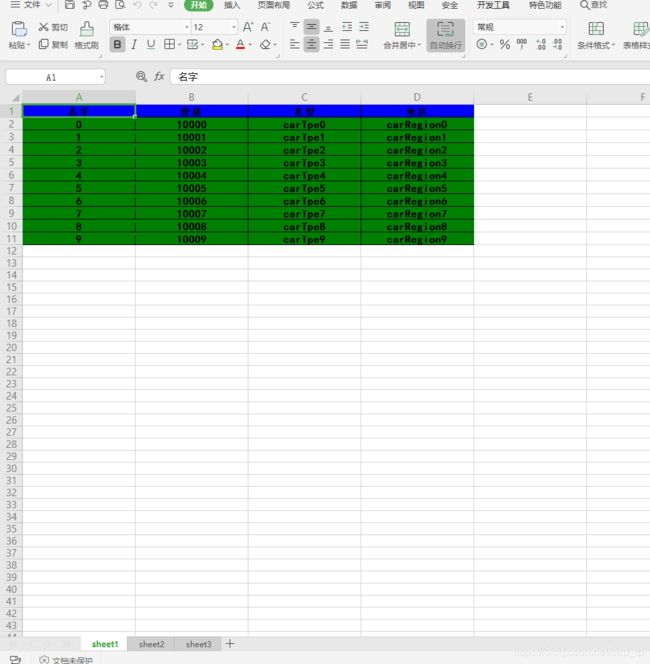
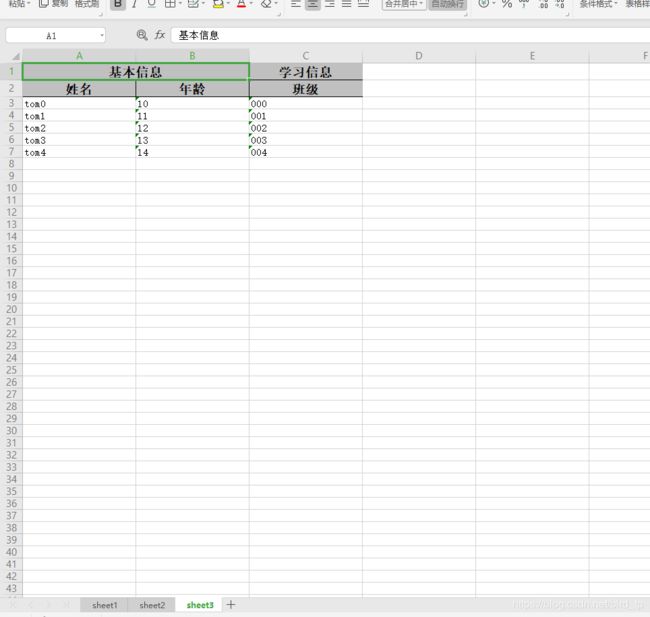
表格展示如下
代码展示
//一个excell写多个sheet
@Test
public void downExcell5(){
    try {
        OutputStream out = new FileOutputStream(file);
        ExcelWriter writer = EasyExcelFactory.getWriter(out);
        //创建第一个sheet
        Sheet sheet = new Sheet(1, 0, Car.class);
        sheet.setSheetName("sheet1");
        //获取第一个sheet的数据,Car实体继承BaseModel
        List list = createList();
        //设置第一个sheet表格的样式
        sheet.setTableStyle(createTableStyle());
        //写第一个sheet
        writer.write(createList(),sheet);

        //创建第二个sheet
        Sheet sheet1 = new Sheet(2,0);
        sheet1.setSheetName("sheet2");
        Table table = new Table(1);
        table.setHead(createHeads());
        writer.write1(creatBodysValue(),sheet1,table);

        //创建第三个sheet
        Sheet sheet2 = new Sheet(3,0);
        sheet2.setSheetName("sheet3");
        sheet2.setHead(createHeads());
        writer.write1(creatBodysValue(),sheet2);

        writer.finish();
        out.close();

    } catch (FileNotFoundException e) {
        e.printStackTrace();
    } catch (IOException e) {
        e.printStackTrace();
    }

}
代码讲解
在以上代码中,创建sheet,写sheet的表格都跟前面的代码差不多,实现一个Excell写多个sheet的要点就在于,创建多个sheet
,并写入
七、一个sheet写多个表格
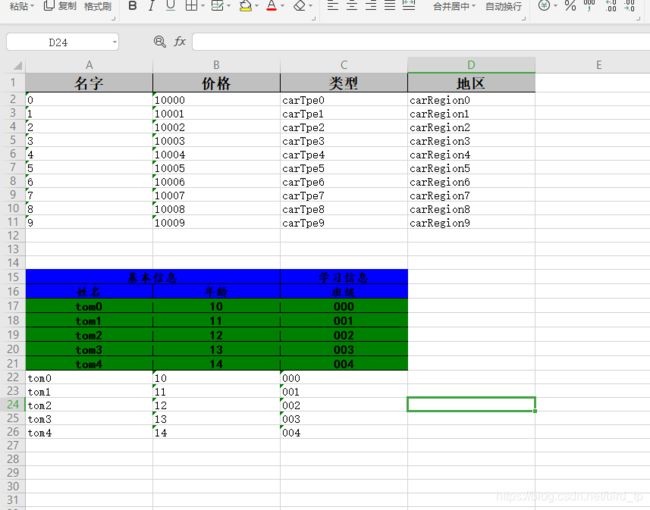
表格展示
代码展示
//一个sheet写多个表格
@Test
public void downExcell6(){
    try {
        OutputStream out = new FileOutputStream(file);
        ExcelWriter writer = EasyExcelFactory.getWriter(out);
        Sheet sheet = new Sheet(1,0);
        //创建第一个Table
        Table table = new Table(1);
        //设置第一个表格的实体类型,因为createList()创建的是Car实体的集合,是继承了BaseModel的
        table.setClazz(Car.class);
        //写第一个表格
        writer.write(createList(), sheet,table);

        //创建第二个表格
        Table table1 = new Table(2);
        //写第二个表格的表格头
        table1.setHead(createHeads());
        //设置表格格式
        table1.setTableStyle(createTableStyle());
        writer.write1(creatBodysValue(),sheet,table1);

        //创建第三个表格
        Table table2 = new Table(3);
        //直接写表格
        writer.write1(creatBodysValue(),sheet,table2);

        writer.finish();
        out.close();
    } catch (FileNotFoundException e) {
        e.printStackTrace();
    } catch (IOException e) {
        e.printStackTrace();
    }


}
知识总结
一个sheet写多个表格的代码和之前写一个sheet一个表格的代码差不多,差别的地方在于,创建了一个sheet,在一个sheet上创建了多个table,然后分别的写入
整体总结
easyExcel的基本导出使用学习就到这里,如果有不对的地方,请各位指出
