SpringBoot整合Mybatis-plus(一)基本使用与自定义模板代码生成器
SpringBoot整合Mybatis-plus 代码生成以及基本使用(一)
本小章节学习内容是SpringBoot整合Mybatis-plus ,通过本文可以初步了解以及使用Mybatis-plus 以下简称mp ,掌握对mp代码生成器的使用(内置/自定义模板)
MyBatis-Plus(简称 MP)是一个 MyBatis 的增强工具,在 MyBatis 的基础上只做增强不做改变,为简化开发、提高效率而生。
一.所需依赖
依赖包含了阿里druid (数据库监控) mp 以及mp代码生成器和相关依赖 lombok 简化开发代码 数据库连接驱动等…
            com.alibaba
            druid-spring-boot-starter
            1.1.14


            com.baomidou
            mybatis-plus-boot-starter
            3.3.1.tmp


            com.baomidou
            mybatis-plus-generator
            3.3.1.tmp


            org.apache.velocity
            velocity-engine-core
            2.2


            org.springframework.boot
            spring-boot-starter-web


            mysql
            mysql-connector-java
            runtime


            org.projectlombok
            lombok
            true
二.使用MybatisPlus需要配置什么
扫包
和mybatis一样 ,mp的使用也是需要扫包的(扫描Mapper接口)
在SpringBoot启动主程序上打上注解
@EnableTransactionManagement //开启事务管理
@MapperScan("com.leilei.mapper") //扫描包
配置的说明我已经在YML文件中详细的写了
yml配置
# 配置端口
server:
  port: 8081
spring:
  # 配置数据源
  datasource:
    type: com.alibaba.druid.pool.DruidDataSource
    driver-class-name: com.mysql.cj.jdbc.Driver
    url: jdbc:mysql://localhost:3306/mybatis-plus?serverTimezone=UTC&useUnicode=true&characterEncoding=utf-8
    username: root
    password: root
    druid:
      # 初始连接数
      initialSize: 5
      # 最小连接池数量
      minIdle: 10
      # 最大连接池数量
      maxActive: 20
      # 配置获取连接等待超时的时间
      maxWait: 60000
      # 配置间隔多久才进行一次检测,检测需要关闭的空闲连接,单位是毫秒
      timeBetweenEvictionRunsMillis: 60000
      # 配置一个连接在池中最小生存的时间,单位是毫秒
      minEvictableIdleTimeMillis: 300000
      # 配置一个连接在池中最大生存的时间,单位是毫秒
      maxEvictableIdleTimeMillis: 900000
      # 配置检测连接是否有效
      validationQuery: SELECT 1 FROM DUAL
      testWhileIdle: true
      testOnBorrow: false
      testOnReturn: false
      webStatFilter:
        enabled: true
      statViewServlet:
        enabled: true
        # 设置白名单,不填则允许所有访问
        allow:
        url-pattern: /druid/*
        # 控制台管理用户名和密码
        login-username: leilei
        login-password: 123456
      filter:
        stat:
          enabled: true
          # 慢SQL记录
          log-slow-sql: true
          slow-sql-millis: 1000
          merge-sql: true
        wall:
          config:
            multi-statement-allow: true
# mybatis-plus相关配置
mybatis-plus:
  # xml扫描,多个目录用逗号或者分号分隔(告诉 Mapper 所对应的 XML 文件位置)
  mapper-locations: classpath:com/leilei/mapper/*/*Mapper.xml
  # 以下配置均有默认值,可以不设置
  global-config:
    db-config:
      #主键类型  auto:"数据库ID自增" 1:"用户输入ID",2:"全局唯一ID (数字类型唯一ID)", 3:"全局唯一ID UUID";
      id-type: auto
      #字段策略 IGNORED:"忽略判断"  NOT_NULL:"非 NULL 判断")  NOT_EMPTY:"非空判断"
      field-strategy: NOT_EMPTY
      #数据库类型
      db-type: MYSQL
  configuration:
    # 是否开启自动驼峰命名规则映射:从数据库列名到Java属性驼峰命名的类似映射
    map-underscore-to-camel-case: true
    # 如果查询结果中包含空值的列,则 MyBatis 在映射的时候,不会映射这个字段
    call-setters-on-nulls: true
    # 这个配置会将执行的sql打印出来,在开发或测试的时候可以用
    log-impl: org.apache.ibatis.logging.stdout.StdOutImpl
代码生成器配置
在本文中,我使用了mp代码生成器
Copy官网的代码生成器后我发现有一句代码,感觉一脸懵逼
String projectPath = System.getProperty("user.dir");
后续发现,此句是获取项目根目录的代码
代码生成相关的所有配置均可在CodeGenerator.class 中配置,当然,也可以编写一个xxx.properties文件 将所有统一的文件编写在其中,然后再CodeGenerator 读取这个文件即可,这样,我们就可以从修改代码,转向修改配置
本文中,我举例了将数据源以及作者 还有我们的工程父包路径内容写在了xxx.properties中
genreator.properties
#作者
author=leilei

#数据源
jdbc.username=root
jdbc.password=root
jdbc.url=jdbc:mysql://localhost:3306/mybatis-plus?serverTimezone=UTC&useUnicode=true&useSSL=false&characterEncoding=utf8

#包配置
parent=com.leilei
CodeGenerator
package com.leilei.generator;

import com.baomidou.mybatisplus.annotation.DbType;
import com.baomidou.mybatisplus.core.toolkit.StringPool;
import com.baomidou.mybatisplus.generator.AutoGenerator;
import com.baomidou.mybatisplus.generator.InjectionConfig;
import com.baomidou.mybatisplus.generator.config.*;
import com.baomidou.mybatisplus.generator.config.converts.MySqlTypeConvert;
import com.baomidou.mybatisplus.generator.config.po.TableInfo;
import com.baomidou.mybatisplus.generator.config.rules.NamingStrategy;
import lombok.extern.slf4j.Slf4j;

import java.util.ArrayList;
import java.util.List;
import java.util.ResourceBundle;
@Slf4j
public class CodeGenerator {

    public static void main(String[] args) throws InterruptedException {
        //项目根目录  不可修改
        String projectPath = System.getProperty("user.dir");
        log.info("项目根路径"+projectPath);
        //用来获取Mybatis-Plus.properties文件的配置信息
        ResourceBundle rb = ResourceBundle.getBundle("genreator");

        AutoGenerator mpg = new AutoGenerator();
        // 全局配置
        GlobalConfig gc = new GlobalConfig();
        gc.setOutputDir(projectPath + "/src/main/java");
        gc.setFileOverride(true);
        // 开启 activeRecord 模式
        gc.setActiveRecord(true);
        // XML 二级缓存
        gc.setEnableCache(false);
        // XML ResultMap 映射图
        gc.setBaseResultMap(true);
        // XML columList
        gc.setBaseColumnList(false);
        gc.setAuthor(rb.getString("author"));
        mpg.setGlobalConfig(gc);

        // 数据源配置
        DataSourceConfig dsc = new DataSourceConfig();
        dsc.setDbType(DbType.MYSQL);
        dsc.setTypeConvert(new MySqlTypeConvert());
        //注意Mysql 驱动版本问题 我这为8版本
        dsc.setDriverName("com.mysql.cj.jdbc.Driver");
        dsc.setUsername(rb.getString("jdbc.username"));
        dsc.setPassword(rb.getString("jdbc.password"));
        dsc.setUrl(rb.getString("jdbc.url"));
        mpg.setDataSource(dsc);

        // 策略配置
        StrategyConfig strategy = new StrategyConfig();
         /** 此处可以修改为您的表前缀,如果没有,注释掉即可*/
         //strategy.setTablePrefix(new String[] { "t_" });
        /** 表名生成策略*/
        strategy.setNaming(NamingStrategy.underline_to_camel);
        /** 需要生成的表*/
        strategy.setInclude(new String[]{"dept"});
        mpg.setStrategy(strategy);

        // 包配置
        PackageConfig pc = new PackageConfig();
        pc.setParent(rb.getString("parent"));
        pc.setController("controller");
        pc.setService("service");
        pc.setServiceImpl("service.impl");
        pc.setEntity("entity");
        pc.setMapper("mapper");
        mpg.setPackageInfo(pc);

        // 注入自定义配置,可以在 VM 中使用 cfg.abc 【可无】
        InjectionConfig cfg = new InjectionConfig() {
            @Override
            public void initMap() {
            }
        };

        List focList = new ArrayList();

        // 调整 xml 生成目录演示
        focList.add(new FileOutConfig("/templates/mapper.xml.vm") {
            @Override
            public String outputFile(TableInfo tableInfo) {

                // 自定义输出文件名 , 如果你 Entity 设置了前后缀、此处注意 xml 的名称会跟着发生变化!!
                return projectPath + "/src/main/resources/com/leilei/mapper/" + tableInfo.getEntityName()
                        + "/" + tableInfo.getEntityName() + "Mapper" + StringPool.DOT_XML;
            }
        });

        // 调整 query 生成目录
/*        focList.add(new FileOutConfig("/templates/query.java.vm") {
            @Override
            public String outputFile(TableInfo tableInfo) {
                return rb.getString("OutputDomainDir")+ "/cn/leilei/query/" + tableInfo.getEntityName() + "Query.java";
            }
        });*/

        //调整 entity 生成目录
        focList.add(new FileOutConfig("/templates/entity.java.vm") {
            @Override
            public String outputFile(TableInfo tableInfo) {
                return projectPath+ "/src/main/java/com/leilei/entity/" + tableInfo.getEntityName() + ".java";
            }
        });

        cfg.setFileOutConfigList(focList);
        mpg.setCfg(cfg);

        // 自定义模板配置,可以 copy 源码 mybatis-plus/src/main/resources/templates 下面内容修改,
        // 放置自己项目的 src/main/resources/templates 目录下, 默认名称一下可以不配置,也可以自定义模板名称
        TemplateConfig tc = new TemplateConfig();
        //tc.setController("/templates/controller.java.vm");
        // 如上任何一个模块如果设置 空 OR Null 将不生成该模块。
        tc.setEntity(null);
        tc.setXml(null);
        mpg.setTemplate(tc);
        // 执行生成
        mpg.execute();
    }
}
本项目是参照代码生成器源码修改了Controller ,编写了单表的CRUD ,直接生成即可接口测试,简化了很多单表接口的开发时间
附上我的Controller模板,本模板是使用了RestController ,所有接口返回值全是Json
注意: 模板中的import com.leilei.util.response.JsonReturn; 包路径是我项目中我自定义的统一json返回封装类
Controller模板
package ${package.Controller};

import ${package.Service}.${table.serviceName};
import ${package.Entity}.${entity};

import com.baomidou.mybatisplus.extension.plugins.pagination.Page;
import com.leilei.util.response.JsonReturn;
import org.springframework.beans.factory.annotation.Autowired;
import org.springframework.web.bind.annotation.PostMapping;
import org.springframework.web.bind.annotation.RequestMapping;
import org.springframework.web.bind.annotation.RestController;

import java.util.List;

/**
 *
 *  ${table.entityPath}前端控制器  RestController注解 将结果以JSON形式返回
 *
 *
 * @author leilei
 * @since ${date}
 */
@RestController
@RequestMapping("/${table.entityPath}")
public class ${entity}Controller {
    @Autowired
    public ${table.serviceName} ${table.entityPath}Service;

    /**
     * 保存修改公用 POST请求方式
     * @param ${table.entityPath} 修改或保存的对象
     * @return JsonReturn
     */
    @PostMapping("/save")
    public JsonReturn save(${entity} ${table.entityPath}) {
        if (${table.entityPath}.getId() != null){
            try {
                ${table.entityPath}Service.updateById(${table.entityPath});
                return JsonReturn.buildSuccess(${table.entityPath}, "操作成功");
            } catch (Exception e) {
                e.printStackTrace();
                return JsonReturn.buildFailure("操作失败" + e.getMessage());
            }
        }
        try {
            ${table.entityPath}Service.save(${table.entityPath});
            return JsonReturn.buildSuccess(${table.entityPath}, "操作成功");
        } catch (Exception e) {
            e.printStackTrace();
            return JsonReturn.buildFailure("操作失败" + e.getMessage());
        }

    }

    /**批量删除 支持POST GET
     * @param ids Long 类型 List 集合
     * @return JsonReturn
     */
    @RequestMapping("remove")
    public JsonReturn delete(@RequestBody List ids) {
        try {
            ${table.entityPath}Service.removeByIds(ids);
            return JsonReturn.buildSuccess(ids, "操作成功");
        } catch (Exception e) {
            e.printStackTrace();
            return JsonReturn.buildFailure("操作失败" + e.getMessage());
        }
    }

    /**
     * 查询一个  支持POST GET
     *
     * @param id 查找对象的主键ID
     * @return JsonReturn
     */
    @RequestMapping("findOne")
    public JsonReturn findOne(Long id) {
        try {
            ${entity} ${table.entityPath} = ${table.entityPath}Service.getById(id);
            return JsonReturn.buildSuccess(${table.entityPath}, "操作成功");
        } catch (Exception e) {
            e.printStackTrace();
            return JsonReturn.buildFailure("操作失败" + e.getMessage());
        }
    }


    /**查询所有 支持POST GET ,未传当前页以及分页长度 则默认1页 10条数据
     * @param pageNum 当前页
     * @param pageSize 每页最大数据数
     * @return JsonReturn
     */
    @RequestMapping("findAll")
    public JsonReturn findAll(Integer pageNum, Integer pageSize) {

        if (pageNum != null && pageSize != null) {
            try {
                Page<${entity}> page = ${table.entityPath}Service.page(new Page<${entity}>(pageNum, pageSize));
                return JsonReturn.buildSuccess(page, "操作成功");
            } catch (Exception e) {
                e.printStackTrace();
                return JsonReturn.buildFailure("操作失败" + e.getMessage());
            }
        }
        try {
            Page<${entity}> page = ${table.entityPath}Service.page(new Page<>());
            return JsonReturn.buildSuccess(page, "操作成功");
        } catch (Exception e) {
            e.printStackTrace();
            return JsonReturn.buildFailure("操作失败" + e.getMessage());
        }
    }
}
那么到这里 mp的数据源配置 druid 监控 以及Mp强大的代码生成器就完成了
代码生成只要运行CodeGenerator 中的Main 方法即可生成了!!!!!!
三.mp的基本使用
mp内提供了大量的方法 很多单表的查询方法都已经帮我们封装好了
mp中方法使用的详细教程
查询所有
    @Test
    void contextLoads() {
        userService.list().forEach(e -> System.out.println(e));
        roleService.list().forEach(e -> System.out.println(e));
    }
分页
使用Mp分页需要一个配置类 (别想太多 ,从官网Copy来的,当然也还有其他方式进行分页)
/**
 * @author leilei
 * Spring boot方式 -Mybatis-plus 分页
 */
@Configuration
public class MybatisPlusConfig {

    @Bean
    public PaginationInterceptor paginationInterceptor() {
        PaginationInterceptor paginationInterceptor = new PaginationInterceptor();
        // 设置请求的页面大于最大页后操作, true调回到首页,false 继续请求  默认false
        paginationInterceptor.setOverflow(false);
        // 设置最大单页限制数量,默认 500 条,-1 不受限制
        paginationInterceptor.setLimit(500);
        // 开启 count 的 join 优化,只针对部分 left join
        paginationInterceptor.setCountSqlParser(new JsqlParserCountOptimize(true));
        return paginationInterceptor;
    }
}
单表分页查询
    @Test
    public void testPage() {
        Page realEseatePage = realEseateService.page(new Page(1, 5), new QueryWrapper().orderByDesc("build_time"));
        realEseatePage.getRecords().forEach(e -> System.out.println(e));
        System.out.println(realEseatePage.getTotal());

    }
Mybatis-plus 中LocalDateTime字段 查询报错
在测试 realEseateService.page()发现报错
我记得很清楚,在一开始我并未配置Druid 的时候,没有报错的,并且我也查看了实体类中是一个LocalDateTime字段,并且也是提供了GET SET 方法的,怎么会获取不到,难道是Druid问题???
我百度了很久 有人说是Druid版本问题,需要升级版本, 于是我提升Druid 到了 1.1.19 ,并未解决
惊了 难道是mp与Druid 有问题?
经过我不断的修改以及网上查找资料降mp版本 改字段等等,终于找到了解决办法!!!!
解决办法
方法1.降低mp版本
由于我mp 版本使用的最新版,为3.3.1 当我不断重试 降mp 版本为3.1.0后 发现并无报错
方法2.修改字段类型,不降mp与Druid版本
改变时间相关的实体类字段类型, LocalDateTime 修改为Date 类型
连表查询
mp中连表也是得和mybatis中一样,在mpper.xml中编写sql 或者 mapper 接口中编写sql
    @Override
    public IPage selectJoinTablePage(Integer page, Integer size, String query) {
        Page realEseatePage = new Page<>(page, size);

        return realEseateMapper.selectJoinTablePage(realEseatePage, query);
    }
QueryWrapper条件构造的使用
详细使用请戳官网,本文仅仅只是展示几个。。。MyBatis-Plus条件构造
Test
    public void testWrapper() {
        /**
         * 比较 大于小于 等于 between 排序.....
         */
        //SELECT id,permission_name,permission_sn FROM permission WHERE (permission_name = ?)
        System.out.println(permissionService.getOne(new QueryWrapper().eq("permission_name", "支付管理")));

        //SELECT id,permission_name,permission_sn FROM permission WHERE (id > ? AND id < ? AND permission_sn = ?)
        System.out.println(permissionService.getOne(new QueryWrapper()
                .gt("id", 1)
                .lt("id", 3)
                .eq("permission_sn", "pro")));

        //SELECT id,project_name,address,house_type,area,build_time,user_id FROM real_eseate ORDER BY build_time DESC
        realEseateService.list(new QueryWrapper().orderByDesc("build_time")).forEach(e -> System.out.println(e));

        //SELECT id,project_name,address,house_type,area,build_time,user_id FROM real_eseate WHERE (id BETWEEN ? AND ?) LIMIT ?,?
        Page realEseatePage = realEseateService.page(new Page(1, 3),
                                                                 new QueryWrapper().between("id", 1, 5));

    }
批量操作
@Test
    public void testBatch() {
        /**
         * 新增
         */
        //==>  Preparing: INSERT INTO role ( role_name ) VALUES ( ? )
        //==> Parameters: 驱蚊器翁(String)
        //==> Parameters: 俺问问去(String)
        roleService.saveBatch(Arrays.asList(new Role("驱蚊器翁"), new Role("俺问问去")));
        /**
         *批量修改或者插入  有Id 则修改 无则新增  可传Wrapper
         */
        roleService.saveOrUpdateBatch(Arrays.asList(new Role(3L, "璀璨钻石"), new Role(4L, "尊贵铂金")));
    }
一对多
sql 使用join进行连表
映射
多对多-多对多 多层嵌套映射查询
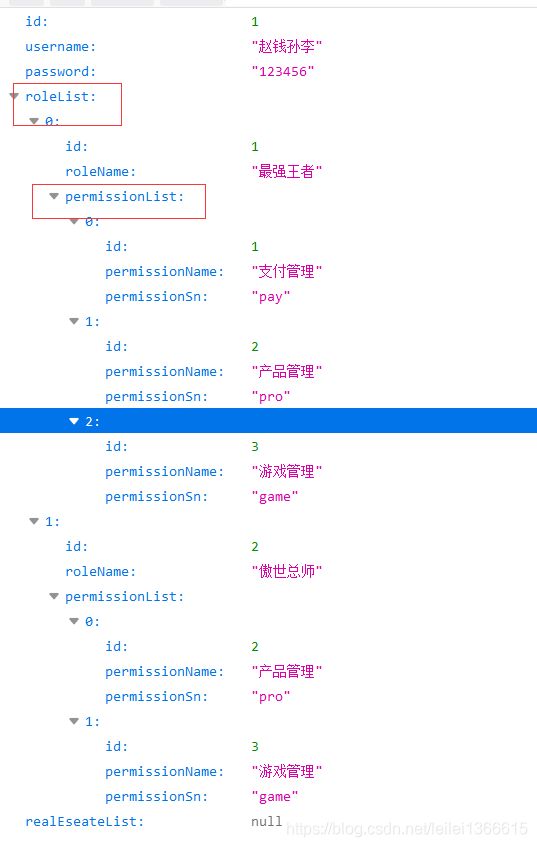
在本文中,我编写了一个用户-角色(多对多) 角色-权限(多对多)的一个情况
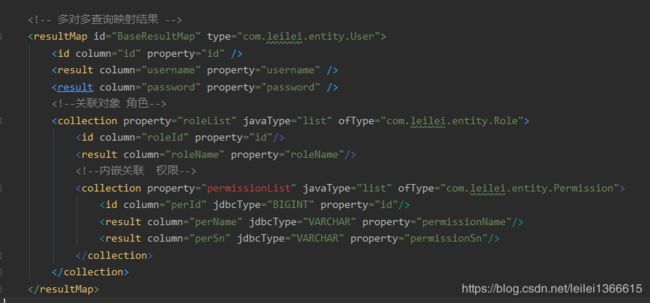
由于我是以用户为第一查询视角的 那用户角色 多对多中 在用户实体类中就需要一个 List<角色> roleList类型的字段来存储多个角色 在角色中呢 ,又需要 List<权限> permissionList 类型的字段来存储多个权限 ,并在通用映射结果中进行嵌套渲染 层层嵌套
sql 不使用join 进行连表
映射
爆红是因为本映射是以User 为第一视角 User类中并未包含 permissionList字段 所以爆假红 但是,在编写数据库了映射到实体中字段有响应代码提示时 则说明,是没有问题的
查询用户1 他对应的是两个角色 一个角色包含三个权限 一个角色包含两个权限

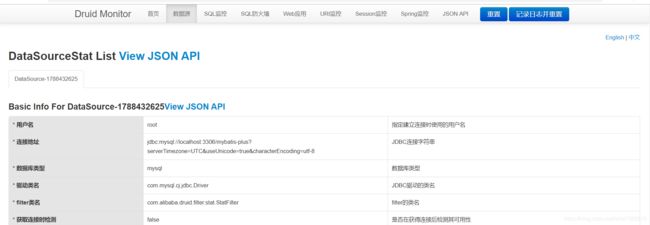
Druid监控
账户密码使用yml中针对由于Druid的配置


那么本文到这里就结束了,附上源码SpringBoot-Mybatis-plus
下一篇我准备整合SpringBoot-Mybatis-plus 多数据源


