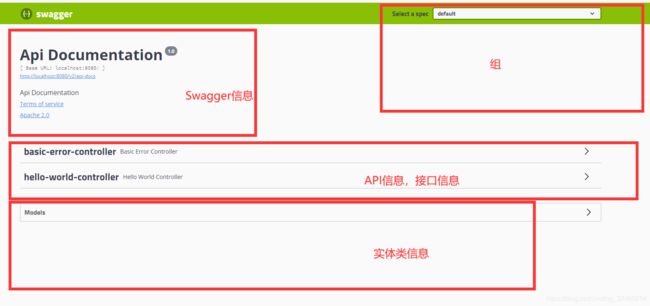
SpringBoot2.X配置Swagger2
一、Swagger
学习目标:
- 了解Swagger的作用和概念
- 了解前后端分离
- 在SpringBoot中集成Swagger
1.1、Swagger简介
- 号称世界上最流行的Api框架
- RestFul Api文档在线自动生成工具=>Api文档与Api定义同步更新
- 直接运行,可以在线测试API接口
- 支持多种语言:(java,php)
作用: 在前后台分离的开发模式中,减小接口定义沟通成本,方便开发过程中测试,自动生成接口文档
官网: https://swagger.io/
在项目中使用Swagger需要springbox;
- swagger2
- ui
1.2、SpringBoot集成Swagger
-
新建一个SpringBooot web项目
-
导入依赖
<!-- swagger2 --> <!--swagger本身不支持spring mvc的,springfox把swagger包装了一下,让他可以支持springmvc--> <dependency> <groupId>io.springfox</groupId> <artifactId>springfox-swagger2</artifactId> <version>2.9.2</version> </dependency> <dependency> <groupId>io.springfox</groupId> <artifactId>springfox-swagger-ui</artifactId> <version>2.9.2</version> </dependency> -
编写一个HelloWord 程序
-
配置Swagger==>config.SwaggerConfig
package com.zh.config;

import org.springframework.context.annotation.Configuration;
import springfox.documentation.swagger2.annotations.EnableSwagger2;

/**
 * @ClassName SwaggerConfig
 * @Description: TODO
 * @Author ZhangHuan
 * @Date 2020/4/3
 * @Version V1.0
 **/
@Configuration  //声明该类为配置类
@EnableSwagger2 //声明启动Swagger2
public class SwaggerConfig {

}
1.3、配置Swagger
1.3.1、Swagger的Bean实例Docket
//配置Swagger的Docket的Bean实例
@Bean
public Docket docket() {
    return new Docket(DocumentationType.SWAGGER_2)
        .groupName("通用API接口文档")
        .apiInfo(apiInfo("测试环境通用接口"))
        .pathMapping("/")
        .select()
        /*
        RequestHandlerSelectors:配置扫描接口的方式
        basePackage: 扫描包的路径
        any():扫描全部
        none():不扫描
        withMethodAnnotation:扫描类上的注解,参数是一个注解的反射类
        withClassAnnotation: 扫描方法上的注解
        */
        .apis(RequestHandlerSelectors.basePackage ("com.zh.controller"))//指向自己的controller即可
        .paths ( PathSelectors.ant ( "/zh/**"  ))   // 需要过滤的路径
        .build();
}
1.3.2、配置是否启动Swagger
//配置Swagger的Docket的Bean实例
    @Bean
    public Docket docket() {
        return new Docket(DocumentationType.SWAGGER_2)
                .groupName("通用API接口文档")
                .apiInfo(apiInfo("测试环境通用接口"))
                .enable (false) //是否启动Swagger,如果false,浏览器中无法访问
                .select()
                .apis(RequestHandlerSelectors.basePackage ("com.zh.controller"))//指向自己的controller即可
                .build();
    }
1.3.3、只在生产环境中使用,发布环境不使用
-
判断是不是生产环境 flag=false
-
注入enable(flag)
//配置Swagger的Docket的Bean实例
@Bean
public Docket docket(Environment environment) {

    //设置要显示的Swagger环境
    Profiles profiles = Profiles.of ( "dev" );
    //获取项目的环境
    boolean flag=environment.acceptsProfiles ( profiles );

    return new Docket(DocumentationType.SWAGGER_2)
        .groupName("通用API接口文档")
        .apiInfo(apiInfo("测试环境通用接口"))
        .enable (flag) //是否启动Swagger,如果false,浏览器中无法访问
        .select()
        .apis(RequestHandlerSelectors.basePackage ("com.zh.controller"))//指向自己的controller即可
        .build();
}
1.3.4配置API的分组
.groupName("张叔")
1.3.5如何配置多个分组
@Bean
public Docket docket1(){
    return new Docket ( DocumentationType.SWAGGER_2 ).groupName ( "A" );
}

@Bean
public Docket docket2(){
    return new Docket ( DocumentationType.SWAGGER_2 ).groupName ( "B" );
}

@Bean
public Docket docket3(){
    return new Docket ( DocumentationType.SWAGGER_2 ).groupName ( "C" );
}
#二、给文档添加注释
2.1、实体类配置
@ApiModel("用户实体类")  //添加类注释
public class User {

    @ApiModelProperty("用户名")    //添加字段注释
    public String username;
    @ApiModelProperty("密码")
    public String password;

    public void setUsername(String username) {
        this.username=username;
    }

    public void setPassword(String password) {
        this.password=password;
    }
}
2.2、Controller
package com.zh.controller;

import com.zh.pojo.User;
import io.swagger.annotations.Api;
import io.swagger.annotations.ApiOperation;
import org.springframework.stereotype.Controller;
import org.springframework.web.bind.annotation.GetMapping;
import org.springframework.web.bind.annotation.PostMapping;
import org.springframework.web.bind.annotation.RequestMapping;
import org.springframework.web.bind.annotation.ResponseBody;

/**
 * @ClassName HelloWorldController
 * @Description: TODO
 * @Author ZhangHuan
 * @Date 2020/4/3
 * @Version V1.0
 **/
@Api(tags="关于 HelloWorldController 接口文档注释")
@Controller
public class HelloWorldController {

    @ApiOperation(value="helloworld")
    @GetMapping ("/hello")
    @ResponseBody
    public String hello(){
        return "hello";
    }


    //只要接口中返回值存在实体类,它就会被Swagger扫描到,显示在Model中
    @ApiOperation(value="获取用户")
    @PostMapping("/user")
    @ResponseBody
    public User user(){
        return new User ();
    }

}
总结:
- 可以通过Swagger给一些比较难理解的接口或者属性,增加注释信息
- 接口文档实时更新
- 可以在线测试
【注意】:在正式发布时,关闭Swagger。
三、Swagger注解说明
Maven依赖
	io.springfox
	springfox-swagger2
	2.9.2


	io.springfox
	springfox-swagger-ui
	2.9.2


	com.github.xiaoymin
	swagger-bootstrap-ui
	1.9.6
1、Swagger2 注解整体说明
- 用于controller类上:
| 注解 | 说明 |
|---|---|
| @Api | 对请求类的说明 |
- 用于方法上面(说明参数的含义):
| 注解 | 说明 |
|---|---|
| @ApiOperation | 方法的说明 |
| @ApiImplicitParams、@ApiImplicitParam | 方法的参数的说明;@ApiImplicitParams 用于指定单个参数的说明 |
- 用于方法上面(返回参数或对象的说明):
| 注解 | 说明 |
|---|---|
| @ApiResponses、@ApiResponse | 方法返回值的说明 ;@ApiResponses 用于指定单个参数的说明 |
- 对象类:
| 注解 | 说明 |
|---|---|
| @ApiModel | 用在JavaBean类上,说明JavaBean的 用途 |
| @ApiModelProperty | 用在JavaBean类的属性上面,说明此属性的的含议 |
2、@Api:请求类的说明
@Api:放在 请求的类上,与 @Controller 并列,说明类的作用,如用户模块,订单类等。
	tags="说明该类的作用"
	value="该参数没什么意义,所以不需要配置"
示例:
@Api(tags="订单模块")
@Controller
public class OrderController {

}
@Api 其它属性配置:
| 属性名称 | 备注 |
|---|---|
| value | url的路径值 |
| tags | 如果设置这个值、value的值会被覆盖 |
| description | 对api资源的描述 |
| basePath | 基本路径 |
| position | 如果配置多个Api 想改变显示的顺序位置 |
| produces | 如, “application/json, application/xml” |
| consumes | 如, “application/json, application/xml” |
| protocols | 协议类型,如: http, https, ws, wss. |
| authorizations | 高级特性认证时配置 |
| hidden | 配置为true ,将在文档中隐藏 |
3、@ApiOperation:方法的说明
@ApiOperation:"用在请求的方法上,说明方法的作用"
	value="说明方法的作用"
	notes="方法的备注说明"
3.1、@ApiImplicitParams、@ApiImplicitParam:方法参数的说明
@ApiImplicitParams:用在请求的方法上,包含一组参数说明
	@ApiImplicitParam:对单个参数的说明
	    name:参数名
	    value:参数的说明、描述
	    required:参数是否必须必填
	    paramType:参数放在哪个地方
	        · query --> 请求参数的获取:@RequestParam
	        · header --> 请求参数的获取:@RequestHeader
	        · path(用于restful接口)--> 请求参数的获取:@PathVariable
	        · body(请求体)-->  @RequestBody User user
	        · form(普通表单提交)
	    dataType:参数类型,默认String,其它值dataType="Integer"
	    defaultValue:参数的默认值
示例:
@Api(tags="用户模块")
@Controller
public class UserController {

	@ApiOperation(value="用户登录",notes="随边说点啥")
	@ApiImplicitParams({
		@ApiImplicitParam(name="mobile",value="手机号",required=true,paramType="form"),
		@ApiImplicitParam(name="password",value="密码",required=true,paramType="form"),
		@ApiImplicitParam(name="age",value="年龄",required=true,paramType="form",dataType="Integer")
	})
	@PostMapping("/login")
	public JsonResult login(@RequestParam String mobile, @RequestParam String password,
	@RequestParam Integer age){
		//...
	    return JsonResult.ok(map);
	}
}
4、@ApiResponses、@ApiResponse:方法返回值的状态码说明
@ApiResponses:方法返回对象的说明
	@ApiResponse:每个参数的说明
	    code:数字,例如400
	    message:信息,例如"请求参数没填好"
	    response:抛出异常的类
示例:
@Api(tags="用户模块")
@Controller
public class UserController {

	@ApiOperation("获取用户信息")
	@ApiImplicitParams({
		@ApiImplicitParam(paramType="query", name="userId", dataType="String", required=true, value="用户Id")
	})
	@ApiResponses({
		@ApiResponse(code = 200, message = "请求成功"),
		@ApiResponse(code = 400, message = "请求参数没填好"),
		@ApiResponse(code = 404, message = "请求路径没有或页面跳转路径不对")
	})
	@ResponseBody
	@RequestMapping("/list")
	public JsonResult list(@RequestParam String userId) {
		...
		return JsonResult.ok().put("page", pageUtil);
	}
}
5、@ApiModel:用于JavaBean上面,表示对JavaBean 的功能描述
@ApiModel的用途有2个:
- 当请求数据描述,即
@RequestBody时, 用于封装请求(包括数据的各种校验)数据; - 当响应值是对象时,即
@ResponseBody时,用于返回值对象的描述。
5.1、当请求数据描述时, @RequestBody 时的使用
@ApiModel(description = "用户登录")
public class UserLoginVO implements Serializable {

	private static final long serialVersionUID = 1L;

	@ApiModelProperty(value = "用户名",required=true)
	private String username;

	@ApiModelProperty(value = "密码",required=true)
	private String password;

	// getter/setter省略
}
@Api(tags="用户模块")
@Controller
public class UserController {

	@ApiOperation(value = "用户登录", notes = "")
	@PostMapping(value = "/login")
	public R login(@RequestBody UserLoginVO userLoginVO) {
		User user=userSerivce.login(userLoginVO);
		return R.okData(user);
	}
}
5.2、@ApiModelProperty:用在JavaBean类的属性上面,说明属性的含义
示例:
@ApiModel(description= "返回响应数据")
public class RestMessage implements Serializable{

	@ApiModelProperty(value = "是否成功",required=true)
	private boolean success=true;

	@ApiModelProperty(value = "错误码")
	private Integer errCode;

	@ApiModelProperty(value = "提示信息")
	private String message;

    @ApiModelProperty(value = "数据")
	private Object data;

	/* getter/setter 略*/
}
部分内容转载于:https://blog.csdn.net/xiaojin21cen/article/details/78654652
