为什么80%的码农都做不了架构师?>>> ![]()
1.安装oracle所需要的安装包
当你安装ORACLE的时候,缺依赖,按提示来,或者在下面的列表中自检。
yum -y install binutilscompat-libstdc++-33 compat-libstdc++-33.i686 elfutils-libelfelfutils-libelf-devel gcc gcc-c++ glibc glibc.i686 glibc-common glibc-develglibc-devel.i686 glibc-headers ksh libaio libaio.i686 libaio-devellibaio-devel.i686 libgcc libgcc.i686 libstdc++ libstdc++.i686 libstdc++-develmake sysstat
最后还需要安装libXp这个Library,这个一定要安装,否则安装Oracle时会出现java Exception。
yum install libXp libXt.i686 libXtst.i686
有的包是64的有的包是32的,都需要装
2. 修改Linux发行版本信息
由于Oracle10g发行的时候,CentOS6.6没有发行,所以Oracle10g并没有对CentOS6.6确认支持,需要修改相关文件让Oracle10g支持CentOS 6。建议就用oracle 11g。
我们需要手工修改Linux的发行注记,让Oracle 10g支持CentOS6.5。
编辑/etc/redhat-release文件
# vim /etc/redhat-release
将其中的内容CentOS release 6.5 (Final)修改为redhat 4
记得安装好后面改回去。
3. 乱码
你的centos是中文环境,安装时会出现中文乱码,请下以下指令。使系统临时为英文状态:
export LC_ALL=en_US.UTF-8
4. ./runInstaller安装过程错误解决:
Exception in thread "main" java.lang.InternalError: Can't connect to X11 window server using 'localhost:10.0' as the value of the DISPLAY variable
解决方案:
1. 远程时会遇到,可以不远程,直接在机器上操作即可。如果可以则不用下面两步。
2. root 下
export DISPLAY= export DISPLAY=localhost:1
xhost +
3. oracle下
export LANG=en_US.UTF-8
./runInstaller -Djava.awt.headless=true
5. linux解决xhost: unable to open display
[root@localhost ~]# vncserver
New 'localhost:1 (root)' desktop is localhost:1
Starting applications specified in /root/.vnc/xstartupLog file is /root/.vnc/localhost:1.log
[root@localhost ~]# export DISPLAY=localhost:1
[root@localhost ~]# xhost +
access control disabled, clients can connect from any host
6. centos 5.10分辨率
当你的oracle安装时,下一步怎么也点不出来,则考虑分辨率,如果没法调,则如下处理
重新登录后依然还是上次的分辨率,直接修改配置文件/etc/X11/xorg.conf可以解决这个问题。我的配置如下:
# Xorg configuration created by system-config-display


Section "ServerLayout"

    Identifier     "single head configuration"

    Screen      0  "Screen0" 0 0

    InputDevice    "Keyboard0" "CoreKeyboard"

EndSection


Section "InputDevice"

    Identifier  "Keyboard0"

    Driver      "kbd"

    Option        "XkbModel" "pc105"

    Option        "XkbLayout" "us"

EndSection


Section "Monitor"


 ### Comment all HorizSync and VertSync values to use DDC:

 ### Comment all HorizSync and VertSync values to use DDC:

 ### Comment all HorizSync and VertSync values to use DDC:

    Identifier   "Monitor0"

    ModelName    "LCD Panel 1440x900"

 ### Comment all HorizSync and VertSync values to use DDC:

    HorizSync    31.5 - 56.0

    VertRefresh  56.0 - 65.0

    Option        "dpms"

EndSection


Section "Device"

    Identifier  "Videocard0"

    Driver      "nv"

EndSection


Section "Screen"

    Identifier "Screen0"

    Device     "Videocard0"

    Monitor    "Monitor0"

    DefaultDepth     24

    SubSection "Display"

        Viewport   0 0

        Depth     24

        Modes    "1440x900" "1024x768" "800x600" "640x480"

    EndSubSection

EndSection
7. linux下安装Oracle时交换空间不足的解决方法
linux上安装Oracle时交换空间不足的解决办法
增加交换空间有两种方法:
严格的说,在系统安装完后只有一种方法可以增加swap,那就是本文的第二种方法,
至于第一种方法应该是安装系统时设置交换区。
1、使用分区:
在安装OS时划分出专门的交换分区,空间大小要事先规划好,启动系统时自动进行mount。
这种方法只能在安装OS时设定,一旦设定好不容易改变,除非重装系统。
2、使用swapfile:(或者是整个空闲分区)
新建临时swapfile或者是空闲分区,在需要的时候设定为交换空间,最多可以增加8个swapfile。
交换空间的大小,与CPU密切相关,在i386系中,最多可以使用2GB的空间。
在系统启动后根据需要在2G的总容量下进行增减。
这种方法比较灵活,也比较方便,缺点是启动系统后需要手工设置。
下面是运用swapfile增加交换空间的步骤:
涉及到的命令:
free ---查看内存状态命令,可以显示memory,swap,buffer cache等的大小及使用状况;
dd ---读取,转换并输出数据命令;
mkswap ---设置交换区
swapon ---启用交换区,相当于mount
swapoff ---关闭交换区,相当于umount
步骤:
1、创建swapfile:
root权限下,创建swapfile,假设当前目录为"/",执行如下命令:
# dd if=/dev/zero of=swapfile bs=1024 count=500000
则在根目录下创建了一个swapfile,名称为“swapfile”,大小为500M,也可以把文件输出到自己想要的任何目录中,
个人觉得还是直接放在根目录下比较好,一目了然,不容易误破坏,放在其他目录下则不然了;
命令中选项解释:
---of:输出的交换文件的路径及名称;
---bs:块大小,单位byte,一般为1k即1024个byte;
---count:总块数即空间总大小,单位为块即k;
---if:读取的源空闲空间,为什么是zero,不清楚,先固定这么写吧;
2、将swapfile设置为swap空间
# mkswap swapfile
3、启用交换空间,这个操作有点类似于mount操作(个人理解):
# swapon swapfile
至此增加交换空间的操作结束了,可以使用free命令查看swap空间大小是否发生变化;
4、如果不再使用空间可以选择关闭交换空间,这个操作有点类似于umount操作(个人理解)::
# swapoff swapfile
使用这种方法在每次系统启动时都需要手动设置、开启swapfile,比较麻烦,解决方法:
在 /etc/rc.d/rc.local 文件的末行下追加加以下内容:(编辑这个文件当然是用vi了~)
/sbin/swapon /swapfile
保存后退出,这样在系统启动后,swap空间就会自动加载了;
总结:在安装OS时一定要规划后swap大小,通常为内存的2倍,但是要考虑到以后增加内存的可能,所以可以考虑设的稍大一些,
想在虚拟机里面安装oracle10g,发现默认的swap交换空间不满足最低要求,因为我分配的物理内存是1G,那么就按照要求需要2G的swap交换空间,默认只有1G的交换空间。添加swap交换空间的步骤如下:
第一步:确保系统中有足够的空间来用做swap交换空间,我使用的是KVM,准备在一个独立的文件系统中添加一个swap交换文件,在/opt/image中添加2G的swap交换文件
第二步:添加交换文件并设置其大小为2G,使用如下命令
[root@sense image]# dd if=/dev/zero of=/opt/image/swap bs=1024 count=2048000
过段时间就返回如下结果:
2048000+0 records in
2048000+0 records out
2097152000 bytes (2.1 GB) copied, 272.867 seconds, 7.7 MB/s
第三步:创建(设置)交换空间,使用命令mkswap
[root@sense image]# mkswap /opt/image/swap
Setting up swapspace version 1, size = 2097147 kB
第四步:检查现有的交换空间大小,使用命令free
[root@sense image]# free -m
total used free shared buffers cached
Mem: 1011 989 21 0 1 875
-/+ buffers/cache: 112 898
Swap: 1027 0 1027
或者检查meminfo文件
grep SwapTotal /proc/meminfo
第五步:启动新增加的2G的交换空间,使用命令swapon
[root@sense image]# swapon /opt/image/swap
第六步:确认新增加的2G交换空间已经生效,使用命令free
[[root@sense image]# free -m
total used free shared buffers cached
Mem: 1011 995 15 0 4 877
-/+ buffers/cache: 113 897
Swap: 3027 0 3027
或者检查meminfo文件
grep SwapTotal /proc/meminfo
第七步:修改/etc/fstab文件,使得新加的2G交换空间在系统重新启动后自动生效
在文件最后加入:
/opt/image/swap swap swap defaults 0 0
8. 安装oracle 11g R2的时候提示:pdksh包没有(或者安装了pdksh-5.2.14但是依旧报告未安装)
下载地址:http://mirror.centos.org/centos/5/os/x86_64/CentOS/pdksh-5.2.14-37.el5_8.1.x86_64.rpm
可能安装时会报错: pdksh conflicts with ksh-20100621-12.el6_2.1.x86_64
rpm -e ksh-20100621-12.el6_2.1.x86_64
卸载了ksh之后就简单了
rpm -ivh pdksh-5.2.14-37.el5_8.1.x86_64.rpm
9. [root@linux211 ~]# su - oracle
su: warning: cannot change directory to /home/oracle: 没有那个文件或目录
[root@linux211 ~]# vim ~/.bash_profile
最后加上 export PS1=’[\u@\h \W]\$’
[root@linux211 ~]# source ~/.bash_profile
[root@linux211 ~]#su oracle
[oracle@linux211 root]$pwd
10. 监听方面
[oracle@linux211 root]$ lsnrctl status
LSNRCTL for Linux: Version 11.2.0.4.0 - Production on 03-JAN-2017 09:47:54
Copyright (c) 1991, 2013, Oracle. All rights reserved.
Connecting to (DESCRIPTION=(ADDRESS=(PROTOCOL=TCP)(HOST=linux211)(PORT=1521)))
TNS-12541: TNS:no listener
TNS-12560: TNS:protocol adapter error
TNS-00511: No listener
Linux Error: 111: Connection refused
解决:
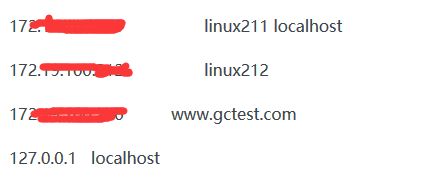
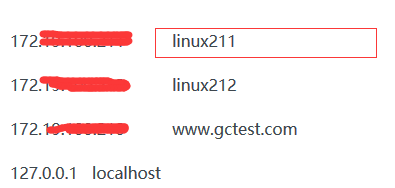
关于主机名和IP配置文件,一般情况下hosts文件的每行为一个主机,每行由三部份组成,每个部份由空格隔开。
第一部份:网络IP地址;
第二部份:主机名或域名;
第三部份:主机名别名;
[root@linux211 11.2.0]# hostname
linux211
[root@linux211 11.2.0]# more /etc/sysconfig/network
NETWORKING=yes
NETWORKING_IPV6=no
HOSTNAME=linux211
[root@linux211 11.2.0]# vim /etc/hosts
# Do not remove the following line, or various programs
# that require network functionality will fail.
修改为:
11.监听启动,查看监听日志:
[oracle@linux211 root]$ lsnrctl start
LSNRCTL for Linux: Version 11.2.0.4.0 - Production on 03-JAN-2017 11:17:54
Copyright (c) 1991, 2013, Oracle. All rights reserved.
Starting /u01/app/oracle/product/11.2.0/dbhome_2/bin/tnslsnr: please wait...
TNSLSNR for Linux: Version 11.2.0.4.0 - Production
System parameter file is /u01/app/oracle/product/11.2.0/dbhome_2/network/admin/listener.ora
Log messages written to /u01/app/oracle/diag/tnslsnr/linux211/listener/alert/log.xml
Listening on: (DESCRIPTION=(ADDRESS=(PROTOCOL=tcp)(HOST=linux211)(PORT=1521)))
Connecting to (DESCRIPTION=(ADDRESS=(PROTOCOL=TCP)(HOST=linux211)(PORT=1521)))
STATUS of the LISTENER
------------------------
Alias LISTENER
Version TNSLSNR for Linux: Version 11.2.0.4.0 - Production
Start Date 03-JAN-2017 11:17:54
Uptime 0 days 0 hr. 0 min. 0 sec
Trace Level off
Security ON: Local OS Authentication
SNMP OFF
Listener Parameter File /u01/app/oracle/product/11.2.0/dbhome_2/network/admin/listener.ora
Listener Log File /u01/app/oracle/diag/tnslsnr/linux211/listener/alert/log.xml
Listening Endpoints Summary...
(DESCRIPTION=(ADDRESS=(PROTOCOL=tcp)(HOST=linux211)(PORT=1521)))
The listener supports no services
The command completed successfully
监听日志:
/$ORACLE_HOME/product/11.2.0/dbhome_2/listener.log
12. 监听错误 ORA-12514: TNS: 监听程序当前无法识别连接描述符中请求的服务解决
解决:/$ORACLE_HOME/product/11.2.0/dbhome_2/network/admin下listener.ora
修改为:
SID_LIST_LISTENER=
(SID_LIST =
(SID_DESC =
(GLOBAL_DBNAME = ORCL)
(ORACLE_HOME =/$ORACLE_HOME/product/11.2.0/dbhome_2)
(SID_NAME = ORCL)
)
)
LISTENER =
(DESCRIPTION_LIST =
(DESCRIPTION =
(ADDRESS = (PROTOCOL = TCP)(HOST = linux211)(PORT = 1521))
)
)
ADR_BASE_LISTENER = /$ORACLE_HOME
Ps:” ORCL”为监听的数据库实例名称
13.监听启动监听状态非ready
[oracle@linux211 root]$ lsnrctl start
LSNRCTL for Linux: Version 11.2.0.4.0 - Production on 03-JAN-2017 14:32:53
Copyright (c) 1991, 2013, Oracle. All rights reserved.
Starting /u01/app/oracle/product/11.2.0/dbhome_2/bin/tnslsnr: please wait...
TNSLSNR for Linux: Version 11.2.0.4.0 - Production
System parameter file is /u01/app/oracle/product/11.2.0/dbhome_2/network/admin/listener.ora
Log messages written to /u01/app/oracle/diag/tnslsnr/linux211/listener/alert/log.xml
Listening on: (DESCRIPTION=(ADDRESS=(PROTOCOL=tcp)(HOST=linux211)(PORT=1521)))
Connecting to (DESCRIPTION=(ADDRESS=(PROTOCOL=TCP)(HOST=linux211)(PORT=1521)))
STATUS of the LISTENER
------------------------
Alias LISTENER
Version TNSLSNR for Linux: Version 11.2.0.4.0 - Production
Start Date 03-JAN-2017 14:32:53
Uptime 0 days 0 hr. 0 min. 5 sec
Trace Level off
Security ON: Local OS Authentication
SNMP OFF
Listener Parameter File /u01/app/oracle/product/11.2.0/dbhome_2/network/admin/listener.ora
Listener Log File /u01/app/oracle/diag/tnslsnr/linux211/listener/alert/log.xml
Listening Endpoints Summary...
(DESCRIPTION=(ADDRESS=(PROTOCOL=tcp)(HOST=linux211)(PORT=1521)))
Services Summary...
Service "QMC" has 1 instance(s).
Instance "QMC", status UNKNOWN, has 1 handler(s) for this service...
The command completed successfully
不是 status READY
解决:
实例没有启动
sqlplus /nolog
connect / as sysdba
startup
如果出现乱码,修改下字符集: export LANG=en_US
14. Xlib: No protocol specified 错误
[main] [ 2017-01-03 16:37:09.553 CST ] [ConfigureProfile.setDefaultProfileParams:109] Not setting ADR_BASE: sqlnet.ora already exist!
java.lang.NullPointerException
at oracle.ewt.lwAWT.BufferedApplet.
at oracle.net.ca.NetCA.
at oracle.net.ca.NetCA.main(NetCA.java:429)
解决:
1.root用户
#vncserver
#DISPLAY=:0.0
2.root用户执行
#xhost +
3.切换到oracle用户执行dbca
15.当没有问题的时候,要优化,设置开机自启动
1.root登录, vim /etc/oratab
orcl:/oracle/product/11.2.0/db_1:N
将N改为Y,orcl是当前oracle实例。
2. su - oracle
cd $ORACLE_HOME/bin
修改dbstart 和 dbshut,
找到 ORACLE_HOME_LISTNER=$1 这行, 修改成:
ORACLE_HOME_LISTNER=/oracle/product/11.2.0/
或者直接修改成:
ORACLE_HOME_LISTNER=$ORACLE_HOME
3.在切换回 su root
vim /etc/rc.d/init.d/oracle
#!/bin/bash
#root
#chkconfig:35 85 15
#description:Oracle
#/etc/rc.d/init.d/oracle
ORACLE_BASE=/home/oracle/app/oracle
ORACLE_HOME=$ORACLE_BASE/product/11.2.0/dbhome_1
ORACLE_SID=orcl
case "$1" in
start)
echo -n "Starting Oracle11g:"
su - oracle -c dbstart >>$ORACLE_HOME/log/autostart.log
su - oracle -c "lsnrctl start" >>$ORACLE_HOME/log/autostart.log
su - oracle -c "emctl start dbconsole" >>$ORACLE_HOME/log/autostart.log
;;
stop)
echo -n "Shutting Down Oracle11g:"
su - oracle -c "emctl stop dbconsole" >>$ORACLE_HOME/log/autostart.log
su - oracle -c "lsnrctl stop" >>$ORACLE_HOME/log/autostart.log
su - oracle -c dbshut >>$ORACLE_HOME/log/autostart.log
;;
restart)
echo -n "Restarting Oracle11g:"
su - oracle -c dbshut >>$ORACLE_HOME/log/autostart.log
su - oracle -c "lsnrctl stop" >>$ORACLE_HOME/log/autostart.log
su - oracle -c "emctl stop dbconsole" >>$ORACLE_HOME/log/autostart.log
su - oracle -c dbstart >>$ORACLE_HOME/log/autostart.log
su - oracle -c "lsnrctl start" >>$ORACLE_HOME/log/autostart.log
su - oracle -c "emctl start dbconsole" >>$ORACLE_HOME/log/autostart.log
;;
*)
echo "Usage: $0{start|stop|restart}"
exit 1
;;
esac
exit 0
4. 更改启动脚本权限
chmod 755 /etc/rc.d/init.d/oracle
5. 启动oracle数据库
service oracle start
6.设置oracle为开机自启动
chkconfig oracle on
chkconfig --list oracle
16.启动数据库,监听和连接
启动,关闭数据库实例
dbstart 和 dbshut
启动,查看实例监听
lsnrctl start
lsnrctl status
超管登录,创建普通用户密码和授权
sqlplus / nolog
conn / as sysdba
select username from dba_users;
create user xxx identified by yyy;
grant connect,resource,dba to xxx;
conn xxx/yyy
17.自启动报错ORACLE_UNQNAME not defined
[root@linux211 init.d]# service oracle stop
Stopping Oracle Database:
LSNRCTL for Linux: Version 11.2.0.4.0 - Production on 18-JAN-2017 14:56:10
Copyright (c) 1991, 2013, Oracle. All rights reserved.
Connecting to (DESCRIPTION=(ADDRESS=(PROTOCOL=TCP)(HOST=linux211)(PORT=1521)))
TNS-12541: TNS:no listener
TNS-12560: TNS:protocol adapter error
TNS-00511: No listener
Linux Error: 111: Connection refused
Connecting to (DESCRIPTION=(ADDRESS=(PROTOCOL=IPC)(KEY=EXTPROC1521)))
TNS-12541: TNS:no listener
TNS-12560: TNS:protocol adapter error
TNS-00511: No listener
Linux Error: 2: No such file or directory
Processing Database instance "orcl": log file /home/oracle/app/oracle/product/11.2.0/dbhome_1/shutdown.log
Environment variable ORACLE_UNQNAME not defined. Please set ORACLE_UNQNAME to database unique name.
解决:
[oracle@linux211 ~]$ emca -config dbcontrol db -repos create
EMCA 开始于 2017-1-18 15:04:36
EM Configuration Assistant, 11.2.0.3.0 正式版
版权所有 (c) 2003, 2011, Oracle。保留所有权利。
输入以下信息:
数据库 SID: orcl
监听程序端口号: 1521
监听程序 ORACLE_HOME [ /home/oracle/app/oracle/product/11.2.0/dbhome_1 ]: /home/oracle/app/oracle/product/11.2.0/dbhome_1
SYS 用户的口令:
DBSNMP 用户的口令:
SYSMAN 用户的口令:
通知的电子邮件地址 (可选):
通知的发件 (SMTP) 服务器 (可选):
-----------------------------------------------------------------
已指定以下设置
数据库 ORACLE_HOME ................ /home/oracle/app/oracle/product/11.2.0/dbhome_1
本地主机名 ................ linux211
监听程序 ORACLE_HOME ................ /home/oracle/app/oracle/product/11.2.0/dbhome_1
监听程序端口号 ................ 1521
数据库 SID ................ orcl
通知的电子邮件地址 ...............
通知的发件 (SMTP) 服务器 ...............
-----------------------------------------------------------------
是否继续? [是(Y)/否(N)]: y
2017-1-18 15:05:30 oracle.sysman.emcp.EMConfig perform
信息: 正在将此操作记录到 /home/oracle/app/cfgtoollogs/emca/orcl/emca_2017_01_18_15_04_35.log。
2017-1-18 15:05:32 oracle.sysman.emcp.EMReposConfig createRepository
信息: 正在创建 EM 资料档案库 (此操作可能需要一段时间)...
2017-1-18 15:14:00 oracle.sysman.emcp.EMReposConfig invoke
信息: 已成功创建资料档案库
2017-1-18 15:14:07 oracle.sysman.emcp.EMReposConfig uploadConfigDataToRepository
信息: 正在将配置数据上载到 EM 资料档案库 (此操作可能需要一段时间)...
2017-1-18 15:17:48 oracle.sysman.emcp.EMReposConfig invoke
信息: 已成功上载配置数据
2017-1-18 15:17:51 oracle.sysman.emcp.util.DBControlUtil secureDBConsole
信息: 正在保护 Database Control (此操作可能需要一段时间)...
2017-1-18 15:18:05 oracle.sysman.emcp.util.DBControlUtil secureDBConsole
信息: 已成功保护 Database Control。
2017-1-18 15:18:05 oracle.sysman.emcp.util.DBControlUtil startOMS
信息: 正在启动 Database Control (此操作可能需要一段时间)...
2017-1-18 15:19:34 oracle.sysman.emcp.EMDBPostConfig performConfiguration
信息: 已成功启动 Database Control
2017-1-18 15:19:34 oracle.sysman.emcp.EMDBPostConfig performConfiguration
信息: >>>>>>>>>>> Database Control URL 为 https://linux211:1158/em <<<<<<<<<<<
2017-1-18 15:19:39 oracle.sysman.emcp.EMDBPostConfig invoke
警告:
************************ WARNING ************************
管理资料档案库已置于安全模式下, 在此模式下将对 Enterprise Manager 数据进行加密。加密密钥已放置在文件 /home/oracle/app/oracle/product/11.2.0/
dbhome_1/linux211_orcl/sysman/config/emkey.ora 中。请务必备份此文件, 因为如果此文件丢失, 则加密数据将不可用。
***********************************************************
已成功完成 Enterprise Manager 的配置
EMCA 结束于 2017-1-18 15:19:39
ps:此处稍等10分钟。
至此,基本上出现的不容易处理的大问题,一一列于此,前车之鉴,后车之师。后浪们加油!欢迎qq(739726136)我补充其他常见问题。

