Meanshift
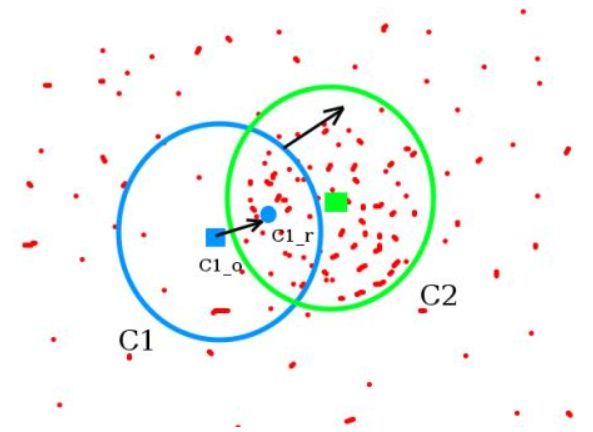
Meanshift 算法的基本原理简单,假设我们有一堆点,和一个小的圆形窗口,Meanshift 算法就是不断移动小圆形窗口,直到找到圆形区域内最大灰度密度处为止.
初始窗口以蓝色圆圈显示,名称为“C1”,其原始中心标有蓝色矩形,名为“C1_o”.但是,这个窗口当中所有点的点集构成的质心在蓝色圆形点处,圆环的型心和质心并不重合,所以,移动蓝色的窗口以使型心与之前得到的质心重合.
不断执行上面的移动过程,直到型心和质心大致重合结束.
通常通过直方图反投影图像和初始目标位置,当物体移动时,移动反映在直方图反投影图像中,最后圆形的窗口会落到像素分布最大的地方,也就是图中的绿色圈并命名为C2.
meanshift in OpenCV
首先要设定目标,并计算的直方图,然后对这个直方图在每一帧当中进行反向投影.需要提供一个初试的窗口位置,计算HSV模型当中H(色调)的直方图,为了避免低亮度造成的影响,使用 cv2.inRange()将低亮度值忽略.
import numpy as np
import cv2
import matplotlib.pyplot as plt

cap = cv2.VideoCapture('test.mp4')
# take first frame of the video
ret,frame = cap.read()

# setup initial location of window
r,h,c,w = 50,200,50,100  # simply hardcoded the values
track_window = (c,r,w,h)

# set up the ROI for tracking
roi = frame[r:r+h, c:c+w]
hsv_roi =  cv2.cvtColor(roi, cv2.COLOR_BGR2HSV)
mask = cv2.inRange(hsv_roi, np.array((0., 60.,32.)), np.array((180.,255.,255.)))
roi_hist = cv2.calcHist([hsv_roi],[0],mask,[180],[0,180])
cv2.normalize(roi_hist,roi_hist,0,255,cv2.NORM_MINMAX)

# Setup the termination criteria, either 10 iteration or move by atleast 1 pt
term_crit = ( cv2.TERM_CRITERIA_EPS | cv2.TERM_CRITERIA_COUNT, 10, 1 )

while(1):
    ret ,frame = cap.read()

    if ret == True:
        hsv = cv2.cvtColor(frame, cv2.COLOR_BGR2HSV)
        dst = cv2.calcBackProject([hsv],[0],roi_hist,[0,180],1)

        # apply meanshift to get the new location
        ret, track_window = cv2.CamShift(dst, track_window, term_crit)

        # Draw it on image
        pts = cv2.boxPoints(ret)
        pts = np.int0(pts)
        img2 = cv2.polylines(frame,[pts],True, 255,2)
        cv2.imshow('img2',img2)

        k = cv2.waitKey(60) & 0xff
        if k == 27:
            break
        else:
            cv2.imwrite(chr(k)+".jpg",img2)

    else:
        break

cv2.destroyAllWindows()
cap.release()
CamShift
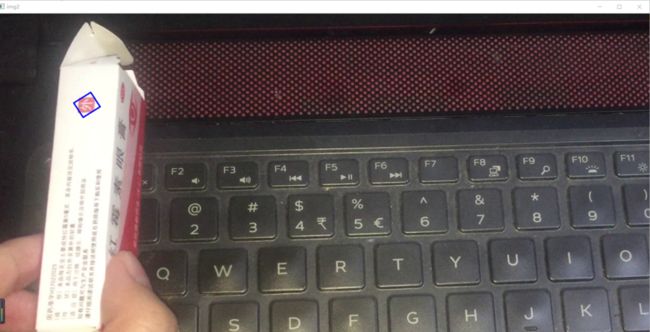
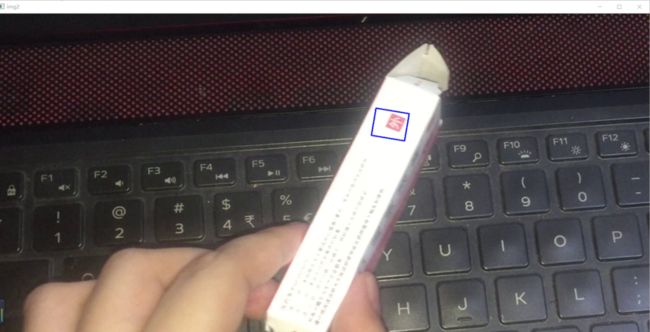
在目标跟踪中,物体的大小不是固定的,所以设置的跟踪窗口也应该随之变化,CAMshift算法,首先使用meanshift算法找到目标,然后调整窗口大小,而且还会计算目标对象的的最佳外接圆的角度,并调整窗口,并使用调整后的窗口对物体继续追踪.
Camshift in OpenCV
它与meanshift几乎相同,但它返回一个旋转的矩形.
import numpy as np
import cv2
import matplotlib.pyplot as plt

cap = cv2.VideoCapture('test.mp4')
# take first frame of the video
ret,frame = cap.read()

# setup initial location of window
r,h,c,w = 50,200,50,100  # simply hardcoded the values
track_window = (c,r,w,h)

# set up the ROI for tracking
roi = frame[r:r+h, c:c+w]
hsv_roi =  cv2.cvtColor(roi, cv2.COLOR_BGR2HSV)
mask = cv2.inRange(hsv_roi, np.array((0., 60.,32.)), np.array((180.,255.,255.)))
roi_hist = cv2.calcHist([hsv_roi],[0],mask,[180],[0,180])
cv2.normalize(roi_hist,roi_hist,0,255,cv2.NORM_MINMAX)

# Setup the termination criteria, either 10 iteration or move by atleast 1 pt
term_crit = ( cv2.TERM_CRITERIA_EPS | cv2.TERM_CRITERIA_COUNT, 10, 1 )

while(1):
    ret ,frame = cap.read()

    if ret == True:
        hsv = cv2.cvtColor(frame, cv2.COLOR_BGR2HSV)
        dst = cv2.calcBackProject([hsv],[0],roi_hist,[0,180],1)

        # apply meanshift to get the new location
        ret, track_window = cv2.CamShift(dst, track_window, term_crit)

        # Draw it on image
        pts = cv2.boxPoints(ret)
        pts = np.int0(pts)
        img2 = cv2.polylines(frame,[pts],True, 255,2)
        cv2.imshow('img2',img2)

        k = cv2.waitKey(60) & 0xff
        if k == 27:
            break
        else:
            cv2.imwrite(chr(k)+".jpg",img2)

    else:
        break

cv2.destroyAllWindows()
cap.release()
