《Apache Flink官方文档》Quick Start
安装: 下载并开始使用Flink
Flink 可以运行在 Linux, Mac OS X和Windows上。为了运行Flink, 唯一的要求是必须在Java 7.x (或者更高版本)上安装。Windows 用户, 请查看 Flink在Windows上的安装指南。
你可以使用以下命令检查Java当前运行的版本:
java -version
如果你有安装Java 8,命令行有如下回显
java version "1.8.0_111"

Java(TM) SE Runtime Environment (build 1.8.0_111-b14)

Java HotSpot(TM) 64-Bit Server VM (build 25.111-b14, mixed mode)
** 下载和解压 **
从下载页下载一个二进制的包,你可以选择任何你喜欢的Hadoop/Scala组合包。如果你计划使用文件系统,那么可以使用任何Hadoop版本。
进入下载目录
解压下载的压缩包
$ cd ~/Downloads        # Go to download directory
$ tar xzf flink-*.tgz   # Unpack the downloaded archive
$ cd flink-1.2.0
Start a Local Flink Cluster
MacOS X
对于 MacOS X 用户, Flink 可以通过Homebrew 进行安装。
 ~~~bash
 $ brew install apache-flink …
 $ flink –version
 Version: 1.2.0, Commit ID: 1c659cf ~~~
启动一个本地的Flink集群
使用如下命令启动Flink:
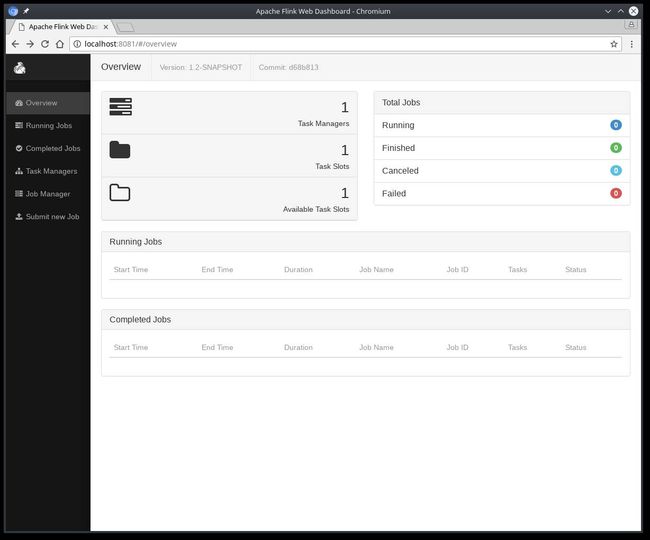
$ ./bin/start-local.sh # Start Flink通过访问http://localhost:8081检查JobManager网页,确保所有组件都已运行。网页会显示一个有效的TaskManager实例。
译注:本地需要有localhost 127.0.0.1的域名映射
你也可以通过检查日志目录里的日志文件来验证系统是否已经运行:
$ tail log/flink-*-jobmanager-*.log
INFO ... - Starting JobManager
INFO ... - Starting JobManager web frontend
INFO ... - Web frontend listening at 127.0.0.1:8081
INFO ... - Registered TaskManager at 127.0.0.1 (akka://flink/user/taskmanager)
阅读源码
你可以在GitHub中找到SocketWindowWordCount完整的代码,有JAVA和SCALA两个版本。
Scala
object SocketWindowWordCount {

    def main(args: Array[String]) : Unit = {

        // the port to connect to
        val port: Int = try {
            ParameterTool.fromArgs(args).getInt("port")
        } catch {
            case e: Exception => {
                System.err.println("No port specified. Please run 'SocketWindowWordCount --port '")
                return
            }
        }

        // get the execution environment
        val env: StreamExecutionEnvironment = StreamExecutionEnvironment.getExecutionEnvironment

        // get input data by connecting to the socket
        val text = env.socketTextStream("localhost", port, '\n')

        // parse the data, group it, window it, and aggregate the counts
        val windowCounts = text
            .flatMap { w => w.split("\\s") }
            .map { w => WordWithCount(w, 1) }
            .keyBy("word")
            .timeWindow(Time.seconds(5), Time.seconds(1))
            .sum("count")

        // print the results with a single thread, rather than in parallel
        windowCounts.print().setParallelism(1)

        env.execute("Socket Window WordCount")
    }

    // Data type for words with count
    case class WordWithCount(word: String, count: Long)
}
Java
public class SocketWindowWordCount {

    public static void main(String[] args) throws Exception {

        // the port to connect to
        final int port;
        try {
            final ParameterTool params = ParameterTool.fromArgs(args);
            port = params.getInt("port");
        } catch (Exception e) {
            System.err.println("No port specified. Please run 'SocketWindowWordCount --port '");
            return;
        }

        // get the execution environment
        final StreamExecutionEnvironment env = StreamExecutionEnvironment.getExecutionEnvironment();

        // get input data by connecting to the socket
        DataStream text = env.socketTextStream("localhost", port, "\n");

        // parse the data, group it, window it, and aggregate the counts
        DataStream windowCounts = text
            .flatMap(new FlatMapFunction() {
                @Override
                public void flatMap(String value, Collector out) {
                    for (String word : value.split("\\s")) {
                        out.collect(new WordWithCount(word, 1L));
                    }
                }
            })
            .keyBy("word")
            .timeWindow(Time.seconds(5), Time.seconds(1))
            .reduce(new ReduceFunction() {
                @Override
                public WordWithCount reduce(WordWithCount a, WordWithCount b) {
                    return new WordWithCount(a.word, a.count + b.count);
                }
            });

        // print the results with a single thread, rather than in parallel
        windowCounts.print().setParallelism(1);

        env.execute("Socket Window WordCount");
    }

    // Data type for words with count
    public static class WordWithCount {

        public String word;
        public long count;

        public WordWithCount() {}

        public WordWithCount(String word, long count) {
            this.word = word;
            this.count = count;
        }

        @Override
        public String toString() {
            return word + " : " + count;
        }
    }
}
运行例子
现在, 我们可以运行Flink 应用程序。 这个例子将会从一个socket中读一段文本,并且每隔5秒打印每个单词出现的数量。 例如 a tumbling window of processing time, as long as words are floating in.
第一步, 我们可以通过
netcat命令来启动本地服务。
$ nc -l 9000提交Flink程序:
$ ./bin/flink run examples/streaming/SocketWindowWordCount.jar --port 9000


Cluster configuration: Standalone cluster with JobManager at /127.0.0.1:6123
Using address 127.0.0.1:6123 to connect to JobManager.
JobManager web interface address http://127.0.0.1:8081
Starting execution of program
Submitting job with JobID: 574a10c8debda3dccd0c78a3bde55e1b. Waiting for job completion.
Connected to JobManager at Actor[akka.tcp://[email protected]:6123/user/jobmanager#297388688]
11/04/2016 14:04:50     Job execution switched to status RUNNING.
11/04/2016 14:04:50     Source: Socket Stream -> Flat Map(1/1) switched to SCHEDULED
11/04/2016 14:04:50     Source: Socket Stream -> Flat Map(1/1) switched to DEPLOYING
11/04/2016 14:04:50     Fast TumblingProcessingTimeWindows(5000) of WindowedStream.main(SocketWindowWordCount.java:79) -> Sink: Unnamed(1/1) switched to SCHEDULED
11/04/2016 14:04:51     Fast TumblingProcessingTimeWindows(5000) of WindowedStream.main(SocketWindowWordCount.java:79) -> Sink: Unnamed(1/1) switched to DEPLOYING
11/04/2016 14:04:51     Fast TumblingProcessingTimeWindows(5000) of WindowedStream.main(SocketWindowWordCount.java:79) -> Sink: Unnamed(1/1) switched to RUNNING
11/04/2016 14:04:51     Source: Socket Stream -> Flat Map(1/1) switched to RUNNING
译者注:你也可以提交一个简单的任务examples/batch/WordCount.jar任务,也可以界面提交任务,提交前需要选择一下Entry Class。
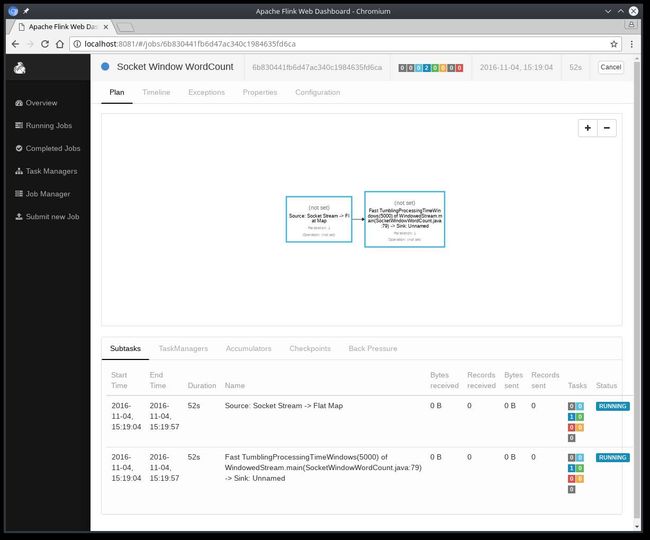
程序连接socket并等待输入,你可以通过web界面来验证任务期望的运行结果:
单词的数量在5秒的时间窗口中进行累加(使用处理时间和tumbling窗口),并打印在stdout。监控JobManager的输出文件,并在nc写一些文本(回车一行就发送一行输入给Flink) :
$ nc -l 9000
lorem ipsum
ipsum ipsum ipsum
bye
译者注:mac下使用命令
nc -l -p 9000来启动监听端口,如果有问题可以telnet localhost 9000看下监听端口是否已经启动,如果启动有问题可以重装netcat ,使用命令brew install netcat。
.out文件将被打印每个时间窗口单词的总数:
$ tail -f log/flink-*-jobmanager-*.out
lorem : 1
bye : 1
ipsum : 4
使用以下命令来停止Flink:
$ ./bin/stop-local.sh下一步
Check out更多的例子来熟悉Flink的编程API。 当你完成这些,可以继续阅读streaming指南。
(本文完)
并发编程网欢迎大家投稿,要求原创和,领域包括但不限于Java,分布式,架构,大数据,项目管理和软技能等,赞赏所得归作者所有,有兴趣的同学可以把文章发送到[email protected]。

