前言
最近在开发angular工程的自定义插件api以实现cordova插件的调用时,发现网上的教程几乎搜不到angular关于自定义插件api开发的文章,然后发现可以参照@ionic-native的插件代码结构整出来,于是就模仿着弄,搞了个简单的脚手架,然后折腾了一个周末总算弄出来了,过程还是有曲有折,故发文记录分享
1 介绍
本文将细致讲解cordova插件的创建、编写、发布到自定义@ionic-native/plugin的创建、发布过程,以及自定义ionic-native的脚手架开发、发布过程,还有angular项目中如何通过调用自定义@ionic-native/plugin来达到调取cordova插件的具体流程。
2 cordova插件开发
2.1 创建Cordova项目
创建之前确保安装Cordova
cordova create CordovaProject io.cordova.hellocordova CordovaAppCordovaProject 是创建应用程序的目录名称。
io.cordova.hellocordova 是默认的反向域值。 如果可能,您应该使用您自己的域值。
CordovaApp 是您应用的标题。本人在jobProject下创建 CordovaProject
$ cordova create CordovaProject com.ths.ll 思路提示框插件2.2 安装依赖plugman
plugman是用于安装和卸载用于Apache Cordova项目的插件的命令行工具。
进入CordovaProject项目目录,安装plugman
$ cd ./CordovaProjectPlugins
$ npm install -g plugman
2.3 创建插件
2.3.1创建一个最简单的Toast插件
plugman create --name [插件名] --plugin_id [插件id] --plugin_version [插件版本]为了方便管理,将插件创建在 Cordova 项目目录下的 plugins 文件夹下
$ cd plugins
$ plugman create --name ThsToast --plugin_id cordova-plugin-ths-toast --plugin_version 1.0.0![]()
接着手动将ThsToast目录重命名为上述plugin_id的值cordova-plugin-ths-toast,这里以及上面的ths表示的是公司的统一插件开发前缀,通常是英文字符串
![]()
进入插件目录,添加插件支持的平台环境
$ cd cordova-plugin-ths-toast
$ plugman platform add --platform_name android
$ plugman platform add --platform_name ios
添加之后将在cordova-plugin-ths-toast目录下产生android和ios两个目录,此处只定义android环境的ThsToast,
生成的文件内容如图所示
![]()
注意:起名不要和安卓原生方法冲突了,比如这里ThsToast如果改成Toast,就会和android.widget.Toast中的Toast类重名,导致构建报错
![]()
2.3.2 插件配置
添加完平台后,cordova-plugin-ths-toast 目录下的 plugin.xml 文件将添加如下内容![]()
修改 plugin.xml 文件内容如下
Toast
修改www/ThsToast.js,顺带提一下其中exec方法就是调用cordova插件的原始方法,该方法传的'ThsToast','show'和[arg0],success,error参数对应的分别是android/ThsToast.java中的class类名,action和args,callbackContext.success,callbackContext.error
![]()
![]()
修改 android/ThsToast.java 文件,
![]()
![]()
2.3.3 初始化插件
npm init提示的时候name输入插件id,其余根据提示填写,不清楚就直接按回车到结束,将创建一个 package.json 文件
{
  "name": "cordova-plugin-ths-toast",
  "version": "1.0.0",
  "description": "show toast",
  "main": "index.js",
  "scripts": {
    "test": "echo \"Error: no test specified\" && exit 1"
  },
  "repository": {
    "type": "git",
    "url": "git+https://github.com/qtpalmtop/cordova-plugin-ths-toast.git"
  },
  "author": "lilin",
  "license": "ISC",
  "bugs": {
    "url": "https://github.com/qtpalmtop/cordova-plugin-ths-toast/issues"
  },
  "homepage": "https://github.com/qtpalmtop/cordova-plugin-ths-toast#readme"
}
接着修改package.json,keywords关键字配置是为了在Cordova Plugin Search中显示插件,engines配置是插件可能会列出多个发行版的依赖关系,以便在Cordova CLI选择要从npm获取的插件版本时向其提供指导,旨在最终替换plugin.xml中的engine元素。
详细内容请参考cordova创建插件
{
  "name": "cordova-plugin-ths-toast",
  "version": "1.0.0",
  "description": "show toast",
  "main": "index.js",
  "scripts": {
    "test": "echo \"Error: no test specified\" && exit 1"
  },
  "repository": {
    "type": "git",
    "url": "git+https://github.com/qtpalmtop/cordova-plugin-ths-toast.git"
  },
  "author": "lilin",
  "license": "ISC",
  "bugs": {
    "url": "https://github.com/qtpalmtop/cordova-plugin-ths-toast/issues"
  },
  "homepage": "https://github.com/qtpalmtop/cordova-plugin-ths-toast#readme",
  "keywords": [
    "ecosystem:cordova",
    "cordova-android",
    "cordova-ios"
  ],
  "engines": {
    "cordovaDependencies": {
      "2.0.0": {
        "cordova-android": ">=3.6.0"
      },
      "4.0.0": {
        "cordova-android": ">=3.6.0",
        "cordova-windows": ">=4.4.0"
      },
      "6.0.0": {
        "cordova": ">100"
      }
    },
    "node": ">=6.0.0"
  }
}
2.3.4 发布插件
发布后就可以正常的通过cordova plugin add cordova-plugin-ths-toast在项目中通过ThsToast.show()使用,但是要在angular项目中使用还需要我们开发自定义插件api,下面我们开始ionic-native的api模块开发
cd cordova-plugin-ths-toast
npm login
npm publish
3 创建ionic-native插件
使用过@ionic-native库的同学肯定都知道,@ionic-native库可以直接导入angular项目中,使用起来也非常方便,只需要在app.module.ts中导入api
// app.module.ts
import { SplashScreen } from '@ionic-native/splash-screen/ngx';

@NgModule({
...,
providers: [
    ...,
    SplashScreen
  ]
})
然后在使用的模块中导入sdk就能直接调用起cordova插件功能
// app.component.ts
import { SplashScreen } from '@ionic-native/splash-screen/ngx';

export class AppComponent {
    constructor(
        private splashScreen: SplashScreen
    ) {
        this.splashScreen.hide();
    }
}
那么要如何才能创建出@ionic-native库一样的插件呢?
3.1 @ionic-native插件代码拆解
首先我们安装下@ionic-native/splash-screen
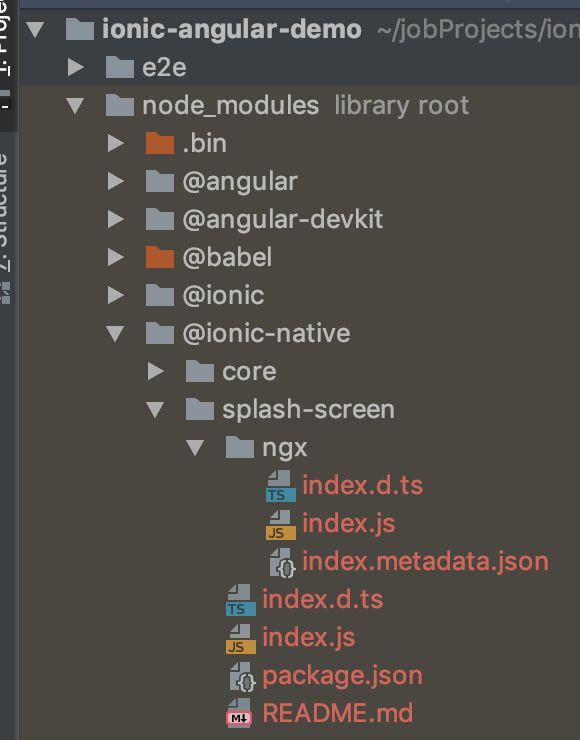
npm install @ionic-native/splash-screen可以看到插件结构如下
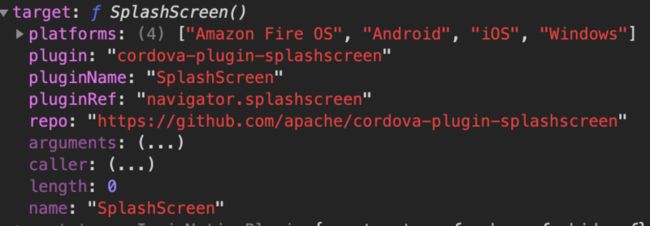
分析:__extends函数功能可以理解为是继承不再详细阐述,左边的参数对象会继承右边的对象,SplashScreenOriginal里新建了个函数SplashScreenOriginal,__extends(SplashScreenOriginal, _super)让该对象继承自IonicNativePlugin,这样就具备IonicNativePlugin的一些功能,最后导出SplashScreenOriginal的实例SplashScreen供我们调用
var __extends = (this && this.__extends) || (function () {
    var extendStatics = function (d, b) {
        extendStatics = Object.setPrototypeOf ||
            ({ __proto__: [] } instanceof Array && function (d, b) { d.__proto__ = b; }) ||
            function (d, b) { for (var p in b) if (b.hasOwnProperty(p)) d[p] = b[p]; };
        return extendStatics(d, b);
    };
    return function (d, b) {
        extendStatics(d, b);
        function __() { this.constructor = d; }
        d.prototype = b === null ? Object.create(b) : (__.prototype = b.prototype, new __());
    };
})();
import { IonicNativePlugin, cordova } from '@ionic-native/core';
var SplashScreenOriginal = /** @class */ (function (_super) {
    __extends(SplashScreenOriginal, _super);
    function SplashScreenOriginal() {
        return _super !== null && _super.apply(this, arguments) || this;
    }
    SplashScreenOriginal.prototype.show = function () { return cordova(this, "show", { "sync": true }, arguments); };
    SplashScreenOriginal.prototype.hide = function () { return cordova(this, "hide", { "sync": true }, arguments); };
    SplashScreenOriginal.pluginName = "SplashScreen";
    SplashScreenOriginal.plugin = "cordova-plugin-splashscreen";
    SplashScreenOriginal.pluginRef = "navigator.splashscreen";
    SplashScreenOriginal.repo = "https://github.com/apache/cordova-plugin-splashscreen";
    SplashScreenOriginal.platforms = ["Amazon Fire OS", "Android", "iOS", "Windows"];
    return SplashScreenOriginal;
}(IonicNativePlugin));
var SplashScreen = new SplashScreenOriginal();
export { SplashScreen };
index.d.ts 规定了对象属性和方法
import { IonicNativePlugin } from '@ionic-native/core';
/**
 * @name Splash Screen
 * @description This plugin displays and hides a splash screen during application launch. The methods below allows showing and hiding the splashscreen after the app has loaded.
 * @usage
 * ```typescript
 * import { SplashScreen } from '@ionic-native/splash-screen/ngx';
 *
 * constructor(private splashScreen: SplashScreen) { }
 *
 * ...
 *
 * this.splashScreen.show();
 *
 * this.splashScreen.hide();
 * ```
 */
export declare class SplashScreenOriginal extends IonicNativePlugin {
    /**
     * Shows the splashscreen
     */
    show(): void;
    /**
     * Hides the splashscreen
     */
    hide(): void;
}

export declare const SplashScreen: SplashScreenOriginal;
上面的代码导出了一个能调用插件的通用实例,但是要在angular中使用,就得看看ngx的代码
ngx/index.js
分析:对index.js而言多了__decorate方法,在调用该方法后实例上多了__annotations__隐式属性,该属性让实例以Injectable的方式注入angular中得以调用,可以理解为加了个
@Injectable({
    providedIn: "root"
})var __extends = (this && this.__extends) || (function () {
var extendStatics = function (d, b) {
extendStatics = Object.setPrototypeOf ||
({ __proto__: [] } instanceof Array && function (d, b) { d.__proto__ = b; }) ||
function (d, b) { for (var p in b) if (b.hasOwnProperty(p)) d[p] = b[p]; };
return extendStatics(d, b);
};
return function (d, b) {
extendStatics(d, b);
function __() { this.constructor = d; }
d.prototype = b === null ? Object.create(b) : (__.prototype = b.prototype, new __());
};
})();
var __decorate = (this && this.__decorate) || function (decorators, target, key, desc) {
var c = arguments.length, r = c < 3 ? target : desc === null ? desc = Object.getOwnPropertyDescriptor(target, key) : desc, d;
if (typeof Reflect === "object" && typeof Reflect.decorate === "function") r = Reflect.decorate(decorators, target, key, desc);
else for (var i = decorators.length - 1; i >= 0; i--) if (d = decorators[i]) r = (c < 3 ? d(r) : c > 3 ? d(target, key, r) : d(target, key)) || r;
return c > 3 && r && Object.defineProperty(target, key, r), r;
};
import { Injectable } from '@angular/core';
import { IonicNativePlugin, cordova } from '@ionic-native/core';
var SplashScreen = /** @class */ (function (_super) {
__extends(SplashScreen, _super);
function SplashScreen() {
return _super !== null && _super.apply(this, arguments) || this;
}
SplashScreen.prototype.show = function () { return cordova(this, "show", { "sync": true }, arguments); };
SplashScreen.prototype.hide = function () { return cordova(this, "hide", { "sync": true }, arguments); };
SplashScreen.pluginName = "SplashScreen";
SplashScreen.plugin = "cordova-plugin-splashscreen";
SplashScreen.pluginRef = "navigator.splashscreen";
SplashScreen.repo = "https://github.com/apache/cordova-plugin-splashscreen";
SplashScreen.platforms = ["Amazon Fire OS", "Android", "iOS", "Windows"];
SplashScreen = __decorate([
Injectable()
], SplashScreen);
return SplashScreen;
}(IonicNativePlugin));
export { SplashScreen };ngx/index.d.ts 类型规定和index.d.ts区别不大
import { IonicNativePlugin } from '@ionic-native/core';
/**
 * @name Splash Screen
 * @description This plugin displays and hides a splash screen during application launch. The methods below allows showing and hiding the splashscreen after the app has loaded.
 * @usage
 * ```typescript
 * import { SplashScreen } from '@ionic-native/splash-screen/ngx';
 *
 * constructor(private splashScreen: SplashScreen) { }
 *
 * ...
 *
 * this.splashScreen.show();
 *
 * this.splashScreen.hide();
 * ```
 */
export declare class SplashScreen extends IonicNativePlugin {
    /**
     * Shows the splashscreen
     */
    show(): void;
    /**
     * Hide the splashscreen
     */
    hide(): void;
}
package.json 我们需要用到的属性有author作者、dependencies依赖、description插件描述、license、module模块入口、name插件名称、peerDependencies同级依赖、repository插件仓库地址、typings类型规定、version插件版本号
{
  "_args": [
    [
      "@ionic-native/[email protected]",
      "/Users/linli/jobProjects/ionic-angular-demo"
    ]
  ],
  "_from": "@ionic-native/[email protected]",
  "_id": "@ionic-native/[email protected]",
  "_inBundle": false,
  "_integrity": "sha512-6IhAEtVBf8lE7HdLgs+GLm83z9ukfdSwbKS9oMciJe8dpXTY3J2B2Fy8HgXpo88phccHXny1acEpFndns3oEkA==",
  "_location": "/@ionic-native/splash-screen",
  "_phantomChildren": {},
  "_requested": {
    "type": "version",
    "registry": true,
    "raw": "@ionic-native/[email protected]",
    "name": "@ionic-native/splash-screen",
    "escapedName": "@ionic-native%2fsplash-screen",
    "scope": "@ionic-native",
    "rawSpec": "5.9.0",
    "saveSpec": null,
    "fetchSpec": "5.9.0"
  },
  "_requiredBy": [
    "/"
  ],
  "_resolved": "https://registry.npmjs.org/@ionic-native/splash-screen/-/splash-screen-5.9.0.tgz",
  "_spec": "5.9.0",
  "_where": "/Users/linli/jobProjects/ionic-angular-demo",
  "author": {
    "name": "ionic"
  },
  "bugs": {
    "url": "https://github.com/ionic-team/ionic-native/issues"
  },
  "dependencies": {
    "@types/cordova": "latest"
  },
  "description": "Ionic Native - Native plugins for ionic apps",
  "homepage": "https://github.com/ionic-team/ionic-native#readme",
  "license": "MIT",
  "module": "index.js",
  "name": "@ionic-native/splash-screen",
  "peerDependencies": {
    "rxjs": "^5.5.0 || ^6.5.0",
    "@ionic-native/core": "^5.1.0"
  },
  "repository": {
    "type": "git",
    "url": "git+https://github.com/ionic-team/ionic-native.git"
  },
  "typings": "index.d.ts",
  "version": "5.9.0"
}
3.2 使用ths-cli脚手架生成ionic-native插件
分析完@ionic-native插件构造后我们现在就利用脚手架来生成上面插件的结构吧!
ths-cli是本人为公司写的脚手架->ths-cli<- 目前只有create-ionic-native命令,可以创建@ionic-native插件供angular项目使用,使用方法如下
// ths-cli已占用故用ths-cli2
npm install ths-cli2 -g
使用
ths-cli create-ionic-native ths-native-toastUsage: ths-cli [项目名称]
Options:
-V, --version output the version number
-h, --help display help for command
Commands:
create-ionic-native 创建ionic-native插件
help [command] display help for command create-ionic-native 表示创建ionic-native插件的指令
ths-native-toast 表示想要生成的插件名称
演示,冒号后面是手动输入的内容,其中cordova的id需要和上述cordova插件的名称一致
ths-cli create-ionic-native ths-native-toast
> 正在下载项目模板,源地址:[email protected]:qtpalmtop/templates-ionic-native.git#master
> 插件的名称 (ThsPlugin): ThsToast
> 插件的id (ths-native-plugin): ths-native-toast
> 插件的版本号 (1.0.0): 1.0.0
> 对应的cordova插件的id  (cordova-plugin-ths-pluginName): cordova-plugin-ths-toast
> 插件的简介 (A plugin named ThsPlugin): show toast
> 插件的git地址 (https://github.com/apache/cordova-plugin-ths-pluginName): https://github.com/qtpalmtop/cordova-plugin-ths-toast
正在初始化项目模板:ths-native-toast
✔ 创建成功:)
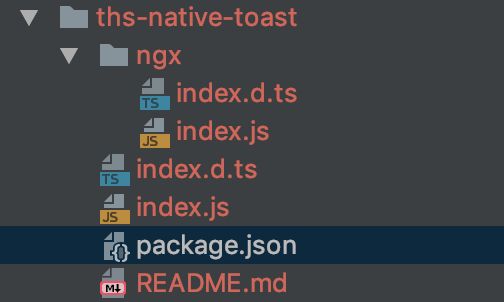
执行完后,当前目录下将会出现创建好的ths-native-toast插件
cd ths-native-toast
npm publish
随后在angular项目中即可通过npm install ths-native-toast, 并在app.module.ts中导入插件
4 在angular项目中调用自定义插件
app.module.ts
import { ThsToast } from 'ths-native-toast/ngx';

@NgModule({
    ...,
    providers: [
        ThsToast
    ]
})
app.component.ts
import {ThsToast} from 'ths-native-toast/ngx';

    constructor(private thsToast: ThsToast) {

    }

    ngOnInit() {
        this.showToast()
    }

    /**
    * 弹出提示
    **/
    showToast(): void {
        this.thsToast.show('hello world', () => {
            console.log('call toast success');
        }, (error) => {
            console.log('call toast error');
        });
    }
app真机运行效果
call toast success5 总结
1 创建cordova插件(plugman)2 创建ionic-native插件(ths-cli)
3 angular项目中导入cordova插件和ionic-native插件
参考文章:
如有疑问或指正,欢迎在评论区留言,相逢便是缘,如果觉得本文对你有所帮助,不妨点个赞鼓励下嘿嘿


