
对于每个服务网格框架来说,处理服务间通信中的通信故障的能力是绝对必要的。它包括超时和HTTP错误代码的处理。在本文中,我将展示如何使用Istio配置重试和熔断机制。与之前Kubernetes上使用Istio Service Mesh的文章相同,我们将分析在Kubernetes上部署的两个简单Spring Boot应用程序之间的通信。但是,我们将讨论更高级的主题,而不是非常基本的示例。
示例
为了演示Istio和Spring Boot的用法,我在GitHub上创建了带有两个示例应用程序的存储库:callme-service和caller-service。该存储库的地址为https://github.com/piomin/sample-istio-services.git。前言中已经提到与Istio有关服务网格的第一篇文章使用了相同的存储库。
架构
我们的示例系统的体系结构与上一篇文章非常相似。但是,存在一些差异。我们不是在使用Istio组件注入故障或延迟,而是直接在源代码内部的应用程序上注入错误或延迟。为什么?现在,我们将能够直接按照为callme-service创建的规则进行处理,而不必像以前那样在客户端进行处理。另外,我们正在运行两个callme-service应用程序版本v2实例,以测试熔断器对相同服务(或相同Deployment)实例的作用如何。下图说明了当前描述的体系结构。

Spring Boot 应用
我们从示例应用程序的实现开始。应用程序callme-service公开了两个端点,这些端点返回有关版本和实例ID的信息。端点GET /ping-with-random-error将HTTP 504错误代码设置为对约50%请求的响应。端点GET /ping-with-random-delay返回的响应具有0s和3s之间的随机延迟。这是callme-service端 @RestController的实现。
@RestController
@RequestMapping("/callme")
public class CallmeController {

    private static final Logger LOGGER = LoggerFactory.getLogger(CallmeController.class);
    private static final String INSTANCE_ID = UUID.randomUUID().toString();
    private Random random = new Random();

    @Autowired
    BuildProperties buildProperties;
    @Value("${VERSION}")
    private String version;

    @GetMapping("/ping-with-random-error")
    public ResponseEntity pingWithRandomError() {
        int r = random.nextInt(100);
        if (r % 2 == 0) {
            LOGGER.info("Ping with random error: name={}, version={}, random={}, httpCode={}",
                    buildProperties.getName(), version, r, HttpStatus.GATEWAY_TIMEOUT);
            return new ResponseEntity<>("Surprise " + INSTANCE_ID + " " + version, HttpStatus.GATEWAY_TIMEOUT);
        } else {
            LOGGER.info("Ping with random error: name={}, version={}, random={}, httpCode={}",
                    buildProperties.getName(), version, r, HttpStatus.OK);
            return new ResponseEntity<>("I'm callme-service" + INSTANCE_ID + " " + version, HttpStatus.OK);
        }
    }

    @GetMapping("/ping-with-random-delay")
    public String pingWithRandomDelay() throws InterruptedException {
        int r = new Random().nextInt(3000);
        LOGGER.info("Ping with random delay: name={}, version={}, delay={}", buildProperties.getName(), version, r);
        Thread.sleep(r);
        return "I'm callme-service " + version;
    }

} 应用程序caller-service公开了两个GET端点。它使用RestTemplate来调用callme-service公开的相应GET端点。它还返回caller-service的版本,但是只有一个标有version = v1的应用程序的部署。
@RestController
@RequestMapping("/caller")
public class CallerController {

    private static final Logger LOGGER = LoggerFactory.getLogger(CallerController.class);

    @Autowired
    BuildProperties buildProperties;
    @Autowired
    RestTemplate restTemplate;
    @Value("${VERSION}")
    private String version;


    @GetMapping("/ping-with-random-error")
    public ResponseEntity pingWithRandomError() {
        LOGGER.info("Ping with random error: name={}, version={}", buildProperties.getName(), version);
        ResponseEntity responseEntity =
                restTemplate.getForEntity("http://callme-service:8080/callme/ping-with-random-error", String.class);
        LOGGER.info("Calling: responseCode={}, response={}", responseEntity.getStatusCode(), responseEntity.getBody());
        return new ResponseEntity<>("I'm caller-service " + version + ". Calling... " + responseEntity.getBody(), responseEntity.getStatusCode());
    }

    @GetMapping("/ping-with-random-delay")
    public String pingWithRandomDelay() {
        LOGGER.info("Ping with random delay: name={}, version={}", buildProperties.getName(), version);
        String response = restTemplate.getForObject("http://callme-service:8080/callme/ping-with-random-delay", String.class);
        LOGGER.info("Calling: response={}", response);
        return "I'm caller-service " + version + ". Calling... " + response;
    }

}
Istio中处理重试
Istio DestinationRule的定义与我的文章使用Istio和Spring Boot在Kubernetes上的服务网格中的定义相同。为标记为version = v1和version = v2的实例创建了两个子集。重试和超时可以在VirtualService上配置。我们可以设置重试次数和重试条件(枚举字符串列表)。以下配置还为整个请求设置了3s超时。这两个设置都可以在HTTPRoute对象中使用。我们还需要为每次尝试设置超时。在这种情况下,我设置为1。在实践中如何运作?我们将通过简单的示例对其进行分析。
apiVersion: networking.istio.io/v1beta1
kind: DestinationRule
metadata:
  name: callme-service-destination
spec:
  host: callme-service
  subsets:
    - name: v1
      labels:
        version: v1
    - name: v2
      labels:
        version: v2
---
apiVersion: networking.istio.io/v1beta1
kind: VirtualService
metadata:
  name: callme-service-route
spec:
  hosts:
    - callme-service
  http:
    - route:
      - destination:
          host: callme-service
          subset: v2
        weight: 80
      - destination:
          host: callme-service
          subset: v1
        weight: 20
      retries:
        attempts: 3
        perTryTimeout: 1s
        retryOn: 5xx
      timeout: 3s
在部署示例应用程序之前,我们应该增加日志记录级别。我们可以轻松启用Istio访问日志记录。Envoy代理打印访问日志,并将所有传入请求和传出响应发送到它们的标准输出。日志记录条目的分析将特别用于检测重试尝试。
$ istioctl manifest apply --set profile=default --set meshConfig.accessLogFile="/dev/stdout"现在,让我们向HTTP端点GET /caller/ping-with-random-delay发送测试请求。它调用随机延迟的callme-service端点GET /callme/ping-with-random-delay。这是该操作的请求和响应。

看来情况非常清楚。但是,让我们检查一下背后发生了什么。我已经强调了重试的顺序。如您所见,Istio执行了两次重试,因为前两次尝试的时间比设置为1s的perTryTimoeut更长。两次尝试均被Istio超时,可以在其访问日志中进行验证。第三次尝试成功了,因为它花费了大约400毫秒。

重试超时不是Istio中唯一可用的重试选项。实际上,我们可以重试所有5XX甚至4XX代码。用于测试错误代码的VirtualService更加简单,因为我们没有配置任何超时。
apiVersion: networking.istio.io/v1beta1
kind: VirtualService
metadata:
  name: callme-service-route
spec:
  hosts:
    - callme-service
  http:
    - route:
      - destination:
          host: callme-service
          subset: v2
        weight: 80
      - destination:
          host: callme-service
          subset: v1
        weight: 20
      retries:
        attempts: 3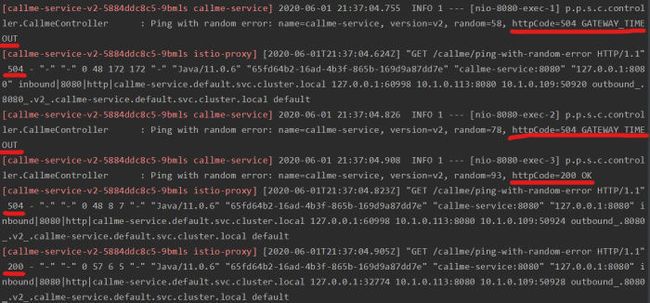
retryOn: gateway-error,connect-failure,refused-stream我们将使用GET /caller/ping-with-random-error调用HTTP端点,即调用callme-service公开的端点GET /callme/ping-with-random-error。它为大约50%的传入请求返回HTTP 504。这是带有200 OK HTTP代码的请求和成功的响应。
![]()
以下是日志,这些日志说明了callme-service发生的情况。由于两次第一次尝试均导致HTTP错误代码,因此请求已重试了2次。
Istio 中处理熔断
在DestinationRule对象上配置了断路器。我们为此使用了TrafficPolicy。首先,我们不会设置用于先前示例的任何重试,因此我们需要将其从VirtualService定义中删除。我们还应该在TrafficPolicy中的connectionPool上禁用任何重试。现在最重要。为了在Istio中配置断路器,我们使用OutlierDetection对象。 Istion断路器的实现基于下游服务返回的连续错误。后续错误的数量可以使用属性continuous5xxErrors或continuousGatewayErrors进行配置。它们之间的唯一区别在于它们能够处理的HTTP错误。尽管ContinuousGatewayErrors仅适用于502、503和504,但continuous5xxErrors用于5XX代码。在以下callme-service-destination的配置中,我在3上使用了set Continuous5xxErrors的设置。这意味着在发生3个错误行后,将从负载平衡中删除应用程序的一个实例(pod)1分钟(baseEjectionTime = 1m)。因为我们在版本v2中运行两个callme-service Pod,所以我们还需要将maxEjectionPercent的默认值覆盖为100%。该属性的默认值为10%,它表示负载平衡池中可以弹出的最大主机百分比。
apiVersion: networking.istio.io/v1beta1
kind: DestinationRule
metadata:
  name: callme-service-destination
spec:
  host: callme-service
  subsets:
    - name: v1
      labels:
        version: v1
    - name: v2
      labels:
        version: v2
  trafficPolicy:
    connectionPool:
      http:
        http1MaxPendingRequests: 1
        maxRequestsPerConnection: 1
        maxRetries: 0
    outlierDetection:
      consecutive5xxErrors: 3
      interval: 30s
      baseEjectionTime: 1m
      maxEjectionPercent: 100
---
apiVersion: networking.istio.io/v1beta1
kind: VirtualService
metadata:
  name: callme-service-route
spec:
  hosts:
    - callme-service
  http:
    - route:
      - destination:
          host: callme-service
          subset: v2
        weight: 80
      - destination:
          host: callme-service
          subset: v1
weight: 20部署两个应用程序的最快方法是使用Jib和Skaffold。首先,您进入目录callme-service并使用可选的--port-forward参数执行skaffold dev命令。
$ cd callme-service
$ skaffold dev --port-forward对caller-service做相同的操作:
$ cd caller-service
$ skaffold dev --port-forward在发送一些测试请求之前,让我们运行callme-service v2版本的第二个实例,因为Deployment将参数副本设置为1。为此,我们需要运行以下命令。
$ kubectl scale --replicas=2 deployment/callme-service-v2现在,让我们验证Kubernetes上的部署状态。有3个部署。

之后,我们准备发送一些测试请求。我们正在调用由caller-service暴露的端点GET /caller/ping-with-random-error,即正在调用由callme-service暴露的端点GET /callme/ping-with-random-error。 callme-service公开的端点针对50%的请求返回HTTP 504。我已经在8080上为callme-service设置了端口转发,因此用于调用应用程序的命令是:
curl http://localhost:8080/caller/ping-with-random-error现在,让我们分析caller-service的响应。我已经突出显示了来自版本为v2的callme-service实例的HTTP 504错误代码响应,并生成了ID 98c068bb-8d02-4d2a-9999-23951bbed6ad。在该实例的行中出现3次错误响应后,立即将其从负载平衡池中删除,这导致将所有其他请求发送到ID为00653617-58e1-4d59-9e36-3f98f9d403b8的callme-service v2的第二个实例。当然,仍然有一个callme-service v1实例,该实例正在接收caller-service发送的请求总数的20%。

好的,让我们检查一下单个实例callme-service v1返回3个错误会发生什么情况。我还用以下可见的日志突出显示了这些错误响应。因为池中只有一个callme-service v1实例,所以没有机会将传入的流量重定向到其他实例。这就是为什么Istio为发送到callme-service v1的下一个请求返回HTTP 503的原因。自熔断后的1分钟内,将返回相同的响应。

PS:本文属于翻译,原文